RabbitMQ之消息模式2
消费端限流
什么是消费端的限流?
假设一个场景,首先,我们RabbitMQ服务器有上万条未处理的消息,我们随便打开一个消费者客户端,会出现下面情况:
巨量的消息瞬间全部推送过来,但是我们单个客户端无法同时处理这么多数据!
消费端限流RabbitMQ提供的解决方案
RabbitMQ提供了一种qos(服务质量保证)功能,即在非自动确认消息的前提下,如果一定数目的消息(通过基于Consumer或者Channel设置Qos的值)未被确认前,不进行消费新的消息
Void BasicQos(uint prefetchSize, ushort prefetchCount, bool global);
prefetchSize:0 不限制消息大小
prefetchSize:会告诉RabbitMQ不要同时给一个消费者推送多于N个消息,即一旦有N个消息还没有ack,则该Consumer将block(阻塞)掉,直到有消息ack
Global:true\false是否将上面设置应用于Channel;简单来说,就是上面限制是Channel级别的还是Consumer级别
注意:
prefetchSize和global这两项,RabbitMQ没有实现,暂且不研究;
prefetch_count在no_ask=false的情况下生效,即在自动应答的情况下,这两个值是不生效的;
自定义消费端代码
package com.liuwenwu.rabbitmqaqi.limit;

import com.rabbitmq.client.AMQP;

import com.rabbitmq.client.Channel;

import com.rabbitmq.client.DefaultConsumer;

import com.rabbitmq.client.Envelope;

import java.io.IOException;

public class MyConsumer extends DefaultConsumer {

    private Channel channel ;

    public MyConsumer(Channel channel) {

        super(channel);

        this.channel = channel;

    }

    @Override

    public void handleDelivery(String consumerTag, Envelope envelope, AMQP.BasicProperties properties, byte[] body) throws IOException {

        System.err.println("-----------consume message----------");

        System.err.println("consumerTag: " + consumerTag);

        System.err.println("envelope: " + envelope);

        System.err.println("properties: " + properties);

        System.err.println("body: " + new String(body));

        channel.basicAck(envelope.getDeliveryTag(), false);

    }

}
消费端代码
package com.liuwenwu.rabbitmqaqi.limit;

import com.rabbitmq.client.Channel;

import com.rabbitmq.client.Connection;

import com.rabbitmq.client.ConnectionFactory;

public class Consumer {

    public static void main(String[] args) throws Exception {

        ConnectionFactory connectionFactory = new ConnectionFactory();

        connectionFactory.setHost("192.168.241.134");

        connectionFactory.setPort(5672);

        connectionFactory.setVirtualHost("/");

        Connection connection = connectionFactory.newConnection();

        Channel channel = connection.createChannel();

        String exchangeName = "test_qos_exchange";

        String queueName = "test_qos_queue";

        String routingKey = "qos.#";

        channel.exchangeDeclare(exchangeName, "topic", true, false, null);

        channel.queueDeclare(queueName, true, false, false, null);

        channel.queueBind(queueName, exchangeName, routingKey);

        //1 限流方式  第一件事就是 autoAck设置为 false

        channel.basicQos(0, 1, false);

        channel.basicConsume(queueName, false, new MyConsumer(channel));

    }

}
提供方代码
package com.liuwenwu.rabbitmqaqi.limit;

import com.rabbitmq.client.Channel;

import com.rabbitmq.client.Connection;

import com.rabbitmq.client.ConnectionFactory;

public class Producer {

    public static void main(String[] args) throws Exception {

        ConnectionFactory connectionFactory = new ConnectionFactory();

        connectionFactory.setHost("192.168.241.134");

        connectionFactory.setPort(5672);

        connectionFactory.setVirtualHost("/");

        Connection connection = connectionFactory.newConnection();

        Channel channel = connection.createChannel();

        String exchange = "test_qos_exchange";

        String routingKey = "qos.save";

        String msg = "Hello RabbitMQ QOS Message";

        for(int i =0; i<5; i ++){

            channel.basicPublish(exchange, routingKey, true, null, msg.getBytes());

        }

    }

}
消息的ACK与重回队列
消费端手工ACK与NACK
消费端进行消费的时候,如果由于业务异常我们可以进行日志的记录,然后进行补偿
如果由于服务器宕机等严重问题,那么我们就需要手工进行ACK,保障消费端消费成功!
消费端的重回队列
消费端重回队列是为了对没有处理成功的消息,把消息重新回递给Broker!
一般我们在实际应用中,都会关闭重回队列,也就是设置为False;因为重回队列消息有很大概率依然会处理失败!
自定义消费者代码
package com.liuwenwu.rabbitmqaqi.ack;

import com.rabbitmq.client.AMQP;

import com.rabbitmq.client.Channel;

import com.rabbitmq.client.DefaultConsumer;

import com.rabbitmq.client.Envelope;

import java.io.IOException;

public class MyConsumer extends DefaultConsumer {

    private Channel channel ;

    public MyConsumer(Channel channel) {

        super(channel);

        this.channel = channel;

    }

    @Override

    public void handleDelivery(String consumerTag, Envelope envelope, AMQP.BasicProperties properties, byte[] body) throws IOException {

        System.err.println("-----------consume message----------");

        System.err.println("body: " + new String(body));

        try {

            Thread.sleep(2000);

        } catch (InterruptedException e) {

            e.printStackTrace();

        }

        if((Integer)properties.getHeaders().get("num") == 0) {

//            手动签收,重回队列

            channel.basicNack(envelope.getDeliveryTag(), false, true);

        } else {

            channel.basicAck(envelope.getDeliveryTag(), false);

        }

    }

}
消费者代码
package com.liuwenwu.rabbitmqaqi.ack;

import com.rabbitmq.client.Channel;

import com.rabbitmq.client.Connection;

import com.rabbitmq.client.ConnectionFactory;

public class Consumer {

    public static void main(String[] args) throws Exception {

        ConnectionFactory connectionFactory = new ConnectionFactory();

        connectionFactory.setHost("192.168.241.134");

        connectionFactory.setPort(5672);

        connectionFactory.setVirtualHost("/");

        Connection connection = connectionFactory.newConnection();

        Channel channel = connection.createChannel();

        String exchangeName = "test_ack_exchange";

        String queueName = "test_ack_queue";

        String routingKey = "ack.#";

        channel.exchangeDeclare(exchangeName, "topic", true, false, null);

        channel.queueDeclare(queueName, true, false, false, null);

        channel.queueBind(queueName, exchangeName, routingKey);

        // 手工签收 必须要关闭 autoAck = false

        channel.basicConsume(queueName, false, new MyConsumer(channel));

    }

}
生产者代码
package com.liuwenwu.rabbitmqaqi.ack;

import com.rabbitmq.client.AMQP;

import com.rabbitmq.client.Channel;

import com.rabbitmq.client.Connection;

import com.rabbitmq.client.ConnectionFactory;

import java.util.HashMap;

import java.util.Map;

public class Producer {

    public static void main(String[] args) throws Exception {

        ConnectionFactory connectionFactory = new ConnectionFactory();

        connectionFactory.setHost("192.168.241.134");

        connectionFactory.setPort(5672);

        connectionFactory.setVirtualHost("/");

        Connection connection = connectionFactory.newConnection();

        Channel channel = connection.createChannel();

        String exchange = "test_ack_exchange";

        String routingKey = "ack.save";

        for(int i =0; i<5; i ++){

            Map<String, Object> headers = new HashMap<String, Object>();

            headers.put("num", i);

            AMQP.BasicProperties properties = new AMQP.BasicProperties.Builder()

                    .deliveryMode(2)

                    .contentEncoding("UTF-8")

                    .headers(headers)

                    .build();

            String msg = "Hello RabbitMQ ACK Message " + i;

            channel.basicPublish(exchange, routingKey, true, properties, msg.getBytes());

        }

    }

}
TTL消息
TTL
TTL是Time To Live的缩写,也就是生存时间
RabbitMQ支持消息的过期时间,在消息发送时可以进行指定
RabbitMQ支持队列的过期时间,从消息入队列开始计算,只要超过了队列的超时时间配置,那么消息自动的清除
纯控制台操作(演示TTL队列消息特点)
针对队列,只要是这个队列的消息,就只有这么长的存活时间
注意:主要针对消息设置,跟交换机、队列、消费者设置毫无关系
消费端代码
package com.liuwenwu.rabbitmqaqi.ttl;

import com.rabbitmq.client.Channel;

import com.rabbitmq.client.Connection;

import com.rabbitmq.client.ConnectionFactory;

import com.rabbitmq.client.QueueingConsumer;

import java.util.Map;

public class Consumer {

    public static void main(String[] args) throws Exception {

        //1 创建一个ConnectionFactory, 并进行配置

        ConnectionFactory connectionFactory = new ConnectionFactory();

        connectionFactory.setHost("192.168.241.134");

        connectionFactory.setPort(5672);

        connectionFactory.setVirtualHost("/");

        //2 通过连接工厂创建连接

        Connection connection = connectionFactory.newConnection();

        //3 通过connection创建一个Channel

        Channel channel = connection.createChannel();

        //4 声明(创建)一个队列

        String queueName = "test001";

        channel.queueDeclare(queueName, true, false, false, null);

        //5 创建消费者

        QueueingConsumer queueingConsumer = new QueueingConsumer(channel);

        //6 设置Channel

        channel.basicConsume(queueName, true, queueingConsumer);

        while(true){

            //7 获取消息

            QueueingConsumer.Delivery delivery = queueingConsumer.nextDelivery();

            String msg = new String(delivery.getBody());

            System.err.println("消费端: " + msg);

            Map<String, Object> headers = delivery.getProperties().getHeaders();

            System.err.println("headers get my1 value: " + headers.get("my1"));

            //Envelope envelope = delivery.getEnvelope();

        }

    }

}
生产端代码
package com.liuwenwu.rabbitmqaqi.ttl;

import com.rabbitmq.client.AMQP;

import com.rabbitmq.client.Channel;

import com.rabbitmq.client.Connection;

import com.rabbitmq.client.ConnectionFactory;

import java.util.HashMap;

import java.util.Map;

public class Procuder {

    public static void main(String[] args) throws Exception {

        //1 创建一个ConnectionFactory, 并进行配置

        ConnectionFactory connectionFactory = new ConnectionFactory();

        connectionFactory.setHost("192.168.241.134");

        connectionFactory.setPort(5672);

        connectionFactory.setVirtualHost("/");

        //2 通过连接工厂创建连接

        Connection connection = connectionFactory.newConnection();

        //3 通过connection创建一个Channel

        Channel channel = connection.createChannel();

        Map<String, Object> headers = new HashMap<>();

        headers.put("my1", "111");

        headers.put("my2", "222");

        AMQP.BasicProperties properties = new AMQP.BasicProperties.Builder()

                .deliveryMode(2)

                .contentEncoding("UTF-8")

                .expiration("10000")

                .headers(headers)

                .build();

        //4 通过Channel发送数据

        for(int i=0; i < 5; i++){

            String msg = "Hello RabbitMQ!";

            //1 exchange   2 routingKey

            channel.basicPublish("", "test001", properties, msg.getBytes());

        }

        //5 记得要关闭相关的连接

        channel.close();

        connection.close();

    }

}
死信队列
死信队列:DLX,Dead-Letter-Exchange
利用DLX,当消息在一个队列中变成死信(dead message)之后,它能被重新publish到另一个Exchange,这个Exchange就是DLX
消息变成死信有以下几种情况
消息被拒绝(basic.reject/basic.nack)并且requeue=false
消息TTL过期
队列达到最大长度
死信队列的特点
DLX也是一个正常的Exchange,和一般的Exchange没有区别,它能在任何的队列上被指定,实际上就是设置某个队列的属性;
当这个队列中有死信时,RabbitMQ就会自动的将这个消息重新发布到设置的Exchange上去,进而被路由到另一个队列;
可以监听这个队列中消息做相应的处理,这个特性可以弥补RabbitMQ3.0以前支持的immediate参数的功能;
死信队列设置
首先需要设置死信队列的Exchange和Queue,然后进行绑定:
Exchange:dlx.exchange
Queue:dlx.queue
RoutingKey:#
然后我们进行正常声明交换机、队列、绑定,只不过我们需要在队列加上一个参数即可:
Arguments.put(“x-dead-letter-exchange”,”dlx.exchange”);
这样消息在过期、requeue、队列在达到最大长度时,消息就可以直接路由到死信队列!
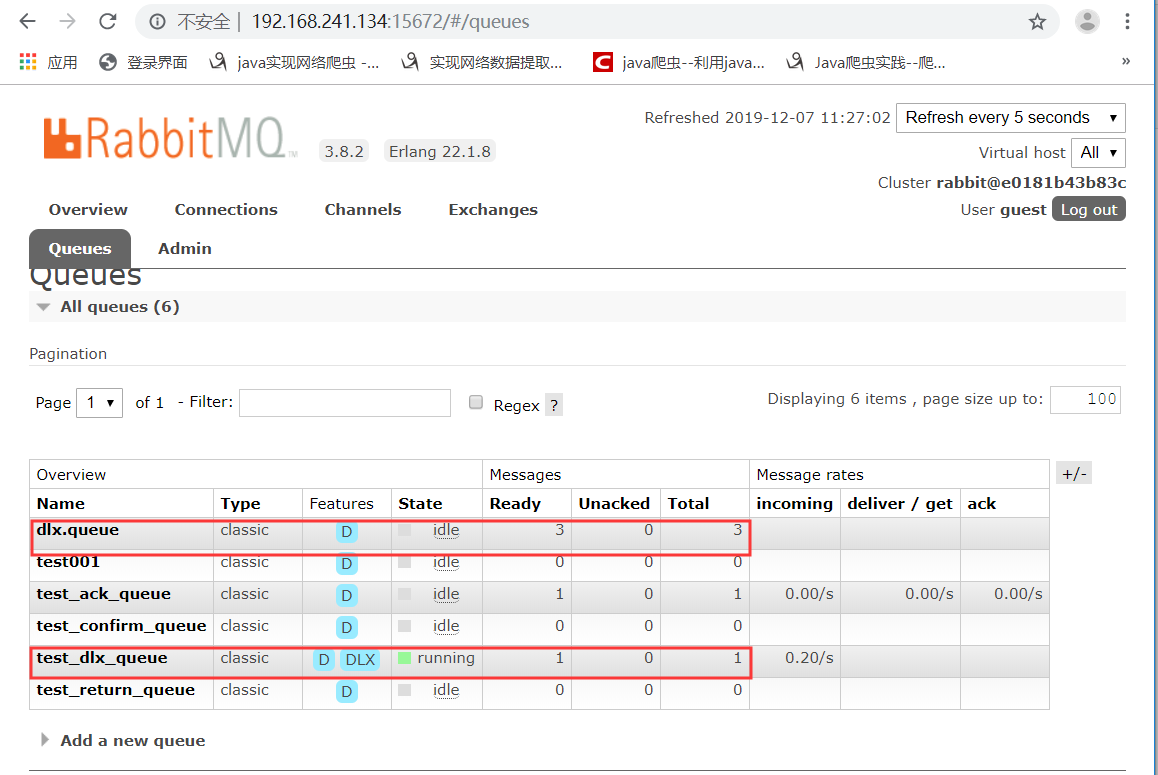
消息10s后还没有消费者消费,所以进入了死信队列
自定义消费端
package com.liuwenwu.rabbitmqaqi.dlx;

import com.rabbitmq.client.AMQP;

import com.rabbitmq.client.Channel;

import com.rabbitmq.client.DefaultConsumer;

import com.rabbitmq.client.Envelope;

import java.io.IOException;

public class MyConsumer extends DefaultConsumer {

    public MyConsumer(Channel channel) {

        super(channel);

    }

    @Override

    public void handleDelivery(String consumerTag, Envelope envelope, AMQP.BasicProperties properties, byte[] body) throws IOException {

        System.err.println("-----------consume message----------");

        System.err.println("consumerTag: " + consumerTag);

        System.err.println("envelope: " + envelope);

        System.err.println("properties: " + properties);

        System.err.println("body: " + new String(body));

    }

}
消费端代码
package com.liuwenwu.rabbitmqaqi.dlx;

import com.rabbitmq.client.Channel;

import com.rabbitmq.client.Connection;

import com.rabbitmq.client.ConnectionFactory;

import java.util.HashMap;

import java.util.Map;

public class Consumer {

    public static void main(String[] args) throws Exception {

        ConnectionFactory connectionFactory = new ConnectionFactory();

        connectionFactory.setHost("192.168.241.134");

        connectionFactory.setPort(5672);

        connectionFactory.setVirtualHost("/");

        Connection connection = connectionFactory.newConnection();

        Channel channel = connection.createChannel();

        // 这就是一个普通的交换机 和 队列 以及路由

        String exchangeName = "test_dlx_exchange";

        String routingKey = "dlx.#";

        String queueName = "test_dlx_queue";

        channel.exchangeDeclare(exchangeName, "topic", true, false, null);

        Map<String, Object> agruments = new HashMap<String, Object>();

        agruments.put("x-dead-letter-exchange", "dlx.exchange");

        //这个agruments属性,要设置到声明队列上

        channel.queueDeclare(queueName, true, false, false, agruments);

        channel.queueBind(queueName, exchangeName, routingKey);

        //要进行死信队列的声明:

        channel.exchangeDeclare("dlx.exchange", "topic", true, false, null);

        channel.queueDeclare("dlx.queue", true, false, false, null);

        channel.queueBind("dlx.queue", "dlx.exchange", "#");

        channel.basicConsume(queueName, true, new MyConsumer(channel));

    }

}
生产端代码
package com.liuwenwu.rabbitmqaqi.dlx;

import com.rabbitmq.client.AMQP;

import com.rabbitmq.client.Channel;

import com.rabbitmq.client.Connection;

import com.rabbitmq.client.ConnectionFactory;

public class Producer {

    public static void main(String[] args) throws Exception {

        ConnectionFactory connectionFactory = new ConnectionFactory();

        connectionFactory.setHost("192.168.241.134");

        connectionFactory.setPort(5672);

        connectionFactory.setVirtualHost("/");

        Connection connection = connectionFactory.newConnection();

        Channel channel = connection.createChannel();

        String exchange = "test_dlx_exchange";

        String routingKey = "dlx.save";

        String msg = "Hello RabbitMQ DLX Message";

        for(int i =0; i<1; i ++){

            AMQP.BasicProperties properties = new AMQP.BasicProperties.Builder()

                    .deliveryMode(2)

                    .contentEncoding("UTF-8")

                    .expiration("10000")

                    .build();

            channel.basicPublish(exchange, routingKey, true, properties, msg.getBytes());

        }

    }

}
最新文章
- Dev GridView行拖拽
- Hive 字符串操作[转]
- hdfs 集群间拷贝
- Hibernate的关联映射——单向1-N关联
- oracle通过plsql导入dmp数据文件
- hdu 1515 dfs
- 3d中的坐标系的概念
- AVAudioPlayer 播放音频
- keil C51绝对地址访问
- Virtual Friends(并查集+map)
- 坑爹BUG,没有详细的看还真看不出问题
- nodeJs 控制台打印中文显示为Unicode解决方案
- 【转】ffmpeg常用基本命令
- 开源版本PowerShell Core 6.2 发布
- Docker构建YApi镜像, Docker安装YApi, Docker部署YApi
- G - 看病要排队
- py-day1-1 python的基本运算符和语句
- ASP入门(八)-Request对象
- Linux中禁用THP(Transparent Huge Pages)
- 不改源代码,修改服务器配置,解决全局Get中文乱码问题