Spring Cloud06: Ribbon 负载均衡
一、使用背景
前面的学习中,我们已经使用RestTemplate来实现了服务消费者对服务提供者的调用,如果在某个具体的业务场景下,对某个服务的调用量突然大幅提升,这个时候就需要对该服务实现负载均衡以满足对高并发的访问情况。在大型的分布式项目中,负载均衡是必备的,那么就可以采用Ribbon来实现。
二、什么是Ribbon
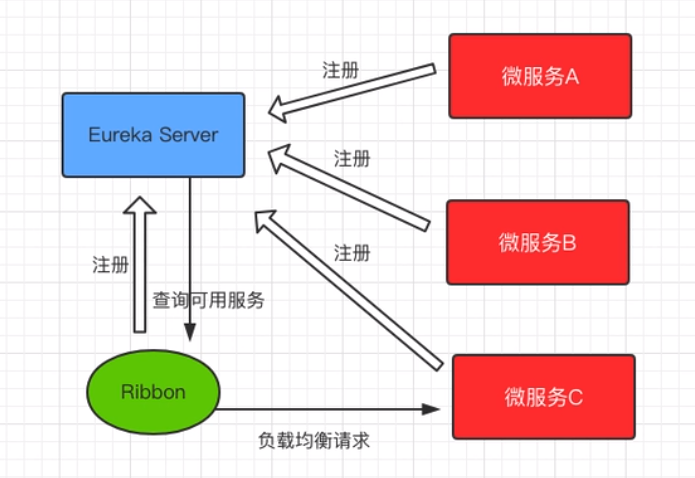
Ribbon是Sping Cloud的一个组件,Spring Cloud Ribbon是一个负载均衡的解决方案,Ribbon是Netflix发布的负载均衡器,Spring对其进行了集成,Spring Cloud Ribbon是基于Netflix Ribbon实现的,是一个用于对HTTP请求进行控制的负载均衡客户端。Spring Cloud Ribbon也是要结合Eureka Server来使用的,因为也要在注册中心进行注册。在注册中心对Ribbon进行注册之后,Ribbon就可以基于某种负载均衡算法,如轮询、随机、加权轮询、加权随机等自动帮助服务消费者调用接口,开发者也可以根据具体需求自定义Ribbon负载均衡算法。实际开发中,Spring Cloud Eureka来使用,Eureka Server提供所有可以调用的服务提供者列表,Ribbon基于特定的负载均衡算法从这些服务提供者中选择要调用的具体实例。示例图如下:
三、实战,快速搭建Ribbon实例
1.创建Module,pom.xml添加Eureka client依赖,将其注册到注册中心,添加代码如下:
    <dependency>

    	<groupId>org.springframework.cloud</groupId>

    	<artifactId>spring-cloud-starter-netflix-eureka-client</artifactId>

    	<version>2.0.2.RELEASE</version>

    </dependency>
2.创建配置文件application.yml,配置信息如下:
server:

  port: 8040

spring:

  application:

    name: ribbon

eureka:

  client:

    service-url:

      defaultZone: http://localhost:8761/eureka

  instance:

    prefer-ip-address: true
属性说明
* spring.application.name : 当前服务注册在 Eureka Server 上的名称。
* eureka.client.service-url.defaultZone : 注册中⼼的访问地址。
* eureka.instance.prefer-ip-address : 是否将当前服务的 IP 注册到 Eureka Server。 3.创建启动类
3.创建启动类,代码如下:
package com.zing;

import org.springframework.boot.SpringApplication;

import org.springframework.boot.autoconfigure.SpringBootApplication;

import org.springframework.cloud.client.loadbalancer.LoadBalanced;

import org.springframework.context.annotation.Bean;

import org.springframework.web.client.RestTemplate;

@SpringBootApplication

public class RibbonApplication {

	public static void main(String[] args) throws Exception {

		SpringApplication.run(RibbonApplication.class, args);

	}

	@Bean

	@LoadBalanced

	public RestTemplate restTemplate() {

		return new RestTemplate();

	}

}
注解说明:
* @Bean:通过@Bean注解将实例注入到IOC容器中。实际上@SpringBootApplication 相当于使用@Configuration、@EnableAutoConfiguration和@ComponentScan的默认属性,而@Bean是一个方法级别的注解,主要用在@Configuration注解的类里,@Configuration相当于xml文件中的beans标签,@Bean相当于bean标签。
* @LoadBalanced:声明一个基于Ribbon的负载均衡。标注此注解后,RestTemplate就具有了客户端负载均衡的能力。
4.Controller层代码实现如下:
package com.zing.controller;

import java.util.Collection;

import org.springframework.beans.factory.annotation.Autowired;

import org.springframework.web.bind.annotation.GetMapping;

import org.springframework.web.bind.annotation.RequestMapping;

import org.springframework.web.bind.annotation.RestController;

import org.springframework.web.client.RestTemplate;

import com.zing.entity.Student;

@RestController

@RequestMapping("/ribbon")

public class RibbonHandler {

	@Autowired

	private RestTemplate restTemplate;

	@GetMapping("/findAll")

	public Collection<Student> findAll(){

		return restTemplate.getForObject("http://provider/student/findAll", Collection.class);

	}

	@GetMapping("/index")

	public String index() {

		return restTemplate.getForObject("http://provider/student/index", String.class);

	}

}
5.测试接口
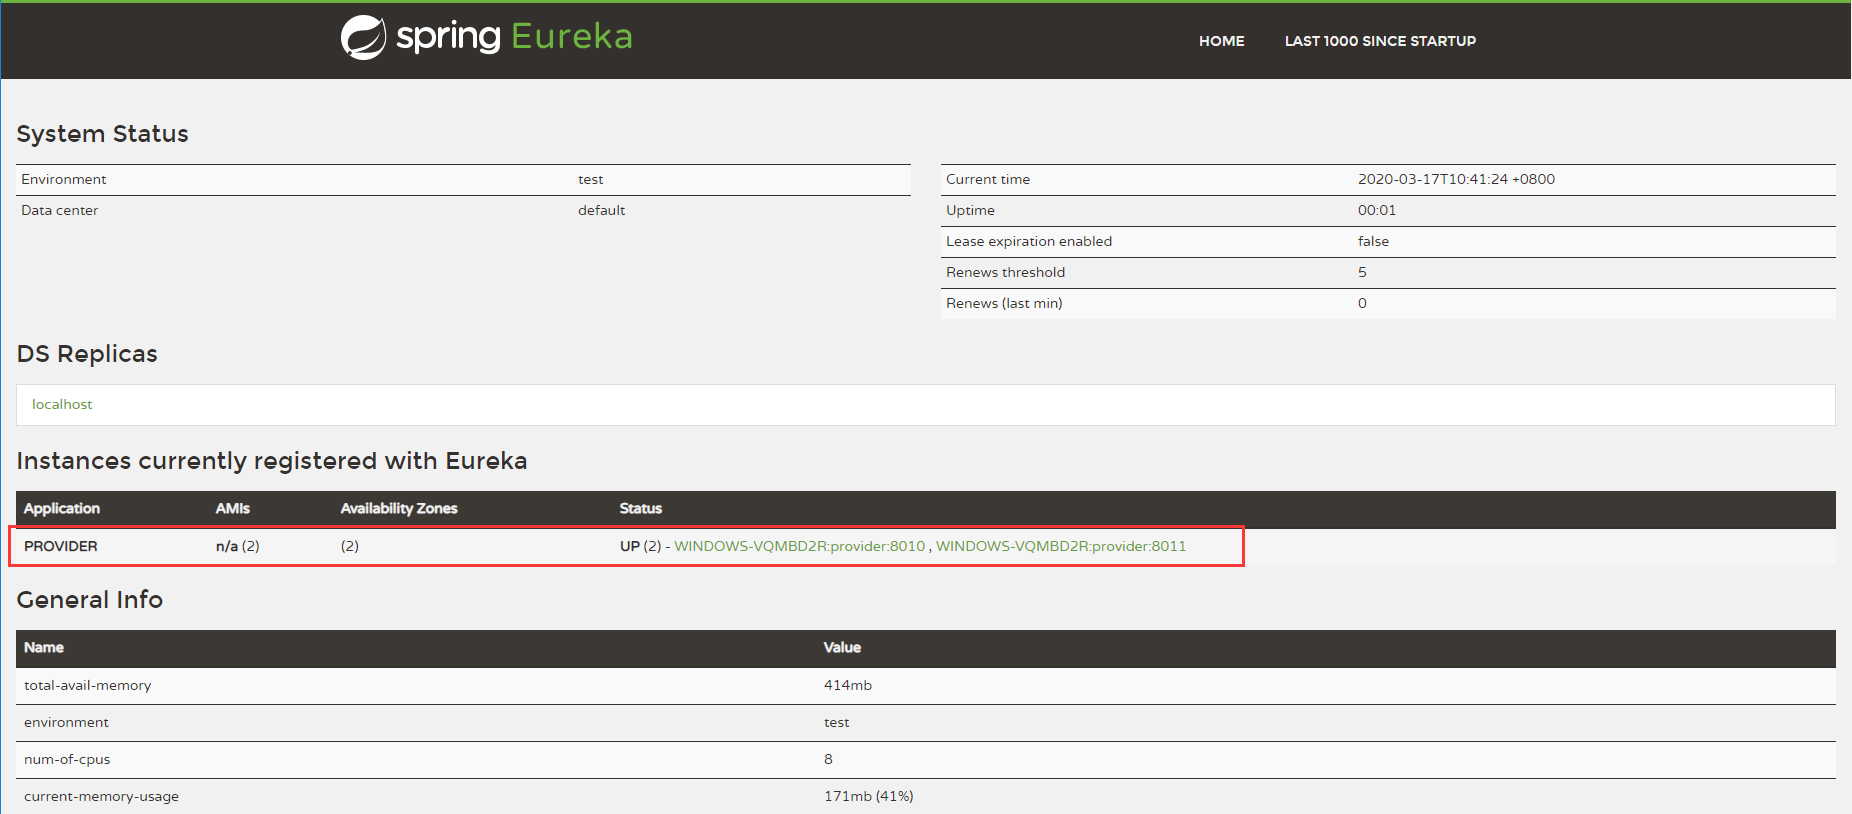
(1) 启动注册中心,然后分别启动两个provider实例。打开注册中心可看到如下信息:
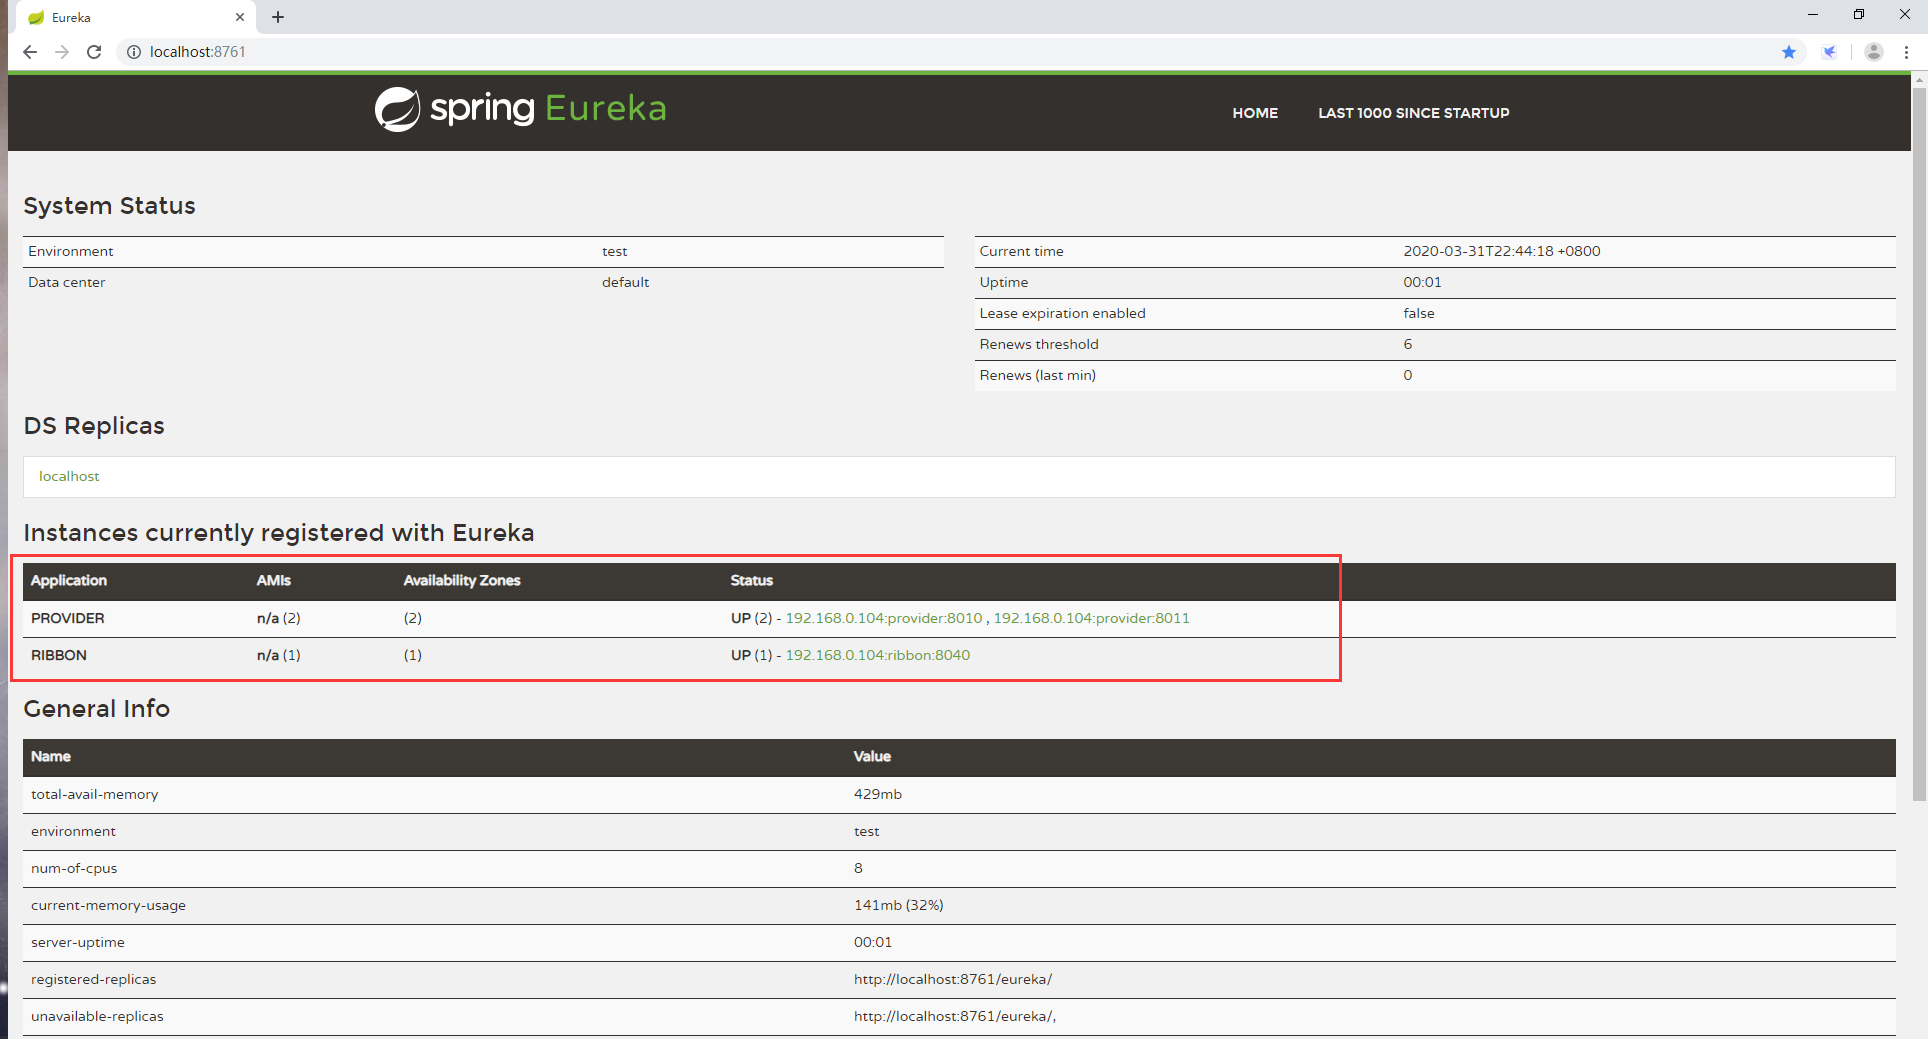
(2) 启动Ribbon,可看到注册中心有RIBBON的一个实例,如下:
(3) 测试index接口,可看到端口交替出现,结果如下:


四、总结
此次代码采用Ribbon+RestTemplate的方式来实现服务调用的负载均衡,客户端默认采用轮询的方式调用服务提供者,是两个provider实例交替进行响应。但是这种开发方式是可以被简化的,在实际的开发中有更加便捷的方式,可以同样实现这样一个功能,即Feign
最新文章
- STL插入删除和查询测试
- 基础理解2:CSS3按钮动画
- 父类方法返回子类实例:PHP延迟静态绑定
- django 提示ImportError: cannot import name json_response
- javascript正则表达式(一)
- CGRect 结构体的另外一种写法
- LR Socket 测试demo
- 关于display的那些事儿!
- SignalR小计
- mac编译openssl扩展报错 openssl.c:44:10: fatal error: 'openssl/evp.h' file not found
- display:table 表格布局
- linux上创建svn服务器(centos7.3)
- python——虚拟环境之pipenv的安装及使用(windows10,64位)
- Xcode中控制台中打印中文处理
- shell编程学习笔记(八):Shell中if判断的使用
- Bugku-CTF之输入密码查看flag
- Git学习篇之git remote add origin错误
- jmx - first demo
- Android 自定义TabHost,TabWidget样式
- poi excel