Vue-router插件使用
单页面原理
Vue是单页面开发,即页面不刷新。
页面不刷新,而又要根据用户选择完成内容的更新该怎么做?Vue中采用锚点来完成。
如访问http://127.0.0.1#/index就是主页,而访问http://127.0.0.1#/home就是家目录。
手动分析url组成与处理视图的切换非常麻烦,所以Vue提供插件Vue-router,它能够根据用户在地址栏中输入的不同链接展示不同的内容,十分的方便。
Vue-router
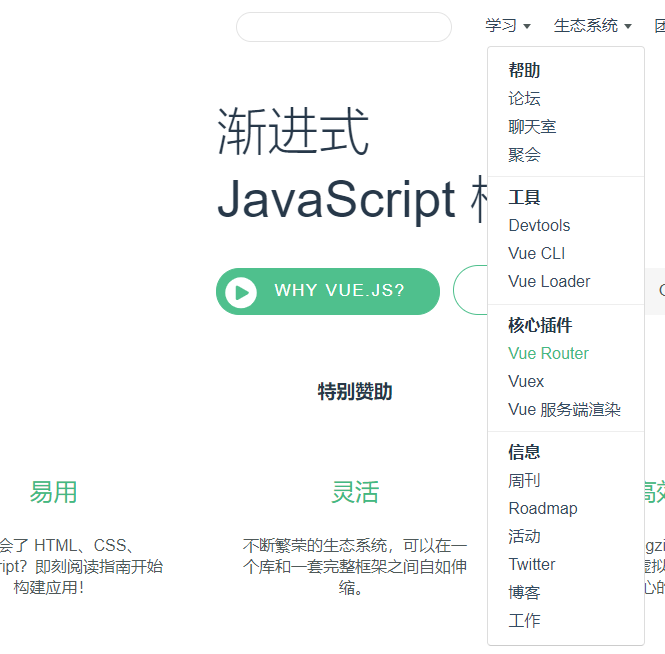
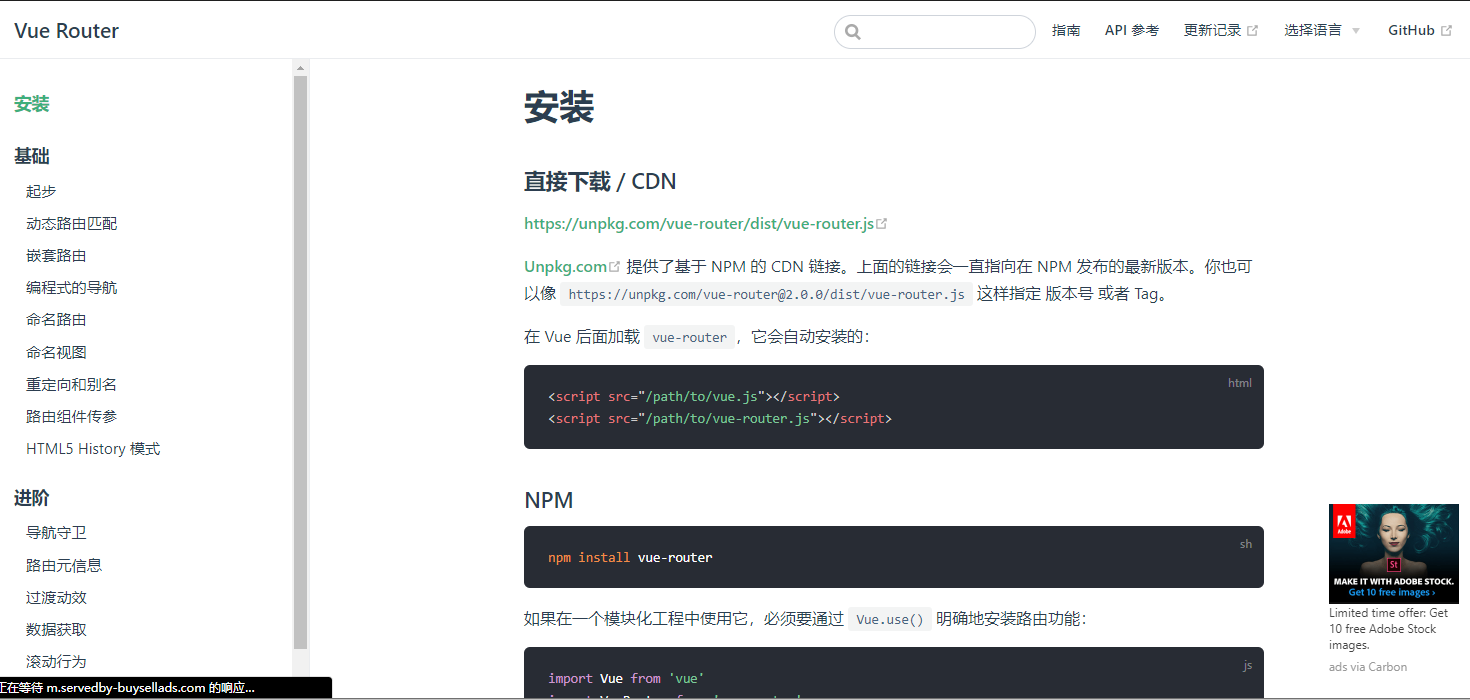
打开Vue.js官网,在生态系统中找到vue-router。
然后根据它的官方文档进行安装即可:
示例演示
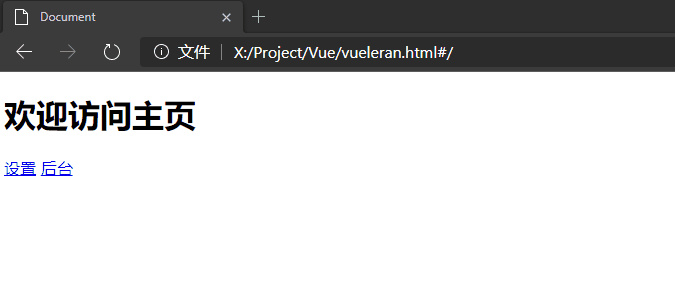
使用<router-view>当作组件的显示容器。
使用<router-link>与属性to让Vue切换显示的组件。
注意查看下图中url的变化,它确实没有刷新。
<body>

<div id="app">

    <router-view></router-view>

</div>

<script src="./vue.js"></script>

<script src="./vue-router.js"></script>

<script>

    // 第一步:书写组件

    const index = {

        template: `

        <div>

            <h1>欢迎访问主页</h1>

            <router-link to="/settings">设置</router-link>

            <router-link to="/backend">后台</router-link>

        </div>

        `

    }

    const backend = {

        template: `

        <div>

            <h1>欢迎访问后台</h1>

            <router-link to="/">访问主页</router-link>

        </div>

        `

    }

    const settings = {

        template: `

        <div>

            <h1>欢迎访问个人设置页面</h1>

            <router-link to="/">访问主页</router-link>

        </div>

        `

    }

    // 第二步:配置路由

    // 根据资源请求来展示或隐藏对应的组件

    const routes = [

        // 主页,/

        {path: "/", component: index},

        {path: "/backend", component: backend},

        {path: "/settings", component: settings},

    ]

    // 第三步:实例化路由对象

    // {routes:routes}

    const router = new VueRouter({routes,})

    // 第四步:根组件中添加路由信息

    // {router:router}

    const app = new Vue({

        el: "#app",

        router,

    })

</script>

</body>
参数相关
参数传递
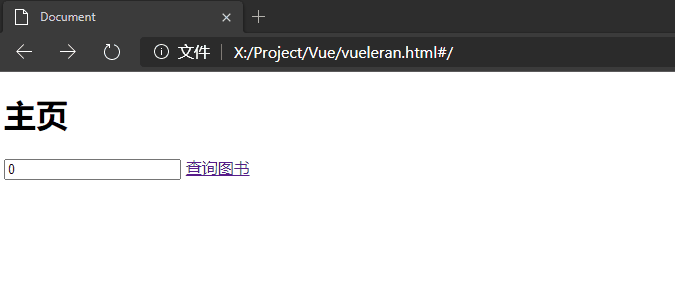
在很多情况下,我们都需要用户的请求地址携带一些参数,然后通过这个参数再进行查询。
比如查询某一本书时,地址栏通常是这样的:
#/book/2
而且很有可能在今后的<router-link>以及methods中都要使用这个参数,如何操作?
{path: "/book/:id(\\d+)", component: book},  // 转义 \d+

我该如何从Template里拿到参数:{{ $route.params }}

我该如何从Methods里拿到参数:this.$route.params
示例如下:
<body>

<div id="app">

    <router-view></router-view>

</div>

<script src="./vue.js"></script>

<script src="./vue-router.js"></script>

<script>

    // 第一步:书写组件

    const index = {

        template: `

          <div>

              <h1>主页</h1>

              <input type="text" v-model="book_id" placeholder="输入要查询的图书编号">

              <router-link :to="'/book/'+book_id">查询图书</router-link>

          </div>

        `,

        data() {

            return {

                book_id: 0,

            };

        }

    }

    const book = {

        // 在模板以及方法中,你都可以拿到查询的参数

        template: `

          <div>

              <p>我该如何从Template里拿到参数:{{ $route.params }}</p>

              <p>我该如何从Methods里拿到参数:{{ show() }}</p>

              <p v-for="item in books" v-if="item.id==$route.params.id">你查询的图书是:{{ item }}</p>

          </div>

        `,

        data() {

            return {

                books: [

                    {id: 1, name: "红楼梦", author: "曹雪芹", price: 199,},

                    {id: 2, name: "西游记", author: "吴承恩", price: 179,},

                    {id: 3, name: "三国演义", author: "罗贯中", price: 158,},

                    {id: 4, name: "水浒传", author: "施耐庵", price: 128,},

                ]

            }

        },

        methods:{

            show(){

                return this.$route.params

            }

        }

    }

    // 第二步:配置路由

    const routes = [

        // 主页,/

        {path: "/", component: index},

        {path: "/book/:id(\\d+)", component: book},  // 转义 \d+

    ]

    // 第三步:实例化路由对象

    // {routes:routes}

    const router = new VueRouter({routes,})

    // 第四步:根组件中添加路由信息

    // {router:router}

    const app = new Vue({

        el: "#app",

        router,

    })

</script>

</body>
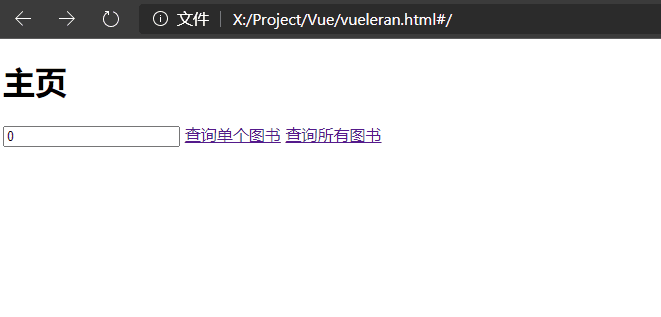
默认参数
根据RestAPI规范,如果没有携带参数则代表查询所有。
如果按照上面的示例,直接不带参数进行请求路由将匹配不上,所以我们还需要做一个查询所有的功能。
其实对上面路由进行改进即可,设置为默认参数:
{path: "/book/:id?", component: book}, // ?代表可以有也可以没有
示例如下:
<body>

<div id="app">

    <router-view></router-view>

</div>

<!--查询模板-->

<template id="result">

    <div>

        <table border="1" :style="{borderCollapse:'collapse'}">

            <caption :style="{border:'1px solid #000',fontSize:'1.2rem'}">查询结果</caption>

            <thead>

            <tr>

                <th>编号</th>

                <th>名称</th>

                <th>作者</th>

                <th>价格</th>

            </tr>

            </thead>

            <!-- 查询一本 -->

            <tbody v-if="$route.params.id">

            <tr v-for="item in books" v-if="item.id == $route.params.id">

                <td>{{ item.id }}</td>

                <td>{{ item.name }}</td>

                <td>{{ item.author }}</td>

                <td>{{ item.price }}</td>

            </tr>

            </tbody>

            <!-- 查询所有 -->

            <tbody v-else>

            <tr v-for="item in books">

                <td>{{ item.id }}</td>

                <td>{{ item.name }}</td>

                <td>{{ item.author }}</td>

                <td>{{ item.price }}</td>

            </tr>

            </tbody>

        </table>

    </div>

</template>

<script src="./vue.js"></script>

<script src="./vue-router.js"></script>

<script>

    // 第一步:书写组件

    const index = {

        template: `

          <div>

          <h1>主页</h1>

          <input type="text" v-model="book_id" placeholder="输入要查询的图书编号">

          <router-link :to="'/book/'+book_id">查询单个图书</router-link>

          <router-link to="/book/">查询所有图书</router-link>

          </div>

        `,

        data() {

            return {

                book_id: 0,

            };

        }

    }

    const book = {

        // 在模板以及方法中,你都可以拿到查询的参数

        template: `#result`,

        data() {

            return {

                books: [

                    {id: 1, name: "红楼梦", author: "曹雪芹", price: 199,},

                    {id: 2, name: "西游记", author: "吴承恩", price: 179,},

                    {id: 3, name: "三国演义", author: "罗贯中", price: 158,},

                    {id: 4, name: "水浒传", author: "施耐庵", price: 128,},

                ]

            }

        },

    }

    // 第二步:配置路由

    const routes = [

        // 主页,/

        {path: "/", component: index},

        {path: "/book/:id?", component: book},  // 转义 \d+,?可以有也可以没有

    ]

    // 第三步:实例化路由对象

    // {routes:routes}

    const router = new VueRouter({routes,})

    // 第四步:根组件中添加路由信息

    // {router:router}

    const app = new Vue({

        el: "#app",

        router,

    })

</script>

</body>
路由别名
路由name
为每一个路由匹配规则添加name属性,使其更方便的在模板以及Js代码中进行跳转:
如下所示:
    const routes = [

        {path: "/", component: index, name: "index"},

        {path: "/book/:id?", component: book, name: "query_book"},

    ]
router-link
模板中使用router-link与路由的别名name进行跳转时,格式如下:
<!-- 有参数就传递,没有就不传递。注意在to前添加: -->

<router-link :to="{name:'query_book',params:{id:书籍编号}}">查询</router-link>
$route.push
Js代码中使用跳转时要用到this.$router.push()这个方法,如下所示:
// 模板中的按钮

<button @click="func(书籍编号)">查看详情</button>

// js

func(bookId){

	// 使用url拼接跳转

    let url = {path:"/book/"+bookId};

    // 使用别名进行跳转跳转:

    // {name:'book_query',params:{id:id}}

    this.$router.push(url);  // 使用$router.push(url)进行跳转

}
视图布局
视图嵌套
一个大的组件中可以包含很多小的组件。
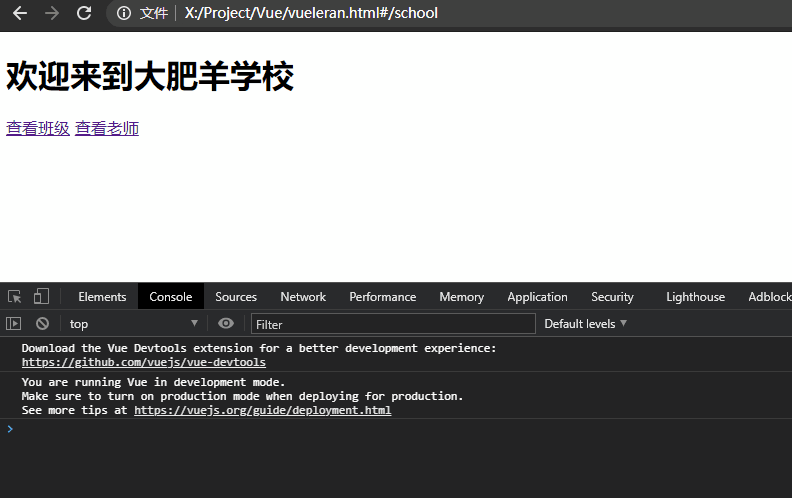
如下所示,有一个school组件,在school组件中你可以查看到当前的teacher和classes。
当然teacher与classes也都是两个组件。
换而言之,我在school组件中点击查看教师或者班级,我并不希望他跳转到新的页面而是在当前页面的其他位置进行显示其他组件就可以使用路由嵌套。
<div id="app">

	<!-- 第一层,展示学校 -->

    <router-view></router-view>

</div>

# 子组件中的关键代码

 <router-view></router-view>

# 路由中的代码,第一层的路由匹配第一层的router-view,第二层的路由就在第二层的router-view中显示

 path: "/school", component: school, name: "school", children: [

     {path: "/school/teacher", component: teacher, name: "teacher"},

     {path: "/school/classes", component: classes, name: "classes"},

 ]
<body>

<div id="app">

	<!-- 第一层,展示学校 -->

    <router-view></router-view>

</div>

<script src="./vue.js"></script>

<script src="./vue-router.js"></script>

<script>

    // 第一步:书写组件

    const school = {

        template: `

        <div>

            <h1>欢迎来到大肥羊学校</h1>

            <router-link :to="{name:'classes'}">查看班级</router-link>

            <router-link :to="{name:'teacher'}">查看老师</router-link>

            <!-- 第二层,展示班级或者教师 -->

            <router-view></router-view>

        </div>

        `

    }

    const teacher = {

        template: `

          <div>

            <ul>

              <li v-for="item in teacherMessage">{{item.id}}-{{item.name}}</li>

            </ul>

          </div>

        `,

        data() {

            return {

                teacherMessage: [

                    {id: 1, name: "王老师",},

                    {id: 2, name: "张老师",},

                    {id: 3, name: "李老师",},

                ]

            }

        }

    }

    const classes = {

        template: `

          <div>

              <ul>

                <li v-for="item in classMessage">{{item.id}}-{{item.name}}</li>

              </ul>

          </div>

        `,

        data() {

            return {

                classMessage: [

                    {id: 1, name: "一年级一班",},

                    {id: 2, name: "一年级二班",},

                    {id: 3, name: "一年级三班",},

                ]

            }

        }

    }

    // 第二步:配置路由

    const routes = [

        {

            path: "/school", component: school, name: "school", children: [

                {path: "/school/teacher", component: teacher, name: "teacher"},

                {path: "/school/classes", component: classes, name: "classes"},

            ]

        },

    ]

    // 第三步:实例化路由对象

    // {routes:routes}

    const router = new VueRouter({routes,})

    // 第四步:根组件中添加路由信息

    // {router:router}

    const app = new Vue({

        el: "#app",

        router,

    })

</script>

</body>
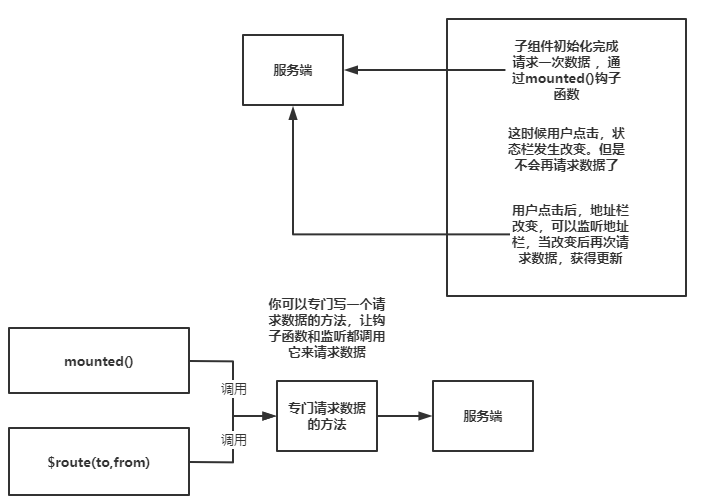
嵌套的问题
当页面发生变化,如#school/classes跳转到#school/teacher,school组件将会产生复用。
这代表school的组件声明周期钩子函数不会被重复调用,就可能造成数据更新不及时的问题。
举一个例子,上述示例中的school欢迎语是欢迎来到大肥羊学校,如果它是钩子函数created()从后端获取的数据,在用户查看#school/classes后跳转到#school/teacher这个时间点中间后端数据发生了改变,变成了欢迎来到小肥羊学校,由于组件复用问题不会再次执行created(),则代表用户依旧看到的是欢迎来到大肥羊学校。如下所示,我们只有手动更新标语才能执行更新,这显然是不符合常理的:
<body>

<div id="app">

    <router-view></router-view>

</div>

<script src="./vue.js"></script>

<script src="./vue-router.js"></script>

<script>

    // 假设是从后端抓取数据

    let schoolTitle = "欢迎来到大肥羊学校";

    // 5s后发生改变

    setTimeout(() => {

        schoolTitle = "欢迎来到小肥羊学校";

    }, 5000);

    // 第一步:书写组件

    const school = {

        template: `

        <div>

            <h1>{{ title }}</h1>

            <router-link :to="{name:'classes'}">查看班级</router-link>

            <router-link :to="{name:'teacher'}">查看老师</router-link>

            <p><button @click="updateTitle">更新新的标语</button></p>

            <router-view></router-view>

        </div>

        `,

        data(){

            return {

                title : "",

            }

        },

        created(){

            // 假设发送异步请求

            console.log("school钩子函数触发了...")

            this.title = schoolTitle;

        },

        methods:{

            updateTitle(){

                this.title = schoolTitle;

            }

        }

    }

    const teacher = {

        template: `

          <div>

            <h3>老师太多了,显示不过来...</h3>

          </div>

        `,

    }

    const classes = {

        template: `

          <div>

            <h3>班级太多了,显示不过来...</h3>

          </div>

        `,

    }

    // 第二步:配置路由

    const routes = [

        {

            path: "/school", component: school, name: "school", children: [

                {path: "/school/teacher", component: teacher, name: "teacher"},

                {path: "/school/classes", component: classes, name: "classes"},

            ]

        },

    ]

    // 第三步:实例化路由对象

    // {routes:routes}

    const router = new VueRouter({routes,})

    // 第四步:根组件中添加路由信息

    // {router:router}

    const app = new Vue({

        el: "#app",

        router,

    })

</script>

</body>
解决问题
如果想解决组件复用钩子函数不执行的问题,我们可以使用watch来监听$route对象,也就是使用watch来监听地址栏变化,当发生变化时就重新获取数据。
或者使用 2.2 中引入的 beforeRouteUpdate 导航守卫,解决思路如下图所示:
代码如下,使用watch进行解决:
    const school = {

		template:"...",

        data(){

            return {

                title : "",

            }

        },

        created(){

            // 假设发送异步请求

            this.getTitle();

        },

        methods:{

            getTitle(){

                // 从后端获取数据

                this.title = schoolTitle;

            }

        },

        watch:{

            $route(to,from){

                // to 要跳转的页面

                // from 从那个页面进行跳转

                this.getTitle();

            }

        }

    }
使用导航守卫进行解决的代码如下:
    // 第一步:书写组件

    const school = {

    	template:"...",

        data(){

            return {

                title : "",

            }

        },

        created(){

            // 假设发送异步请求

            this.getTitle();

        },

        methods:{

            getTitle(){

                // 从后端获取数据

                this.title = schoolTitle;

            }

        },

        beforeRouteUpdate (to, from, next) {

            this.getTitle();

        }

    }
命名视图
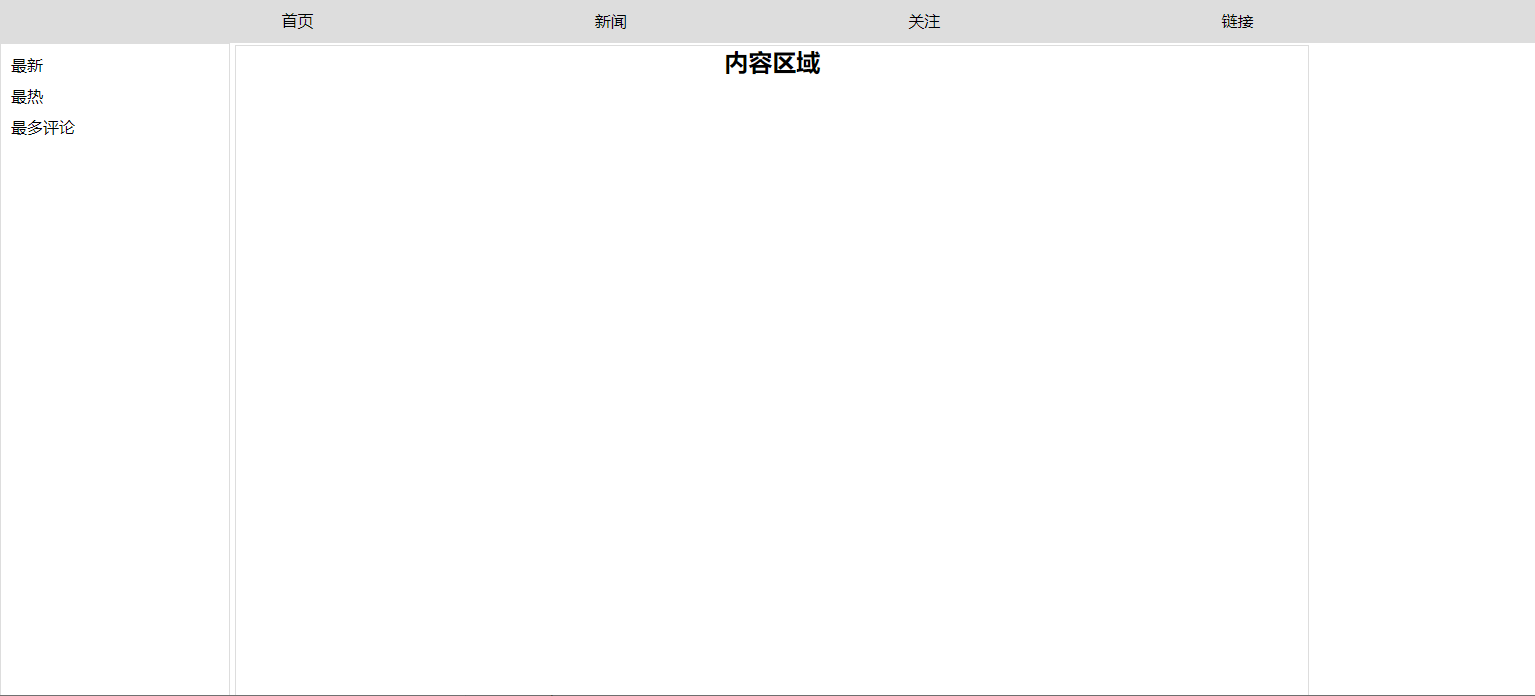
命名视图就是说可以在一个页面上,使用多个<router-view>,相较于路由嵌套的层级关系,它是一种扁平化的设计。
如,头部导航栏,左侧菜单栏,右边内容块三个组件,都显示在一个页面上,就可以使用命名视图。
核心代码如下:
# 根组件模板

<div id="app">

    <!-- 这里只放个人主页 -->

    <router-view></router-view>

    <router-view name="menu"></router-view>

    <router-view name="show"></router-view>

</div>

# Js配置路由,/代表根目录。有三个视图,router-view

path: "/", components: {

    default: header,  // 如果 view-router没有name属性,则用default

    menu: menu,

    show: show,

}
 <style>

        *{

            padding: 0;

            margin: 0;

            box-sizing: border-box;

        }

        header{

            height: 45px;

            display: flex;

            justify-content: space-evenly;

            background-color: #ddd;

            align-items: center;

        }

        body>div>div:nth-child(2){

            display: inline-flex;

            width: 15%;

            border: 1px solid #ddd;

            height: 1000px;

        }

        menu>ul{

            list-style-type: none;

            display: inline-flex;

            flex-flow: column;

        }

        menu>ul>li{

            margin: 10px 0 0 10px;

        }

        body>div>div:last-child{

            display: inline-flex;

            justify-content: center;

            border: 1px solid #ddd;

            width: 70%;

            height: 1000px;

        }

    </style>

<body>

    <div id="app">

        <!-- 这里只放个人主页 -->

        <router-view></router-view>

        <router-view name="menu"></router-view>

        <router-view name="show"></router-view>

    </div>

    <!-- 头部组件 -->

    <template id="header">

        <div>

            <header><span>首页</span><span>新闻</span><span>关注</span><span>链接</span></header>

        </div>

    </template>

    <!-- 左侧菜单 -->

    <template id="menu">

        <div>

            <menu>

                <ul>

                    <li>最新</li>

                    <li>最热</li>

                    <li>最多评论</li>

                </ul>

            </menu>

        </div>

    </template>

    <!-- 内容区域 -->

    <template id="show">

        <div>

            <section>

                <h1>内容区域</h1>

            </section>

        </div>

    </template>

    <script src="vue.js"></script>

    <script src="vue-router.js"></script>

    <script>

        // 第一步:书写组件

        const header = {

            template: "#header",

        }

        const menu = {

            template: "#menu",

        }

        const show = {

            template: "#show",

        }

        // 第二步:配置路由

        const routes = [

            {

                // 当你访问主页时,有三个组件扁平显示

                path: "/", components: {

                    default: header,  // 如果 view-router没有name属性,则用default

                    menu: menu,

                    show: show,

                }

            }

        ]

        // 第三步:实例化路由对象

        const router = new VueRouter({

            routes, // es6新语法

        })

        // 第四步:根组件中添加路由信息

        const app = new Vue({

            el: "#app",

            router,

        });

    </script>

</body>
重定向
redirect
当你访问一个页面时,可以重定向至另一个页面,如下示例,使用redirect进行重定向。
访问/doc,重定向到/help中。但是地址栏中显示的还是/help:
const routes = [

    // 当用户访问doc时,将会跳转到help中,地址栏中显示是help

    { path: "/help", component: help, name: "help"},

    { path: "/doc", redirect: { name: "help" } }

]
alias
如果你使用alias参数进行匹配,就方便许多了,并且地址栏中显示的是用户输入的值,但是当输入的路径不存在,则不会显示:

const routes = [

    // 用户输入在alias中的所有路径,都会交给help组件进行处理

    { path: "/help", component: help, name: "help", alias: ["/doc", "/doc.html", "/help.html"] },

]
history模式
如果你的url中不想有#号的锚点,可开启history模式。
同时你还需要在后端做相应的配置,参见官方文档:
切换动画
相信现在你已经对单页面开发有所了解,单页面开发说白了就是根据url请求的#后的参数不停的更换要显示的组件。
所以我们可以为这一切换过程加上过渡动画,你可以在其他子组件模板中添加<transition>标签,并自己书写css类或者引用第三方库。
如下所示:
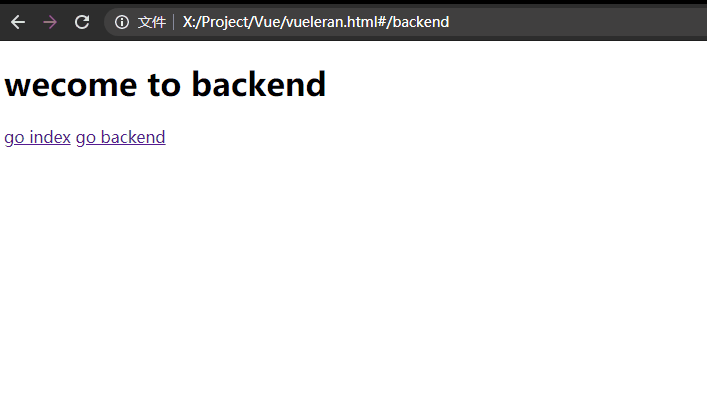
我这里是单独给每个子组件加的动画:
        // 书写组件

        const index = {

            template:

             `

            <transition enter-active-class="animate__animated  animate__bounce">

                <h1>wecome to index</h1>

            </transition>

            `,

        }

        const backend = {

            template:             `

            <transition enter-active-class="animate__animated  animate__bounce">

                <h1>wecome to backend</h1>

            </transition>

            `,

        }
如想了解更多,请参考官方文档。
最新文章
- MySQL------Navicat激活方法
- 簡單SQL存儲過程實例
- Ubuntu 安装JDK并配置成为默认的JDK
- IOS 多线程 NSOperation GCD
- Linux安装后的系统配置
- POJ_3273_Monthly_Expense_(二分,最小化最大值)
- Axis2 java调用.net webservice接口的问题(郑州就维)
- EF调用存储过程实例
- 一个意想不到的Javascript内存泄漏
- C语言-第一次作业
- windows中在vs code终端使用bash
- 剑指offer(7)
- QT插件+ROS 2 新建项目
- Codeforces 374C - Inna and Dima
- C语言--第七周作业评分(5班)
- Spring(AbstractRoutingDataSource)实现动态数据源切换
- Matlab zeros ones
- Spring集成Struts、Hibernate----三大框架SSH(Spring、Struts和hibernate)
- 主机不能访问虚拟机CentOS中的站点
- SqlServer中循环和条件语句示例!
热门文章
- centos8平台使用loginctl管理登录用户与session
- 骨架屏(page-skeleton-webpack-plugin)初探
- 【Azure Redis 缓存 Azure Cache For Redis】在创建高级层Redis(P1)集成虚拟网络(VNET)后,如何测试VNET中资源如何成功访问及配置白名单的效果
- Pytest配置文件声明自定义用例标识
- 51nod 最大M子段和系列(1052、1053、1115)
- JS初级运算符优先级
- Azure Kay Vault(一).NET Core Console App 获取密钥保管库中的机密信息
- 如何解决json返回的乱码
- 阿里云ecs,rds,redis优惠套餐
- CountDownLatch(减少计数)