jumpserver部署0.3版本 =====( ̄▽ ̄*)b
jumpserver概述
跳板机概述:
跳板机就是一台服务器,开发或运维人员在维护过程中首先要统一登录到这台服务器,然后再登录到目标设备进行维护和操作;
跳板机缺点:没有实现对运维人员操作行为的控制和审计,使用跳板机的过程中还是会出现误操作、违规操作导致的事故,一旦出现操作事故很难快速定位到原因和责任人;
Jumpserver概述:
Jumpserver是一款使用Python, Django开发的开源跳板机系统,为互联网企业提供了认证,授权,审计,自动化运维等功能。
jumpserver堡垒机组件说明:
1. Jumpserver:现指 Jumpserver 管理后台,是核心组件(Core), 使用 Django Class Based View 风格开发,支持 Restful API。
2. Coco: 实现了 SSH Server 和 Web Terminal Server 的组件,提供 SSH 和 WebSocket 接口, 使用 Paramiko 和 Flask 开发。
3. Luna: 现在是 Web Terminal 前端,计划前端页面都由该项目提供,Jumpserver 只提供 API,不再负责后台渲染html等。
jumpserver部署
| 主机名 | ip地址 | 说明 |
| tiaobanji | 172.16.1.91 | jumpserver客户端 |
部署环境
阿里源:curl -o /etc/yum.repos.d/CentOS-Base.repo http://mirrors.aliyun.com/repo/Centos-7.repo
阿里扩展源:curl -o /etc/yum.repos.d/epel.repo http://mirrors.aliyun.com/repo/epel-7.repo
yum -y install git python-pip mysql-devel gcc automake autoconf python-devel vim sshpass lrzsz readline-devel
git --- 下载软件代码程序
python-pip --- 下载和python有关模块信息 pip install
mysql-devel --- 存储网站数据
gcc --- 编译软件(翻译) C语言
automake --- 自动编译
autoconf --- 自动配置
python-devel --- 和python环境有关依赖
readline-devel --- 实现python有些代码补全功能
下载jumpserver软件
国外: https://github.com/jumpserver/jumpserver.git
国内: https://git.coding.net/jumpserver/jumpserver.git
[root@tiaobanji ~]# cd /opt/

[root@tiaobanji /opt]# git clone  https://git.coding.net/jumpserver/jumpserver.git

正克隆到 'jumpserver'...

remote: Enumerating objects: , done.

remote: Counting objects: % (/), done.

remote: Compressing objects: % (/), done.

remote: Total  (delta ), reused  (delta )

接收对象中: % (/), 13.56 MiB | 587.00 KiB/s, done.

处理 delta 中: % (/), done.
更新pip源
源地址:https://developer.aliyun.com/mirror/pypi?spm=a2c6h.13651102.0.0.53322f70PEvszf
[root@tiaobanji ~]# mkdir ~/.pip/ -p

[root@tiaobanji ~]#  vim ~/.pip/pip.conf

[global]

index-url = https://mirrors.aliyun.com/pypi/simple/

[install]

trusted-host=mirrors.aliyun.com
jumpserver软件安装部署
[root@tiaobanji ~]# cd /opt/jumpserver/install

[root@tiaobanji /opt/jumpserver/install]# pip install -r requirements.txt
mariadb数据库部署
[root@tiaobanji ~]# yum install -y mariadb-server mariadb

[root@tiaobanji ~]# systemctl start mariadb.service ;  systemctl  enable  mariadb

[root@tiaobanji ~]# mysqladmin  -uroot password ''  #后期要输入密码
创建数据库
[root@tiaobanji ~]# mysql -uroot -p123456

MariaDB [(none)]> create database jumpserver default charset 'utf8';

MariaDB [(none)]> grant all on jumpserver.* to 'jumpserver'@'127.0.0.1' identified by '';

MariaDB [(none)]> exit;

Bye
安装jumpserver
安装时会有填入邮箱的步骤,填写163或者qq的邮箱都可以,163授权码是自己设定的,qq授权码是自动生成。
163邮箱:https://mail.163.com/
qq邮箱:https://mail.qq.com/
[root@tiaobanji /opt/jumpserver/install]# python ./install.py

请务必先查看wiki https://github.com/ibuler/jumpserver/wiki/Quickinstall

开始关闭防火墙和selinux

sed: can't read /etc/sysconfig/i18n: No such file or directory

Redirecting to /bin/systemctl stop iptables.service

Failed to stop iptables.service: Unit iptables.service not loaded.

请输入您服务器的IP地址,用户浏览器可以访问 [10.0.0.91]: 10.0.0.91

是否安装新的MySQL服务器? (y/n) [y]: n

请输入数据库服务器IP [127.0.0.1]: 127.0.0.1

请输入数据库服务器端口 []:

请输入数据库服务器用户 [root]: root

请输入数据库服务器密码:

请输入使用的数据库 [jumpserver]: jumpserver

连接数据库成功

请输入SMTP地址: smtp..com       #163邮箱的smtp服务器地址,qq邮箱也可以

请输入SMTP端口 []:

请输入账户: w13545866**@.com    #163邮箱账号

请输入密码: ****999                #自己设定的授权码

    请登陆邮箱查收邮件, 然后确认是否继续安装

是否继续? (y/n) [y]: y

开始写入配置文件

开始安装Jumpserver, 要求环境为 CentOS 6.5 x86_64

开始更新jumpserver

Creating tables ...

Creating table django_admin_log

Creating table auth_permission

Creating table auth_group_permissions

Creating table auth_group

Creating table django_content_type

Creating table django_session

Creating table setting

Creating table juser_usergroup

Creating table juser_user_group

Creating table juser_user_groups

Creating table juser_user_user_permissions

Creating table juser_user

Creating table juser_admingroup

Creating table juser_document

Creating table jasset_assetgroup

Creating table jasset_idc

Creating table jasset_asset_group

Creating table jasset_asset

Creating table jasset_assetrecord

Creating table jasset_assetalias

Creating table jperm_permlog

Creating table jperm_permsudo

Creating table jperm_permrole_sudo

Creating table jperm_permrole

Creating table jperm_permrule_asset_group

Creating table jperm_permrule_role

Creating table jperm_permrule_asset

Creating table jperm_permrule_user_group

Creating table jperm_permrule_user

Creating table jperm_permrule

Creating table jperm_permpush

Creating table jlog_log

Creating table jlog_alert

Creating table jlog_ttylog

Creating table jlog_execlog

Creating table jlog_filelog

Installing custom SQL ...

Installing indexes ...

Installed  object(s) from  fixture(s)

请输入管理员用户名 [admin]: admin

请输入管理员密码: [5Lov@wife]: admin

请再次输入管理员密码: [5Lov@wife]: admin

Starting jumpsever service:                                [  OK  ]

安装成功,请访问web, 祝你使用愉快。

请访问 https://github.com/ibuler/jumpserver 查看文档
jumpserver服务启动
[root@tiaobanji /]# cd /opt/jumpserver/

[root@tiaobanji /opt/jumpserver]# ./service.sh  start

jumpserver  is running...

[root@tiaobanji /opt/jumpserver]#                          [  OK  ]

# 需要在指定目录下启动
#启动:./service.sh  start
#重启:./service.sh  restart
#停止:./service.sh  stop
页面配置jumpserver
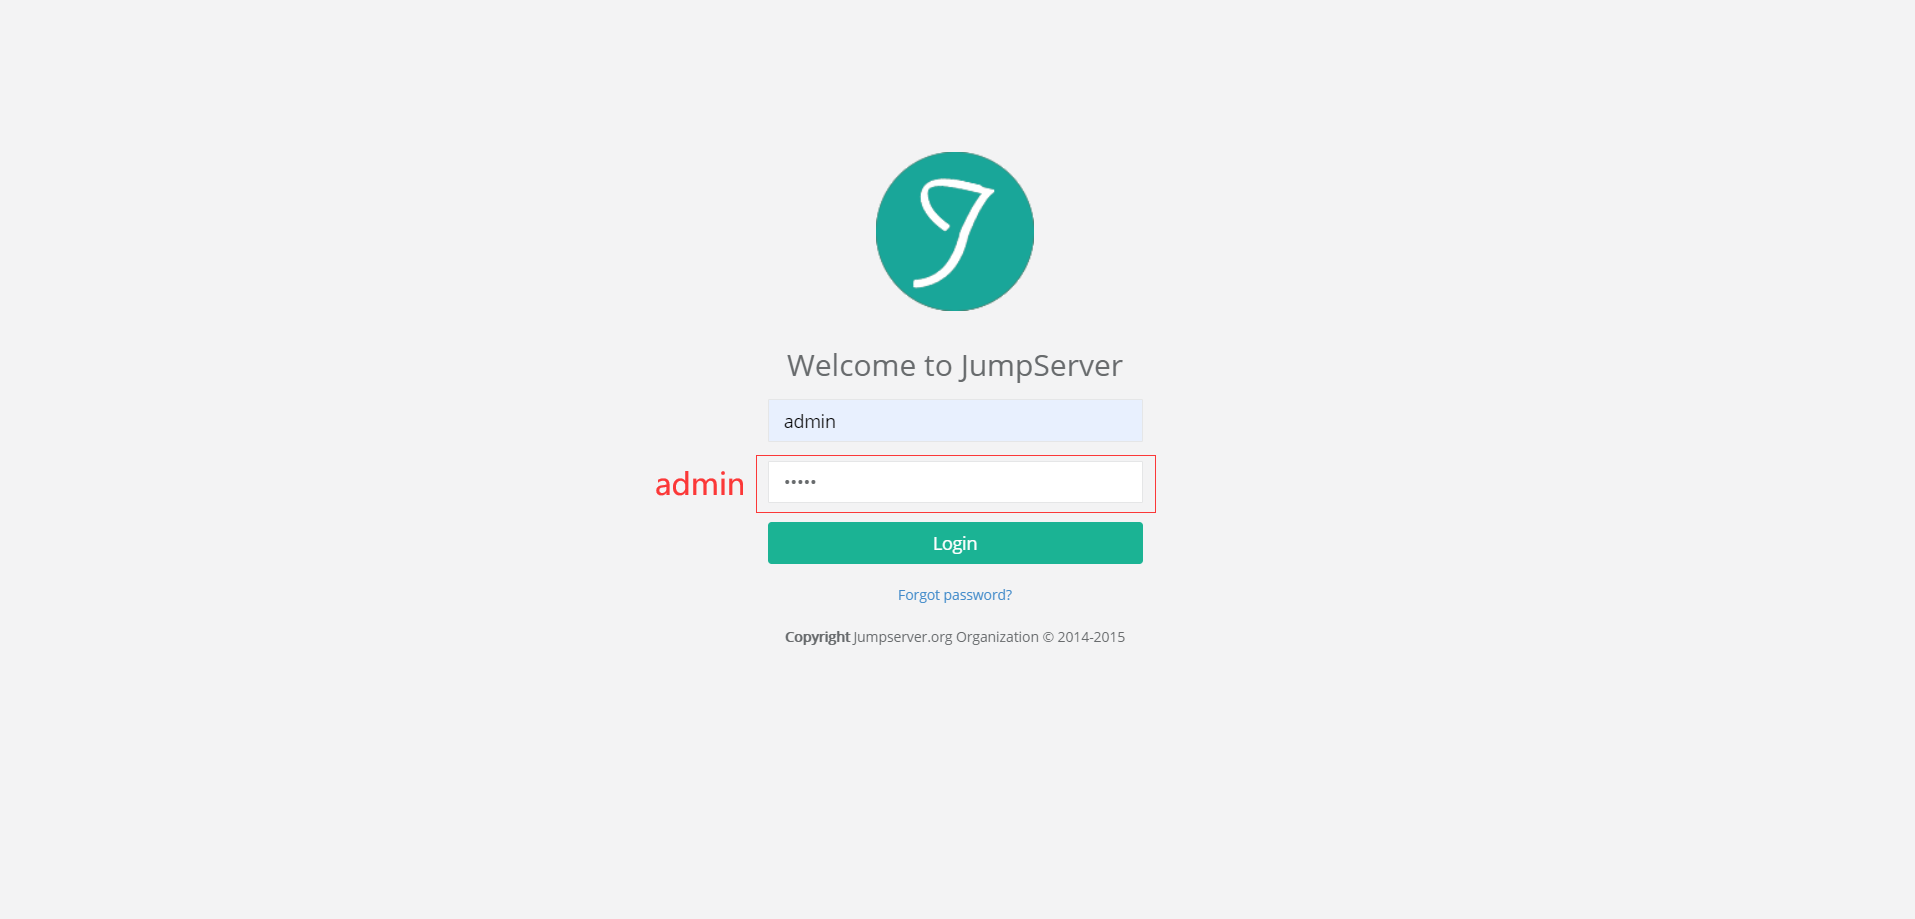
登录jumpserver 地址:http://10.0.0.91/
企业需求:
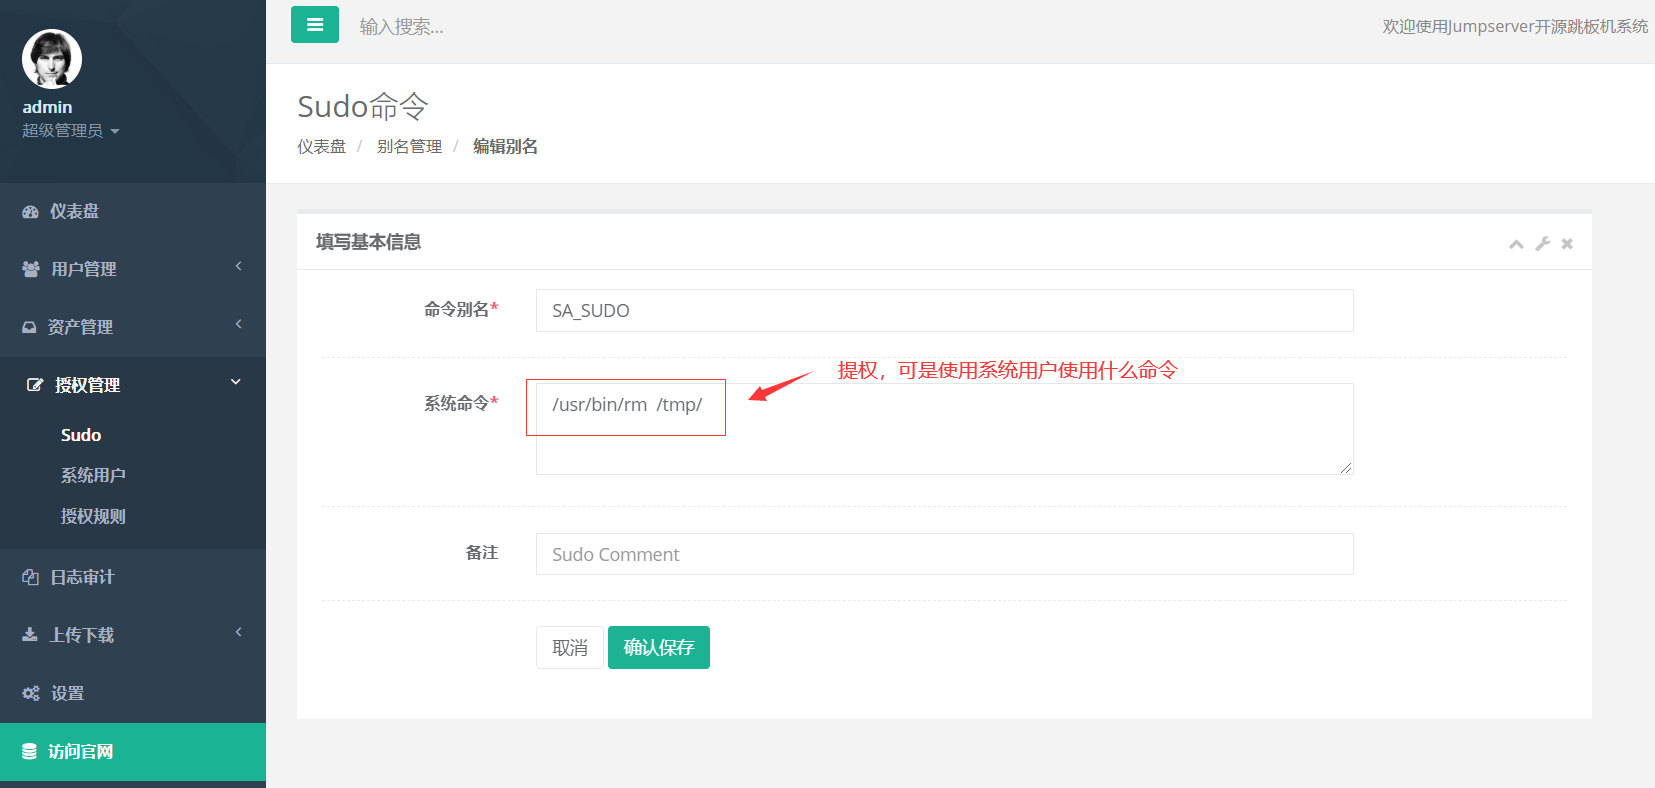
运维部门 sa_web web01 web02 nfs01 sudo权限:/usr/bin/rm /tmp/
数据库部门 sa_db db01 db02 sudo权限:/usr/bin/mysql
用户管理信息
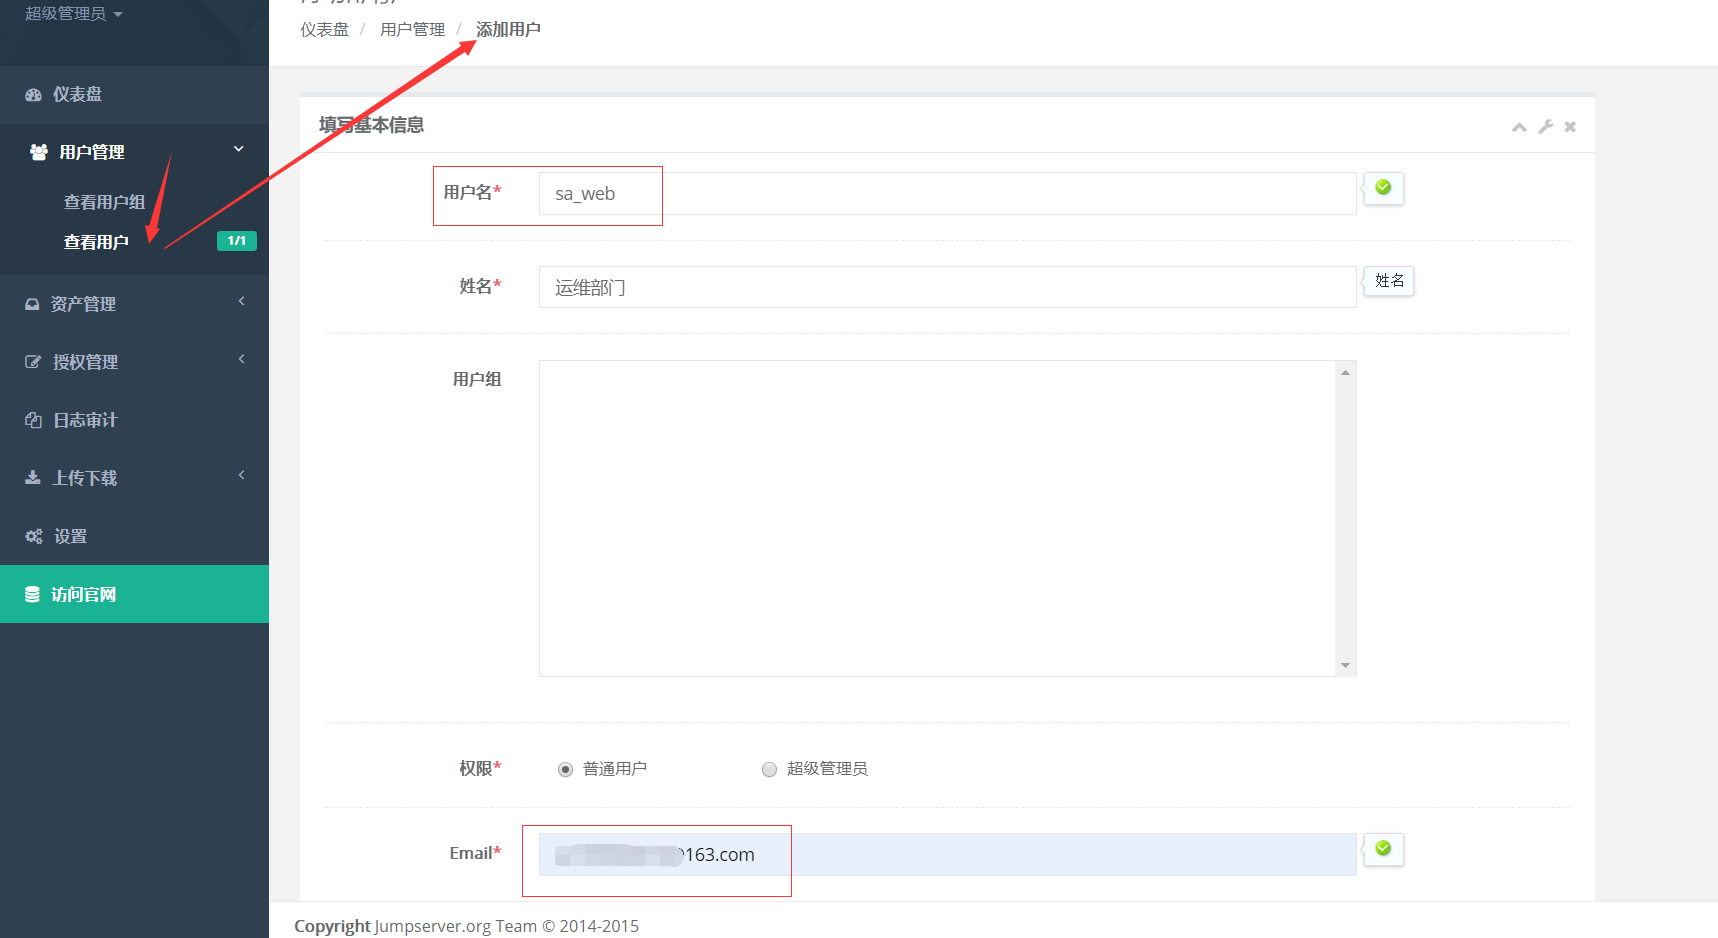
创建用户,可以使用jumpserver用户信息
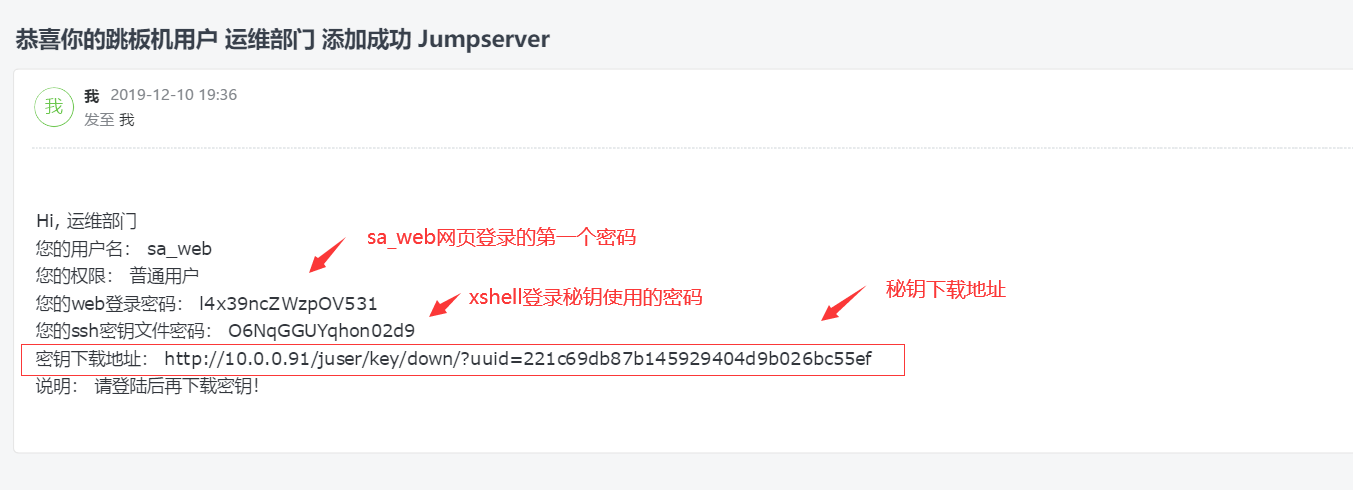
用户管理---> 查看用户----> 添加用户----> 创建用户 ----> 邮箱查看密码
创建用户: sa_web , sa_db
资产管理信息
创建主机资产:可以从表格内批量创建主机资产

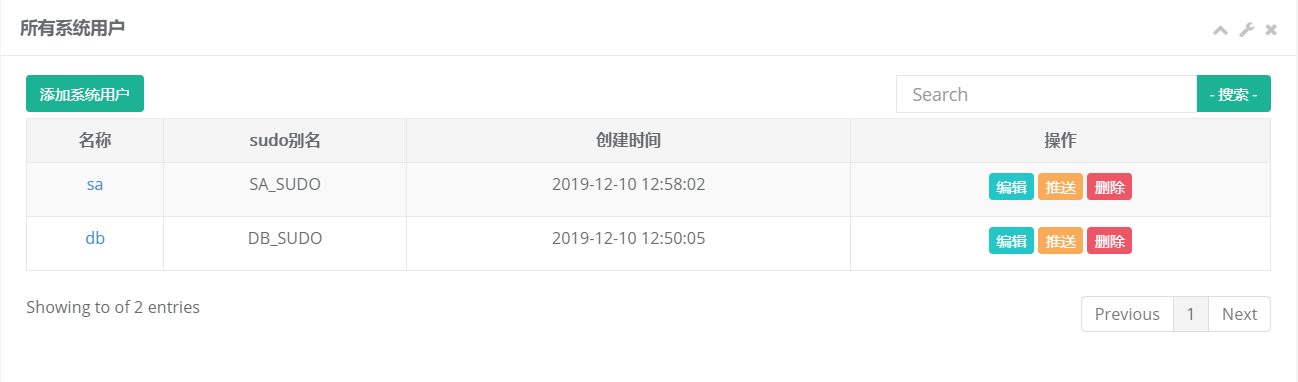
需要授权系统用户才可以使用资产主机
先进行sudo提权,使系统用户可以使用什么命令。
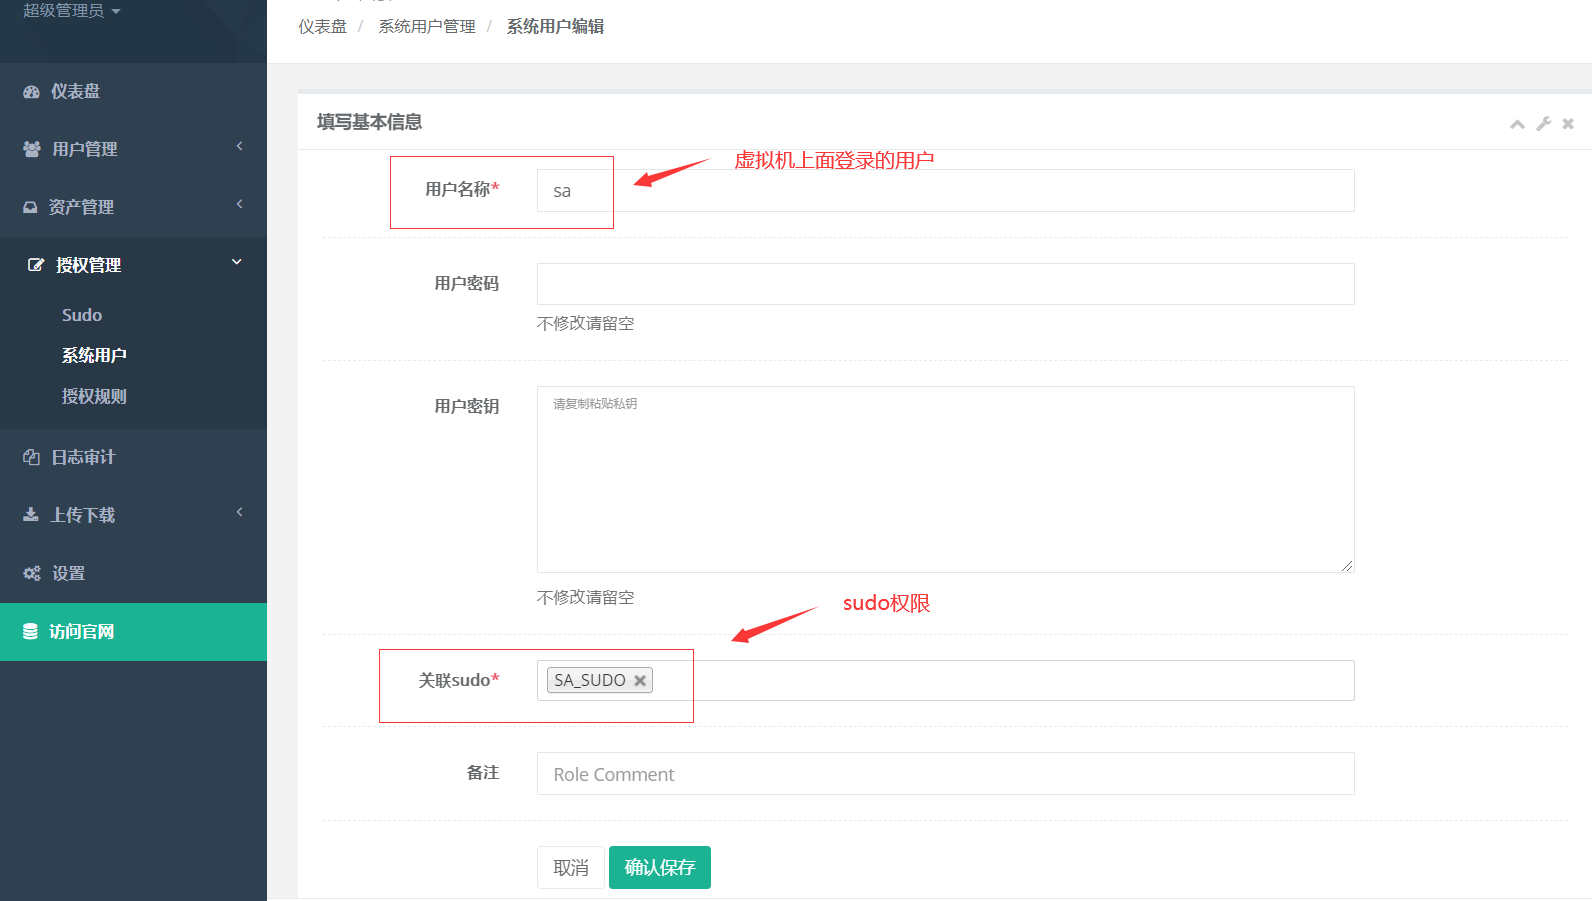
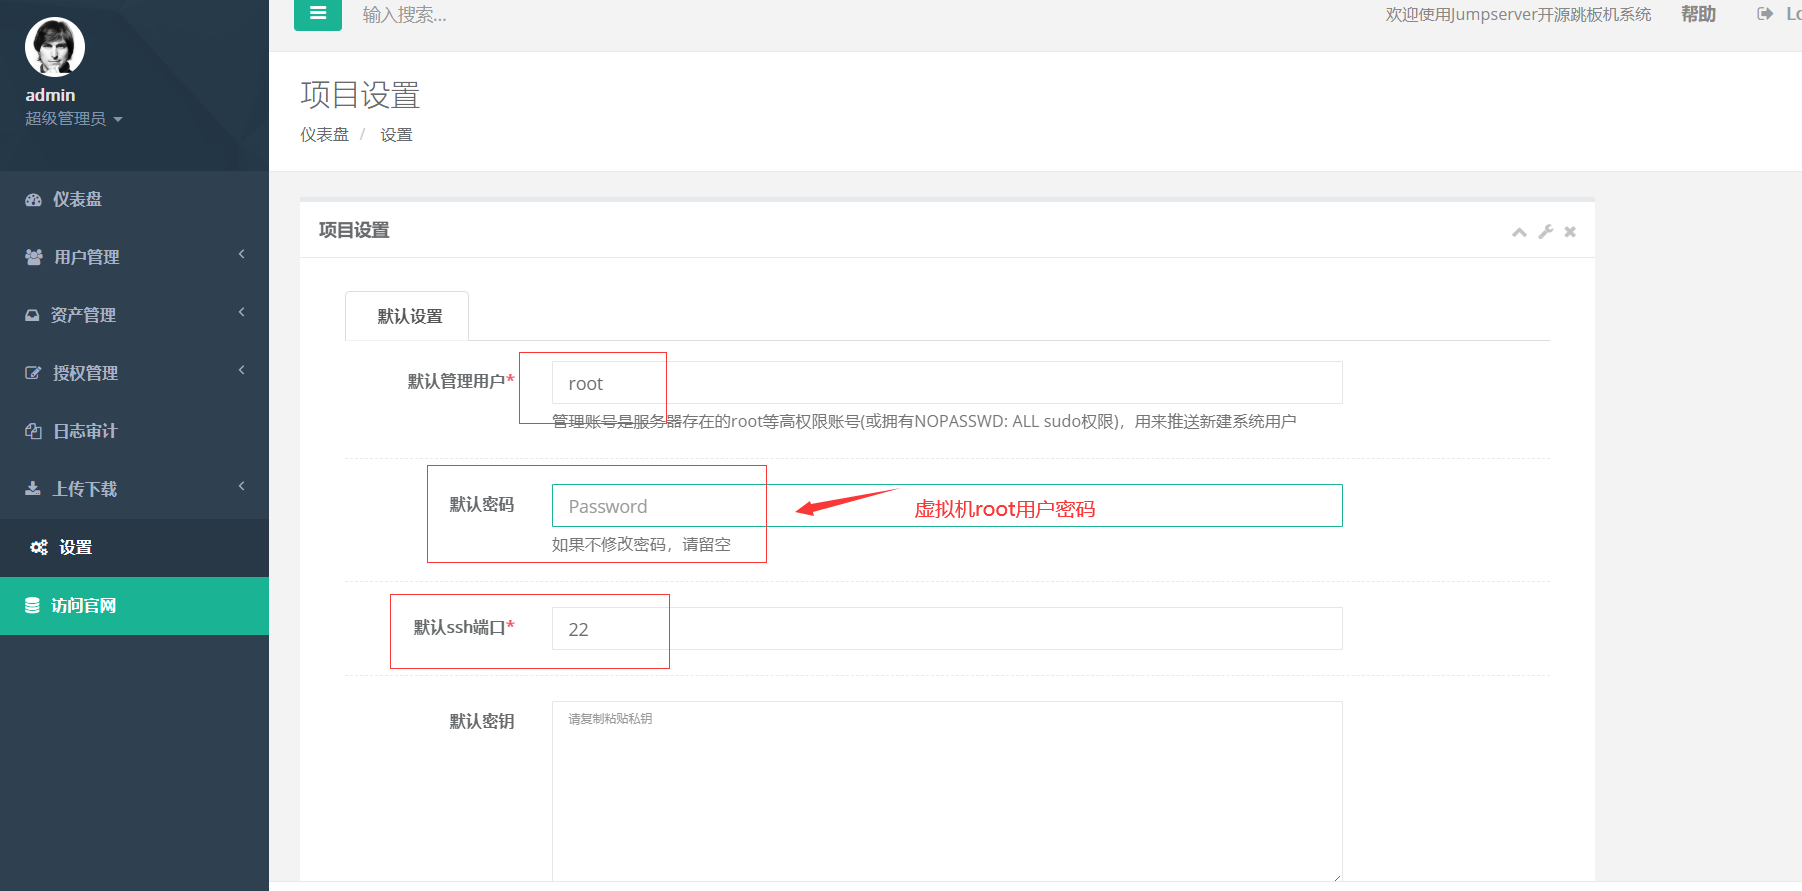
在推送之前要设置默认用户,否则主机会推送失败
主机推送:
检查主机网络是否连接成功,否则可能会有主机推送不过来。。。
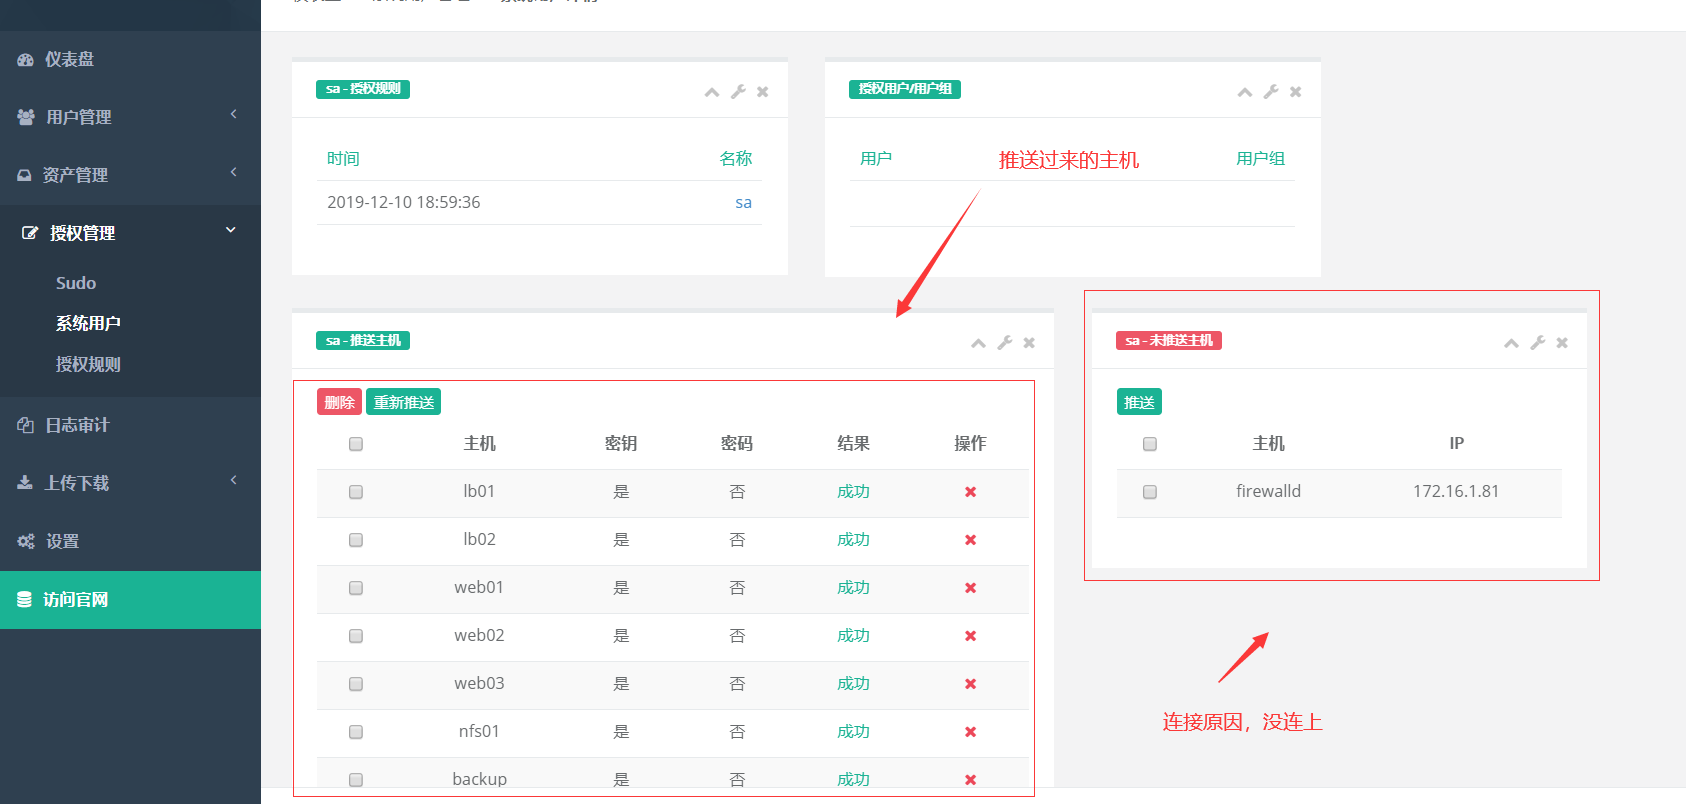
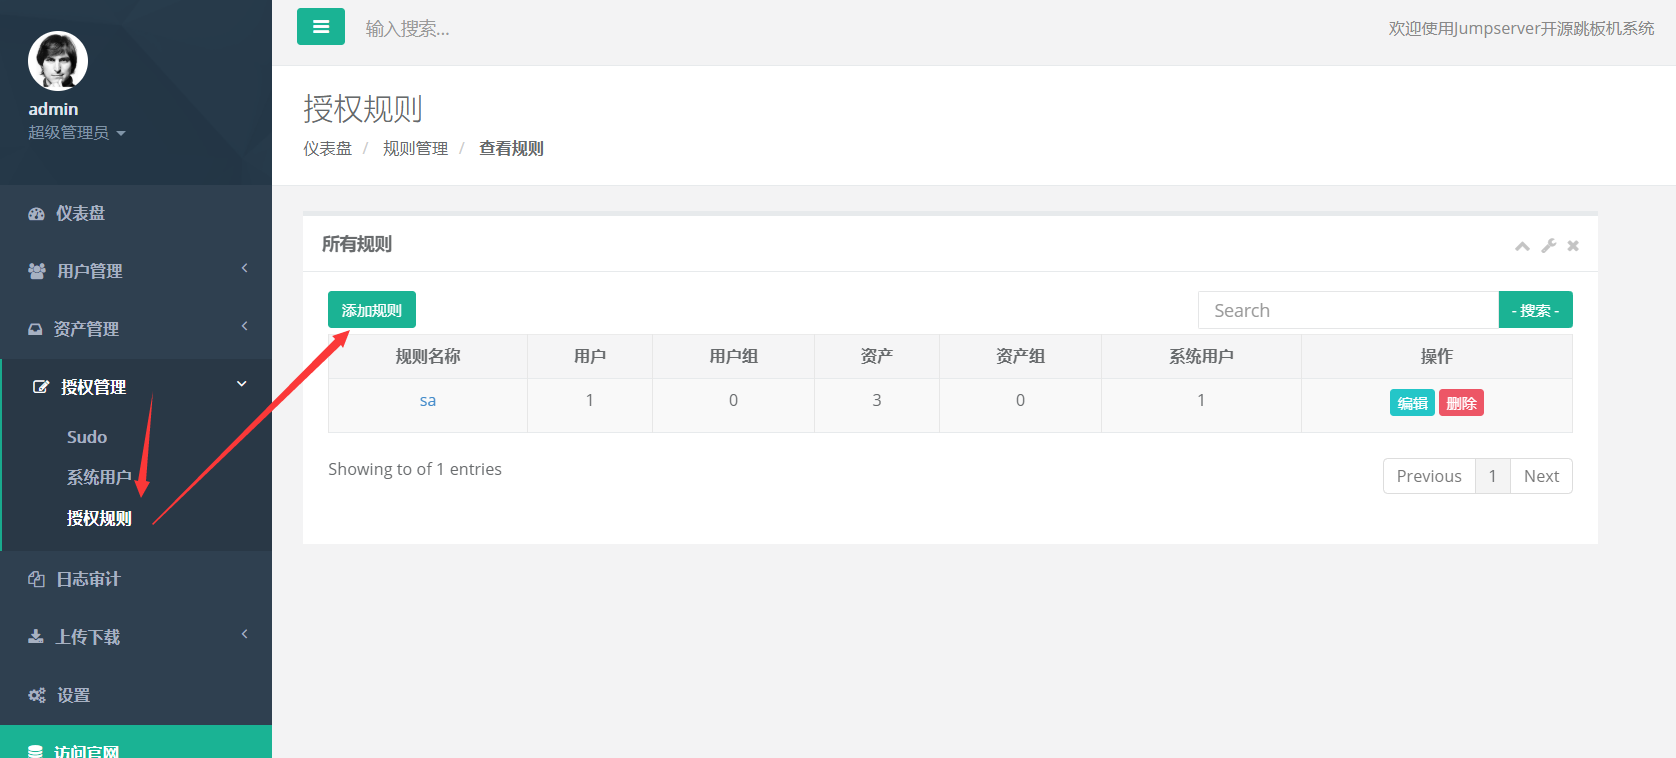
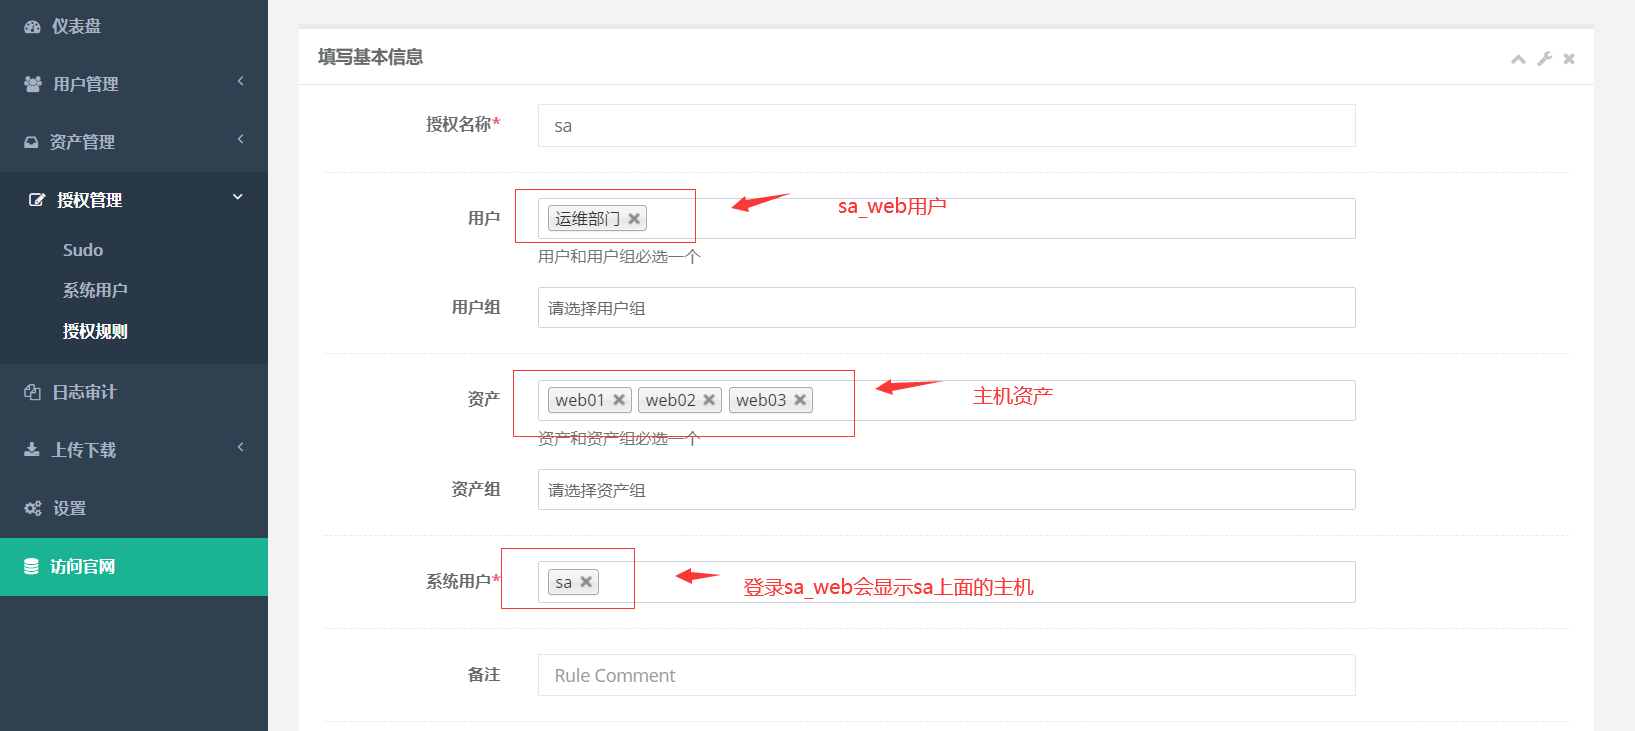
授权策略是一个对配置的总结,一定要配置。
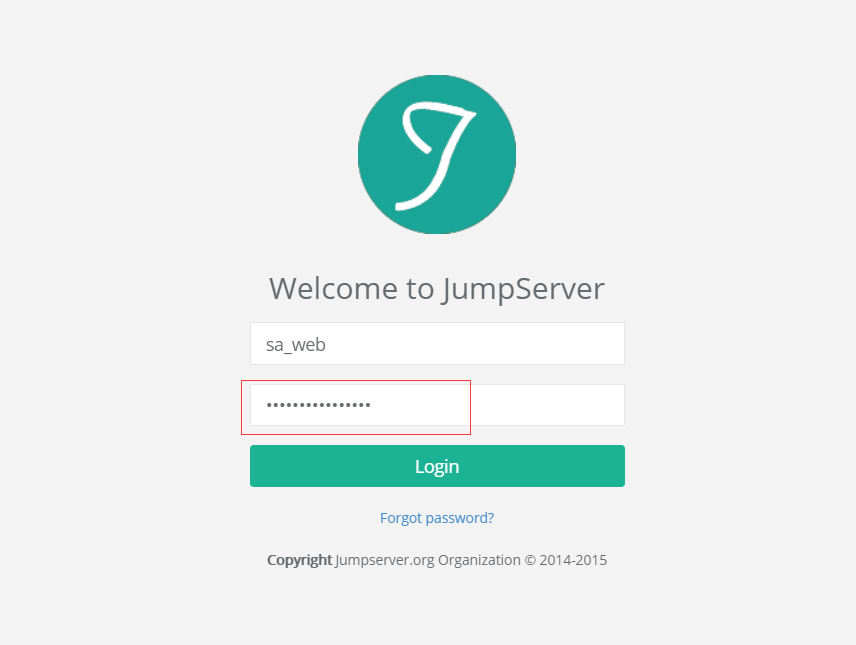
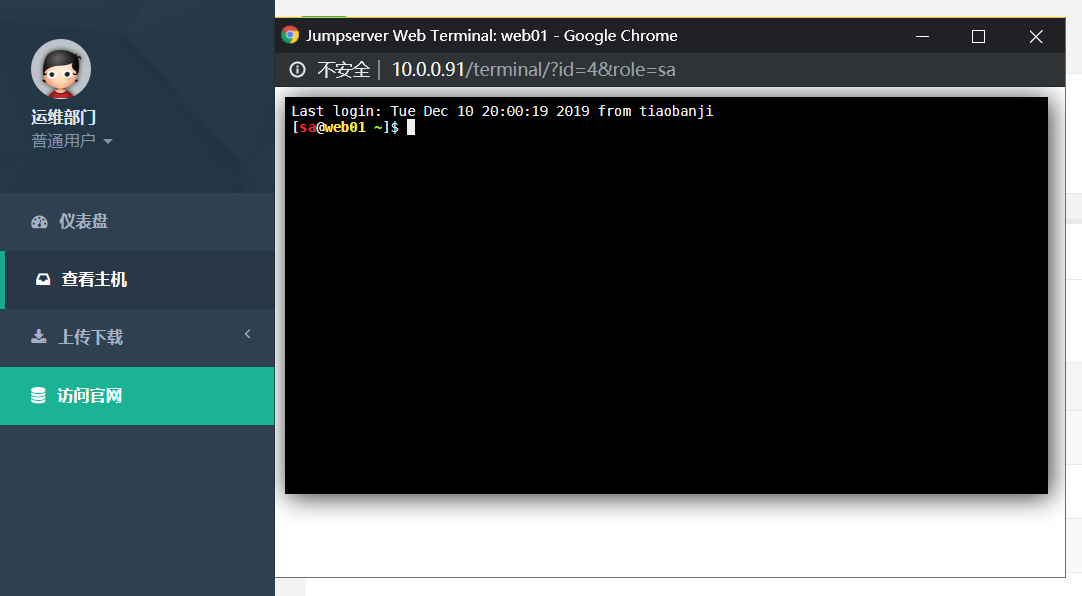
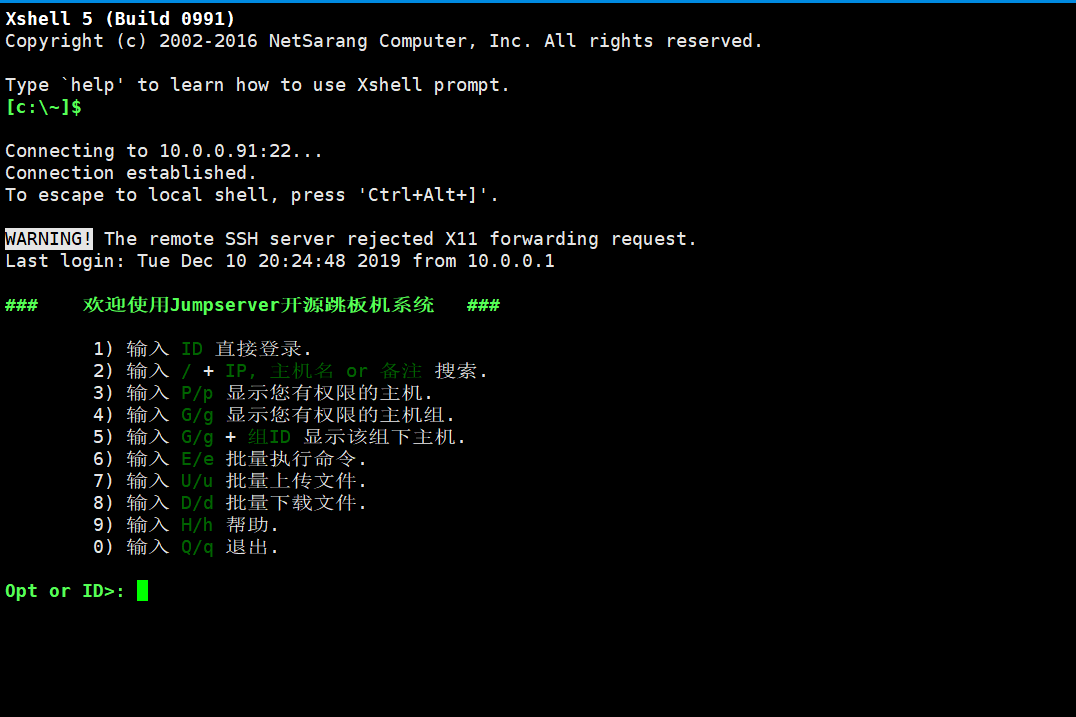
登录普通用户sa_web,会看到可以连接的主机,进行连接
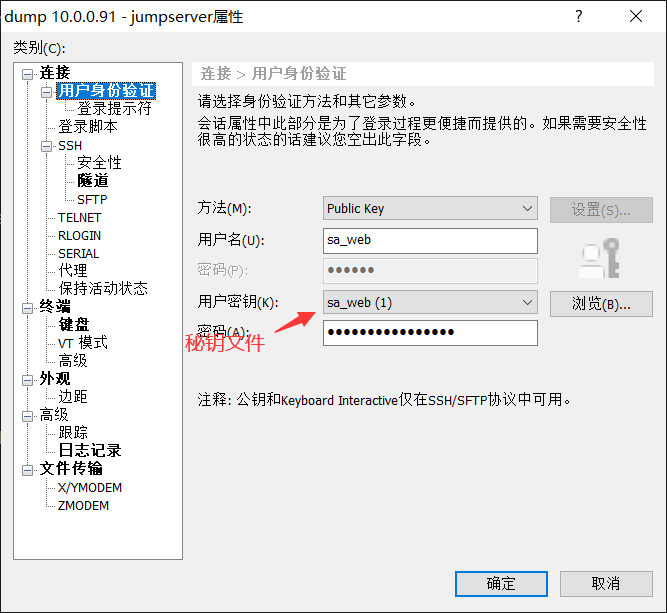
xsehll秘钥连接跳板机:
连接xshell
连接成功!
最新文章
- ubuntu 14.10 lts 64-bits环境下使用Android Studio
- 深入浅出数据仓库中SQL性能优化之Hive篇
- 【原创】kafka client源代码分析
- JKS TO PEM
- spring3使用task:annotation-driven开始定时
- Robot Framework-DatabaseLibrary数据库(MySql)
- (转载整理)SAP ERP常用表
- Linux之档案管理
- 在Tomcat中部署Java Web应用程序
- jQuery proxy详解
- context.drawImage绘制图片
- Angular--ui-router的使用
- 先进过程控制之一:浅说APC
- Homework 2.0
- Python中操作Redis
- Spring IOC - 控制反转(依赖注入) - 单例和多例
- Qt宏Q_OBJECT展开记录
- C语言:10个整数排序(别忘了负数)
- flask框架实战项目架构
- ZOHO 免费小型企业邮箱和个人邮箱