从FBV到CBV二(认证器)
span::selection, .CodeMirror-line > span > span::selection { background: #d7d4f0; }.CodeMirror-line::-moz-selection, .CodeMirror-line > span::-moz-selection, .CodeMirror-line > span > span::-moz-selection { background: #d7d4f0; }.cm-searching {background: #ffa; background: rgba(255, 255, 0, .4);}.cm-force-border { padding-right: .1px; }@media print { .CodeMirror div.CodeMirror-cursors {visibility: hidden;}}.cm-tab-wrap-hack:after { content: ""; }span.CodeMirror-selectedtext { background: none; }.CodeMirror-activeline-background, .CodeMirror-selected {transition: visibility 0ms 100ms;}.CodeMirror-blur .CodeMirror-activeline-background, .CodeMirror-blur .CodeMirror-selected {visibility:hidden;}.CodeMirror-blur .CodeMirror-matchingbracket {color:inherit !important;outline:none !important;text-decoration:none !important;}.CodeMirror-sizer {min-height:auto !important;}
-->
li {list-style-type:decimal;}.wiz-editor-body ol.wiz-list-level2 > li {list-style-type:lower-latin;}.wiz-editor-body ol.wiz-list-level3 > li {list-style-type:lower-roman;}.wiz-editor-body li.wiz-list-align-style {list-style-position: inside; margin-left: -1em;}.wiz-editor-body blockquote {padding: 0 12px;}.wiz-editor-body blockquote > :first-child {margin-top:0;}.wiz-editor-body blockquote > :last-child {margin-bottom:0;}.wiz-editor-body img {border:0;max-width:100%;height:auto !important;margin:2px 0;}.wiz-editor-body table {border-collapse:collapse;border:1px solid #bbbbbb;}.wiz-editor-body td,.wiz-editor-body th {padding:4px 8px;border-collapse:collapse;border:1px solid #bbbbbb;min-height:28px;word-break:break-word;box-sizing: border-box;}.wiz-editor-body td > div:first-child {margin-top:0;}.wiz-editor-body td > div:last-child {margin-bottom:0;}.wiz-editor-body img.wiz-svg-image {box-shadow:1px 1px 4px #E8E8E8;}.wiz-hide {display:none !important;}
-->
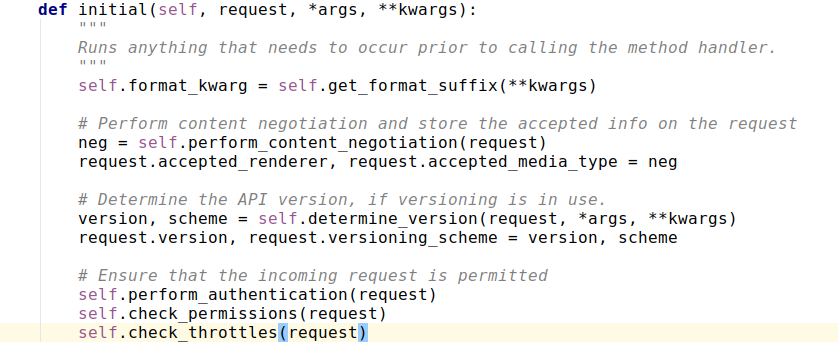
- 认证


'DEFAULT_AUTHENTICATION_CLASSES': (
'rest_framework_jwt.authentication.JSONWebTokenAuthentication',
'rest_framework.authentication.SessionAuthentication',
'rest_framework.authentication.BasicAuthentication',
)
}<wiz_code_mirror>
REST_FRAMEWORK = {
'DEFAULT_AUTHENTICATION_CLASSES': (
'rest_framework_jwt.authentication.JSONWebTokenAuthentication',
'rest_framework.authentication.SessionAuthentication',
'rest_framework.authentication.BasicAuthentication',
)
}


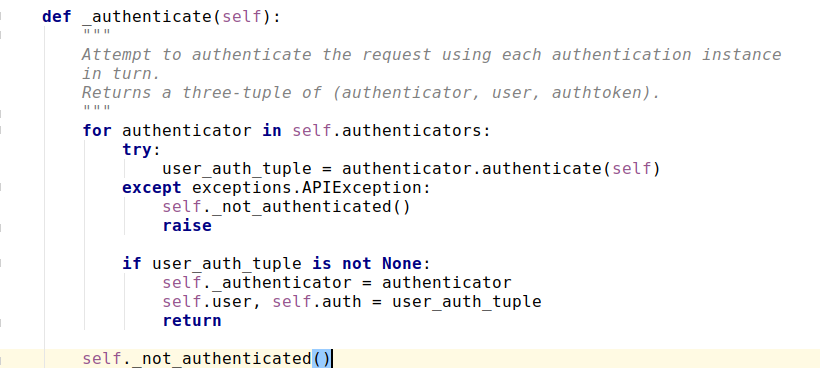

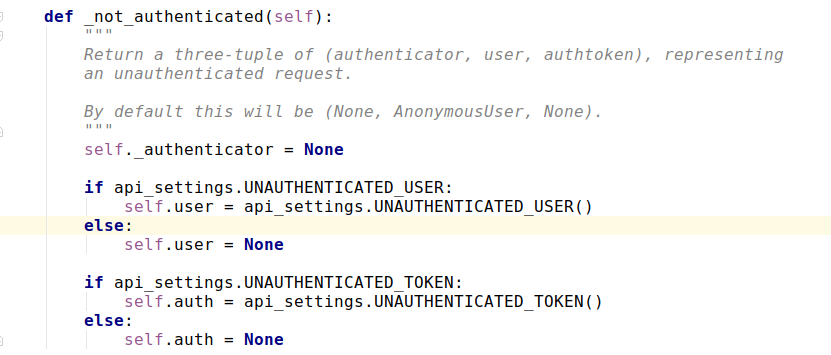
- for authenticator in self.authenticators:
通过遍历找到我们的认证器 - user_auth_tuple = authenticator.authenticate(self)
- except exceptions.APIException: self._not_authenticated() raise
- if user_auth_tuple is not None:
self._authenticator = authenticator
self.user, self.auth = user_auth_tuple
return
- self._not_authenticated()

class MyAuthentication(object):
# authenticate authenticate_header 两个方法是必须有的,authenticate用来写我们自己的认证方式,authenticate_header直接写pass就行,不写会抛错,缺少authenticate_header方法
def authenticate(self, request):
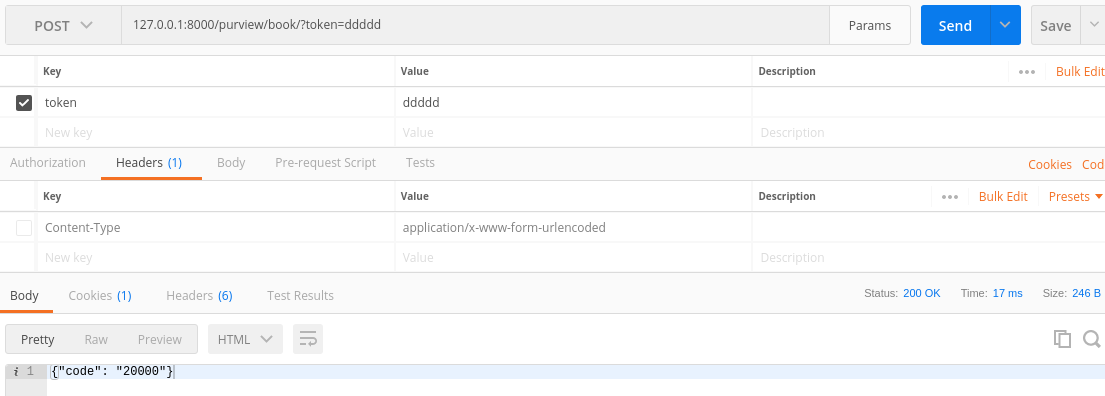
self.token = request._request.GET.get('token')
if not self.token:
raise AuthenticationFailed('用户认证失败') # 如果认证失败,就抛出一个AuthenticationFailed异常
return ('wbj', self.token) # 如果认证通过,就行返回一个元组,第一个元素是用户身份(user),第二个是auth
def authenticate_header(self, request):
pass
from rest_framework.exceptions import AuthenticationFailed
class MyAuthentication(object):
# authenticate authenticate_header 两个方法是必须有的,authenticate用来写我们自己的认证方式,authenticate_header直接写pass就行,不写会抛错,缺少authenticate_header方法
def authenticate(self, request):
self.token = request._request.GET.get('token')
if not self.token:
raise AuthenticationFailed('用户认证失败') # 如果认证失败,就抛出一个AuthenticationFailed异常
return ('wbj', self.token) # 如果认证通过,就行返回一个元组,第一个元素是用户身份(user),第二个是auth
def authenticate_header(self, request): # 如果不想写这个方法,可以让MyAuthentication继承于rest_framework.authentication.BaseAuthentication
pass
authentication_classes = [MyAuthentication, ]
def dispatch(self, request, *args, **kwargs):
return super().dispatch(request, *args, **kwargs)
def get(self, request):
# get a book
return HttpResponse(json.dumps({'code': '20000'}))
def post(self, request):
return HttpResponse(json.dumps({'code': '20000'}))
def put(self, request):
# update a book
return HttpResponse(json.dumps({'code': '20000'}))
def delete(self, request):
# delete a book
return HttpResponse(json.dumps({'code': '20000'}))
class Book(APIView):
authentication_classes = [MyAuthentication, ]
def dispatch(self, request, *args, **kwargs):
return super().dispatch(request, *args, **kwargs)
def get(self, request):
# get a book
return HttpResponse(json.dumps({'code': '20000'}))
def post(self, request):
return HttpResponse(json.dumps({'code': '20000'}))
def put(self, request):
# update a book
return HttpResponse(json.dumps({'code': '20000'}))
def delete(self, request):
# delete a book
return HttpResponse(json.dumps({'code': '20000'}))


最新文章
- 第二天----列表、元组、字符串、算数运算、字典、while
- python取mysql数据写入excel
- 【转载】Keil中的USE MicroLib说明
- Light OJ 1030 - Discovering Gold(概率dp)
- 开一个帖子,等有时间了写写如何用shapelib创建点线面等shp图层
- c++中的virtual函数,即虚函数
- 怎么样能让自己的虚拟机上网win7 for linux
- 选择Android还是选择JavaEE?
- (转)CSS+DIV float 定位
- Selenium API(C#)
- valuestack(值栈) 和 actioncontext(上下文)
- Sql Server 2008开发版(Developer Edition)过期升级企业版(Enterprise Edition)失败后安装学习版(Express Edition)
- 解決 centos中-bash: vim: command not found
- Laravel OAuth2 (一) ---简单获取用户信息
- Python+Django+SAE系列教程15-----输出非HTML内容(图片/PDF)
- scroll事件实现监控滚动条并分页显示示例(zepto.js )
- 如何修改nexus的端口号
- MFC桌面电子时钟的设计与实现
- 从hivesql结果中读取数值到shell变量的方法
- Highcharts实现图形报表(我主要实现javaweb开发的图形报表)