Python 爬取 北京市政府首都之窗信件列表-[Scrapy框架](2020年寒假小目标04)
日期:2020.01.22
博客期:130
星期三
【代码说明,如果要使用此页代码,必须在本博客页面评论区给予说明】
//博客总体说明
1、准备工作(本期博客)
2、爬取工作
3、数据处理
4、信息展示
今天来说一说爬取的工作进展,我们的要求是爬取首都之窗的信件类型,那么我们就开始吧!
首先,先找到网页:http://www.beijing.gov.cn/hudong/hdjl/com.web.search.mailList.flow
然后找到网页的结构,发现是简单的HTML结构,那我们就可以启动Scrapy框架了。
前边说了,之前是一直报403 Forbidden的错,原因我已经找到了!因为广大运营网站不可能希望各个程序员都能够轻易爬走自己的数据,那么怎么办呢?诶~他就对每个请求访问的用户进行检查,发现有一类用户什么都没有,就是想访问,网站一看到这种用户心里可真不是滋味,就会断定“你是来爬我的数据的”,你自然就被网站服务器禁掉了!人家有了“政策”,我们程序员就要想对策是吧!诶,我们可以在爬取的时候,模拟添加一个header,让服务器误认为我们是人,我们应该得到数据!
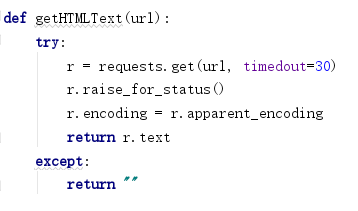
进行改造:(这是截图没有错,到时候我会给你们代码的)

嗯,现在服务器终于肯乖乖听话了!
先来看我们的基础数据类型:

由此我们可以构造基础的 Bean 类型了(为了方便引入,我就使用Bean当作类名了)
看代码:
 # [ 保存的数据格式 ]

 class Bean:

     # 构造方法

     def __init__(self,asker,responser,askTime,responseTime,title,questionSupport,responseSupport,responseUnsupport,questionText,responseText):

         self.asker = asker

         self.responser = responser

         self.askTime = askTime

         self.responseTime = responseTime

         self.title = title

         self.questionSupport = questionSupport

         self.responseSupport = responseSupport

         self.responseUnsupport = responseUnsupport

         self.questionText = questionText

         self.responseText = responseText

     # 在控制台输出结果(测试用)

     def display(self):

         print("提问方:"+self.asker)

         print("回答方:"+self.responser)

         print("提问时间:" + self.askTime)

         print("回答时间:" + self.responseTime)

         print("问题标题:" + self.title)

         print("问题支持量:" + self.questionSupport)

         print("回答点赞数:" + self.responseSupport)

         print("回答被踩数:" + self.responseUnsupport)

         print("提问具体内容:" + self.questionText)

         print("回答具体内容:" + self.responseText)

     def toString(self):

         strs = ""

         strs = strs + self.asker;

         strs = strs + "\t"

         strs = strs + self.responser;

         strs = strs + "\t"

         strs = strs + self.askTime;

         strs = strs + "\t"

         strs = strs + self.responseTime;

         strs = strs + "\t"

         strs = strs + self.title;

         strs = strs + self.questionSupport;

         strs = strs + "\t"

         strs = strs + self.responseSupport;

         strs = strs + "\t"

         strs = strs + self.responseUnsupport;

         strs = strs + "\t"

         strs = strs + self.questionText;

         strs = strs + "\t"

         strs = strs + self.responseText;

         return strs

     # 将信息附加到文件里

     def addToFile(self,fpath, model):

         f = codecs.open(fpath, model, 'utf-8')

         f.write(self.toString()+"\n")

         f.close()

     # --------------------[基础数据]

     # 提问方

     asker = ""

     # 回答方

     responser = ""

     # 提问时间

     askTime = ""

     # 回答时间

     responseTime = ""

     # 问题标题

     title = ""

     # 问题支持量

     questionSupport = ""

     # 回答点赞数

     responseSupport = ""

     # 回答被踩数

     responseUnsupport = ""

     # 问题具体内容

     questionText = ""

     # 回答具体内容

     responseText = ""
Bean.py
//-------[代码解析]
这算是一个中介者,沟通着数据与展示或者数据与文件,这个类相当于是对数据的处理的方法封装
... ...
忘了展示字符串的标签处理封装类了:
 # [ 对字符串的特殊处理方法-集合 ]

 class StrSpecialDealer:

     @staticmethod

     def getReaction(stri):

         strs = str(stri).replace(" ","")

         strs = strs[strs.find('>')+1:strs.rfind('<')]

         strs = strs.replace("\t","")

         strs = strs.replace("\r","")

         strs = strs.replace("\n","")

         return  strs
StrSpecialDealer.py
嗯,之后我们需要想如何根据网页地址来获取html
比如给定了原网站当中的其中一条比如对应网页:
需要我们制作一个对应的网站爬取结点类(它的任务是对于已经给定的网页,进行爬取,并封装成我们上述的Bean类型)
看代码:(省略导包...)
 # [ 信息爬取结点 ]

 class DetailConnector:

     headers = {

         'User-Agent': 'Mozilla/5.0 (Windows NT 10.0; WOW64) AppleWebKit/537.36 (KHTML, like Gecko) Chrome/55.0.2883.75 Safari/537.36'}

     basicURL = ""

     # ---[定义构造方法]

     def __init__(self, url):

         self.basicURL = url

     # 获取 url 的内部 HTML 代码

     def getHTMLText(self):

         req = request.Request(url=self.basicURL, headers=self.headers)

         r = request.urlopen(req).read().decode()

         return r

     # 获取基本数据

     def getBean(self):

         index_html = self.getHTMLText()

         index_sel = parsel.Selector(index_html)

         container_div = index_sel.css('div .container')[0]

         container_strong = index_sel.css('div strong')[0]

         container_retire = index_sel.css('div div div div')[5]

         #基础数据配置

         title = " "

         num_supp = " "

         question_toBuilder = " "

         question_time = " "

         support_quert = " "

         quText = " "

         answer_name = " "

         answer_time = " "

         answer_text = " "

         num_supp = " "

         num_unsupp = " "

         #------------------------------------------------------------------------------------------提问内容

         # 获取提问标题

         title = str(container_strong.extract())

         title = title.replace("<strong>", "")

         title = title.replace("</strong>", "")

         # 获取来信人

         container_builder = container_retire.css("div div")

         question_toBuilder = str(container_builder.extract()[0])

         question_toBuilder = StrSpecialDealer.getReaction(question_toBuilder)

         if (question_toBuilder.__contains__("来信人:")):

             question_toBuilder = question_toBuilder.replace("来信人:", "")

         # 获取提问时间

         question_time = str(container_builder.extract()[1])

         question_time = StrSpecialDealer.getReaction(question_time)

         if (question_time.__contains__("时间:")):

             question_time = question_time.replace("时间:", "")

         # 获取网友支持量

         support_quert = str(container_builder.extract()[2])

         support_quert = support_quert[support_quert.find('>') + 1:support_quert.rfind('<')]

         support_quert = StrSpecialDealer.getReaction(support_quert)

         # 获取问题具体内容

         quText = str(index_sel.css('div div div div').extract()[9])

         if(quText.__contains__("input")):

             quText = str(index_sel.css('div div div div').extract()[10])

         quText = quText.replace("<p>", "")

         quText = quText.replace("</p>", "")

         quText = StrSpecialDealer.getReaction(quText)

         # ------------------------------------------------------------------------------------------回答内容

         try:

             # 回答点赞数

             num_supp = str(index_sel.css('div a span').extract()[0])

             num_supp = StrSpecialDealer.getReaction(num_supp)

             # 回答不支持数

             num_unsupp = str(index_sel.css('div a span').extract()[1])

             num_unsupp = StrSpecialDealer.getReaction(num_unsupp)

             # 获取回答方

             answer_name = str(container_div.css("div div div div div div div").extract()[1])

             answer_name = answer_name.replace("<strong>", "")

             answer_name = answer_name.replace("</strong>", "")

             answer_name = answer_name.replace("</div>", "")

             answer_name = answer_name.replace(" ", "")

             answer_name = answer_name.replace("\t", "")

             answer_name = answer_name.replace("\r", "")

             answer_name = answer_name.replace("\n", "")

             answer_name = answer_name[answer_name.find('>') + 1:answer_name.__len__()]

             # ---------------------不想带着这个符号就拿开

             if (answer_name.__contains__("[官方回答]:")):

                 answer_name = answer_name.replace("[官方回答]:", "")

             # 答复时间

             answer_time = str(index_sel.css('div div div div div div div div')[2].extract())

             answer_time = StrSpecialDealer.getReaction(answer_time)

             if (answer_time.__contains__("答复时间:")):

                 answer_time = answer_time.replace("答复时间:", "")

             # 答复具体内容

             answer_text = str(index_sel.css('div div div div div div div')[4].extract())

             answer_text = StrSpecialDealer.getReaction(answer_text)

             answer_text = answer_text.replace("<p>", "")

             answer_text = answer_text.replace("</p>", "")

         except:

             pass

         bean = Bean(question_toBuilder, answer_name, question_time, answer_time, title, support_quert, num_supp,

                     num_unsupp, quText, answer_text)

         return bean
DetailConnector.py
此代码对应测试代码
dc = DetailConnector("http://www.beijing.gov.cn/hudong/hdjl/com.web.consult.consultDetail.flow?originalId=AH20012200024")

dc.getBean().display()
测试结果:

里面用到了CSS选择器的使用
CSS选择器的使用方法(参考网页):https://www.w3school.com.cn/cssref/css_selectors.ASP
但是有了这一部分还是不行,我们需要从原网站找到对应网站的链接地址!
而且从第123期博客,我们可以知道:对应链接的onclick事件的两个参数分别对应的跳转地址关系,所以我们看:
 # [ 网页爬取的直接对象 ]

 class WebConnector:

     basicURL = "http://www.beijing.gov.cn/hudong/hdjl/com.web.search.mailList.flow"

     headers = {'User-Agent': 'Mozilla/5.0 (Windows NT 10.0; WOW64) AppleWebKit/537.36 (KHTML, like Gecko) Chrome/55.0.2883.75 Safari/537.36'}

     # ---[定义构造方法]

     def __init__(self):

         pass

     # 获取 url 的内部 HTML 代码

     def getHTMLText(self):

         req = request.Request(url=self.basicURL, headers=self.headers)

         r = request.urlopen(req).read().decode()

         return r

     # 获取页面内的基本链接

     def getFirstChanel(self):

         index_html = self.getHTMLText()

         index_sel = parsel.Selector(index_html)

         links = index_sel.css('div #mailul').css("a[onclick]").extract()

         inNum = links.__len__()

         for seat in range(0, inNum):

             # 获取相应的<a>标签

             pe = links[seat]

             # 找到第一个 < 字符的位置

             seat_turol = str(pe).find('>')

             # 找到第一个 " 字符的位置

             seat_stnvs = str(pe).find('"')

             # 去掉空格

             pe = str(pe)[seat_stnvs:seat_turol].replace(" ","")

             # 获取资源

             pe = pe[14:pe.__len__()-2]

             pe = pe.replace("'","")

             # 整理成 需要关联数据的样式

             mor = pe.split(",")

             # ---[ 构造网址 ]

             url_get_item = "";

             # 对第一个数据的判断

             if(mor[0]=="咨询"):

                 url_get_item = "http://www.beijing.gov.cn/hudong/hdjl/com.web.consult.consultDetail.flow?originalId="

             else:

                 if(mor[0]=="建议"):

                     url_get_item = "http://www.beijing.gov.cn/hudong/hdjl/com.web.suggest.suggesDetail.flow?originalId="

             url_get_item = url_get_item + mor[1]

             model = "a+"

             if(seat==0):

                 model = "w+"

             dc = DetailConnector(url_get_item)

             dc.getBean().addToFile("../testFile/emails.txt",model)
WebConnector.py
此代码对应测试代码:
wc = WebConnector()

wc.getFirstChanel()
测试结果是将默认得到的第一页的内容爬取到文件email.txt里(分隔符为制表符 "\t" )

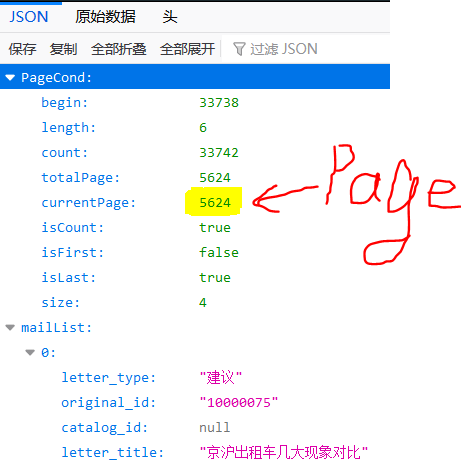
但是这还是没有结束,因为这只有默认的6条数据,如何继续爬取剩下的5624-1页的数据呢?
我目前找到了它传输数据的JSON包(附链接:http://www.beijing.gov.cn/hudong/hdjl/com.web.search.mailList.mailList.biz.ext)
截图如下:
PS:前面那期博客内容应该是不全的,因为爬到第27页才出来一个特殊的页面:(居然还有投诉类型的?!!)

投诉类型对应页面前缀为http://www.beijing.gov.cn/hudong/hdjl/com.web.complain.complainDetail.flow?originalId=
最新文章
- JQuery datepicker 日期控件设置
- android 获取Datepicker日期
- front-end plugin, generate pdf with html5 and jquery
- Owl Carousel – 支持触摸的 jQuery 响应式传送带插件
- #研发解决方案介绍#Recsys-Evaluate(推荐评测)
- 转 一个典型的 C++ 程序员成长经历:
- Unicode编码
- centos安装——usb安装技术问题整理
- 2、onclickListener冲突
- LightOJ 1427 -Repository(ac自动机)
- Myeclipse中java文件注释格式设置
- Java图形化界面设计——布局管理器之FlowLayout(流式布局)
- office2013破解工具
- Http错误代码表
- 初学.net 网页打开过程
- 跳转语句Break、continue
- 笔记本电脑连wifi然后通过有线网口做桥接
- Java Bloom filter几种实现比较
- Jenkins构建后发送邮件
- android sqlite批量插入数据速度解决方案