史上最全最详细JNDI数据源配置说明
转:
史上最全最详细JNDI数据源配置说明
环境:tomcat6.0+Maven
要使用数据源就要知道数据源的由来:在java开发使用jdbc都要经历这四步
①加载数据库驱动程序:(Class.forName(“数据库驱动类”);)
②连接数据库(Connection con = DriverManager.getConnection();)
③操作数据库(PreparedStatement stat = con.prepareStatement(sql);
stat.executeQuery();)
④关闭数据库,释放连接(con.close();)
其中就第三步我们是个性化的,1,2,4步都是重复性的。就需要一个解决办法来减去重复性的劳动–>用一个连接池来管理数据库链接。当需要使用时就去这个池子里取,当不用了在放回池子,就不用耗费大量资源去创建和关闭连接了。这个池子就是数据源。
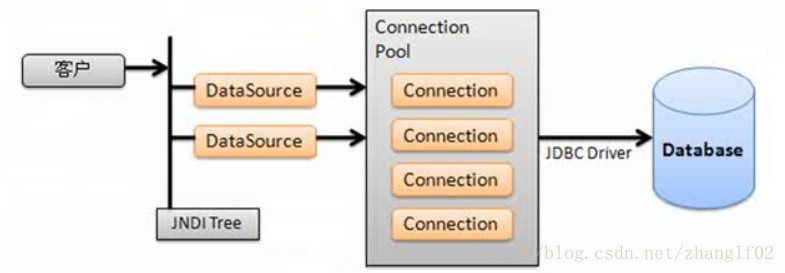
在Tomcat
4.1.27之后,在服务器上就直接增加了数据源的配置选项,直接在服务器上配置好数据源连接池即可。在J2EE服务器上保存着一个数据库的多个连接。每一个连接通过DataSource可以找到。DataSource被绑定在了JNDI树上(为每一个DataSource提供一个名字)客户端通过名称找到在JNDI树上绑定的DataSource,再由DataSource找到一个连接。如下图所示:
1.常见的几种数据库的数据源配置和属性解释
<!--
|- name:表示以后要查找的名称。通过此名称可以找到DataSource,此名称任意更换,但是程序中最终要查找的就是此名称,
为了不与其他的名称混淆,所以使用jdbc/oracle,现在配置的是一个jdbc的关于oracle的命名服务。
|- auth:由容器进行授权及管理,指的用户名和密码是否可以在容器上生效
|- type:此名称所代表的类型,现在为javax.sql.DataSource
|- maxActive:表示一个数据库在此服务器上所能打开的最大连接数
|- maxIdle:表示一个数据库在此服务器上维持的最小连接数
|- maxWait:最大等待时间。10000毫秒
|- username:数据库连接的用户名
|- password:数据库连接的密码
|- driverClassName:数据库连接的驱动程序
|- url:数据库连接的地址
-->
<!--oracle数据库的jndi数据源,这里的lead为service名。-->
<Resource
name="jdbc/oracle"
auth="Container"
type="javax.sql.DataSource"
maxActive="100"
maxIdle="30"
maxWait="10000"
username="lead_oams"
password="p"
driverClassName="oracle.jdbc.driver.OracleDriver"
url="jdbc:oracle:thin:@192.168.1.229:1521:lead"/>
<!--配置MySQL数据库的JNDI数据源-->
<Resource
name="jdbc/mysql"
auth="Container"
type="javax.sql.DataSource"
maxActive="100"
maxIdle="30"
maxWait="10000"
username="root"
password="root"
driverClassName="com.mysql.jdbc.Driver"
url="jdbc:mysql://192.168.1.144:3306/leadtest?useUnicode=true&characterEncoding=utf-8"/>
<!--配置SQLServer数据库的JNDI数据源-->
<Resource
name="jdbc/sqlserver"
auth="Container"
type="javax.sql.DataSource"
maxActive="100"
maxIdle="30"
maxWait="10000"
username="sa"
password="passw0rd" driverClassName="com.microsoft.sqlserver.jdbc.SQLServerDriver" url="jdbc:sqlserver://192.168.1.51:1433;DatabaseName=demo"/>
<!--配置DB2数据库的JNDI数据源-->
<Resource
name="jdbc/DB2"
auth="Container"
type="javax.sql.DataSource"
maxActive="100"
maxIdle="30"
maxWait="10000"
username="root"
password="root"
driverClassName="com.ibm.db2.jcc.DB2Driver"
url="jdbc:db2://10.137.23.130:50000/ntsq"/>2.如何配置,在哪配置?
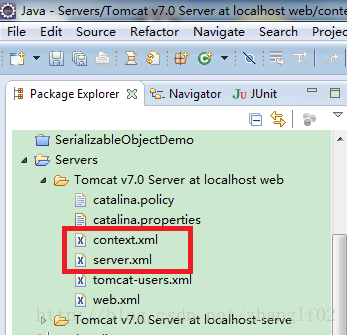
2.1在eclips开发工具这个前置服务Server下对应Tomcat的配置文件中配置。这种方式对在eclips里面Run As Server方式启动项目时使用
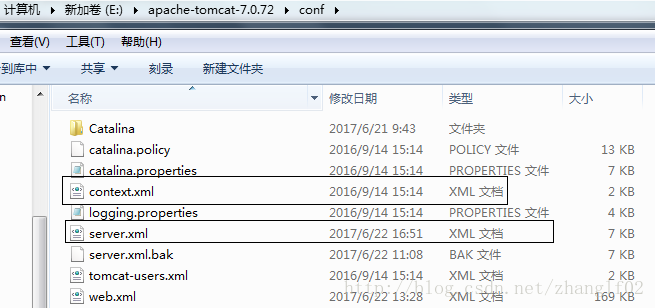
2.2 在tomcat目录conf/下对应文件修改。这种配置是用于部署到tomcat/webapps目录下的工程起作用
2.3 如何配置?操作步骤。
不管上面的那种方式修改。修改的文件一样,配置的内容也是一样的。首先都是要在applicationContext.xml中引入jndi数据源。为比较,我这里把常用的一般数据源也拿过来一起比较:
<!--普通的数据源-->

    <bean id="dataSource" class="org.apache.commons.dbcp.BasicDataSource"

        destroy-method="close">

        <property name="driverClassName" value="${driver}" />

        <property name="url" value="${url}" />

        <property name="username" value="${username}" />

        <property name="password" value="${password}" />

        <!-- 初始化连接大小 -->

        <property name="initialSize" value="${initialSize}"></property>

        <!-- 连接池最大数量 -->

        <property name="maxActive" value="${maxActive}"></property>

        <!-- 连接池最大空闲 -->

        <property name="maxIdle" value="${maxIdle}"></property>

        <!-- 连接池最小空闲 -->

        <property name="minIdle" value="${minIdle}"></property>

        <!-- 获取连接最大等待时间 -->

        <property name="maxWait" value="${maxWait}"></property>

    </bean>
替换为jndi数据源:
<bean id="dataSource" class="org.springframework.jndi.JndiObjectFactoryBean">

<property name="jndiName" value="java:comp/env/jdbc/dbpoolmysql"><!--注意:这里的value值就是在server.xml或者context.xml中配置的name值一样。-->
配置jndi数据源有三种范围。以在eclips中配置为例,和在tomcat中是一样的。实际这两种最后都是对tomcat本身的配置文件进行操作。
a. 单个应用独享数据源
在eclips的Server对应tomcat或者本地对应tomcat/conf目录下的server.xml找到工程的Context节点,添加一个私有数据源(注意,这里如果配置到context.xml文件的<Context>节点下,则变成全局的jndi数据源,即第三种范围配置。)

<Context docBase="WebApp" path="/WebApp" reloadable="true" source="org.eclipse.jst.jee.server:WebApp">

<Resource

    name="jdbc/dbpoolmysql"

    scope="Shareable"

    type="javax.sql.DataSource"

    factory="org.apache.tomcat.dbcp.dbcp.BasicDataSourceFactory"

    url="jdbc:mysql://localhost:3306/test"

    driverClassName ="com.mysql.jdbc.Driver"

    username="root"

    password="root"

/>

</Context>
对应位置如下图:
第一种方式-在context.xml <context>节点中配置。(纠正一下~这个不是单个数据源配置,而是全局数据源的配置方式。是第三中jndi全局配置的一种)
第二种方式-在server.xml 的<context>节点中配置
优点:重用性,可控性
缺点:配置相对第三种方法要繁琐一点,每个工程都得配
b.配置全局JNDI数据源,应用到单个应用.
这种就是<Resource.../> 这样的jndi不用配置了,哪个项目需要引入,只要在自己的项目中引入就可以了,即用第二种情况的第二步即可
第二种分为两步配置:
第一步, 找到Tomcat的server.xml中GlobalNamingResources节点,在节点下加一个全局数据源。这个就是做一次,其他项目在引入就只要第二步就行了。这里我说的是一开始还没有配置的时候最全的配置步骤。
<Resource

    name="jdbc/mysql"

    scope="Shareable"

    type="javax.sql.DataSource"

    factory="org.apache.tomcat.dbcp.dbcp.BasicDataSourceFactory"

    url="jdbc:mysql://localhost:3306/test"

    driverClassName ="com.mysql.jdbc.Driver"

    username="root"

    password="root"

/>
第二步:同样在本server.xml中找到要应用此JNDI数据源的工程Context节点(在文本最下面几行里找到),增加对全局数据源的引用ResourceLink。这里注意一个映射关系要知道—applicationContext.xml中的name要和server.xml中引入的ResourceLink中的name一样。然后ResourceLink中的global要和GlobalNamingResources引入的全局jnid的name一样。这样应用就会由applicationContext.xml中的数据源找到本项目引入的name,得到对应的global的名字,进而找到了全局jndi。
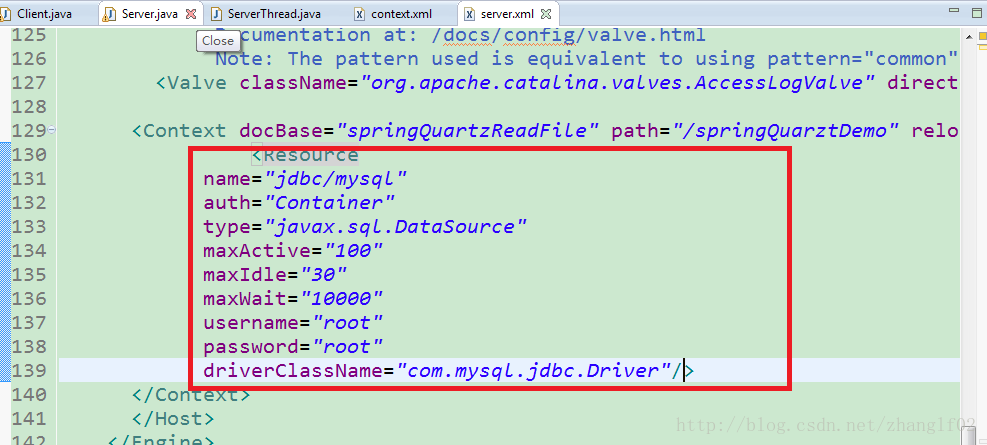
<Context docBase="WebApp" path="/WebApp" reloadable="true">

    <ResourceLink global="jdbc/mysql" name="jdbc/dbpoolmysql" type="javax.sql.DataSource" />

</Context>
我把整个server.xml贴出来更直观来看:
<?xml version="1.0" encoding="UTF-8"?>
<!--
Licensed to the Apache Software Foundation (ASF) under one or more
contributor license agreements. See the NOTICE file distributed with
this work for additional information regarding copyright ownership.
The ASF licenses this file to You under the Apache License, Version 2.0
(the "License"); you may not use this file except in compliance with
the License. You may obtain a copy of the License at
http://www.apache.org/licenses/LICENSE-2.0
Unless required by applicable law or agreed to in writing, software
distributed under the License is distributed on an "AS IS" BASIS,
WITHOUT WARRANTIES OR CONDITIONS OF ANY KIND, either express or implied.
See the License for the specific language governing permissions and
limitations under the License.
--><!-- Note: A "Server" is not itself a "Container", so you may not
define subcomponents such as "Valves" at this level.
Documentation at /docs/config/server.html
--><Server port="8006" shutdown="SHUTDOWN">
<Listener className="org.apache.catalina.startup.VersionLoggerListener"/>
<!-- Security listener. Documentation at /docs/config/listeners.html
<Listener className="org.apache.catalina.security.SecurityListener" />
-->
<!--APR library loader. Documentation at /docs/apr.html -->
<Listener SSLEngine="on" className="org.apache.catalina.core.AprLifecycleListener"/>
<!--Initialize Jasper prior to webapps are loaded. Documentation at /docs/jasper-howto.html -->
<Listener className="org.apache.catalina.core.JasperListener"/>
<!-- Prevent memory leaks due to use of particular java/javax APIs-->
<Listener className="org.apache.catalina.core.JreMemoryLeakPreventionListener"/>
<Listener className="org.apache.catalina.mbeans.GlobalResourcesLifecycleListener"/>
<Listener className="org.apache.catalina.core.ThreadLocalLeakPreventionListener"/>
<!-- Global JNDI resources
Documentation at /docs/jndi-resources-howto.html
-->
<GlobalNamingResources>
<!-- Editable user database that can also be used by
UserDatabaseRealm to authenticate users
-->
<Resource auth="Container" description="User database that can be updated and saved" factory="org.apache.catalina.users.MemoryUserDatabaseFactory" name="UserDatabase" pathname="conf/tomcat-users.xml" type="org.apache.catalina.UserDatabase"/>
<Resource
name="jdbc/mysql"
auth="Container"
type="javax.sql.DataSource"
maxActive="100"
maxIdle="30"
maxWait="10000"
username="root"
password="root"
driverClassName="com.mysql.jdbc.Driver"/>
</GlobalNamingResources>
<!-- A "Service" is a collection of one or more "Connectors" that share
a single "Container" Note: A "Service" is not itself a "Container",
so you may not define subcomponents such as "Valves" at this level.
Documentation at /docs/config/service.html
-->
<Service name="Catalina">
<!--The connectors can use a shared executor, you can define one or more named thread pools-->
<!--
<Executor name="tomcatThreadPool" namePrefix="catalina-exec-"
maxThreads="150" minSpareThreads="4"/>
-->
<!-- A "Connector" represents an endpoint by which requests are received
and responses are returned. Documentation at :
Java HTTP Connector: /docs/config/http.html (blocking & non-blocking)
Java AJP Connector: /docs/config/ajp.html
APR (HTTP/AJP) Connector: /docs/apr.html
Define a non-SSL HTTP/1.1 Connector on port 8080
-->
<Connector connectionTimeout="20000" port="8081" protocol="HTTP/1.1" redirectPort="8443"/>
<!-- A "Connector" using the shared thread pool-->
<!--
<Connector executor="tomcatThreadPool"
port="8080" protocol="HTTP/1.1"
connectionTimeout="20000"
redirectPort="8443" />
-->
<!-- Define a SSL HTTP/1.1 Connector on port 8443
This connector uses the BIO implementation that requires the JSSE
style configuration. When using the APR/native implementation, the
OpenSSL style configuration is required as described in the APR/native
documentation -->
<!--
<Connector port="8443" protocol="org.apache.coyote.http11.Http11Protocol"
maxThreads="150" SSLEnabled="true" scheme="https" secure="true"
clientAuth="false" sslProtocol="TLS" />
-->
<!-- Define an AJP 1.3 Connector on port 8009 -->
<Connector port="8010" protocol="AJP/1.3" redirectPort="8443"/>
<!-- An Engine represents the entry point (within Catalina) that processes
every request. The Engine implementation for Tomcat stand alone
analyzes the HTTP headers included with the request, and passes them
on to the appropriate Host (virtual host).
Documentation at /docs/config/engine.html -->
<!-- You should set jvmRoute to support load-balancing via AJP ie :
<Engine name="Catalina" defaultHost="localhost" jvmRoute="jvm1">
-->
<Engine defaultHost="localhost" name="Catalina">
<!--For clustering, please take a look at documentation at:
/docs/cluster-howto.html (simple how to)
/docs/config/cluster.html (reference documentation) -->
<!--
<Cluster className="org.apache.catalina.ha.tcp.SimpleTcpCluster"/>
-->
<!-- Use the LockOutRealm to prevent attempts to guess user passwords
via a brute-force attack -->
<Realm className="org.apache.catalina.realm.LockOutRealm">
<!-- This Realm uses the UserDatabase configured in the global JNDI
resources under the key "UserDatabase". Any edits
that are performed against this UserDatabase are immediately
available for use by the Realm. -->
<Realm className="org.apache.catalina.realm.UserDatabaseRealm" resourceName="UserDatabase"/>
</Realm>
<Host appBase="webapps" autoDeploy="true" name="localhost" unpackWARs="true">
<!-- SingleSignOn valve, share authentication between web applications
Documentation at: /docs/config/valve.html -->
<!--
<Valve className="org.apache.catalina.authenticator.SingleSignOn" />
-->
<!-- Access log processes all example.
Documentation at: /docs/config/valve.html
Note: The pattern used is equivalent to using pattern="common" -->
<Valve className="org.apache.catalina.valves.AccessLogValve" directory="logs" pattern="%h %l %u %t "%r" %s %b" prefix="localhost_access_log." suffix=".txt"/>
<Context docBase="springQuartzReadFile" path="/springQuarztDemo" reloadable="true" source="org.eclipse.jst.jee.server:springQuartzReadFile">
<ResourceLink global="jdbc/mysql" name="jdbc/dbpoolmysql" type="javax.sql.DataSource"/>
</Context>
</Host>
</Engine>
</Service>
</Server>c.配置全局JNDI数据源,应用到所有Tomcat下部署的应用。
这里的全局的效果是只要你的项目启动用的是这个tomcat,只要在applicationContext.xml中对应jndi名字对应上就可以直接启动成功。数据源就连接上了。不需要对tomcat做任何操作。
上面第一第二种配置都是基于之前没有配置过的情况下,且不共存,你只能选择三种中的一种。
第三种也是分为两步。第一步和第二种的第一步一样。在server.xml中的GlobalNamingResources标签中引入全局jndi数据源,不用多说了。
第二步是把第二种的引入到server.xml的对应应用上的<ResourceLink.../> 换到Context.xml的<context>标签下即可,如下图:

以上就是数据源的全部配置。这里还有一个点就是:java:comp/env前缀在数据源前面的作用?
在描述JNDI,例如获得数据源时,JNDI地址有两种写法,例如同是 jdbc/testDS 数据源:
A: Java:comp/env/jdbc/testDS
B: jdbc/testDS
这两种写法,配置的方式也不尽相同,第一种方法应该算是一种利于程序移植或迁移的方法,它的实现与“映射”的概念相同,而B方法,则是一个硬引用。
java:comp/env 是环境命名上下文(environment naming context(ENC)),是在EJB规范1.1以后引入的,引入这个是为了解决原来JNDI查找所引起的冲突问题,也是为了提高EJB或者J2EE应用的移植性。
在J2EE中的引用常用的有:
JDBC 数据源引用在java:comp/env/jdbc 子上下文中声明
JMS 连接工厂在java:comp/env/jms 子上下文中声明
JavaMail 连接工厂在java:comp/env/mail 子上下文中声明
URL 连接工厂在 java:comp/env/url子上下文中声明
可以通过下面的结构示意来发现这两种描述的不同之处:
A: java:comp/env/jdbc/testDS(虚地址) ——> 映射描述符 ——> jdbc/testDS (实际的地址)
B: jdbc/testDS (实际的地址)
从这种结构上来看,A的确是便于移植的。
参考博文:
1. JNDI学习总结(一)——JNDI数据源的配置
2. 理解JNDI中 java:comp/env/jdbc/datasource 与 jdbc/datasource 的不同之处。
3. 在Tomcat配置JNDI数据源的三种方式
最新文章
- 最长不下降序列nlogn算法
- SPSS数据分析—Poisson回归模型
- BootStrap 的modal 中使用typeahead
- iOS——关于创建真机调试证书(发布证书,测试(调试)证书,推送调试证书)、iOS开发者账号申请 请用开发者账号去iTunes connect 查看状态
- jQuery easyui datagrid数据绑定
- Linux 命令 - top: 动态显示进程信息
- js实现页面时钟
- gridview动态添加行(不用datatable实现)
- 那就用pthon来写个跳板机吧
- mysql 打开慢查询日志
- 初学Python——装饰器
- ubuntu16.04 在/etc/network/interfaces设置static ip无效
- CSS盒模型的介绍
- Steering Behaviors
- bug5 Debug:This kind of launch is configured to openthe debug perspective when it解决办法
- OCiOS开发:音频播放器 AVAudioPlayer
- python中repr和eval可以用来在数据结构和字符串间互转
- SpringMVC @RequestBody 接收Json数组对象
- 修改ligerui 默认确认按钮
- Pandas -- Merge,join and concatenate