十一、java线程
目录:
一、线程的基本概念
- 线程是一个程序内部的顺序控制流
- 线程和进程的区别:
- 每个进程都由独立的代码和数据空间(进程上下文),进程间的切换会有较大的开销
- 线程可以看成是轻量级的进程,同一类线程共享代码和数据空间,每个线程有独立的运行栈和程序计数器(pc),线程切换的开销小
- 多进程:在操作系统中能同时运行多个任务(程序)
- 多线程:在统一应用程序中有多个顺序流同时执行
- java的线程是通过java.lang.Thread类实现的
- VM启动时会有一个由主方法(public static void main(){})所定义的线程
- 可以通过创建Thread的实例来创建新的线程
- 每个线程都是通过某个特定Thread对象所对应的方法run()来完成其操作的,方法run()称为线程体
- 通过调用Thread类的start()方法来启动一个线程
二、线程的创建和启动
有两种方式创建新的线程:
第一种:
- 定义线程类实现Runnable接口
- Thread myThread = new Thread (target) //target为uRunnable接口类型
- Runnable中只有一个方法:public void run();可以定义线程运行体
- 使用Runnable接口可以为多个线程提供共享的数据
- 在实现Runnable接口的类和run方法定义中可恶意使用Thread的静态方法:Public static Thread currentThread() 获取当前线程的引用 \
看一个例子:
//实现Runnable接口

public class Runner1 implements Runnable{

    //实现run()方法

    public void run() {

        for(int i=0; i <100; i++) {

            System.out.println("Runner1 :"+i);

        }

    }

}
public class TestThread1 {

    public static void main(String[] args) {

        Runner1 r = new Runner1();

        //r.run();可以将下面两行注释掉然后调用这一行的代码查看并分析下结果

         Thread t = new Thread(r);

        t.start();

        for(int i=0; i<100; i++) {

            System.out.println("Main Thread:----"+i);

        }

    }

}
以上代码在运行的时候我们会发现t.satrt和main方法下的for里的输出是在交替进行输出,此时相当于是两个线程并行的情况
如果将thread t = new Thread(r); t.start;注释掉,启用r.run相当于是方法调用,那么他在执行的时候就是先执行r.run(),执行完了之后才执行main下的for里面的内容
第二种:
- 可以定义一个Thread的子类并重写其run方法,如:
class MyThread extends Thread {

    publiuc void run() {

        ......

    }

}
- 然后生成该类的对象:
MyThread myThread = new MyThread(...)
看一个例子
public class Runner1 extends Thread{

    //实现run()方法

    public void run() {

        for(int i=0; i <100; i++) {

            System.out.println("Runner1 :"+i);

        }

    }

}
public class TestThread1 {

    public static void main(String[] args) {

        Runner1 r = new Runner1();

        //Thread t = new Thread(r);//此处就不需要再new一个thread了,直接调用r.start()就可以了

        r.start();

        for(int i=0; i<100; i++) {

            System.out.println("Main Thread:----"+i);

        }

    }

}
三、线程的调度和优先级
- java提供一个线程调度器来监控程序中启动后进入就绪状态的所有线程,线程调度器按照线程的优先级决定应先调度哪个线程来执行
- 线程的优先级用数字表示米范围从1到10,一个线程的缺省优先级是5
Thread.Min_PRIORITY = 1
Thread.Max_PRIORITY = 10
Thread.NORM_PRIORITY = 5
- 使用getPriority()和setPriority(int newPriority)来后去和设置线程对象的优先级
看一个例子
class T1 implements Runnable{

    public void run() {

        for(int i=0; i<10; i++){

            System.out.println("T1 : "+i);

        }

    }

}
class T2 implements Runnable{

    public void run() {

        for(int i=0; i<10; i++){

            System.out.println("----T2 : "+i);

        }

    }

}
public class TestPriority {

    public static void main(String[] args) {

        Thread t1 = new Thread(new T1());

        Thread t2 = new Thread(new T2());

        t1.setPriority(Thread.NORM_PRIORITY +3);//把t1优先级调高

         t1.start();

        t2.start();

    }

}
在实际运行过程中把t1的优先级调高并不表示要先执行完t1再执行t2,而是cpu把大部分的空间都留给了t1,所有t1执行效率会比较高一点
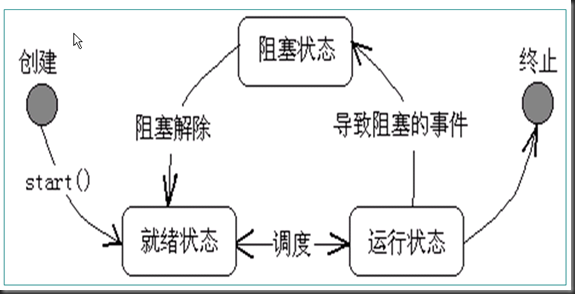
四、线程的状态控制
线程状态转换:

线程控制基本方法:
|
方法 |
功能 |
| isAlive() | 判断线程是否还”活”着,即线程是否还未终止 |
| getPriority() | 获得线程的优先级数值 |
| setPriority() | 设置线程的优先级数值 |
| Thread.sleep() | 将当前线程睡眠指定毫秒数 |
| join() | 调用某线程的该方法,将当前线程与该线程”合并”,即等待该线程结束,再回复当前线程的运行 |
| yield() | 让出cpu,当前线程进入就绪队列等待调度 |
| wait() | 当前线程进入对象的wait pool |
| notify() notifyAll() |
唤醒对象的wait pool中的一个/所有等待线程 |
例子1:
public class MyThread extends Thread{

    public void run() {

        while(true) {

            System.out.println("==="+new Date()+"===");

            try {

                sleep(1000);

            } catch(InterruptedException e){

                return;

            }

        }

    }

}
public class TestInterrup {

    public static void main(String[] args) {

        MyThread thread = new MyThread();

        thread.start();

        try {

            Thread.sleep(10000);//主线程睡眠10秒

        } catch(InterruptedException e) {

            thread.interrupt();//打断该线程

        }

    }

}
例子2:
class MyThread2 extends Thread{

    //接收一个字符串

    MyThread2(String s) {

        super(s);

    }

    public void run() {

        for(int i=1; i<=10; i++) {

            System.out.println("i am "+getName());//获取到s

            try {

                sleep(1000);

            } catch (InterruptedException e) {

                return;

            }

        }

    }

}
public class TestJoin {

    public static void main(String[] args) {

        MyThread2 t1 = new MyThread2("t1");

        t1.start();

        try{

            t1.join();//t1合并到main中一块去执行,他执行完了之后才会执行主线程

        } catch (InterruptedException e) {

            for(int i=1; i<=10; i++) {

                System.out.println("i am Thread");

            }

        }

    }

}
例子3:
class MyThread3 extends Thread{

    MyThread3(String s) {

        super(s);

    }

    public void run() {

        for(int i=1; i<=100; i++) {

            System.out.println(getName()+": "+i);

            if(i % 10 == 0) {

                yield();

            }

        }

    }

}
public class TestYield {

    public static void main(String[] args) {

        MyThread3 t1 = new MyThread3("11111");

        MyThread3 t2 = new MyThread3("22222");

        t1.start();

        t2.start();

    }

}
例子4:
class Runner4 implements Runnable{

    private boolean flag = true;

    public void run() {

        int i = 0;

        while(flag == true) {

            System.out.print(" "+i++);

        }

    }

    public void shutDown(){

        flag = false;

    }

}
public class TestThread4 {

    public static void main(String[] args) {

        Runner4 r = new Runner4();

        Thread t = new Thread(r);

        t.start();

        for(int i=0; i<1000; i++) {

            if(i%100 ==0 && i>0) {

                System.out.println("in thread main i="+i);

            }

        }

        System.out.println("Thread main is over-----------");

        r.shutDown();//用类似于这样的方法结束线程

    }

}
public class Runner6 extends Thread{

    public void run() {

        //currentThread()拿到当前线程

        System.out.println(Thread.currentThread().isAlive());//输出当前线程状态,活着true,死的false

        for(int i=0; i<50;i++) {

            System.out.println("SybThread: "+i);

        }

    }

}
public class TestThread6 {

    public static void main(String[] args) {

        Thread t = new Runner6();

        t.start();

        for(int i=0; i<50; i++) {

            System.out.println("MainThread: "+i);

        }

    }

}
五、线程同步
java语言中,引入了对象互斥锁的概念,保证共享数据操作的完整性,每个对象都对应于一个可成为“互斥锁”的标记,这个标记保证在任一时刻,只能有一个线程方位该对象
关键字synchronized来与对象的互斥练习。当某个对象synchronized修饰时,表明该对象在任一时刻只能由一个线程来访问
使用方法:
1.放到方法生命中,表示整个方法为同步方法,例如:public synchronized void add(){……}
2.使用sunchronized(this){}来包住需要同步的代码,被包住的部分就是要同步的部分
看一个例子:
public class Timer {

    private int num = 0;

    //第二种锁定对象的写法是这里写public synchronized void add (String name){
public void add(String name) {
//第一种锁定对象的写法
//synchronized (this) {

        num++;

        try {

            Thread.sleep(1);

        } catch (InterruptedException e) {

        }

        System.out.println(name+",你是第"+num+"个使用timer的线程");

        //}

    }

}
public class TestSync implements Runnable{

    Timer timer = new Timer();

    public static void main(String[] args) {

        TestSync test = new TestSync();

        Thread t1 = new Thread(test);

        Thread t2 = new Thread(test);

        t1.setName("t1");

        t2.setName("t2");

        t1.start();

        t2.start();

    }

    //拿到当前线程的名子

    public void run() {

        timer.add(Thread.currentThread().getName());

    }

}
上面的程序执行完之后结果为:

因为线程在执行add方法的过程中被另外的线程给打断了,所以才会出现上面的情况
如果不想出现上面样的情况,将第一段代码的注释部分还原,相当于执行方法过程中锁定当前对象,不允许被打断,这样就不存在被打断的情况,运行结果:

这里引入一个死锁的概念:假设线程1和线程2都在执行的过程中都使用了两把锁:
线程1先执行锁1,再执行锁2,
线程2先执行锁2,再执行锁1,
那么当线程1和线程2同时启动的时候就会出现死锁的情况,可以想象一下一个只能通过一人的桥左右两边都有人要同时过桥的情景
看一个死锁的例子:
public class TestDeadLock implements Runnable {

    public int flag = 1;

    static Object o1 = new Object();

    static Object o2 = new Object();

    public void run() {

        System.out.println("flag="+flag);

        if (flag == 1) {

            synchronized(o1) {

                try {

                    Thread.sleep(500);

                } catch (Exception e) {

                    e.printStackTrace();

                }

                synchronized(o2) {

                    System.out.println("1");

                }

            }

        }

        if (flag == 0) {

            synchronized(o2) {

                try {

                    Thread.sleep(500);

                } catch (Exception e) {

                    e.printStackTrace();

                }

                synchronized(o1) {

                    System.out.println("0");

                }

            }

        }

    }

    public static void main(String[] args) {

        TestDeadLock td1 = new TestDeadLock();

        TestDeadLock td2 = new TestDeadLock();

        td1.flag = 1;

        td2.flag = 0;

        Thread t1 = new Thread(td1);

        Thread t2 = new Thread(td2);

        t1.start();

        t2.start();

    }

}
再看一个例子:
public class TT implements Runnable{

    int b = 100;

    public synchronized void m1() throws Exception {

        b = 1000;

        Thread.sleep(5000);

        System.out.println("b="+b);

    }

    public void m2() {

        System.out.println(b);

    }

    public void run() {

        try {

            m1();

        } catch (Exception e) {

            e.printStackTrace();

        }

    }

    public static void main(String[] args)  throws Exception{

        TT tt = new TT();

        Thread t = new Thread(tt);

        t.start();

        Thread.sleep(1000);

        tt.m2();

    }

}
上面这个例子的输出结果是b=1000,而不是想象中的100,说明被锁定的对象只是不允许另外的线程使用,但是其他的方法还是可以访问的
wait和sleep的区别:
wiat(Object类的方法)时别的线程可以访问锁定对象,调用wait方法的时候必需锁定该对象
sleep(Thread类的方法)时别的线程也不可以访问锁定对象
最新文章
- js中遍历删除数组中的项(项目中遇到的问题解决)
- 线性表的链式存储C语言版
- bzoj1124[POI2008]枪战maf
- HDU 5923 Prediction
- mysql grant all on *.* to xxx@'%' 报Access denied for user 'root'@'localhost'
- SAP本地文件策略(导EXCEL选择拒绝后处理)
- WIN8 下 Hyper-V和Vmware Workstation
- 输出数组里面第N大的数
- GG同步sqlserver报错一个案例 Invalid date format
- 你应该知道的CSS文字大小单位PX、EM、PT
- 1.6 在WHERE子句中引用取别名的列
- APP自动化框架LazyAndroid使用手册(2)--元素自动抓取
- 仿9GAG制作过程(三)
- VC6中函数点go to definition报告the symbol XXX is undefined
- Ubuntu16.04安装使用wineqq
- ABP框架系列之五十二:(Validating-Data-Transfer-Objects-验证数据传输对象)
- apache 限制连接并发数和下载速度
- QT笔记之内存管理
- Unity3D学习笔记(二十八):Editor
- OpenWrt挂载移动硬盘实现脱机下载