莫烦大大keras的Mnist手写识别(5)----自编码
2024-08-28 10:01:22
一、步骤:
导入包和读取数据
数据预处理
编码层和解码层的建立 + 构建模型
编译模型
训练模型
测试模型【只用编码层来画图】
二、代码:
1、导入包和读取数据
#导入相关的包

import numpy as np

np.random.seed(1337)  # for reproducibility

from keras.datasets import mnist

from keras.models import Model #采用通用模型

from keras.layers import Dense, Input #只用到全连接层

import matplotlib.pyplot as plt

#读取数据

(X_train, _), (X_test, y_test) = mnist.load_data()
2、数据预处理:将28*28维度的数据拉成一个向量784,原数据X_train的shape为(60000,28,28),转成x_train(60000,784)。
x_train = X_train.astype('float32') / 255. - 0.5       # minmax_normalized

x_test = X_test.astype('float32') / 255. - 0.5         # minmax_normalized

x_train = X_train.reshape((x_train.shape[0], -1))

x_test = X_test.reshape((x_test.shape[0], -1))

print(x_train.shape) #(60000, 784)

print(x_test.shape) #(10000, 784)

print(X_train.shape)  # (60000, 28, 28)
3、编码层和解码层的建立+构建模型
# in order to plot in a 2D figure

encoding_dim = 2

# this is our input placeholder

input_img = Input(shape=(784,))

# encoder layers编码层

encoded = Dense(128, activation='relu')(input_img)

encoded = Dense(64, activation='relu')(encoded)

encoded = Dense(10, activation='relu')(encoded)

encoder_output = Dense(encoding_dim)(encoded)

# decoder layers解码层

decoded = Dense(10, activation='relu')(encoder_output)

decoded = Dense(64, activation='relu')(decoded)

decoded = Dense(128, activation='relu')(decoded)

decoded = Dense(784, activation='tanh')(decoded)

#构建模型

#包括编码层也包括解码层

autoencoder = Model(input = input_img,output = decoded)

#只包括编码层

encoder = Model(input = input_img,output = encoder_output)
4、编译模型
#编译模型
autoencoder.compile(optimizer='adam', loss='mse')
5、训练模型【编码和解码一起训练】
autoencoder.fit(x_train, x_train,

                epochs=20,

                batch_size=256,

                shuffle=True)
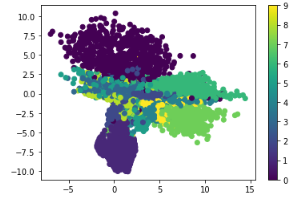
6、测试模型并画图显示【仅用编码来预测2维的特征空间】
encoded_imgs = encoder.predict(x_test)

plt.scatter(encoded_imgs[:, 0], encoded_imgs[:, 1], c=y_test) #c表示颜色维度

plt.colorbar()

plt.show()
最新文章
- 【翻译】MongoDB指南/聚合——聚合管道
- WCF学习之旅—TcpTrace工具(二十六)
- Go语言开发
- [转载]TFS安装配置教程
- OpenGL在 win8 64bits系统下的配置
- 利用序列化的方式实现C#深复制和浅复制
- 【HDOJ】1823 Luck and Love
- oracle开启/关闭归档模式
- 在 Inno Setup 中实现倒数N秒后激活按钮
- linux自旋锁
- set up blog on github
- WIN10怎么安装SQL server2000数据库
- 小白的首个maven web项目Step1软件安装二(Tomcat及相关配置)
- bzoj 3673 可持久化并查集 by zky
- Oracle亿级数据查询处理(数据库分表、分区实战)
- 01 bubbleSort
- Tencent QQ现在就是一个十八层地狱下面的大恶魔-删除右键里的"通过QQ发送到"
- 兴趣点 / 关键点( Interest point/Keypoint )
- 鸟哥的Linux私房菜 基础学习篇读书笔记(9):Linux磁盘与文件系统管理(2)
- angular.element()的用法