HillCrest Sensor HAL
1. 抽象定义
Google为Sensor提供了统一的HAL接口,不同的硬件厂商需要根据该接口来实现并完成具体的硬件抽象层,Android中Sensor的HAL接口定义在:hardware/libhardware/include/hardware/sensors.h,
其中定义了几个数据类型:
- sensor_t - 包含传感器相关信息
- sensors_module_t - 传感器硬件模块类型
- sensors_event_t - 传感器事件
- sensors_poll_device_t - 传感器抽象设备类型
HAL实现必须完成下面的函数接口:
- get_sensors_list - 返回所有传感器的列表
- activate - 启动或停止传感器
- batch - 设置传感器的参数,如采样率和最大报告延迟
- setDelay - 仅用于 1.0 版本的 HAL,设置指定传感器的采样率
- flush - 刷写指定传感器的 FIFO 并在完成后报告刷写完成事件
- poll - 返回可用的传感器事件
1.1 sensor type
sensor type的定义如下:
[sensors-base.h]

enum {

    SENSOR_TYPE_META_DATA = 0,

    SENSOR_TYPE_ACCELEROMETER = 1,

    SENSOR_TYPE_MAGNETIC_FIELD = 2,

    SENSOR_TYPE_ORIENTATION = 3,

    SENSOR_TYPE_GYROSCOPE = 4,

    SENSOR_TYPE_LIGHT = 5,

    SENSOR_TYPE_PRESSURE = 6,

    SENSOR_TYPE_TEMPERATURE = 7,

    SENSOR_TYPE_PROXIMITY = 8,

    SENSOR_TYPE_GRAVITY = 9,

    ...

}

#define SENSOR_STRING_TYPE_ACCELEROMETER                "android.sensor.accelerometer"

#define SENSOR_STRING_TYPE_MAGNETIC_FIELD               "android.sensor.magnetic_field"

#define SENSOR_STRING_TYPE_ORIENTATION                  "android.sensor.orientation"

#define SENSOR_STRING_TYPE_GYROSCOPE                    "android.sensor.gyroscope"

#define SENSOR_STRING_TYPE_LIGHT                        "android.sensor.light"

#define SENSOR_STRING_TYPE_PRESSURE                     "android.sensor.pressure"

#define SENSOR_STRING_TYPE_TEMPERATURE                  "android.sensor.temperature"

#define SENSOR_STRING_TYPE_PROXIMITY                    "android.sensor.proximity"
1.2 sensor_t
sensor_t 的定义如下
[sensors.h]

struct sensor_t {

    /* Name of this sensor.

     * All sensors of the same "type" must have a different "name".

     */

    const char*     name;

    /* vendor of the hardware part */

    const char*     vendor;

    /* version of the hardware part + driver. The value of this field

     * must increase when the driver is updated in a way that changes the

     * output of this sensor. This is important for fused sensors when the

     * fusion algorithm is updated.

     */

    int             version;

    /* handle that identifies this sensors. This handle is used to reference

     * this sensor throughout the HAL API.

     */

    int             handle;

    /* this sensor's type. */

    int             type;	//sensor type

    /* maximum range of this sensor's value in SI units */

    float           maxRange;

    /* smallest difference between two values reported by this sensor */

    float           resolution;

    /* rough estimate of this sensor's power consumption in mA */

    float           power;

    /* this value depends on the reporting mode:

     *

     *   continuous: minimum sample period allowed in microseconds

     *   on-change : 0

     *   one-shot  :-1

     *   special   : 0, unless otherwise noted

     */

    int32_t         minDelay;

    /* number of events reserved for this sensor in the batch mode FIFO.

     * If there is a dedicated FIFO for this sensor, then this is the

     * size of this FIFO. If the FIFO is shared with other sensors,

     * this is the size reserved for that sensor and it can be zero.

     */

    uint32_t        fifoReservedEventCount;

    /* maximum number of events of this sensor that could be batched.

     * This is especially relevant when the FIFO is shared between

     * several sensors; this value is then set to the size of that FIFO.

     */

    uint32_t        fifoMaxEventCount;

    /* type of this sensor as a string.

     *

     * If type is OEM specific or sensor manufacturer specific type

     * (>=SENSOR_TYPE_DEVICE_PRIVATE_BASE), this string must be defined with reserved domain of

     * vendor/OEM as a prefix, e.g. com.google.glass.onheaddetector

     *

     * For sensors of Android defined types, Android framework will override this value. It is ok to

     * leave it pointing to an empty string.

     */

    const char*    stringType;

    /* permission required to see this sensor, register to it and receive data.

     * Set to "" if no permission is required. Some sensor types like the

     * heart rate monitor have a mandatory require_permission.

     * For sensors that always require a specific permission, like the heart

     * rate monitor, the android framework might overwrite this string

     * automatically.

     */

    const char*    requiredPermission;

    /* This value is defined only for continuous mode and on-change sensors. It is the delay between

     * two sensor events corresponding to the lowest frequency that this sensor supports. When lower

     * frequencies are requested through batch()/setDelay() the events will be generated at this

     * frequency instead. It can be used by the framework or applications to estimate when the batch

     * FIFO may be full.

     *

     * NOTE: 1) period_ns is in nanoseconds where as maxDelay/minDelay are in microseconds.

     *              continuous, on-change: maximum sampling period allowed in microseconds.

     *              one-shot, special : 0

     *   2) maxDelay should always fit within a 32 bit signed integer. It is declared as 64 bit

     *      on 64 bit architectures only for binary compatibility reasons.

     * Availability: SENSORS_DEVICE_API_VERSION_1_3

     */

    #ifdef __LP64__

       int64_t maxDelay;

    #else

       int32_t maxDelay;

    #endif

    /* Flags for sensor. See SENSOR_FLAG_* above. Only the least significant 32 bits are used here.

     * It is declared as 64 bit on 64 bit architectures only for binary compatibility reasons.

     * Availability: SENSORS_DEVICE_API_VERSION_1_3

     */

    #ifdef __LP64__

       uint64_t flags;

    #else

       uint32_t flags;

    #endif

    /* reserved fields, must be zero */

    void*           reserved[2];

};
1.3 sensor_module_t
该结构体实际上是对标准硬件模块hw_module_t的一个扩展,增加一个get_sensor_list函数,用于获取传感器的列表,以及set_operation_mode设置为相关的mode;
struct sensors_module_t {

    struct hw_module_t common;

    /**

     * Enumerate all available sensors. The list is returned in "list".

     * return number of sensors in the list

     */

    int (*get_sensors_list)(struct sensors_module_t* module,

            struct sensor_t const** list);

    /**

     *  Place the module in a specific mode. The following modes are defined

     *

     *  0 - Normal operation. Default state of the module.

     *  1 - Loopback mode. Data is injected for the supported

     *      sensors by the sensor service in this mode.

     * return 0 on success

     *         -EINVAL if requested mode is not supported

     *         -EPERM if operation is not allowed

     */

    int (*set_operation_mode)(unsigned int mode);

};
1.4 sensors_poll_device_t
sensors_poll_device_t 定义了以下方法
[sensors.h]

struct sensors_poll_device_t {

    struct hw_device_t common;

    int (*activate)(struct sensors_poll_device_t *dev,

            int sensor_handle, int enabled);

    int (*setDelay)(struct sensors_poll_device_t *dev,

            int sensor_handle, int64_t sampling_period_ns);

    int (*poll)(struct sensors_poll_device_t *dev,

            sensors_event_t* data, int count);

};
2. 抽象方法
2.1 get_sensors_list
sensors_module_t 是用于为传感器创建 Android 硬件模块的类型。HAL 的实现必须定义一个该类型的对象 HAL_MODULE_INFO_SYM,以提供 get_sensors_list 函数。
[HAL.cpp]

struct sensors_module_t HAL_MODULE_INFO_SYM = {

	.common = {

		.tag = HARDWARE_MODULE_TAG,

#ifdef SENSORS_MODULE_API_VERSION_0_1

		.module_api_version = SENSORS_MODULE_API_VERSION_0_1,

#else

		.module_api_version = 0,

#endif

		.hal_api_version = 0,

		.id = SENSORS_HARDWARE_MODULE_ID,

		.name = "Freespace SensorHub Sensor Module",

		.author = "Hillcrest Labs, Inc.",

		.methods = &sensors_module_methods,

		.dso = 0,

		.reserved = {},

	},

	.get_sensors_list = get_sensors_list

};
get_sensors_list 提供由 HAL 实现的传感器列表,该函数返回列表中的传感器数量。
调用单例模式实例化,然后调用对应方法获取传感器列表,返回对应的 sensor_t 结构体数组指针。
static int get_sensors_list(struct sensors_module_t* module,

		struct sensor_t const** list) {

	if (getContext()) {

		return getContext()->getSensorList(list);

	}

	return 0;

}

static Context * getContext() {

	if (context_) {

		return context_;

	}

	if (!HAL_ENABLED) {

		return NULL;

	}

	context_ = new Context();

#ifdef ENABLE_SOURCE_OBSERVER

	if (OBS_ENABLED) {

		hubServer_  = new HubServer(*context_, true);

	}

#endif

	return context_;

}
2.2 open method
打开 sensor 的实例化对象, 并填充 hw_device_t
static struct hw_module_methods_t sensors_module_methods = {

	.open = open_sensors

};

struct hcrest_sensors_device_t {

#ifdef SENSORS_DEVICE_API_VERSION_1_1

	struct sensors_poll_device_1 base; // must be first

#else

	struct sensors_poll_device_t base; // must be first

#endif

	unsigned int magic;

	void * context;

};

static hcrest_sensors_device_t hwdevice_;

static bool open_ = false;

static int open_sensors(const struct hw_module_t* module, const char* name,

		struct hw_device_t** device) {

	LOGI("Freespace SensorHub HAL open");

	LOGD("   open from: %s", name);

	LOGI("   version:   " FS_SENSORHUB_HAL_VERSION);

	if (open_) {

		LOGE("Already open, refusing open_sensors");

		return -EBUSY;

	}

	int rc;

	*device = NULL;

	Context * context = getContext();

	if (context) {

		hwdevice_.base.common.tag     = HARDWARE_DEVICE_TAG;

#if defined(SENSORS_DEVICE_API_VERSION_1_3)

		hwdevice_.base.common.version = SENSORS_DEVICE_API_VERSION_1_3;

#elif defined(SENSORS_DEVICE_API_VERSION_1_2)

		hwdevice_.base.common.version = SENSORS_DEVICE_API_VERSION_1_2;

#elif defined(SENSORS_DEVICE_API_VERSION_1_1)

		hwdevice_.base.common.version = SENSORS_DEVICE_API_VERSION_1_1;

#elif defined(SENSORS_DEVICE_API_VERSION_1_0)

		hwdevice_.base.common.version = SENSORS_DEVICE_API_VERSION_1_0;

#else

		hwdevice_.base.common.version = 0;

#endif

		hwdevice_.base.common.module  = const_cast<hw_module_t*>(module);

		hwdevice_.base.common.close   = ctx_close;

		hwdevice_.base.activate       = ctx_activate;

		hwdevice_.base.setDelay       = ctx_setDelay;

		hwdevice_.base.poll           = ctx_poll;

#ifdef SENSORS_DEVICE_API_VERSION_1_1

		hwdevice_.base.batch          = ctx_batch;

		hwdevice_.base.flush          = ctx_flush;

#endif

		hwdevice_.magic               = HCREST_MAGIC;

		hwdevice_.context             = context;

		rc =  context->open();

#ifdef ENABLE_SOURCE_OBSERVER

		if (rc == 0 && OBS_ENABLED) {

			LOGI("Initializing source server");

			if ((rc = hubServer_->init())) {

				LOGE("Failed initializing server");

				freeContext();

			}

		}

#endif

		if (!rc) {

			*device = &hwdevice_.base.common;

		}

	} else {

		// Dummy context

		*device = NULL;

		rc = 0;

		LOGD(">>> Dummy Sensors <<<");

	}

	LOGD("Freespace SensorHub HAL open = %s, device=%p ", rc ? strerror(-rc) : "Success", *device);

	return rc;

}
先看下 context->open() , 打开挂在 SensorHub 上的所有 sensor,并设置 hcrest_sensors_device_t
[Context.cpp]

int Context::open() {

	int rc;

	quit_ = false;

#ifdef CONTROL_INTERFACE

	rc = ctrlIface_.init(this);

	if (rc < 0) {

		return rc;

	}

#endif

	if ((rc = hub_.probe())) {

		return rc;

	}

#ifdef EXTENSION_LIB

	if ((rc = external_sensors_init(*this))) {

		LOGW("Error from external_sensors_init() = %d; %s", rc, strerror(rc));

	}

#endif

	return 0;

}
SensorHub::probe() 继续调用基类的 probe, SensorHubDevice::probe 到这里浅尝辄止。
[SensorHub.cpp]

int SensorHub::probe() {

	AutoLock _l(configLock_);

	AutoLock _ll(pollLock_);

	int rc = SensorHubDevice::probe();

	if (rc < 0) {

		return rc;

	}

	rc = frsDirector_.probe();

	if (rc < 0) {

		return rc;

	}

	ctx_.addFd(normal_.getFd(), POLLIN | POLLHUP | POLLERR, this);

	if ((rc = initSensorsLocked())) {

		return rc;

	}

	// switch to non-blocking

	open_ = true;

	return 0;

}
2.3 activate、setDelay、poll
[HAL.cpp]

static int ctx_activate(struct sensors_poll_device_t *dev, int handle, int enabled) {

	return toContext(dev)->activate(handle, enabled);

}

static int ctx_setDelay(struct sensors_poll_device_t *dev, int handle, int64_t ns) {

	return toContext(dev)->setDelay(handle, ns);

}

static int ctx_poll(struct sensors_poll_device_t *dev, sensors_event_t* data, int count) {

	return toContext(dev)->pollEvents(data, count);

}

#ifdef SENSORS_DEVICE_API_VERSION_1_1

static int ctx_batch(struct sensors_poll_device_1 *dev, int sensor_handle, int flags,

     int64_t sampling_period_ns,

     int64_t max_report_latency_ns) {

	return toContext(dev)->batch(sensor_handle, flags, sampling_period_ns, max_report_latency_ns);

}

static int ctx_flush(struct sensors_poll_device_1 *dev, int sensor_handle) {

 	return toContext(dev)->flush(sensor_handle);

}

#endif
- activate 激活或禁用传感器
int (*activate)(struct sensors_poll_device_t *dev, int sensor_handle, int enabled);
如果 enabled 为 1 且传感器已激活,则该函数是空操作且操作成功。
如果 enabled 为 0 且传感器已禁用,则该函数是空操作且操作成功。
如果操作成功了,则该函数返回 0;否则返回表示错误的负数。
- poll 机制来轮询读取数据
int (*poll)(struct sensors_poll_device_t *dev, sensors_event_t* data, int count);
- batch 设置传感器的参数(包括采样率和最大报告延迟)
int (*batch)( struct sensors_poll_device_1* dev, int sensor_handle, int flags, int64_t sampling_period_ns, int64_t max_report_latency_ns);
- flush 将刷新完成事件添加到指定传感器的硬件 FIFO末尾并刷新 FIFO
int (*flush)(struct sensors_poll_device_t* dev, int sensor_handle);
Sensor HAL的简单流程可以按照下面来理解:
当设备启动时,调用 get_sensors_list。
当传感器激活时,则先使用请求的参数调用 batch 函数,然后调用 activate(..., enable=1)。
当激活状态下的传感器的请求特性发生变化时,会调用 batch 函数。
可以随时调用 flush,甚至在未激活的传感器上也可以调用(在这种情况下,该函数必须返回 -EINVAL)
当传感器禁用时,将调用 activate(..., enable=0)。
在进行上述调用的同时,会反复调用 poll 函数来请求数据。甚至在没有传感器激活的情况下,也可以调用 poll。
3. 框架流程
当前方案AP并未直接对接 SensorHUB,而是将 SensorHUB 挂载在一颗 MCU 上,AP与MCU通过USB相连接,进行数据传输。
基本框架如下图所示:
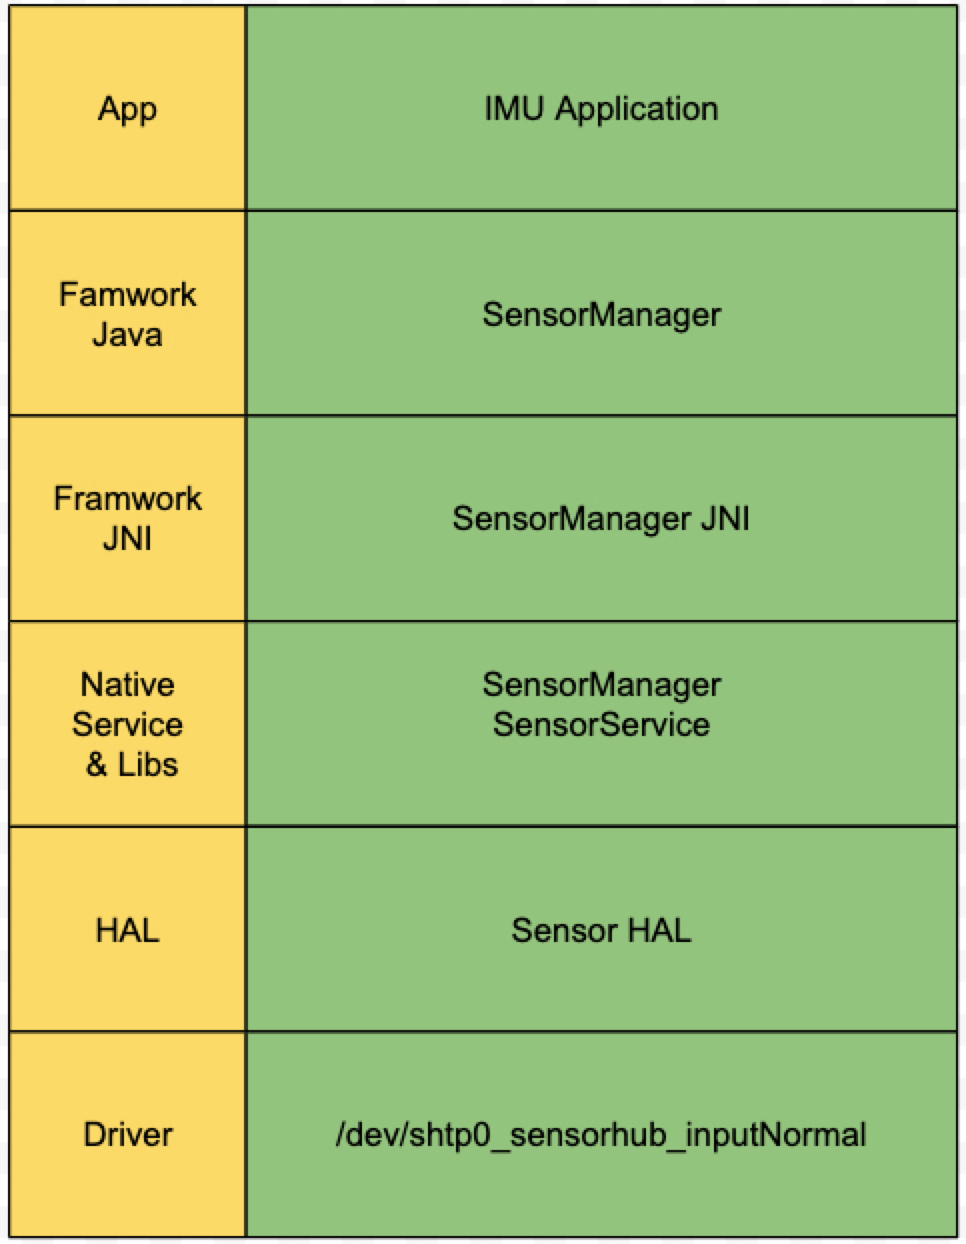
IMU App
App 通过正常的 SDK 接口访问 Sensor 服务,获取 Sensor 数据。Framewrok Java
SensorManager 提供了 Java 层 Sensor 的接口,并通过 JNI 和 Native SensorManager 通信。
代码位于frameworks/base/core/java/android/hardware/SensorManage.javaFramework JNI
提供机制,供 SensorManager 和 Native SensorManager 通信。
代码位于frameworks/base/core/jni/android_hardware_SensorManager.cppNative Service & Libs
SensorManager 属于 NativeLibs,为 JNI 提供接口,获取 SensorService 的服务,从而获取 SensorEvent;
代码位于frameworks/native/libs/sensor/SensorManager.cpp
SensorService 属于 NativeService,向 SensorManager 注册服务,和 Sensor HAL 进行交互,控制 sensor 和获取 SensorEvent。
代码位于frameworks/native/services/sensorservice/SensorService.cppHAL
SensorHub HAL,向上为 Native SensorService 提供接口,向下和 Driver 进行交互。Driver
创建虚拟设备节点,并提供接口供 HAL 层获取 SensorEvent 和控制 Sensor。
4. 问题分析
问题现象:
IMU sensordump App 无法获取 Accelerometer Sensor 数据
初步分析:
通过 dumpsys sensorservice 获取相关信息,发现 Client 0 中 Accelerometer 的状态是 First flush pending, 并不是 active 的状态。
2 active connections

Connection Number: 0

	Operating Mode: NORMAL

	 org.cvpcs.android.sensordump.ASensor | WakeLockRefCount 0 | uid 10056 | cache size 0 | max cache size 984

	 Rokid Glasses Accelerometer 0x00000001 | status: First flush pending | pending flush events 0

	 events recvd: 0 | sent 0 | cache 0 | dropped 0 | total_acks_needed 0 | total_acks_recvd 0

Connection Number: 1

	Operating Mode: NORMAL

	 com.android.server.policy.WindowOrientationListener | WakeLockRefCount 0 | uid 1000 | cache size 0 | max cache size 984

	 Rokid Glasses Accelerometer 0x00000001 | status: active | pending flush events 0

	 events recvd: 3976 | sent 3971 | cache 5 | dropped 0 | total_acks_needed 0 | total_acks_recvd 0
根据 log 定位 sensorservice 代码的位置,确定 mFirstFlushPending 标志被设置为 true
[SensorEventConnection.cpp]

void SensorService::SensorEventConnection::dump(String8& result) {

    Mutex::Autolock _l(mConnectionLock);

    result.appendFormat("\tOperating Mode: %s\n",mDataInjectionMode ? "DATA_INJECTION" : "NORMAL");

    result.appendFormat("\t %s | WakeLockRefCount %d | uid %d | cache size %d | "

            "max cache size %d\n", mPackageName.string(), mWakeLockRefCount, mUid, mCacheSize,

            mMaxCacheSize);

    for (size_t i = 0; i < mSensorInfo.size(); ++i) {

        const FlushInfo& flushInfo = mSensorInfo.valueAt(i);

        result.appendFormat("\t %s 0x%08x | status: %s | pending flush events %d \n",

                            mService->getSensorName(mSensorInfo.keyAt(i)).string(),

                            mSensorInfo.keyAt(i),

                            flushInfo.mFirstFlushPending ? "First flush pending" :

                                                           "active",

                            flushInfo.mPendingFlushEventsToSend);
这个标志在构造函数初始化列表中被初始化为 false,那么这个标志是在哪里被修改的呢?
SensorEventConnection 类提供了 setFirstFlushPending 方法去设置这个标志,
[SensorEventConnection.cpp]

void SensorService::SensorEventConnection::setFirstFlushPending(int32_t handle,

                                bool value) {

    Mutex::Autolock _l(mConnectionLock);

    ssize_t index = mSensorInfo.indexOfKey(handle);

    if (index >= 0) {

        FlushInfo& flushInfo = mSensorInfo.editValueAt(index);

        flushInfo.mFirstFlushPending = value;

    }

}
而这个方法在类 SensorService 的 enable 方法中被调用。
[SensorService.cpp]

status_t SensorService::enable(const sp<SensorEventConnection>& connection,

        int handle, nsecs_t samplingPeriodNs, nsecs_t maxBatchReportLatencyNs, int reservedFlags,

        const String16& opPackageName) {

    ...

    if (err == NO_ERROR &&

            sensor->getSensor().getReportingMode() == AREPORTING_MODE_CONTINUOUS &&

            rec->getNumConnections() > 1) {

        connection->setFirstFlushPending(handle, true);

        status_t err_flush = sensor->flush(connection.get(), handle);

        // Flush may return error if the underlying h/w sensor uses an older HAL.

        if (err_flush == NO_ERROR) {

            rec->addPendingFlushConnection(connection.get());

        } else {

            connection->setFirstFlushPending(handle, false);

        }

    }

    ...

}
参考前面的 Sensor HAL 的流程分析,对比 enable 方法中的流程,先执行 batch 设置采样时间等参数,然后调用 flush 刷新 FIFO,最后调用 activcate 激活传感器。
SensorService 继承于 Thread, 复写方法 threadLoop,不断的从 Sensor HAL 中读取数据
[SensorService.cpp]

bool SensorService::threadLoop() {

    ALOGD("nuSensorService thread starting...");

    // each virtual sensor could generate an event per "real" event, that's why we need to size

    // numEventMax much smaller than MAX_RECEIVE_BUFFER_EVENT_COUNT.  in practice, this is too

    // aggressive, but guaranteed to be enough.

    const size_t vcount = mSensors.getVirtualSensors().size();

    const size_t minBufferSize = SensorEventQueue::MAX_RECEIVE_BUFFER_EVENT_COUNT;

    const size_t numEventMax = minBufferSize / (1 + vcount);

    SensorDevice& device(SensorDevice::getInstance());

    const int halVersion = device.getHalDeviceVersion();

    do {

        ssize_t count = device.poll(mSensorEventBuffer, numEventMax);

        if (count < 0) {

            ALOGE("sensor poll failed (%s)", strerror(-count));

            break;

        }

        // Reset sensors_event_t.flags to zero for all events in the buffer.

        for (int i = 0; i < count; i++) {

             mSensorEventBuffer[i].flags = 0;

        }
在读取完数据后,它会向所有连接的 Client 发送 SensorEvents
[SensorService.cpp]

        // Send our events to clients. Check the state of wake lock for each client and release the

        // lock if none of the clients need it.

        bool needsWakeLock = false;

        size_t numConnections = activeConnections.size();

        for (size_t i=0 ; i < numConnections; ++i) {

            if (activeConnections[i] != 0) {

                activeConnections[i]->sendEvents(mSensorEventBuffer, count, mSensorEventScratch,

                        mMapFlushEventsToConnections);

                needsWakeLock |= activeConnections[i]->needsWakeLock();

                // If the connection has one-shot sensors, it may be cleaned up after first trigger.

                // Early check for one-shot sensors.

                if (activeConnections[i]->hasOneShotSensors()) {

                    cleanupAutoDisabledSensorLocked(activeConnections[i], mSensorEventBuffer,

                            count);

                }

            }

        }
在 SendEvents 的方法中,判断获取的数据流中类型是否存在 SENSOR_TYPE_META_DATA ,如果有且 flushInfo.mFirstFlushPending == true,设置该标志为 false,然后接收到的数据才能被送到 Client。
[SensorEventConnection.cpp]

status_t SensorService::SensorEventConnection::sendEvents(

        sensors_event_t const* buffer, size_t numEvents,

        sensors_event_t* scratch,

        wp<const SensorEventConnection> const * mapFlushEventsToConnections) {

    ...

    if (scratch) {

        size_t i=0;

        while (i<numEvents) {

            int32_t sensor_handle = buffer[i].sensor;

            if (buffer[i].type == SENSOR_TYPE_META_DATA) {

                ALOGD_IF(DEBUG_CONNECTIONS, "flush complete event sensor==%d ",

                        buffer[i].meta_data.sensor);

                // Setting sensor_handle to the correct sensor to ensure the sensor events per

                // connection are filtered correctly.  buffer[i].sensor is zero for meta_data

                // events.

                sensor_handle = buffer[i].meta_data.sensor;

            }

            ssize_t index = mSensorInfo.indexOfKey(sensor_handle);

            // Check if this connection has registered for this sensor. If not continue to the

            // next sensor_event.

            if (index < 0) {

                ++i;

                continue;

            }

            FlushInfo& flushInfo = mSensorInfo.editValueAt(index);

            // Check if there is a pending flush_complete event for this sensor on this connection.

            if (buffer[i].type == SENSOR_TYPE_META_DATA && flushInfo.mFirstFlushPending == true &&

                    mapFlushEventsToConnections[i] == this) {

                flushInfo.mFirstFlushPending = false;

                ALOGD_IF(DEBUG_CONNECTIONS, "First flush event for sensor==%d ",

                        buffer[i].meta_data.sensor);

                ++i;

                continue;

            }

        ...

        }

        ...

    }

    ...

    // NOTE: ASensorEvent and sensors_event_t are the same type.

    ssize_t size = SensorEventQueue::write(mChannel,

                                    reinterpret_cast<ASensorEvent const*>(scratch), count);

    ...

}
到这里问题的原因基本可以定位了,结合 libsensors log 确定 SensorHUB HAL 没有上报 SENSOR_TYPE_META_DATA 类型的数据到 SensorService,导致数据无法发送到对应的 Client。
这里追查了代码,发现 SENSOR_TYPE_META_DATA 类型的数据的上报流程不能正常工作,因为 SensorHUB HAL 适配当前方案时,移除了部分代码。在修改了这部分流程后,顺利解决了这一问题。
2 active connections

Connection Number: 0

	Operating Mode: NORMAL

	 org.cvpcs.android.sensordump.ASensor | WakeLockRefCount 0 | uid 10056 | cache size 0 | max cache size 984

	 Rokid Glasses Accelerometer 0x00000001 | status: active | pending flush events 0

	 events recvd: 6168 | sent 4353 | cache 1815 | dropped 0 | total_acks_needed 0 | total_acks_recvd 0

Connection Number: 1

	Operating Mode: NORMAL

	 com.android.server.policy.WindowOrientationListener | WakeLockRefCount 0 | uid 1000 | cache size 0 | max cache size 984

	 Rokid Glasses Accelerometer 0x00000001 | status: active | pending flush events 0

	 events recvd: 589106 | sent 588481 | cache 625 | dropped 0 | total_acks_needed 0 | total_acks_recvd 0

0 direct connections
最新文章
- Git原理及常用操作命令总结
- 用 string 进行插入、替代、查找输出下标等操作
- 后台设置gridview不换行
- 【HDU】4035 Maze
- 完全图解scrollLeft,scrollWidth,clientWidth,offsetWidth 获取相对途径,滚动图片(网上找的,未经试验,但觉得比较好)
- 小数量宽带用户的福音,Panabit 云计费easyradius 接口隆重发布,PA宽带计费系统
- Arbitrage(bellman_ford)
- XML引入多scheme文件约束简单示例
- 你需要知道的三个 CSS3技巧(转)
- SQLServer2005 常用语法大全
- windowsphone中获取手机位置信息
- hdu2102(bfs)
- 【leetcode】LRU
- PHP学习笔记----IIS7下安装配置php环境
- Activiti工作流(一)之基本操作介绍
- UEP-添加表格
- Can't connect to X11 window server using ':1.0' as the value of the DISPLAY variable.
- JavaScript 对象属性底层原理
- y7000笔记本 darknet-yolo安装与测试(Ubuntu18.04+Cuda9.0+Cudnn7.1)
- 【学亮IT手记】Java 8新特性实例介绍