swagger2接口发布demo
2024-10-07 12:17:07
近来发现knife4j比swagger2整合起来方便,功能也更强大,推荐使用, 具体可参考 springboot2整合knife4j
1.目的:使用Swagger2发布接口,ui可操作
2.项目结构

3. 代码
3.1 接口类qinfeng.zheng.api.controller.DemoController
import io.swagger.annotations.Api;

import io.swagger.annotations.ApiImplicitParam;

import io.swagger.annotations.ApiImplicitParams;

import io.swagger.annotations.ApiOperation;

import org.springframework.web.bind.annotation.*;

import qinfeng.zheng.api.entity.UserEntity;

@Api(value = "会员接口")

@RestController

public class DemoController {

    @ApiOperation(value = "swagger接口测试demo", nickname = "swagger接口测试demo昵称")

    @GetMapping("/getDemo")

    public String getDemo() {

        return "getDemo方法调用成功...";

    }

    @ApiOperation(value = "获取会员信息接口", nickname = "根据userName获取用户相关信息")

    @ApiImplicitParam(name = "userName", value = "用户名称", required = true, dataType = "String")

    @PostMapping("/postMember")

    public String postMember(@RequestParam String userName) {

        return userName;

    }

    @ApiOperation(value = "添加用户信息", nickname = "nickname是什么", notes = "notes是什么", produces = "application/json")

    @PostMapping("/postUser")

    @ResponseBody

    @ApiImplicitParam(paramType = "query", name = "userId", value = "用户id", required = true, dataType = "int")

    public UserEntity postUser(@RequestBody UserEntity user, @RequestParam("userId") int userId) { // 这里用包装类竟然报错

        if (user.getId() == userId) {

            return user;

        }

        return new UserEntity();

    }

    @ApiOperation(value = "添加用户信息", nickname = "哈哈测试", notes = "哈哈测试添加用户", produces = "application/json")

    @PostMapping("/addUser")

    @ResponseBody

    @ApiImplicitParams({

            @ApiImplicitParam(paramType = "query", name = "userName", value = "用户姓名", required = true, dataType = "String"),

            @ApiImplicitParam(paramType = "query", name = "id", value = "用户id", required = true, dataType = "int") })

    public UserEntity addUser(String userName, int id) {

        UserEntity userEntity = new UserEntity();

        userEntity.setName(userName);

        userEntity.setId(id);

        return userEntity;

    }

}
3.2 实体类qinfeng.zheng.api.entity.UserEntity
package qinfeng.zheng.api.entity;

import io.swagger.annotations.ApiModel;

import io.swagger.annotations.ApiModelProperty;

/**

 * 创建时间: 23:09 2018/9/19

 * 修改时间:

 * 编码人员: ZhengQf

 * 版   本: 0.0.1

 * 功能描述:

 */

@ApiModel(value = "用户模型")

public class UserEntity {

    @ApiModelProperty(value="id" ,required= true,example = "123")

    private Integer id;

    @ApiModelProperty(value="用户姓名" ,required=true,example = "郑钦锋")

    private String name;

    public Integer getId() {

        return id;

    }

    public void setId(Integer id) {

        this.id = id;

    }

    public String getName() {

        return name;

    }

    public void setName(String name) {

        this.name = name;

    }

    @Override

    public String toString() {

        return "DemoDoctor [id=" + id + ", name=" + name + "]";

    }

}
3.3 配置类qinfeng.zheng.config.SwaggerConfig
package qinfeng.zheng.config;

import org.springframework.context.annotation.Bean;

import org.springframework.context.annotation.Configuration;

import springfox.documentation.builders.ApiInfoBuilder;

import springfox.documentation.builders.PathSelectors;

import springfox.documentation.builders.RequestHandlerSelectors;

import springfox.documentation.service.ApiInfo;

import springfox.documentation.spi.DocumentationType;

import springfox.documentation.spring.web.plugins.Docket;

import springfox.documentation.swagger2.annotations.EnableSwagger2;

/**

 * swagger2的配置类

 */

@Configuration

@EnableSwagger2

public class SwaggerConfig {

   @Bean

   public Docket createRestApi() {

      return new Docket(DocumentationType.SWAGGER_2).apiInfo(apiInfo()).select()

            // api扫包范围

            .apis(RequestHandlerSelectors.basePackage("qinfeng.zheng.api")).paths(PathSelectors.any()).build();

   }

    /**

     * 创建该API的基本信息(这些基本信息会展现在文档页面中)

     * 访问地址:http://项目实际地址/swagger-ui.html

     * @return

     */

   private ApiInfo apiInfo() {

      return new ApiInfoBuilder().title("Swagger接口发布测试").description("测试|Swagger接口功能")

            .termsOfServiceUrl("http://www.baidu.com")

            .version("1.0").build();

   }

}
3.4 启动类qinfeng.zheng.AppSwagger
package qinfeng.zheng;

import org.springframework.boot.SpringApplication;

import org.springframework.boot.autoconfigure.SpringBootApplication;

@SpringBootApplication

public class AppSwagger {

   public static void main(String[] args) {

      SpringApplication.run(AppSwagger.class, args);

   }

}
3.5 application.yml
server:

  port: 8080

spring:

  application:

    name: swagger
3.6 maven依赖
<?xml version="1.0" encoding="UTF-8"?>

<project xmlns="http://maven.apache.org/POM/4.0.0" xmlns:xsi="http://www.w3.org/2001/XMLSchema-instance"

   xsi:schemaLocation="http://maven.apache.org/POM/4.0.0 http://maven.apache.org/xsd/maven-4.0.0.xsd">

   <modelVersion>4.0.0</modelVersion>

   <groupId>qinfeng.zheng</groupId>

   <artifactId>springboot-swagger-demo</artifactId>

   <version>0.0.1-SNAPSHOT</version>

   <packaging>jar</packaging>

   <name>springboot-swagger-demo</name>

   <description>Demo project for Spring Boot</description>

   <parent>

      <groupId>org.springframework.boot</groupId>

      <artifactId>spring-boot-starter-parent</artifactId>

      <version>2.0.4.RELEASE</version>

      <relativePath/> <!-- lookup parent from repository -->

   </parent>

    <dependencies>

        <!-- SpringBoot整合Web组件 -->

        <dependency>

            <groupId>org.springframework.boot</groupId>

            <artifactId>spring-boot-starter-web</artifactId>

        </dependency>

        <!-- https://mvnrepository.com/artifact/io.springfox/springfox-swagger2 -->

        <dependency>

            <groupId>io.springfox</groupId>

            <artifactId>springfox-swagger2</artifactId>

            <version>2.9.2</version>

        </dependency>

        <dependency>

            <groupId>io.springfox</groupId>

            <artifactId>springfox-swagger-ui</artifactId>

            <version>2.9.2</version>

        </dependency>

    </dependencies>

</project>
4. 启动项目
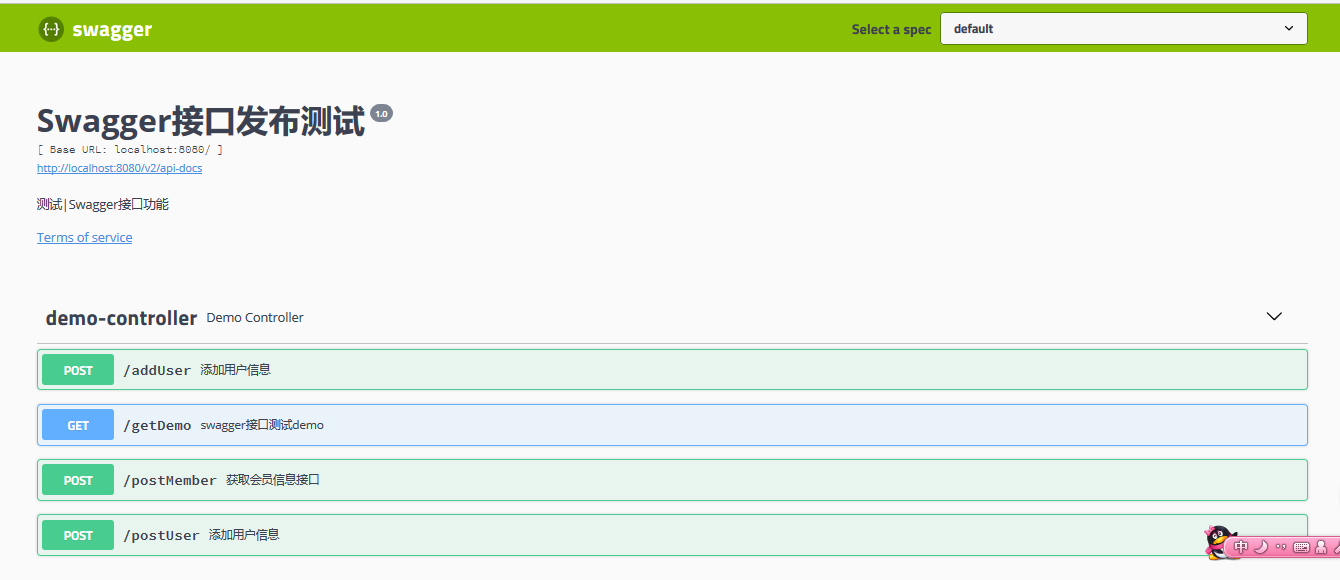
4.1 项目启动成功之后,浏览器访问http://localhost:8080/swagger-ui.html
4.2 测试addUser接口
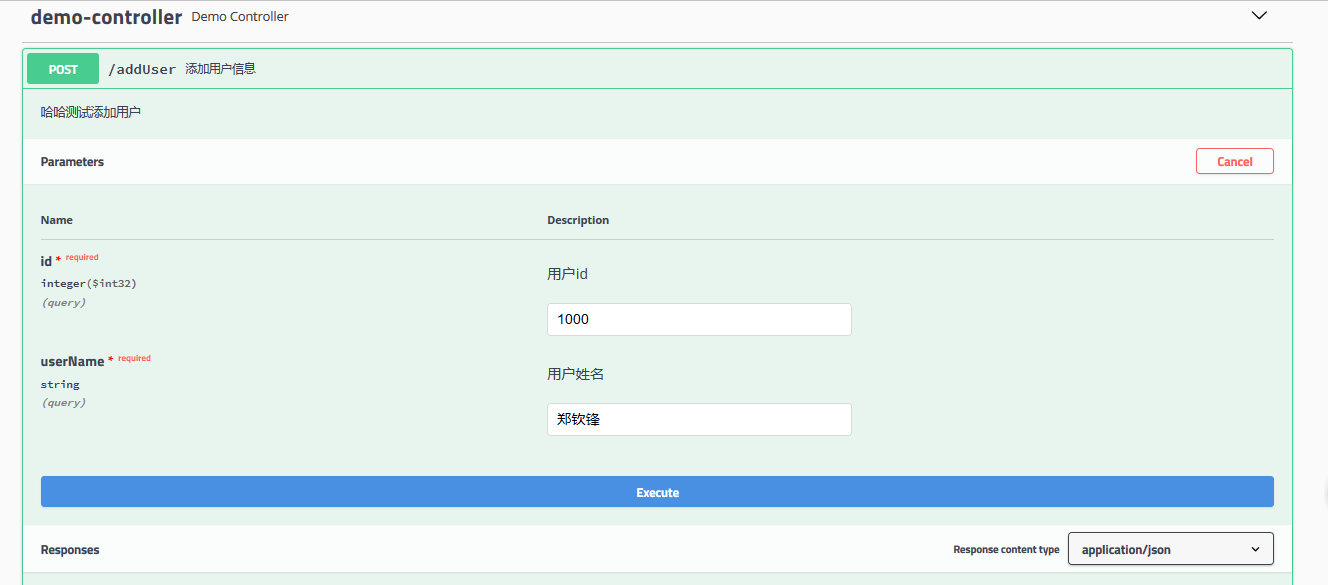
点击Execute提交请求,
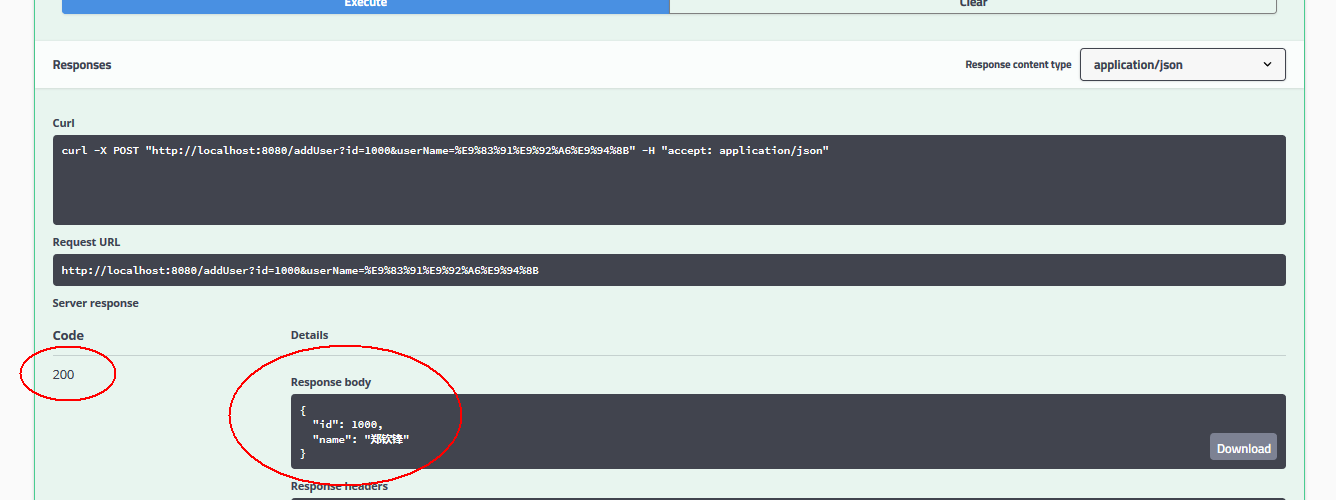
请求成功,其它接口可自行测试,皆正常!!!
最新文章
- 关闭SELinux和iptables防火墙
- UI控件(UITextField)
- SFC的OAM管理框架
- DirectShow Filter的开发实践
- 在Ubuntu上安装LAMP服务器
- href的那些事
- springMVC-错误消息的显示和国际化
- Android源码分析之MessageQueue
- 使用Ajax.BeginForm 中需要 上传文件 但 Request.files获取不到
- NodeJS异常处理uncaughtException篇
- 好记心不如烂笔头之jQuery学习,第一章
- python:利用asyncio进行快速抓取
- [计算机基础]HTTP协议学习笔记
- tcp/ip通信传输流
- 【css3】使用filter属性实现改变svg图标颜色
- Oracle数据库查看表空间是否为自增的
- jQuery创建元素和添加子元素
- spring 原理1:java 模拟springIOC容器
- log4delphi使用(转)
- scala中Map和Set