Beego学习笔记6:分页的实现
2024-10-19 11:57:43
实现分页的效果
1> 分页的实现的业务逻辑
1->每个页面显示N条数据,总的数据记录数M,则分页的个数为M%N==0?M/N:M/N+1;
2->页面渲染分页的html部分
3>切换页数,以及输入参数,后台处理,重新获取新的满足条件的数据
4>分页的方法,js分页,以及后台分页(下面的分页就是实现后台分页)
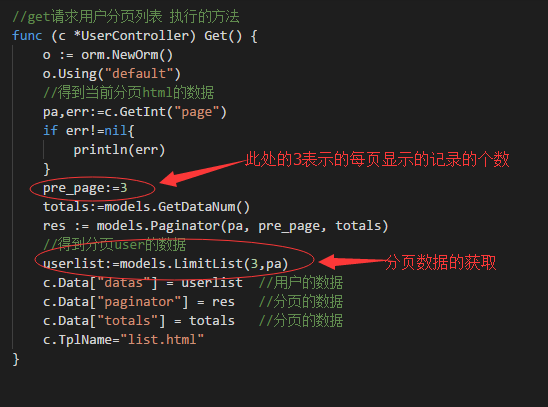
2>在models分页夹下,新建一个pager.go的模型,作为分页模型的结构使用。其代码如下:
package models

import (

	"math"

	_ "github.com/go-sql-driver/mysql"

)

//分页方法,根据传递过来的页数,每页数,总数,返回分页的内容 7个页数 前 1,2,3,4,5 后 的格式返回,小于5页返回具体页数

func Paginator(page, prepage int, nums int64) map[string]interface{} {

		var firstpage int //前一页地址

		var lastpage int  //后一页地址

		//根据nums总数,和prepage每页数量 生成分页总数

		totalpages := int(math.Ceil(float64(nums) / float64(prepage))) //page总数

		if page > totalpages {

			page = totalpages

		}

		if page <= 0 {

			page = 1

		}

		var pages []int

		switch {

		case page >= totalpages-5 && totalpages > 5: //最后5页

			start := totalpages - 5 + 1

			firstpage = page - 1

			lastpage = int(math.Min(float64(totalpages), float64(page+1)))

			pages = make([]int, 5)

			for i, _ := range pages {

				pages[i] = start + i

			}

		case page >= 3 && totalpages > 5:

			start := page - 3 + 1

			pages = make([]int, 5)

			firstpage = page - 3

			for i, _ := range pages {

				pages[i] = start + i

			}

			firstpage = page - 1

			lastpage = page + 1

		default:

			pages = make([]int, int(math.Min(5, float64(totalpages))))

			for i, _ := range pages {

				pages[i] = i + 1

			}

			firstpage = int(math.Max(float64(1), float64(page-1)))

			lastpage = page + 1

			//fmt.Println(pages)

		}

		paginatorMap := make(map[string]interface{})

		paginatorMap["pages"] = pages

		paginatorMap["totalpages"] = totalpages

		paginatorMap["firstpage"] = firstpage

		paginatorMap["lastpage"] = lastpage

		paginatorMap["currpage"] = page

		return paginatorMap

}
3> 在views文件夹下,新建一个list.html页面作为显示分页的效果。其代码如下:
<!DOCTYPE html>
<html>
<head>
<title>首页 - 用户列表页面</title>
<link rel="shortcut icon" href="/static/img/favicon.png" />
<meta http-equiv="Content-Type" content="text/html; charset=utf-8">
<style>
.am-cf{
height: 50px;
margin-top: 30px;
line-height: 50px;
text-align: center;
vertical-align: middle;
margin-left: 40%;
}
.am-fr{
float: left;
line-height: 50px;
text-align: center;
vertical-align: middle;
height: 50px;
margin-top: -15px;
}
.am-pagination{
list-style:none;
height: 50px;
line-height: 50px;
text-align: center;
vertical-align: middle;
}
.am-pagination li{
float:left;
margin-left: 10px;
}
.am-pagination li a{
text-decoration:none;
}
.am-jl{
float: left;
margin-left: 20px;
}
.am-active{
color: #f00;
}
</style>
</head>
<body>
<div class="row pull-right" style="margin-bottom: 20px;margin-right: 5px;text-align:right;margin-right: 40px;">
<a class="btn btn-success" href="/Home/Edit?Id=0">添加</a>
</div> <table class="table table-striped table-hover table-bordered ">
<thead>
<th style="text-align: center">ID</th>
<th style="text-align: center">名称</th>
<th style="text-align: center">昵称</th>
<th style="text-align: center">密码</th>
<th style="text-align: center">Email</th>
<th style="text-align: center">性别</th>
<th style="text-align: center">手机号</th>
<th style="text-align: center">操作</th>
</thead> <tbody id="sortable">
{{range $index, $item := .datas}}
<tr class="sort-item" id="module_{{$item.Id}}" value="{{$item.Id}}">
<td style="text-align: center;width: 150px;"><span class="label label-default" >{{$item.Id}}</span></td>
<td style="text-align: center;width: 240px;" ><strong>{{$item.Name}}</strong></td>
<td style="text-align: center;width: 240px;" ><strong>{{$item.Nickname}}</strong></td>
<td style="text-align: center;width: 240px;" ><strong>{{$item.Pwd}}</strong></td>
<td style="text-align: center;width: 240px;" ><strong>{{$item.Email}}</strong></td>
<td style="text-align: center;width: 240px;" ><strong>{{$item.Sex}}</strong></td>
<td style="text-align: center;width: 240px;" ><strong>{{$item.Phone}}</strong></td>
<td style="text-align: center;width: 150px;">
<a href="/Home/Edit?Id={{$item.Id}}" class="label label-info" title="修改" >修改</a>
<a href="/Home/Delete?Id={{$item.Id}}" class="label label-info" title="删除">删除</a>
</td>
</tr>
{{end}}
</tbody>
</table>
<div class="am-cf"> <div class="am-fr">
<ul class="am-pagination">
<li class=""><a href="/Home/List?page={{.paginator.firstpage}}">«</a></li>
{{range $index,$page := .paginator.pages}}
<li {{if eq $.paginator.currpage $page }}class="am-active"{{end}}>
<a href="/Home/List?page={{$page}}">{{$page}}</a></li>
{{end}}
<li><a href="/Home/List?page={{.paginator.lastpage}}">»</a></li>
</ul>
</div>
<div class="am-jl">
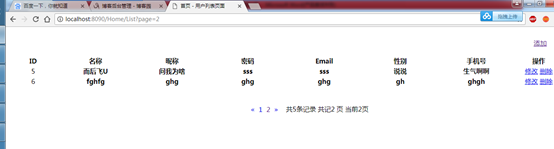
共{{.totals}}条记录 共记{{.paginator.totalpages}} 页 当前{{.paginator.currpage}}页
</div>
</div>
<script type="text/javascript" src="http://cdn.staticfile.org/jquery/2.0.3/jquery.min.js"></script>
</body>
</html>
4> 运行起来,看看效果

5> 下一章,实现js分页的效果
6>分页的注意点:
最新文章
- ASP.NET MVC随想录——锋利的KATANA
- android 定时器AlarmManager
- CHAP认证原理
- kendo ui grid控件在选择行时如何取得所选行的某一列数据
- XML操作:2.LINQ TO XML(http://www.cnblogs.com/AlexLiu/archive/2008/10/27/linq.html)
- [总结]Android系统体系结构
- 【c#操作office】--OleDbDataAdapter 与OleDbDataReader方式读取excel,并转换为datatable
- 常见查找算法之php, js,python版
- Windows上安装配置SSH教程(9)——综合应用:在Windows上使用脚本实现SSH远程登陆与文件传输
- springboot情操陶冶-web配置(九)
- 批量删除Excel里面的换行符
- 前端 - jsonp 跨域ajax
- 20165220预备作业3 Linux安装及学习
- 深度优化LNMP之PHP
- (并查集)How Many Tables -- HDU --1213
- (转) Linux(Centos7)yum安装最新mysql
- JavaScript callback function 理解
- MySQL级联删除和级联修改
- python 网络编程--socket模块/struct模块
- 使用jQuery实现向上循环滚动效果(超简单)