Vuex源码分析(转)
当我们用vue在开发的过程中,经常会遇到以下问题
多个vue组件共享状态
Vue组件间的通讯
在项目不复杂的时候,我们会利用全局事件bus的方式解决,但随着复杂度的提升,用这种方式将会使得代码难以维护,因此vue官网推荐了一种更好用的解决方案Vuex。
Vuex是什么
Vuex 是一个专为 Vue.js 应用程序开发的状态管理模式。它采用集中式存储管理应用的所有组件的状态,并以相应的规则保证状态以一种可预测的方式发生变化。说直白一点,vuex就是把组件的共享状态抽取出来,以一个全局单例模式管理的数据仓库,里面提供了对应用的数据存储和对数据的操作,维护整个应用的公共数据。
看源代码之前,我们看一下vuex的使用方法
/***code例子*****/

/**

 *  store.js文件

 *  创建store对象,配置state、action、mutation以及getter

 *

 **/

import Vue from 'vue'

import Vuex from 'vuex'

//注册插件

Vue.use(Vuex)

//创建store仓库

export default new Vuex.Store({

  state: {

    count: 0

  },

  mutations: {

    increment (state) {

      state.count++

    }

  },

  actions: {

    increment (context) {

      context.commit('increment')

    }

  }

})

/**

 *  vue-index.js文件

 *

 *

 **/

import Vue from 'vue'

import App from './../pages/app.vue'

import store from './store.js'

//将store挂载到根组件

new Vue({

  el: '#root',

  router,

  store,

  render: h => h(App)

})

//app.vue

export default {

  computed: {

  },

  methods: {

    increment (obj) {

    //组件中调用increment方法

      this.$store.dispatch('increment', obj)

    }

  }

}
整个vuex的使用步骤如下:
1、安装vuex插件
2、创建store状态管理仓库
3、将store注入到vue组件
4、使用dispatch调用action方法
框架核心流程
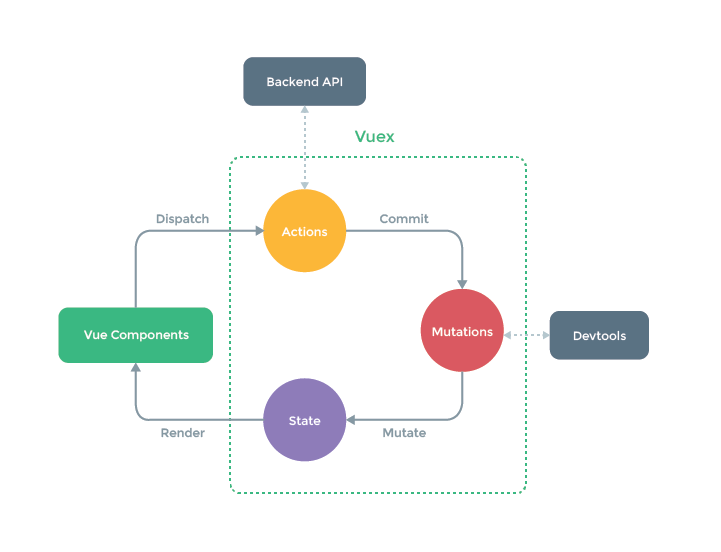
在分析源代码之前,我们先来看一下整个vuex的运行流程,下面这张图是官方文档中提供的核心思想图

Vue Components:Vue组件。HTML页面上,负责接收用户操作等交互行为,执行dispatch方法触发对应action进行回应。
dispatch:操作行为触发方法,是唯一能执行action的方法。
actions:操作行为处理模块。负责处理Vue Components接收到的所有交互行为。包含同步/异步操作,支持多个同名方法,按照注册的顺序依次触发。向后台API请求的操作就在这个模块中进行,包括触发其他action以及提交mutation的操作。
commit:状态改变提交操作方法。对mutation进行提交,是唯一能执行mutation的方法。
mutations:状态改变操作方法。是Vuex修改state的唯一推荐方法
state:页面状态管理容器对象。集中存储Vue components中data对象的零散数据,全局唯一,以进行统一的状态管理。页面显示所需的数据从该对象中进行读取,利用Vue的细粒度数据响应机制来进行高效的状态更新。
整体流程:
用户在组件上的交互触发的action,action通过调用(commit)mutations的方法去改变state的状态,而state由于加入了vue的数据响应机制,会导致对应的vue组件更新视图,完成整个状态更新。
目录结构
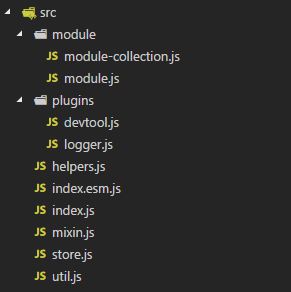
源代码分析前,首先我们看一下目录结构

module
module-collection.js:创建模块树
Module.js:创建模块
plugins
devtool.js:开发环境工具插件,针对chorme安装 vue-tool 插件
logger.js:state状态改变日志查询
helpers.js:提供mapSate,mapMutations,mapActions,mapGetters 等操作api函数
index.js
index.exm.js:都是入口文件
mixin.js:混入方法,提供将store 仓库挂载到每个vue实例的方法
store.js:整个代码核心,创建store对象
util.js:工具类
Vuex的安装
Vue 通过Vue.use(Vuex)安装vuex, use通过调用vuex对象的install方法将vuex载入,我们看一下install方法的实现:
let Vue // 安装的时候增加vue对象,避免引入vue包

//安装插件

export function install(_Vue) {

    //Vue已经被初始化,说明已经安装过,给出提示

    if (Vue) {

        if (process.env.NODE_ENV !== 'production') {

            console.error(

                '[vuex] already installed. Vue.use(Vuex) should be called only once.'

            )

        }

        return

    }

    Vue = _Vue

        //安装vuex

    applyMixin(Vue)

}

// 自动安装模块

if (typeof window !== 'undefined' && window.Vue) {

    install(window.Vue)

}
这里用了一个比较巧的方法,vue作为参数传入vuex,所以我们不用通过导入vue,代码打包的时候就不会将vue包含进来。
来看下applyMixin方法内部代码
const version = Number(Vue.version.split('.')[0])

    //2.0以上用混入

if (version >= 2) {

    Vue.mixin({ beforeCreate: vuexInit })

} else {

    // override init and inject vuex init procedure

    // for 1.x backwards compatibility.

    //重写init方法

    const _init = Vue.prototype._init

    Vue.prototype._init = function(options = {}) {

        options.init = options.init ? [vuexInit].concat(options.init) :

            vuexInit

        _init.call(this, options)

    }

}

  function vuexInit() {

    const options = this.$options

        // store 注入

    if (options.store) { //根组件

        this.$store = typeof options.store === 'function' ?

            options.store() : //模块重用

            options.store

    } else if (options.parent && options.parent.$store) { //其他非根组件注入,向上传递$store,保证任何组件都可以访问到

        this.$store = options.parent.$store

    }

}
根据不同版本,2.x.x以上版本,使用 hook 的形式进行注入,或使用封装并替换Vue对象原型的_init方法,实现注入。
将初始化Vue根组件时传入的store设置到this对象的$store属性上,子组件从其父组件引用$store属性,层层嵌套进行设置。在任意组件中执行 this.$store 都能找到装载的那个store对象
接下来我们来看状态管理库的创建
我们从构造函数一步一步分析
ModuleCollection构建
if (process.env.NODE_ENV !== 'production') {

        assert(Vue, `must call Vue.use(Vuex) before creating a store instance.`) //没有vue对象说明没有注入

        assert(typeof Promise !== 'undefined', `vuex requires a Promise polyfill in this browser.`)

        assert(this instanceof Store, `Store must be called with the new operator.`)

    }

    const {

        plugins = [], //这个选项暴露出每次 mutation 的钩子。Vuex 插件就是一个函数,它接收 store 作为唯一参数

            strict = false //严格模式下,无论何时发生了状态变更且不是由 mutation 函数引起的,将会抛出错误

    } = options

    let {

        state = {} //状态

    } = options

    if (typeof state === 'function') {

        state = state() //状态复用,使用一个函数来声明模块状态

    }

    // store internal state

    this._committing = false //是否在提交状态

    this._actions = Object.create(null) //action对象存储

    this._mutations = Object.create(null) //mutation对象存储

    this._wrappedGetters = Object.create(null) //装后的getters集合对象

    this._modules = new ModuleCollection(options) //封装module集合对象

    this._modulesNamespaceMap = Object.create(null) //创建命名空间

    this._subscribers = []

    this._watcherVM = new Vue() //vue实例,Vue组件用于watch监视变化,相当于bus
首先对执行环境做判断,vuex必须已经安装并且支持Promise语法,接下来对输入的参数进行简单的处理以及创建一些属性,用于后续操作,其中有一步操作this._modules = new ModuleCollection(options),对传入的options进行处理,生成模块集合。来看一下ModuleCollection的操作
constructor(rawRootModule) {

    // register root module (Vuex.Store options)

    //注册根模块

    this.register([], rawRootModule, false)

}

register(path, rawModule, runtime = true) {

    if (process.env.NODE_ENV !== 'production') {

        assertRawModule(path, rawModule)

    }

    //生成模块对象

    const newModule = new Module(rawModule, runtime)

    if (path.length === 0) {

        this.root = newModule //根模块

    } else {

        //子元素把关系添加到父元素,形式关系树

        const parent = this.get(path.slice(0, -1))

        parent.addChild(path[path.length - 1], newModule)

    }

    // 注册嵌套的模块

    if (rawModule.modules) {

        forEachValue(rawModule.modules, (rawChildModule, key) => {

            this.register(path.concat(key), rawChildModule, runtime)

                //this.register(['cart',{cartmodules},runtime])

        })

    }

}
ModuleCollection主要将传入的options对象整个构造为一个module对象,并循环调用 this.register([key], rawModule, false) 为其中的modules属性进行模块注册,使其都成为module对象,最后options对象被构造成一个完整的状态树。ModuleCollection类还提供了modules的更替功能
modules属性中每一个模块都是一个模块对象,而传入的option会被当成是整个状态树的根模块。
我们接下来看一下了解一下module对象
    constructor(rawModule, runtime) {

        this.runtime = runtime //运行时间

        this._children = Object.create(null) //children子模块

        this._rawModule = rawModule //模块内容

        const rawState = rawModule.state //模块状态

        this.state = (typeof rawState === 'function' ? rawState() : rawState) || {} //state

    }
对象是对传入的每一个module参数进行封装,添加了存储的子模块,已达到状态树的构建目的,同时提供一些基本操作的方法。
我们来看一下官网提供的购物车的例子构建完的moduleCollection对象

这个利用树形结构,清晰地表达出了整个数据仓库数据的关系,moduleCollection将成为后期数据和操作重新组织和查找基础。
dispatch和commit函数设置
回到store的构造函数
const store = this

const { dispatch, commit } = this

//dispatch 方法

this.dispatch = function boundDispatch(type, payload) {

        return dispatch.call(store, type, payload)

    }

    //commit 方法

this.commit = function boundCommit(type, payload, options) {

    return commit.call(store, type, payload, options)

}
封装dispatch 和commit方法,具体实现如下:
commit(_type, _payload, _options) {

        // check object-style commit

        const {

            type,

            payload,

            options

        } = unifyObjectStyle(_type, _payload, _options)

        const mutation = { type, payload }

        const entry = this._mutations[type] //变化有没有注册这个类型  commit导致mutation

        if (!entry) {

            if (process.env.NODE_ENV !== 'production') {

                console.error(`[vuex] unknown mutation type: ${type}`)

            }

            return

        }

        //处理commit

        this._withCommit(() => {

            entry.forEach(function commitIterator(handler) {

                handler(payload) //mutation操作

            })

        })

        // 订阅者函数遍历执行,传入当前的mutation对象和当前的state

        this._subscribers.forEach(sub => sub(mutation, this.state))

        //新版本silent去掉了

        if (

            process.env.NODE_ENV !== 'production' &&

            options && options.silent

        ) {

            console.warn(

                `[vuex] mutation type: ${type}. Silent option has been removed. ` +

                'Use the filter functionality in the vue-devtools'

            )

        }

    }

    //触发action

dispatch(_type, _payload) {

    // check object-style dispatch

    const {

        type,

        payload

    } = unifyObjectStyle(_type, _payload)

    const entry = this._actions[type] //触发action配置表

    if (!entry) {

        if (process.env.NODE_ENV !== 'production') {

            console.error(`[vuex] unknown action type: ${type}`)

        }

        return

    }

    return entry.length > 1 ?

        Promise.all(entry.map(handler => handler(payload))) :

        entry[0](payload)

}
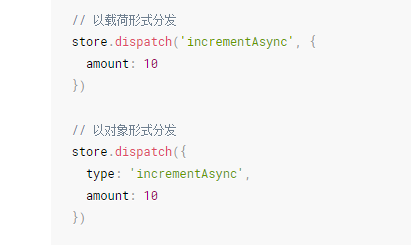
dispatch的功能是触发并传递一些参数(payload)给对应type的action。Dispatch提供了两种方法的调用:
所以使用了unifyObjectStyle对传入的参数做了统一化处理。接着找到对应type的action,并逐个执行。

commit方法和dispatch方法大同小异,但是比dispatch复杂一点。每次调用都要对订阅者遍历执行,这个操作的原因后面再解析。同时每次执行mutation方法集合时,都要调用函数_withCommit方法。
_withCommit是一个代理方法,所有触发mutation的进行state修改的操作都经过它,由此来统一管理监控state状态的修改。实现代码如下。
    _withCommit(fn) {

        const committing = this._committing

        this._committing = true

        fn()

        this._committing = committing

    }
每次提交前保存当前commit状态,然后置为true后进行本次操作,操作完成后再还原本次修改之前的状态。我们上面说过mutation是Vuex修改state的唯一推荐方法。这样设置的作用有利于状态的跟踪,state的修改来自于mutation。那是如何跟踪的呢?我们看下面一段代码:
function enableStrictMode(store) {

    store._vm.$watch(function() { return this._data.$$state }, () => {

        if (process.env.NODE_ENV !== 'production') {

            //如果不是通过commit函数,提示

            assert(store._committing, `Do not mutate vuex store state outside mutation handlers.`)

        }

    }, { deep: true, sync: true })

}
这里通过vue $watch 方法监控每一次data的变化,如果在开发环境并且committing为false的话,则表明不是通过mutation操作状态变化,提示非法。同时这也解释了官网要求mutation必须为同步操作state。因为如果异步的话,异步函数调用完成后committing已经还原状态,而回调函数还没调用,$watch还没有接收到data的变化,当回调成功时,committing已经被置为false,不利于状态的跟踪。
模块的安装
接下来,构造函数进行模块的安装
// init root module. 初始化根模块

// this also recursively registers all sub-modules 递归所有子模块

// and collects all module getters inside this._wrappedGetters 把所有的getters对象都收集到Getter里面

installModule(this, state, [], this._modules.root)
我们看一下installModule的具体内容
function installModule(store, rootState, path, module, hot) {

    const isRoot = !path.length //是否为根元素

    const namespace = store._modules.getNamespace(path) //命名空间

    // register in namespace map 如果是命名空间模块,推送到map对象里面

    if (module.namespaced) {

        store._modulesNamespaceMap[namespace] = module

    }

    // set state

    //将模块的state添加到state链中,是的可以按照 state.moduleName 访问

    if (!isRoot && !hot) {

        const parentState = getNestedState(rootState, path.slice(0, -1))

        const moduleName = path[path.length - 1]

        store._withCommit(() => {

            //确保属性被创建后也是响应式的

            Vue.set(parentState, moduleName, module.state)

        })

    }

    //模块上下文

    /*local {

        dispatch,

        commit,

        getters,

        state

    }

    */

    const local = module.context = makeLocalContext(store, namespace, path)

        // 注册对应模块的mutation,供state修改使用

    module.forEachMutation((mutation, key) => {

            const namespacedType = namespace + key

            registerMutation(store, namespacedType, mutation, local)

        })

        // 注册对应模块的action,供数据操作、提交mutation等异步操作使用

    module.forEachAction((action, key) => {

            const namespacedType = namespace + key

            registerAction(store, namespacedType, action, local)

        })

        // 注册对应模块的getters,供state读取使用

    module.forEachGetter((getter, key) => {

        const namespacedType = namespace + key

        registerGetter(store, namespacedType, getter, local)

    })

}
判断是否是根目录,以及是否设置了命名空间,若存在则在namespace中进行module的存储,在不是根组件且不是 hot 条件的情况下,通过getNestedState方法拿到该module父级的state,拿到其所在moduleName,调用 Vue.set(parentState, moduleName, module.state) 方法将其state设置到父级state对象的moduleName属性中,由此实现该模块的state注册。这里建立了一条可观测的data数据链。
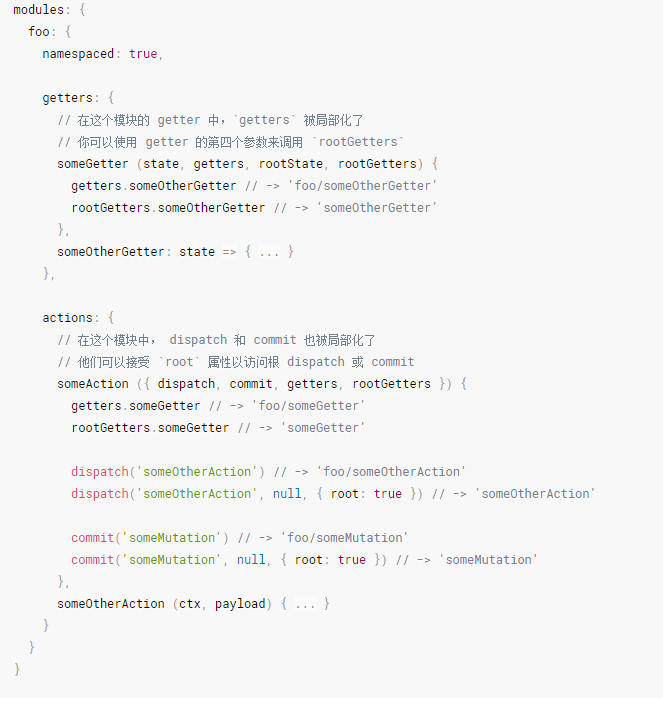
接下来定义local变量和module.context的值,执行makeLocalContext方法,为该module设置局部的 dispatch、commit方法以及getters和state,为的是在局部的模块内调用模块定义的action和mutation。也就是官网提供的这种调用方式

定义local环境后,循环注册我们在options中配置的action以及mutation等,这种注册操作都是大同小异,我们来看一下注册mutation的步骤:
/***registerMutation***/

function registerMutation(store, type, handler, local) {

    const entry = store._mutations[type] || (store._mutations[type] = [])

        //重新封装调用函数

    entry.push(function wrappedMutationHandler(payload) {

        handler.call(store, local.state, payload)

    })

}
type作为id,把对应的值函数封装后存储在数组里面,然后作为store._mutations的属性。store._mutations收集了我们传入的所有mutation函数
action和getter的注册也是同理的,只是action handler比mutation handler以及getter wrapper多拿到dispatch和commit操作方法,因此action可以进行dispatch action和commit mutation操作。
注册完了根组件的actions、mutations以及getters后,递归调用自身,为子组件注册其state,actions、mutations以及getters等。
/***子模块代码****/

  module.forEachChild((child, key) => {

        installModule(store, rootState, path.concat(key), child, hot)

    })

/***子模块代码end****/
Store._vm组件安装
执行完各module的install后,执行resetStoreVM方法,进行store组件的初始化。
resetStoreVM(this, state)

 function resetStoreVM(store, state, hot) {

    const oldVm = store._vm

    // bind store public getters

    store.getters = {}

    const wrappedGetters = store._wrappedGetters

    const computed = {}

        // 循环所有处理过的getters,并新建computed对象进行存储,通过Object.defineProperty方法为getters对象建立属性,

        //使得我们通过this.$store.getters.xxxgetter能够访问到该getters

    forEachValue(wrappedGetters, (fn, key) => {

        // use computed to leverage its lazy-caching mechanism

        computed[key] = () => fn(store)

        Object.defineProperty(store.getters, key, {

            get: () => store._vm[key],

            enumerable: true // for local getters

        })

    })

    // use a Vue instance to store the state tree

    // suppress warnings just in case the user has added

    // some funky global mixins

    const silent = Vue.config.silent

    Vue.config.silent = true

        // 设置新的storeVm,将当前初始化的state以及getters作为computed属性(刚刚遍历生成的)

    store._vm = new Vue({

        data: {

            $$state: state //相当于总线

        },

        computed

    })

    Vue.config.silent = silent

    // enable strict mode for new vm

    // 该方法对state执行$watch以禁止从mutation外部修改state

    if (store.strict) {

        enableStrictMode(store)

    }

    // 若不是初始化过程执行的该方法,将旧的组件state设置为null,

    //强制更新所有监听者(watchers),待更新生效,DOM更新完成后,执行vm组件的destroy方法进行销毁,减少内存的占用

    if (oldVm) {

        if (hot) {

            // dispatch changes in all subscribed watchers

            // to force getter re-evaluation for hot reloading.

            store._withCommit(() => {

                oldVm._data.$$state = null

            })

        }

        Vue.nextTick(() => oldVm.$destroy())

    }

}
resetStoreVm方法创建了当前store实例的_vm组件,至此store就创建完毕了
plugin注入
最后执行plugin插件
//打印变化前后的值

plugins.forEach(plugin => plugin(this))

//如果配置了开发者工具

if (Vue.config.devtools) {

    devtoolPlugin(this)

}
Plugins.foreach 默认执行了createlogger方法,我们来看createLogger的实现代码:
export default function createLogger({

    collapsed = true,

    filter = (mutation, stateBefore, stateAfter) => true,

    transformer = state => state,

    mutationTransformer = mut => mut

} = {}) {

    return store => {

        let prevState = deepCopy(store.state)

        store.subscribe((mutation, state) => {

            if (typeof console === 'undefined') {

                return

            }

            const nextState = deepCopy(state)

            if (filter(mutation, prevState, nextState)) {

                const time = new Date()

                const formattedTime = ` @ ${pad(time.getHours(), 2)}:${pad(time.getMinutes(), 2)}:${pad(time.getSeconds(), 2)}.${pad(time.getMilliseconds(), 3)}`

                const formattedMutation = mutationTransformer(mutation)

                const message = `mutation ${mutation.type}${formattedTime}`

                const startMessage = collapsed ?

                    console.groupCollapsed :

                    console.group

                // render

                try {

                    startMessage.call(console, message)

                } catch (e) {

                    console.log(message)

                }

                console.log('%c prev state', 'color: #9E9E9E; font-weight: bold', transformer(prevState))

                console.log('%c mutation', 'color: #03A9F4; font-weight: bold', formattedMutation)

                console.log('%c next state', 'color: #4CAF50; font-weight: bold', transformer(nextState))

                try {

                    console.groupEnd()

                } catch (e) {

                    console.log('—— log end ——')

                }

            }

            prevState = nextState

        })

    }

}
createLogger通过store.subscribe将方法添加到订阅,待触发的时候调用。这里通过前后state状态的打印对比,跟踪状态变更。
devtoolPlugin则是对vue-tool控制台信息的添加监控
mapSate,mapMutations,mapActions,mapGetters函数实现
Vuex还提供了mapSate,mapMutations,mapActions,mapGetters辅助函数来帮助我们生成计算属性和对应方法。下面用mapMutations为例来分析一下实现过程
首先看调用的方式:
import { mapMutations } from 'vuex'

export default {

  // ...

  methods: {

    ...mapMutations([

      'increment', // 将 `this.increment()` 映射为 `this.$store.commit('increment')`

      // `mapMutations` 也支持载荷:

      'incrementBy' // 将 `this.incrementBy(amount)` 映射为 `this.$store.commit('incrementBy', amount)`

    ]),

    ...mapMutations({

      add: 'increment' // 将 `this.add()` 映射为 `this.$store.commit('increment')`

    }),

    ...mapMutations('some/nested/module', [  //在模块some/nested/module查看

    'foo', //将 `this.increment()` 映射为 `this.$store.commit('some/nested/module/foo')`

    'bar'

  ])

  }

}
看一下源代码:
export const mapMutations = normalizeNamespace((namespace, mutations) => {

const res = {}

normalizeMap(mutations).forEach(({ key, val }) => {

    val = namespace + val

    res[key] = function mappedMutation(...args) {

        if (namespace && !getModuleByNamespace(this.$store, 'mapMutations', namespace)) {

            return

        }

        return this.$store.commit.apply(this.$store, [val].concat(args))

    }

})

return res

})

  //返回对象数组 key-value

function normalizeMap(map) {

    return Array.isArray(map) ?

        map.map(key => ({ key, val: key })) :

        Object.keys(map).map(key => ({ key, val: map[key] }))

}

//处理命名空间参数问题

function normalizeNamespace(fn) {

    return (namespace, map) => {

        if (typeof namespace !== 'string') {

            map = namespace

            namespace = ''

        } else if (namespace.charAt(namespace.length - 1) !== '/') {

            namespace += '/'

        }

        return fn(namespace, map)

    }

}

//通过命名空间找模块

function getModuleByNamespace(store, helper, namespace) {

    const module = store._modulesNamespaceMap[namespace]

    if (process.env.NODE_ENV !== 'production' && !module) {

        console.error(`[vuex] module namespace not found in ${helper}(): ${namespace}`)

    }

    return module

}
其实就是用normalizeNamespace和normalizeMap去统一化参数,生成key-value的对象组,然后对函数惊醒封装,调用commit方法。
至此,整个vuex的源码核心就分析完成。源码中还有一些工具函数类似registerModule、unregisterModule、hotUpdate、watch以及subscribe等,这些方法都是对上面代码行为的封装调用,然后暴露出来的接口,都比较容易理解。
链接:https://www.cnblogs.com/caizhenbo/p/7380200.html
最新文章
- 用批处理脚本一键安装 MongoDB
- jquery_datatables
- CaptureManagerSDK
- java的客户端可以连接CPlus的服务端
- js的深度拷贝和浅拷贝
- Python3基础 逻辑与 and
- [SQL]开启事物,当两条插入语句有出现错误的时候,没有错误的就插入到表中,错误的语句不影响到正确的插入语句
- [Netbeans]为面板设置背景图片
- java JDK安装
- POJ 1037 DP
- java 显示视频时间--玩的
- grunt getHTML
- Ubuntu VPN PPTP 连接要选上这个啊
- JS实现EasyUI ,Datagrid,合并单元格功能
- 邓_phpcms_二次开发_留言板
- 记一次禁止chrome打印出现空白页的情况
- JavaScript深入(操作BOM对象)
- linux的tar命令
- Django根据现有数据库建立/更新model
- fragment The specified child already has a parent. You must call removeView()