夯实Java基础(二十五)——JDBC使用详解
1、JDBC介绍
JDBC的全称是Java Data Base Connectivity(Java数据库连接)。是一种用于执行SQL语句的Java API,可以为多种关系数据库提供统一访问(例如MySQL,Oracle等),它由一组用Java语言编写的类和接口组成。JDBC提供了一种基准,据此可以构建更高级的工具和接口,使数据库开发人员能够编写数据库应用程序,JDBC实现了所有这些面向标准的目标并且具有简单、严格类型定义且高性能实现的接口。
JDBC给数据库的连接搭建了桥梁,然后再根据不同的数据库厂商实现JDBC接口的驱动,就可以轻松的连接各种关系型数据库了。
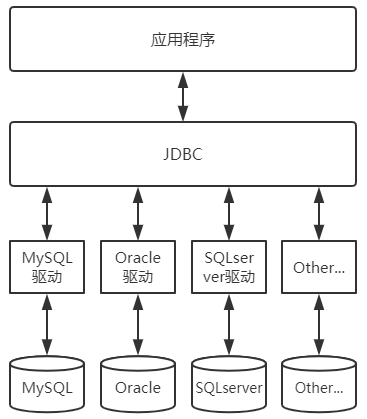
上面的图片是各种不同类型的数据库都有相应的实现,本文中的代码都是使用MySQL数据库实现的。所以我们需要MySQL的驱动
驱动下载网址:ttps://repo1.maven.org/maven2/mysql/mysql-connector-java/ (我选的是mysql-connector-java-5.1.48.jar)
2、常用接口
①、Driver接口
Driver接口由数据库厂家提供,作为java开发人员,只需要使用Driver接口就可以了。在编程中要连接数据库,必须先装载特定厂商的数据库驱动程序,不同的数据库有不同的装载方法。如:
装载MySql驱动:Class.forName("com.mysql.jdbc.Driver");
装载Oracle驱动:Class.forName("oracle.jdbc.driver.OracleDriver");
②、Connection接口
Connection与特定数据库的连接(会话),在连接上下文中执行sql语句并返回结果。DriverManager.getConnection(url, user, password)方法建立在JDBC URL中定义的数据库Connection连接上。
连接MySql数据库:Connection conn = DriverManager.getConnection("jdbc:mysql://host:port/database", "user", "password");
连接Oracle数据库:Connection conn = DriverManager.getConnection("jdbc:oracle:thin:@host:port:database", "user", "password");
连接SqlServer数据库:Connection conn = DriverManager.getConnection("jdbc:microsoft:sqlserver://host:port; DatabaseName=database", "user", "password");
常用方法:
- createStatement():创建向数据库发送sql的statement对象。
- prepareStatement(sql) :创建向数据库发送预编译sql的PrepareSatement对象。
- prepareCall(sql):创建执行存储过程的callableStatement对象。
- setAutoCommit(boolean autoCommit):设置事务是否自动提交。
- commit() :在链接上提交事务。
- rollback() :在此链接上回滚事务。
③、Statement接口
用于执行静态SQL语句并返回它所生成结果的对象。
三种Statement类:
- Statement:由createStatement创建,用于发送简单的SQL语句(不带参数)。
- PreparedStatement :继承自Statement接口,由preparedStatement创建,用于发送含有一个或多个参数的SQL语句。PreparedStatement对象比Statement对象的效率更高,并且可以防止SQL注入,所以我们一般都使用PreparedStatement。
- CallableStatement:继承自PreparedStatement接口,由方法prepareCall创建,用于调用存储过程。
常用Statement方法:
- execute(String sql):运行语句,返回是否有结果集
- executeQuery(String sql):运行select语句,返回ResultSet结果集。
- executeUpdate(String sql):运行insert/update/delete操作,返回更新的行数。
- addBatch(String sql) :把多条sql语句放到一个批处理中。
- executeBatch():向数据库发送一批sql语句执行。
④、ResultSet接口
ResultSet提供检索不同类型字段的方法,常用的有:
- getString(int index)、getString(String columnName):获得在数据库里是varchar、char等类型的数据对象。
- getFloat(int index)、getFloat(String columnName):获得在数据库里是Float类型的数据对象。
- getDate(int index)、getDate(String columnName):获得在数据库里是Date类型的数据。
- getBoolean(int index)、getBoolean(String columnName):获得在数据库里是Boolean类型的数据。
- getObject(int index)、getObject(String columnName):获取在数据库里任意类型的数据。
ResultSet还提供了对结果集进行滚动的方法:
- next():移动到下一行
- Previous():移动到前一行
- absolute(int row):移动到指定行
- beforeFirst():移动resultSet的最前面。
- afterLast() :移动到resultSet的最后面。
3、JDBC创建步骤
JDBC创建步骤可以分为如下:
导包—>加载驱动—>创建连接—>执行sql—>返回结果—>关闭连接
①、首先需要导入对应数据库的驱动包。
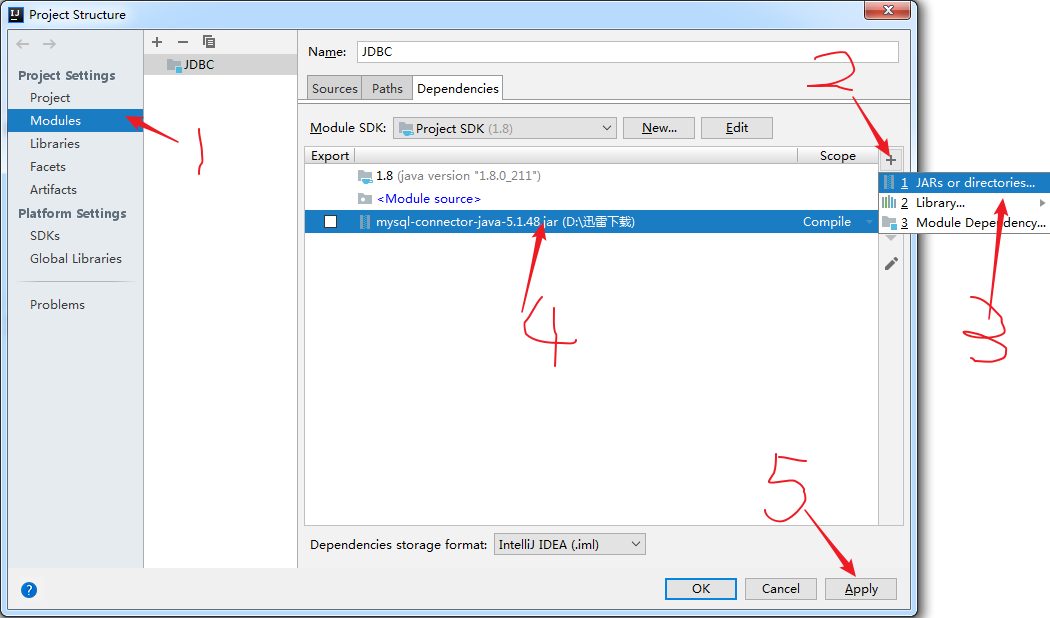
要访问MySQL时间就必须要用到MySQL驱动包(前面已经给出了链接),下载然后导入即可。本例用的是IDEA导入这个jar包。
导包步骤: 点击当前项目左上角File—>Project Structur—>Modules—>点击右边+号—>Jars Or directories
②、加载驱动
驱动的加载我们一般使用反射 Class.forName(“com.mysql.jdbc.Driver”) 来加载Driver这个类(因为它只会创建一次)。也可以使用 DriverManager.registerDriver(new Driver()) 来加载,但这种方式会new两个Driver,从而造成资源浪费,所以不推荐使用这种方式。
        try {

            Class.forName("com.mysql.jdbc.Driver");

        } catch (ClassNotFoundException e) {

            e.printStackTrace();

        }
注意:Class.forName是需要捕获ClassNotFoundException的。
③、建立连接
建立连接需要我们提供三个参数,分别是URL、USER、PASSWORD。
Connection conn = DriverManager.getConnection(url, user, password);
Connection conn = DriverManager.getConnection("jdbc:mysql://localhost:3306/mydb?characterEncoding=UTF-8","root","root");
它们各自的含义依次如下:
协议:jdbc
子协议:mysql
数据库服务端的IP地址:localhost或127.0.0.1
数据库端口:3306
连接的数据库名称:mydb
编码格式:?characterEncoding=UTF-8
数据库用户名:root
数据库密码:root (数据库密码是你安装时设置的密码)
        try {

            Class.forName("com.mysql.jdbc.Driver");

            Connection con = DriverManager.getConnection("jdbc:mysql://localhost:3306/mydb?characterEncoding=UTF-8", "root", "root");

        } catch (ClassNotFoundException e) {

            e.printStackTrace();

        } catch (SQLException e) {

            e.printStackTrace();

        }
Connection的getConnection方法也需要捕获SQLException异常。
④、执行SQL语句(Statement和PreparedStatement)
- 使用Statement执行语句
Statement对象的获取可以使用createStatement()方法。当Statement对象创建之后,就可以执行SQL语句,完成对数据库的增删改查操作。
对于查询类的SQL语句使用:executeQuery(sql),sql是一个字符串sql语句,返回结果是一个结果集
对于更新类(插入、删除、更新)的语句使用:executeUpdate(sql),sql是一个字符串sql语句,返回结果是一个整数(受影响的行数)
            Class.forName("com.mysql.jdbc.Driver");

            Connection con = DriverManager.getConnection("jdbc:mysql://localhost:3306/mydb?characterEncoding=UTF-8", "root", "root");

            Statement statement = con.createStatement();

            //添加数据

            String insert_sql="insert into t_user(username,password) values ('张三',123456)";

            int count = statement.executeUpdate(insert_sql);

            System.out.println("受影响行数:"+count);
在Statement中是可以使用字符串拼接的方式,该方式存在句法复杂,容易犯错等缺点,字符串拼接方式的SQL语句是非常繁琐的,中间有很多的单引号和双引号的混用,极易出错。
而且使用Statement有一个极大的缺点,会导致SQL注入。当SQL语句的 where 条件后面带有 or 1=1 的条件时,数据库会认为是true可以执行的,所以外界可以对数据库进行删、改操作,这样的数据库如同虚设。
所以一般不推荐使用Statement(如果是处理批量数据则推荐使用它),并且它在实际过程中使用的非常的少。而是使用后面的PreparedStatement。
            Class.forName("com.mysql.jdbc.Driver");

            Connection con = DriverManager.getConnection("jdbc:mysql://localhost:3306/mydb?characterEncoding=UTF-8", "root", "root");

            Statement statement = con.createStatement();

            //删除数据

            String id="1 or 1=1";

            String delete_sql="delete from t_user where id="+id;

            int count = statement.executeUpdate(delete_sql);

            System.out.println("受影响行数:"+count);
上面的例子典型的SQL注入,这样会将数据库中的所有数据全部删除。
- 使用PreparedStatement执行语句
PreparedStatement继承自Statement接口,它的实例对象可以通过调用preparedStatement(sql)方法来获取,注意它是直接传入了一条SQL语句。与Statement不同的是PrepareStatement中的SQL使用了占位符(也可以执行没有占位符的SQL语句)。“?”在SQL中就起到占位符的作用。这种方式除了避免了Statement拼接字符串的繁琐之外,还能够提高性能。每次SQL语句都是一样的,Java类就不会再次编译,这样能够显著提高性能。
然后再逐一给占位符填入数据,填入数据使用PreparedStatement实例的setXXX(int parameterIndex, String x)方法,其中第一个参数时索引位置,第二个是传入数据。
        Connection con=null;

        PreparedStatement ps=null;

        try {

            Class.forName("com.mysql.jdbc.Driver");

            con = DriverManager.getConnection("jdbc:mysql://localhost:3306/mydb?characterEncoding=UTF-8", "root", "root");

            String sql="insert into t_user(username,password) values (?,?)";

            ps=con.prepareStatement(sql);

            ps.setString(1,"李四");

            ps.setString(2,"123456");

            int count = ps.executeUpdate();

            System.out.println("受影响行数:"+count);

        } catch (ClassNotFoundException e) {

            e.printStackTrace();

        } catch (SQLException e) {

            e.printStackTrace();

        }
注意PreparedStatement中的索引是从 1开始的,而不是从0。
⑤、返回结果
当执行了查询操作后,会返回一个结果集,返回结果是一个结果集,它有一个光标指向结果的每一行,最开始它不指向结果,第一次执行next()后,它指向第一行结果,继续执行next(),他会继续指向下一行。next的返回结果是布尔值,它可以用来判断是否有下一行。ResultSet中常用的方法在前面第二点已经给出来了,可自行划上去瞄一眼。
- 而对于每一行结果,可以使用getXXX方法(XXX代表某一基本数据类型)来获取某一列的结果,getXXX方法的参数可以为字段名,也可以为索引号(从1开始)
        Connection con=null;

        PreparedStatement ps=null;

        ResultSet rs=null;

        try {

            Class.forName("com.mysql.jdbc.Driver");

            con = DriverManager.getConnection("jdbc:mysql://localhost:3306/mydb?characterEncoding=UTF-8", "root", "root");

            String sql="select * from t_user where username like ?";//查询SQL

            ps= con.prepareStatement(sql);

            ps.setString(1,"张"+"%");//查询条件

            rs = ps.executeQuery();//执行查询操作,并返回数据

            while (rs.next()){

                int id=rs.getInt(1);//用索引

                String username=rs.getString("username");//用字段名

                String password=rs.getString("password");

                System.out.print("编号:"+id+";");

                System.out.print("姓名:"+username+";");

                System.out.print("密码:"+password+";");

                System.out.println();

            }

        } catch (ClassNotFoundException e) {

            e.printStackTrace();

        } catch (SQLException e) {

            e.printStackTrace();

        }
⑥、关闭连接
当程序对数据库的操作完成后,切记一定要关闭连接,因为数据库连接非常的耗资源。顺序是后创建的先关闭,这些对象通常是ResultSet, Statement和Connection。
而且还要在关闭语句中加try catch已经以防止前面关闭出错,导致后面的关闭不了。
        }finally {

            if (rs!=null){

                try {

                    rs.close();

                } catch (SQLException e) {

                    e.printStackTrace();

                }

            }

            if (ps != null) {

                try {

                    ps.close();

                } catch (SQLException e) {

                    e.printStackTrace();

                }

            }

            if (con != null) {

                try {

                    con.close();

                } catch (SQLException e) {

                }

            }

        }
注意:为确保资源释放代码能运行,资源释放代码最好放在finally语句中。
4、JdbcUtil工具
前面Jdbc的基本使用使用已经讲得差不多了,但如果我们经常要创建连接,关闭连接的话,那么每次都要写重复的代码,显然这样非常的麻烦,为了避免这种情况,编写了一个JdbcUtil工具类,如下。
db.properties文件,用于放置驱动名称,连接数据库地址,数据库账号和密码。(db.properties要放在src或者默认会加载的目录下,不要放在包下面了)
#MySQL连接配置

mysqlDriver=com.mysql.jdbc.Driver

mysqlURL=jdbc:mysql://localhost:3306/mydb?characterEncoding=utf8&useSSL=false

mysqlUser=root

mysqlPwd=root
JdbcUtil工具类
package com.thr;

import java.io.IOException;

import java.sql.*;

import java.util.Properties;

/**

 * @author Administrator

 * @date 2020-02-14

 * @desc JdbcUtil工具

 */

public class JdbcUtil {

    static Properties pros = null;  //读取和处理资源文件中的信息

    static { //加载JdbcUtil类的时候调用db.properties文件

        pros = new Properties();

        try {

            pros.load(Thread.currentThread().getContextClassLoader().getResourceAsStream("db.properties"));

        } catch (IOException e) {

            e.printStackTrace();

        }

    }

    //创建连接

    public static Connection getConnection(){

        try {

            Class.forName(pros.getProperty("mysqlDriver"));

            return DriverManager.getConnection(pros.getProperty("mysqlURL"),

                    pros.getProperty("mysqlUser"),pros.getProperty("mysqlPwd"));

        } catch (Exception e) {

            e.printStackTrace();

            return null;

        }

    }

    //Connection关闭

    public static void close(Connection conn){

        try {

            if (conn!=null) {

                conn.close();

            }

        } catch (SQLException e) {

            e.printStackTrace();

        }

    }

    //Statement关闭

    public static void close(Statement st) {

        try {

            if (st != null) {

                st.close();

            }

        } catch (SQLException e) {

            e.printStackTrace();

        }

    }

    //ResultSet关闭

    public static void close(ResultSet rs){

        try {

            if (rs != null) {

                rs.close();

            }

        } catch (SQLException e) {

            e.printStackTrace();

        }

    }

}
JdbcUtil的简单示例


public class Demo2 {

    public static void main(String[] args) {

        Connection conn =null;

        Statement st=null;

        ResultSet rs=null;

        //调用JdbcUtil来创建连接

        conn = JdbcUtil.getConnection();

        String sql="select * from t_user";

        try {

            st = conn.createStatement();

            rs = st.executeQuery(sql);

            while (rs.next()){

                int id=rs.getInt(1);

                String username=rs.getString(2);

                String password=rs.getString(3);

                System.out.print("编号:"+id+";");

                System.out.print("姓名:"+username+";");

                System.out.print("密码:"+password+";");

                System.out.println();

            }

        } catch (SQLException e) {

            e.printStackTrace();

        } finally {

            JdbcUtil.close(rs);

            JdbcUtil.close(st);

            JdbcUtil.close(conn);

        }

    }

}

JdbcUtil简单示例
JdbcUtil简单示例
5、JDBC事物
1、事物的基本概念:是若干个SQL语句构成的一个操作序列,这些操作要么全做,要么全不做,是一个不可分割的整体单位。
2、事务的四个基本要素(ACID)
- 原子性(Atomicity):事务是一个不可分割的整体,所有操作要么全做,要么全不做;只要事务中有一个操作出错,回滚到事务开始前的状态的话,那么之前已经执行的所有操作都是无效的,都应该回滚到开始前的状态。
- 一致性(Consistency):事务开始前和结束后,数据库的完整性约束没有被破坏 。比如A向B转账,不可能A扣了钱,B却没收到。
- 隔离性(Isolation):同一时间,只允许一个事务请求同一数据,不同的事务之间彼此没有任何干扰。比如A正在从一张银行卡中取钱,在A取钱结束前,B不能向这张卡转账。
- 持久性(Durability):事务完成后,事务对数据库的所有更新将被永远保存到数据库,不能回滚。
3、事务并发问题
- 脏读:事务A读取了事务B更新的数据,然后B回滚操作,那么A读取到的数据是脏数据
- 不可重复读:事务 A 多次读取同一数据,事务 B 在事务A多次读取的过程中,对数据作了更新并提交,导致事务A多次读取同一数据时,结果不一致。
- 幻读:用户A将数据库中所有学生的成绩从具体分数改为ABCDE等级,但是用户B就在这个时候插入了一条具体分数的记录,当修改A改结束后发现还有一条记录没有改过来,就好像发生了幻觉一样,这就叫幻读。
4、Mysql事务隔离级别
由于数据库事物可以并发执行,而并发操作可能会带来数据的不一致性,包括脏读、不可重复读、幻读等。数据库为了避免数据不一致问题提供了隔离级别来让我们有针对性地选择事务的隔离级别。
SQL标准定义了4种隔离级别(从低到高),分别对应可能出现的数据不一致的情况:
| 事务隔离级别 | 脏读 | 不可重复读 | 幻读 |
| 读未提交(read-uncommitted) | 是 | 是 | 是 |
| 不可重复读(read-committed) | 否 | 是 | 是 |
| 可重复读(repeatable-read) | 否 | 否 | 是 |
| 串行化(serializable) | 否 | 否 | 否 |
mysql默认的事务隔离级别为REPEATABLE-READ,我们可以通过sql语句:
sql> select @@tx_isolation;
更详细的事物隔离级别:理解事务的4种隔离级别
5、JDBC事务原理
JDBC中的事物分为两种: 自动事务和手动事务。注意这两者有一定的区别需要记住。
①、自动事务(默认 con.setAutoCommit(true)):
在自动事务的情况下,只要SQL语句是正确的,执行的过程中没有发生异常、错误,就会提交到是数据库中,一般情况下没有指定的话就是默认为自动事务,实际上没有设定过的数据库就是自动事务,也就是说我们平时的数据库操作都是自动事务,所以自动事务会出现数据残留现象。
②、手动事务(con.setAutoCommit(false)):
在手动事务的情况下,需要自己调用提交或回滚来接结束事务,不然事务处理不会结束,手动事务有自定义的好处,而且能够自己判断语句的操作结果是否是自己想要的,如果不是自己想要的就可以进行回滚,是自己想要的操作结果才提交,自动事务则只要语句没出错都会进行提交。在大部分情况下,使用手动事务要多一些,因为使用自动事务的话语句没出错就自动把操作结果提交了,当SQL语句里的值写错了,或者操作结果不是正确的,就没办法进行回滚了,这些情况下SQL语句不会报错。
首先我们来看一下自动提交事物的例子:
public class Demo3 {

    public static void main(String[] args) {

        Connection con =null;

        PreparedStatement ps1 =null;

        PreparedStatement ps2 =null;

        try {

            con = JdbcUtil.getConnection();

            con.setAutoCommit(true);//默认自动提交事务,这段可以省略

            ps1 = con.prepareStatement("insert into t_user(username,password) values(?,?)");

            ps1.setString(1,"张三");

            ps1.setString(2,"123456");

            ps1.executeUpdate();

            System.out.println("添加第一条...");

            ps2 = con.prepareStatement("insert into t_user(username,password) values(?,?,?)");//这里多添加一个占位符用来报错

            ps2.setString(1,"李四");

            ps2.setString(2,"654321");

            ps2.executeUpdate();

            System.out.println("添加第二条...");

        } catch (SQLException e) {

            e.printStackTrace();

        }

        finally {

            JdbcUtil.close(ps2);

            JdbcUtil.close(ps1);

            JdbcUtil.close(con);

        }

    }

}
自动提交事物的代码运行完成之后的数据库如下:
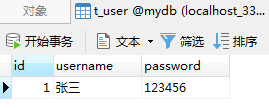
发现第一条添加成功了,而第二因为出错没有添加成功,所以自动提交事物会导致正确的SQL语句依然会执行,从而造成数据的残留。(不推荐使用)
手动事物代码示例如下:
注意它们的步骤:
- 获取Connection
- 设置autocommit(false)
- 需要执行的sql语句
- 提交事物,commit(提交事务的代码一定要在执行完指定的若干条SQL语句的后面)
- 出错,rollback
- 关闭连接
public class Demo4 {

    public static void main(String[] args) {

        Connection con =null;

        PreparedStatement ps1 =null;

        PreparedStatement ps2 =null;

        try {

            con = JdbcUtil.getConnection();

            con.setAutoCommit(false);//关闭自动事物

            ps1 = con.prepareStatement("insert into t_user(username,password) values(?,?)");

            ps1.setString(1,"张三");

            ps1.setString(2,"123456");

            ps1.executeUpdate();

            System.out.println("添加第一条...");

            ps2 = con.prepareStatement("insert into t_user(username,password) values(?,?,?)");//这里多添加一个占位符用来报错

            ps2.setString(1,"李四");

            ps2.setString(2,"654321");

            ps2.executeUpdate();

            System.out.println("添加第二条...");

            con.commit();//提交事物

        } catch (SQLException e) {

            e.printStackTrace();

            try {

                con.rollback();//回滚

            } catch (SQLException e1) {

                e1.printStackTrace();

            }

        }

        finally {

            JdbcUtil.close(ps2);

            JdbcUtil.close(ps1);

            JdbcUtil.close(con);

        }

    }

}
运行之后的数据库
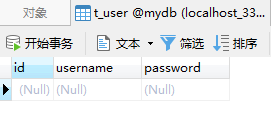
可以发现后面的SQL出现了异常,而前面的数据并没有加入到数据库中,说明整个事物都回滚了。
注意:如果手动添加事物不调用commit、rollback方法默认是会回滚的。
手动事物也可以不用全部回滚全部事物,我们只需设置回滚点即可。
public class Demo5 {

    public static void main(String[] args) {

        Connection con =null;

        PreparedStatement ps1 =null;

        PreparedStatement ps2 =null;

        Savepoint sp = null;

        try {

            con = JdbcUtil.getConnection();

            con.setAutoCommit(false);//关闭自动事物

            ps1 = con.prepareStatement("insert into t_user(username,password) values(?,?)");

            ps1.setString(1,"张三");

            ps1.setString(2,"123456");

            ps1.executeUpdate();

            System.out.println("添加第一条...");

            sp = con.setSavepoint();//在这里设置事务回滚点

            ps2 = con.prepareStatement("insert into t_user(username,password) values(?,?,?)");//这里多添加一个占位符用来报错

            ps2.setString(1,"李四");

            ps2.setString(2,"654321");

            ps2.executeUpdate();

            System.out.println("添加第二条...");

            con.commit();//提交事物

        } catch (SQLException e) {

            e.printStackTrace();

            try {

                con.rollback(sp);//回滚,传入前面设置回滚点

            } catch (SQLException e1) {

                e1.printStackTrace();

            }

        }

        finally {

            try {

                con.setAutoCommit(true);

            } catch (SQLException e) {

                e.printStackTrace();

            }

            JdbcUtil.close(ps2);

            JdbcUtil.close(ps1);

            JdbcUtil.close(con);

        }

    }

}
设置回滚点示例
运行完之后回滚点前面的数据依然会执行,而回滚点后面的数据则会回滚。
6、JDBC其他操作
1、批量处理(批处理建议使用Statement)
package com.thr;

import java.sql.*;

/**

 * @author Administrator

 * @date 2020-02-15

 * @desc 批处理

 */

public class Demo6 {

    public static void main(String[] args) {

        Connection con =null;

        Statement st =null;

        try {

            con = JdbcUtil.getConnection();

            con.setAutoCommit(false);//关闭自动事物

            long start=System.currentTimeMillis();

            st = con.createStatement();

            for (int i=1;i<=10000;i++){ //添加一万条数据

                st.addBatch("insert into t_user(username,password) values ('张三"+i+"','"+i+"')");

            }

            st.executeBatch();

            con.commit();//提交事物

            long end =System.currentTimeMillis();

            System.out.println("耗时:"+(end-start)+" ms");

        } catch (SQLException e) {

            e.printStackTrace();

            try {

                con.rollback();//回滚

            } catch (SQLException e1) {

                e1.printStackTrace();

            }

        }

        finally {

            try {

                con.setAutoCommit(true);

            } catch (SQLException e) {

                e.printStackTrace();

            }

            JdbcUtil.close(st);

            JdbcUtil.close(con);

        }

    }

}
批处理代码示例
2、获取自增主键
package com.thr;

import java.sql.*;

/**

 * @author Administrator

 * @date 2020-02-15

 * @desc 获取自动生成主键

 */

public class Demo7 {

    public static void main(String[] args) {

        Connection con = null;

        PreparedStatement ps = null;

        ResultSet rs = null;

        try {

                con = JdbcUtil.getConnection();

                String sql = "insert into t_user(username) values(?)";

                ps = con.prepareStatement(sql,Statement.RETURN_GENERATED_KEYS);

                ps.setString(1, "张三");//在插入username时数据库会自动生成id

                ps.executeUpdate();

                rs = ps.getGeneratedKeys();//获取自动生成的主键

                if (rs.next()) {

                    System.out.println(rs.getInt(1));

                }

            } catch (SQLException e) {

                e.printStackTrace();

            } finally {

                JdbcUtil.close(ps);

                JdbcUtil.close(con);

            }

    }

}
获取自动生成主键代码示例
为了测试接下来的数据,给数据库表添加了一些字段,如下:
CREATE TABLE `t_user`  (

  `id` int(11) NOT NULL AUTO_INCREMENT,

  `username` varchar(255) CHARACTER SET utf8 COLLATE utf8_general_ci NULL DEFAULT NULL,

  `password` varchar(255) CHARACTER SET utf8 COLLATE utf8_general_ci NULL DEFAULT NULL,

  `regDate` date NULL DEFAULT NULL,

  `regDateTime` timestamp(0) NULL DEFAULT NULL,

  `info` text CHARACTER SET utf8 COLLATE utf8_general_ci NULL,

  `image` longblob NULL,

  PRIMARY KEY (`id`) USING BTREE

)
3、处理日期时间(Date和TimeStamp)
package com.thr;

import java.sql.*;

/**

 * @author Administrator

 * @date 2020-02-15

 * @desc 处理日期时间

 */

public class Demo8 {

    public static void main(String[] args) {

        Connection con = null;

        PreparedStatement ps = null;

        PreparedStatement ps2 = null;

        ResultSet rs = null;

        try {

            con = JdbcUtil.getConnection();

            //插入

            ps = con.prepareStatement("insert into t_user(username,password,regDate,regDateTime)values(?,?,?,?)");

            ps.setString(1, "张三");

            ps.setString(2, "123456");

            ps.setDate(3,new Date(System.currentTimeMillis()));//日期

            ps.setTimestamp(4,new Timestamp(System.currentTimeMillis()));//日期和时间

            ps.executeUpdate();

            //查询

            ps2 = con.prepareStatement("select * from t_user where id=?");

            ps2.setInt(1, 1);

            rs = ps2.executeQuery();

            while (rs.next()){

                System.out.println(rs.getString("username")+","+

                        rs.getString("password")+","+

                        rs.getDate("regDate")+","+

                        rs.getTimestamp("regDateTime"));

            }

            } catch (SQLException e) {

                e.printStackTrace();

            } finally {

                JdbcUtil.close(rs);

                JdbcUtil.close(ps2);

                JdbcUtil.close(ps);

                JdbcUtil.close(con);

            }

    }

}
处理日期时间代码示例
4、存取文本文件(.txt文件)
CLOB(Character Large Object)用于存储大文本(mysql中无clob,存储大文本采用的是Text)
在MySQL中相关的类型:
- TINYTEXT 最大长度为255(2^[8]-1)字符的TEXT列。
- TEXT 最大长度为65535(2^[16]-1)字符的TEXT列。
- MEDIUMTEXT 最大长度为16777215(2^[24]-1)字符的TEXT列。
- LONGTEXT 最大长度为4GB(2^[32]-1)字符的TEXT列。
package com.thr;

import java.io.*;

import java.sql.Clob;

import java.sql.Connection;

import java.sql.PreparedStatement;

import java.sql.ResultSet;

/**

 * @author Administrator

 * @date 2020-02-15

 * @desc CLOB处理文本

 */

public class Demo9 {

    public static void main(String[] args) {

        Connection con = null;

        PreparedStatement ps = null;

        PreparedStatement ps2 = null;

        ResultSet rs = null;

        Reader r = null;

        try {

            con=JdbcUtil.getConnection();

            //插入

            ps = con.prepareStatement("insert into t_user(username,info)values(?,?)");

            ps.setString(1, "张三");

            //将文本文件内容直接输入到数据库中

            ps.setClob(2, new FileReader(new File("C:/1.txt")));

            //将程序中的字符串输入到数据库中的CLOB字段中

            //ps.setClob(2, new BufferedReader(new InputStreamReader(new ByteArrayInputStream("我是张三".getBytes()))));

            ps.executeUpdate();

            System.out.println("插入成功...");

            //查询

            ps2 = con.prepareStatement("select * from t_user where id=?");

            ps2.setInt(1, 1);

            rs = ps2.executeQuery();

            System.out.println("查询成功...");

            while (rs.next()) {

                Clob c = rs.getClob("info");

                r = c.getCharacterStream();

                int temp = 0;

                while ((temp=r.read())!=-1) {

                    System.out.print((char)temp);

                }

            }

        } catch (Exception e) {

            e.printStackTrace();

        } finally{

            JdbcUtil.close(rs);

            JdbcUtil.close(ps2);

            JdbcUtil.close(ps);

            JdbcUtil.close(con);

        }

    }

}
处理文本代码示例
5、存取二进制文件(图片,视频)
BLOB(Binary large Object)用于大量存储二进制文件
在MySQL中相关的类型:
- TINYBLOB 最大长度为255(2^[8]-1)字符的BLOB列。
- BLOB 最大长度为65535(2^[16]-1)字符的BLOB列。
- MEDIUMBLOB 最大长度为16777215(2^[24]-1)字符的BLOB列。
- LONGBLOB 最大长度为4GB(2^[32]-1)字符的BLOB列。
package com.thr;

import java.io.FileInputStream;

import java.io.FileOutputStream;

import java.io.InputStream;

import java.io.OutputStream;

import java.sql.*;

/**

 * @author Administrator

 * @date 2020-02-15

 * @desc BLOB 处理二进制文件

 */

public class Demo10 {

    public static void main(String[] args) {

        Connection con = null;

        PreparedStatement ps = null;

        PreparedStatement ps2 = null;

        ResultSet rs = null;

        InputStream is = null;

        OutputStream os = null;

        try {

            con = JdbcUtil.getConnection();

            //插入

            ps = con.prepareStatement("insert into t_user(username,image)values(?,?)");

            ps.setString(1, "张三");

            ps.setBlob(2, new FileInputStream("C:/1.jpg"));

            ps.executeUpdate();

            System.out.println("插入成功...");

            //查询

            ps2 = con.prepareStatement("select * from t_user where id=?");

            ps2.setInt(1, 1);

            rs = ps2.executeQuery();

            System.out.println("查询成功...");

            while (rs.next()) {

                Blob b = rs.getBlob("image");

                is = b.getBinaryStream();

                os = new FileOutputStream("C:/2.jpg");

                int temp = 0;

                while ((temp=is.read())!=-1) {

                    os.write(temp);

                }

            }

        } catch (Exception e) {

            e.printStackTrace();

        } finally{

        }

    }

}
处理二进制文件代码示例
最新文章
- 答辩HTML5
- [转]Liunx上安装svn客户端
- sql注入实例分析
- hd oj2025
- hibernate注解(转)
- NET MVC权限验证
- Java的垃圾回收
- POJ 3461 Oulipo(——KMP算法)
- Opencv 330 如何裁剪图片中大的目标?
- Hibernate JPA 动态criteria语句针对null查询条件的特殊处理
- linux 显示当前所在文件位置 以及git 分支所在
- [ABP] ASP.NET Zero 5.6.0 之 破解日志
- Kafka吞吐量测试案例
- uwsgi和nginx的故事
- C#字符串转换为float
- (转)python3 urllib.request.urlopen() 错误UnicodeEncodeError: 'ascii' codec can't encode characters
- scrapy主动触发关闭爬虫
- Hibernate xml配置方法之联合主键
- zTree使用技巧与详解
- 把 hhkb 压在mac pro上面用