自定义UICollectionViewLayout并添加UIDynamic
大家也可以到这里查看。
UICollectionView是iOS6引入的控件,而UIDynamicAnimator是iOS7上新添加的框架。本文主要涵盖3部分:
一是简单概括UICollectionView的使用;二是自定义一个UICollectionViewLayout来实现不同的Collection布局;
三是在自定义UICollectionViewLayout的基础上添加UIDynamicAnimator。
1. 使用UICollectionView
因为UICollectionView在iOS6上就引入了,所以这里就简单的介绍下。在正式使用前,我们有必要对UICollectionView认识一下。

UICollectionView和UITableView有点类似,但又有不一样。从上图可以看出,组建一个UICollectionView不仅需要内容相关的对象,
如DataSource和Delegate,还需要布局相关的对象即UICollectionViewLayout。
- Data Source:提供相关的data和view
- Delegate: 实现点击/插入/删除等操作时需要的方法
- Layout:提供布局view(如cell,supplementary,decoration view)需要的相关数据
熟悉UITableView的,对DataSource和Delegate应该比较亲切,他们的作用和在TableView里的完全一样。而UICollectionViewLayout是一个新的类,
他的作用就是控制所有view的显示。Layout会为每个view(如果需要显示),提供一个LayoutAttribute,通过LayoutAttribute,CollectionView就
知道如何去组织了。注意LayoutAttribute除了可以提供frame信息,还可以添加伪3D的信息和UIKit的动态信息。通过抽离布局信息,这样很好的维护了
模块间的独立性,而且也方便我们对layout进行重定义。理解这个框架图有助于理解CollectionView的渲染过程以及自定义Layout。
下面我们认识下COllectionView:
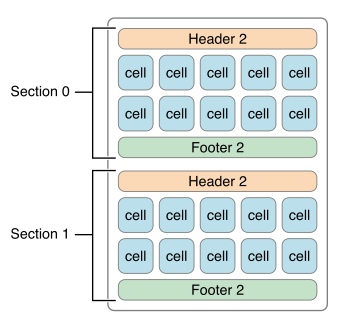
上图是UICollectionViewFlowLayout的一个布局,我们以此进行介绍:
- Cell:如上每一个单元格就是一个cell,和UITableViewCell一样,你可以进行自定义,添加image,label等等
- Supplementary view:图中的Header和Footer就是Supplementary view,
- Decoration view: 图中没有显示,不过顾名思义可以理解为修饰的view,如背景之类。它和Supplemetary的区别在于,后者往往是和数据相关联的。
知道了这些,我们就可以实现一个简单的CollectionView了。
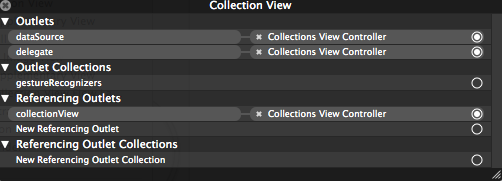
在storeboard里新建一个viewController,并在view上添加一个UICollectionView,collectionview的delegate和datasource都在SB里连接好。
为了简单,我们直接使用UICollectionViewFlowLayout:


红色和绿色的label所在处就代表header和footer,他们都是用supplementary来表示,中间的Imageview所在处代表一个cell。
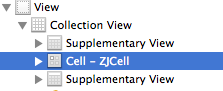
代码里三者都进行了简单的继承自定义,注意给他们三者设置一个identifier,这样利于重用。
然后在代码里实现dataSource方法:
- (NSInteger)numberOfSectionsInCollectionView:(UICollectionView *)collectionView

{

    return 2;

}

- (NSInteger)collectionView:(UICollectionView *)view numberOfItemsInSection:(NSInteger)section;

{

    return 20;

}

- (UICollectionViewCell *)collectionView:(UICollectionView *)collectionView cellForItemAtIndexPath:(NSIndexPath *)indexPath

{

    ZJCell *cell = [collectionView dequeueReusableCellWithReuseIdentifier:@"ZJCell" forIndexPath:indexPath];

    NSString *imgName = [NSString stringWithFormat:@"%d.JPG",indexPath.row];

    cell.imageView.image = [UIImage imageNamed:imgName];

    return cell;

}

- (UICollectionReusableView *)collectionView:(UICollectionView *)collectionView viewForSupplementaryElementOfKind:(NSString *)kind atIndexPath:(NSIndexPath *)indexPath

{

    ZJSupplementaryView *supplementaryView = nil;

    NSString *text = nil;

    if ([kind isEqualToString:UICollectionElementKindSectionHeader])

    {

        supplementaryView = [collectionView dequeueReusableSupplementaryViewOfKind:kind withReuseIdentifier:@"CLHeader" forIndexPath:indexPath];

        text = [NSString stringWithFormat:@"Header %d",indexPath.section];

        supplementaryView.backgroundColor = [UIColor darkGrayColor];

    }

    else

    {

        supplementaryView = [collectionView dequeueReusableSupplementaryViewOfKind:kind withReuseIdentifier:@"CLFooter" forIndexPath:indexPath];;

        text = [NSString stringWithFormat:@"Footer %d",indexPath.section];

        supplementaryView.backgroundColor = [UIColor lightGrayColor];

    }

    supplementaryView.label.text = text;

    return supplementaryView;

}
这样一个最简单的flow式的照片显示就实现了,成品如下:

2 自定义Layout
Layout类中,有3个方法是必定会被依次调用:
prepareLayout: 准备所有view的layoutAttribute信息
collectionViewContentSize: 计算contentsize,显然这一步得在prepare之后进行
layoutAttributesForElementsInRect: 返回在可见区域的view的layoutAttribute信息
此外,还有其他方法可能会被调用:
- (UICollectionViewLayoutAttributes *)layoutAttributesForItemAtIndexPath:(NSIndexPath *)indexPath

{

}

- (UICollectionViewLayoutAttributes *)layoutAttributesForSupplementaryViewOfKind:(NSString *)kind atIndexPath:(NSIndexPath *)indexPath

{

}

- (UICollectionViewLayoutAttributes *)layoutAttributesForDecorationViewOfKind:(NSString *)decorationViewKind atIndexPath:(NSIndexPath *)indexPath

{

}

- (BOOL)shouldInvalidateLayoutForBoundsChange:(CGRect)newBounds

{

}
比如,如果没有Decoration view,那么相应的方法就可以不实现。
接下来我们要实现一个自定义的layout。官方文档CollectionViewPGforIOS中指出了需要自定义layout的情形:

简单的说,就是现有的类(UICollectionViewLayout和UICollectionViewFlowLayout)不能满足需要的情况下需要自定义。
下面我们来实现CollectionViewPGforIOS中的自定义的例子,如图:
文档中,已经详细的阐述了每一步需要做的事情,这里就不多说了。但是因为文档中对于实现细节没有涉及,因此这里主要还是围绕之前提到的3个方法来进行说明。
这里假设你已经看过文档,并且知道自定义所需要的步骤。还需要声明的是,文档中给出的图以及下文的文字说明都是竖状排列的,但是由于疏忽,实现的时候变成了横向。希望因此不会给你造成混淆。
前提还需要做的准备:
1 定义Layout的子类
@interface ZJCustomLayout : UICollectionViewLayout

@property (nonatomic, weak) id<ZJCustomLayoutProtocol> customDataSource;

@end
@interfaceZJCustomLayout ()
{
NSInteger numberOfColumn;//here in this Sample Column equals the section
}
@property (nonatomic) NSDictionary *layoutInformation;//存储所有view的layoutAttribute
@property (nonatomic) CGFloat maxWidth;//用于计算contentSize
@property (nonatomic) UIEdgeInsets insets;
@end
protocol是用来获取一些数据,稍后定义。在扩展中定义一些属性,用于存储信息。
2 定义LayoutAttribute的子类
@interface ZJCollectionViewLayoutAttributes : UICollectionViewLayoutAttributes<UIDynamicItem>

@property (nonatomic) NSArray *children;

@end

@implementation ZJCollectionViewLayoutAttributes

- (BOOL)isEqual:(id)object

{

    ZJCollectionViewLayoutAttributes *attribute = (ZJCollectionViewLayoutAttributes *)object;

    if ([self.children isEqualToArray:attribute.children])

    {

        return [super isEqual:object];

    }

    return NO;

}

@end
ZJCollectionViewLayoutAttribute就是每一个cell的属性,children表示当前cell所拥有的子cell。而isEqual是子类必须要重载的。
我们首先看一下,cell是如何布局的:

红色3是cell的最终位置。布局的时候,先把最后一列的cell依次加上,如红色1所示。
然后排前一列即第二列,先依次加上,这时最后的绿色cell有子cell,就把第三列的绿色cell位置更新。
最后排第一列,因为第一个cell有3个子cell,所以要空两个开始排列。这时最后一个绿色cell有子cell这时就又要调整第二列以及第三列的绿色cell。
这里cell调整的思路很清晰:先依次从上到下排列,然后再根据是否有子cell进行更新。
在实际实现中,我根据这样的思路,设计了类似的算法:
- 从后向前布局每一列,每一列的cell依次从上向下布局;
- 除最后一列的cell开始布局时,先查看当前列前一行的cell是否有子cell:有的话调整自己的位置
- 如果当前cell的位置进行了调整,那么调整自己子cell的位置
很显然,在初始化每个cell的layoutAttribute的时候,我们需要先知道每一个cell的子cell的情况,于是我们设计一个协议:
@protocol ZJCustomLayoutProtocol <NSObject>

- (NSArray *)childrenAtIndexPath:(NSIndexPath *)indexPath;

@end
这个和CollectionView的dataSource,delegate一样,由viewController来提供。
接下来我们开始实现:
- (void)prepareLayout

{

    if (self.layoutInformation)

    {

        return;

    }

    //whole size preparation

    NSMutableDictionary *layoutInformation = [NSMutableDictionary dictionary];

    NSMutableDictionary *cellInformation = [NSMutableDictionary dictionary];

    NSIndexPath *indexPath;

    NSInteger numSections = [self.collectionView numberOfSections];

    numberOfColumn = numSections;

//初始化attribute

    for(NSInteger section = ; section < numSections; section++)

    {

        NSInteger numItems = [self.collectionView numberOfItemsInSection:section];

        for(NSInteger item = ; item < numItems; item++)

        {

            indexPath = [NSIndexPath indexPathForItem:item inSection:section];

            ZJCollectionViewLayoutAttributes *attributes = [self attributesWithChildrenAtIndexPath:indexPath];

//            attributes.zIndex = -(0 + 1);

//            attributes.transform = CGAffineTransformMakeRotation(.1);

//            attributes.transform3D = CATransform3DMakeRotation(.3, 0, 0, 1);

            [cellInformation setObject:attributes forKey:indexPath];

        }

    }

    //从最后向前开始逐个调整attribute

    for(NSInteger section = numSections - ; section >= ; section--)

    {

        NSInteger numItems = [self.collectionView numberOfItemsInSection:section];

        NSInteger totalHeight = ;

        for(NSInteger item = ; item < numItems; item++)

        {

            indexPath = [NSIndexPath indexPathForItem:item inSection:section];

            ZJCollectionViewLayoutAttributes *attributes = [cellInformation objectForKey:indexPath];//

            attributes.frame = [self frameForCellAtIndexPath:indexPath withHeight:totalHeight];

            // begin adjust the frame and its children's frame

            if (item)

            {

                NSIndexPath *previousIndex = [NSIndexPath indexPathForRow:item -  inSection:section];

                ZJCollectionViewLayoutAttributes *previousAttribute = cellInformation[previousIndex];

                CGRect rect = attributes.frame;

                CGRect previousRect = previousAttribute.frame;

                rect.origin.x = previousRect.origin.x + previousRect.size.width + CELL_ROW_SPACE;

//前一个cell是否有孩子

                if (previousAttribute.children)

                {

                    ZJCollectionViewLayoutAttributes *preLastChildAttri  = cellInformation[previousAttribute.children.lastObject];

                    CGRect preLastChildFrame = preLastChildAttri.frame;

                    rect.origin.x = preLastChildFrame.origin.x + preLastChildFrame.size.width + CELL_ROW_SPACE;

                    //                    rect.origin.x += (CELL_WIDTH + CELL_ROW_SPACE) * (previousAttribute.children.count - 1);

                }

                attributes.frame = rect;

                //调整自己的子cell

                if (attributes.children)

                {

                    NSUInteger childrenCount = attributes.children.count;

                    CGFloat baseOffset = rect.origin.x;

                    for (NSUInteger count = ; count < childrenCount; count ++)

                    {

                        NSIndexPath *childIndexpath = attributes.children[count];;

                        ZJCollectionViewLayoutAttributes *childAttri = cellInformation[childIndexpath];

                        CGRect childRect = childAttri.frame;

                        childRect.origin.x = baseOffset + count *(CELL_WIDTH + CELL_ROW_SPACE);

                        childAttri.frame = childRect;

                    }

                }

            }

//记录最大的长度(宽度)

            CGFloat currentWidth = attributes.frame.origin.x + attributes.frame.size.width;

            if (self.maxWidth < currentWidth)

            {

                self.maxWidth = currentWidth;

            }

            cellInformation[indexPath] = attributes;

            //            totalHeight += [self.customDataSource numRowsForClassAndChildrenAtIndexPath:indexPath];//

        }

    }

    [layoutInformation setObject:cellInformation forKey:@"MyCellKind"];//
通过这里获得的数据我们可以返回contentSize了。虽然高度上会有调整,但是宽度上是和section绑定的。
- (CGSize)collectionViewContentSize

{

    CGFloat width = self.maxWidth + CELL_ROW_SPACE;

    CGFloat height = self.collectionView.numberOfSections * (CELL_HEIGHT + CELL_SEC_SPACE) + self.insets.top + self.insets.bottom;

    return CGSizeMake(width, height);

}
接下来就要实现layoutAttributesForElementsInRect,这个通过CGRectIntersectsRect来选择是否在当前的rect里:
- (NSArray *)layoutAttributesForElementsInRect:(CGRect)rect

{

    NSMutableArray *myAttributes = [NSMutableArray arrayWithCapacity:self.layoutInformation.count];

    for (NSString *key  in self.layoutInformation)

    {

        NSDictionary *attributesDict = [self.layoutInformation objectForKey:key];

        for (NSIndexPath *indexPath  in attributesDict)

        {

            ZJCollectionViewLayoutAttributes *attributes = [attributesDict objectForKey:indexPath];

            if (CGRectIntersectsRect(rect, attributes.frame))

            {

                [myAttributes addObject:attributes];

            }

        }

    }

    return myAttributes;

}
然后在viewController类里实现datasource,不要忘记实现我们自定义的protocol。这样,我们就能看到所有的cell了。
接下来我们就要实现cell间的连线。连线我是作为supplementary view来处理。如果一个cell有子cell,那么就设置view,并记录点的相应位置,如图:
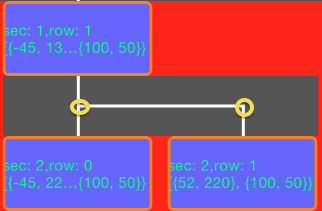
因此仿照cell的处理方式,定义了suppleLayoutAttribute,主要用于存储点:
@interface ZJCollectionSuppleLayoutAttributes : UICollectionViewLayoutAttributes

@property (nonatomic) NSArray *pointArray;

@end
然后继承了UICollectionReusableView用于划线:
@interface ZJClassReusableView()

@property (nonatomic) NSArray *pointArray;

@end

@implementation ZJClassReusableView

- (id)initWithFrame:(CGRect)frame

{

    self = [super initWithFrame:frame];

    if (self) {

        // Initialization code

        self.backgroundColor = [UIColor darkGrayColor];

    }

    return self;

}

// Only override drawRect: if you perform custom drawing.

// An empty implementation adversely affects performance during animation.

- (void)drawRect:(CGRect)rect

{

    [super drawRect:rect];

    // Drawing code

    CGRect frame = self.frame;

    CGContextRef context = UIGraphicsGetCurrentContext();

    CGContextSetStrokeColorWithColor(context, [UIColor whiteColor].CGColor);

    CGContextSetLineWidth(context, );

    NSUInteger count = self.pointArray.count;

    for (NSUInteger num = ; num < count; num ++)

    {

        CGPoint point = [[self.pointArray objectAtIndex:num] CGPointValue];

        CGFloat xPosition = point.x - frame.origin.x;

        if (num == )

        {

            CGContextMoveToPoint(context, xPosition, );

            CGContextAddLineToPoint(context, xPosition, rect.size.height);

        }

        else

        {

            CGContextMoveToPoint(context, xPosition, frame.size.height/);

            CGContextAddLineToPoint(context, xPosition, rect.size.height);

        }

    }

    if (count > )

    {

        CGPoint first = [[self.pointArray objectAtIndex:] CGPointValue];

        CGPoint last = [[self.pointArray lastObject] CGPointValue];

        CGContextMoveToPoint(context, first.x - frame.origin.x, frame.size.height/);

        CGContextAddLineToPoint(context, last.x - frame.origin.x + , frame.size.height/);

    }

    CGContextStrokePath(context);

}

- (void)applyLayoutAttributes:(UICollectionViewLayoutAttributes *)layoutAttributes

{

    [super applyLayoutAttributes:layoutAttributes];

    self.pointArray = ((ZJCollectionSuppleLayoutAttributes *)layoutAttributes).pointArray;

}

@end
而在customLayout中,需要添加:
//frame for supplement view

    NSMutableDictionary *suppleDict = [NSMutableDictionary dictionary];

    for(NSInteger section = ; section < numSections; section++)

    {

        NSInteger numItems = [self.collectionView numberOfItemsInSection:section];

        for(NSInteger item = ; item < numItems; item++)

        {

            indexPath = [NSIndexPath indexPathForItem:item inSection:section];

            ZJCollectionSuppleLayoutAttributes *suppleAttri = [ZJCollectionSuppleLayoutAttributes layoutAttributesForSupplementaryViewOfKind:ZJSupplementKindDiagram withIndexPath:indexPath];

            ZJCollectionViewLayoutAttributes *cellAttribute = cellInformation[indexPath];

            NSArray *cellChildren = cellAttribute.children;

            if (cellChildren)

            {

                NSUInteger childrenCount = cellChildren.count;

                //calculate the frame

                CGRect cellFrame = cellAttribute.frame;

                CGRect suppleFrame = cellFrame;

                suppleFrame.origin.y = cellFrame.origin.y + cellFrame.size.height;

                suppleFrame.size.height = CELL_SEC_SPACE;

                NSMutableArray *mPointArray = [NSMutableArray arrayWithCapacity:childrenCount];

                for (NSUInteger childNum = ; childNum < childrenCount; childNum ++)

                {

                    NSIndexPath *firstIndexPath = [cellChildren objectAtIndex:childNum];

                    ZJCollectionViewLayoutAttributes *firstChildAttri = cellInformation[firstIndexPath];

                    CGRect firstChildFrame = firstChildAttri.frame;

                    CGPoint firstPoint = CGPointMake(firstChildFrame.origin.x + firstChildFrame.size.width /, firstChildFrame.origin.y + firstChildFrame.size.height /);

                    [mPointArray addObject:[NSValue valueWithCGPoint:firstPoint]];

                    if (childNum == childrenCount - )

                    {

                        suppleFrame.size.width = firstChildFrame.origin.x + firstChildFrame.size.width - suppleFrame.origin.x;

                    }

                }

                suppleAttri.frame = suppleFrame;

                suppleAttri.pointArray = mPointArray;

            }

            [suppleDict setObject:suppleAttri forKey:indexPath];

        }

    }
这样一个树状结构的图就完成了。
3 添加动态行为UIKitDynamic
本身这段时间在学习UIDynamicAnimator,正好学到和collectionView的部分,觉得对CollectionView不太熟悉,就先温习了一遍。
所以UIDynamicanimator其实是重点。我的主要参考资料是WWDC2013 221,以及collection-views-and-uidynamics。
主要实现了Cell的动态动画,当拖动collectionView的时候,cell会晃动。
具体的添加方法我就不详细解说了,这里主要说明下自定义的layout添加UIDynamicAnimator需要注意的地方。
- (NSArray *)layoutAttributesForElementsInRect:(CGRect)rect

{

    ....

//之前的代码后要添加

    NSArray *array = [self.dynamicAnimator itemsInRect:rect];

    [myAttributes addObjectsFromArray:array];

}
不知道为什么一定要通过这样的方式把添加到DynamicAnimator的Cell属性取出来,否则cell就会不显示。
还有就是在shouldInvalidateLayoutForBoundsChange中动态更新DynamicItem,否则动画无从启动。
4 总结
主要涉及UICollectionView的使用,简单的自定义UICollectionViewLayout,以及添加UIKitDynamic。
关于CollectionView的点击,插入,删除等操作没有涵盖。
另外,自定义Layout的时候没有考虑性能,比如cell数量大的时候,现有prepare中的方式无疑会造成程序页面变卡;
添加的动态行为没有很好的修饰,纯粹为了说明两者结合的方法。
本文使用到的图片都来自官方文档和本人demo的截图。
关于UIKitDynamic,可以参阅初窥UIKit Dynamic
最后附上代码,请大家指正。
最新文章
- AppBox升级进行时 - Entity Framework的增删改查
- oracle 查询执行过的SQL语句
- apache缓存
- 第一篇、微信小程序_01计算器
- 用POP动画引擎实现衰减动画(POPDecayAnimation)
- PHP:小数位计算
- spring slf4j log4j maven
- 【Python的迭代器,生成器】
- IDEA使用01 创建java项目、创建web项目
- DEDECMS开启邮箱验证通知的解决方法
- Unity插件 - MeshEditor(六) 变形动画状态机
- 如何开发AR增强现实应用与产品
- linux下fcitx的安装与配置
- mac配置自带vim高亮显示
- docker 仓库搭建
- MySQL SELECT 执行的具体步骤
- javascript验证QQ号、邮箱和手机号码
- Java 面向对象的三大特性之一 继承
- eclipse对maven项目进行打war包
- jpa无外键配置