RecyclerView+CardView简单使用
2024-10-18 19:51:56
RecyclerView取代Listview用来显示数据,除此之外还能实现瀑布流的布局。CardView让我们的界面更好看,此外还将使用官方的下拉刷新。
添加支持:
compile 'com.android.support:recyclerview-v7:+'//不知道版本号直接写+就行

compile 'com.android.support:cardview-v7:+'
效果图:
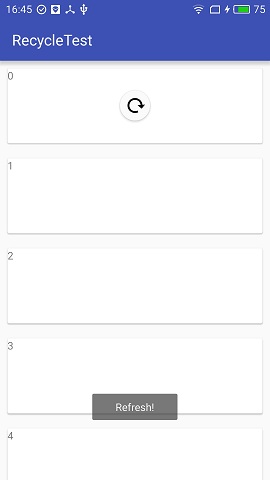
1、RecyclerView+CardView的普通布局
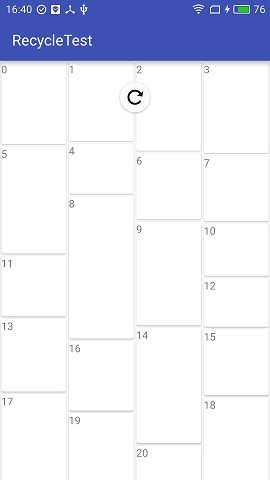
2、瀑布流布局
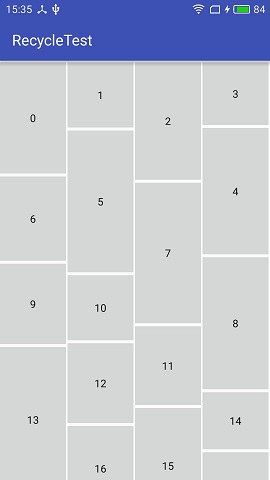
3、还有一张用按钮做成的丑丑的瀑布流,可以对比一下
一:recyclerView的使用
其实和listview差不多
1、自定义adapter,比listview的适配器简单很多,并且要求实现viewHolder来优化
2、在activity里面绑定布局,适配器,间距等操作。
适配器代码:
创建viewHolder,绑定数据
public class MyAdapter extends RecyclerView.Adapter<MyAdapter.ViewHolder> {

    ArrayList lists;//用于显示的数据

    public MyAdapter(ArrayList lists){

        this.lists = lists;

    }

    @Override

    public ViewHolder onCreateViewHolder(ViewGroup parent, int viewType) {

        //给view设定自定义的布局

        View view = LayoutInflater.from(parent.getContext()).inflate(R.layout.card_layout,parent,false);

        ViewHolder vh = new ViewHolder(view);

        return vh;

    }


  //绑定viewHolder的操作

    @Override

    public void onBindViewHolder(ViewHolder holder, int position) {

        holder.textView.setText(lists.get(position).toString());//绑定数据

    }

    @Override

    public int getItemCount() {

        return lists.size();

    }

    //自定义的ViewHolder,持有每个Item的的所有界面元素,其实是优化

    public static class ViewHolder extends RecyclerView.ViewHolder {

        public TextView textView;

        public ViewHolder(View view){

            super(view);

            textView = (TextView)view.findViewById(R.id.textview);//实例化

        }

    }

}
MainActivity代码:
使用listview
 recyclerView = (RecyclerView)findViewById(R.id.recycleview);

        recyclerView.setLayoutManager(new LinearLayoutManager(this));//线性显示

        recyclerView.addItemDecoration(new spaceItemDecoration(30));//设置边距,这个类要自己实现

ArrayList lists = new ArrayList();

        for (int i = 0; i < 100; i++) {

            lists.add("" + i);

        }

        //创建并设置Adapter

        myAdapter = new MyAdapter(lists);

        recyclerView.setAdapter(myAdapter);
边距:
public class spaceItemDecoration extends RecyclerView.ItemDecoration {

    int space;

    public spaceItemDecoration(int space){

        this.space = space;

    }

    @Override

    public void getItemOffsets(Rect outRect, View view, RecyclerView parent, RecyclerView.State state) {

       //这里就是每个item的边距

            outRect.top = space;

            outRect.left = space;

            outRect.right = space;

            outRect.bottom = space;

    }

}
二:瀑布流布局
首先要指定布局
recyclerView.setLayoutManager(new StaggeredGridLayoutManager(4, StaggeredGridLayoutManager.VERTICAL));//指定只有4列
对于每个item,设置随机高度
public void onBindViewHolder(ViewHolder holder, int position) {

        ViewGroup.LayoutParams params =  holder.itemView.getLayoutParams();//得到item的LayoutParams布局参数

        params.height = (int)(200+Math.random()*400) ;//把随机的高度赋予itemView布局

        holder.itemView.setLayoutParams(params);//把params设置给itemView布局

        holder.textView.setText(lists.get(position).toString());

    }
三:cardview
直接使用就行
<?xml version="1.0" encoding="utf-8"?>

<android.support.v7.widget.CardView xmlns:android="http://schemas.android.com/apk/res/android"

    android:paddingLeft="5dp"

    android:paddingRight="5dp"

    android:paddingBottom="5dp"

    android:paddingTop="5dp"

    android:layout_width="match_parent"

    android:layout_height="100dp"

    >

    <TextView

        android:layout_width="wrap_content"

        android:layout_height="wrap_content"

        android:id="@+id/textview"

        />

</android.support.v7.widget.CardView>
四:官方下拉刷新:
该控件布局要写在recyclerview的外面:
<?xml version="1.0" encoding="utf-8"?>

<RelativeLayout xmlns:android="http://schemas.android.com/apk/res/android"

    xmlns:tools="http://schemas.android.com/tools"

    android:layout_width="match_parent"

    android:layout_height="match_parent"

    tools:context="com.example.administrator.recycletest.MainActivity">

    <android.support.v4.widget.SwipeRefreshLayout

        android:id="@+id/id_swipe_ly"

        android:layout_width="match_parent"

        android:layout_height="match_parent" >

    <android.support.v7.widget.RecyclerView

        android:layout_width="match_parent"

        android:layout_height="match_parent"

        android:id="@+id/recycleview"

        >

    </android.support.v7.widget.RecyclerView>

    </android.support.v4.widget.SwipeRefreshLayout>

</RelativeLayout>
使用,下拉监听:
swipeRefreshLayout = (SwipeRefreshLayout)findViewById(R.id.id_swipe_ly);

        swipeRefreshLayout.setOnRefreshListener(new SwipeRefreshLayout.OnRefreshListener() {

            @Override

            public void onRefresh() {

                Toast.makeText(MainActivity.this,"Refresh!",Toast.LENGTH_SHORT).show();

                swipeRefreshLayout.setRefreshing(false);//取消刷新动画

            }

        });
最新文章
- ROS学习笔记(五)——建立工作空间
- margin设置为百分比的含义
- eval(gzinflate(base64_decode N层,自动解密
- java下载安装,环境变量,hello world
- ASP.NET定制简单的错误处理页面
- background-origin
- Debian 6解决中文乱码
- Ubuntu安装sar出错Please check if data collecting is enabled in /etc/default/sysstat
- jquery GET POST
- Digit Stack
- Windows Mobile和Wince(Windows Embedded CE)的字符集问题
- Mongodb系列- java客户端简单使用(CRUD)
- python excel 像 Excel 一样使用 python 进行数据分析
- RedHat6.5创建本地yum源
- Try Catch Finally总结
- 吴裕雄 07-MySQL数据类型
- Code Signal_练习题_arrayMaxConsecutiveSum
- libsvm使用
- oracle基础-创建表空间
- git修改远程仓库