Python之路:堡垒机实例
2024-10-13 00:58:54
堡垒机前戏
开发堡垒机之前,先来学习Python的paramiko模块,该模块机遇SSH用于连接远程服务器并执行相关操作
SSHClient
用于连接远程服务器并执行基本命令
基于用户名密码连接:
|
1
2
3
4
5
6
7
8
9
10
11
12
13
14
15
16
|
import paramiko # 创建SSH对象ssh = paramiko.SSHClient()# 允许连接不在know_hosts文件中的主机ssh.set_missing_host_key_policy(paramiko.AutoAddPolicy())# 连接服务器ssh.connect(hostname='c1.salt.com', port=22, username='wupeiqi', password='123') # 执行命令stdin, stdout, stderr = ssh.exec_command('df')# 获取命令结果result = stdout.read() # 关闭连接ssh.close() |
 import paramiko

 transport = paramiko.Transport(('hostname', 22))

 transport.connect(username='wupeiqi', password='')

 ssh = paramiko.SSHClient()

 ssh._transport = transport

 stdin, stdout, stderr = ssh.exec_command('df')

 print stdout.read()

 transport.close()
SSHClient 封装 Transport
基于公钥密钥连接:
|
1
2
3
4
5
6
7
8
9
10
11
12
13
14
15
16
17
18
|
import paramikoprivate_key = paramiko.RSAKey.from_private_key_file('/home/auto/.ssh/id_rsa')# 创建SSH对象ssh = paramiko.SSHClient()# 允许连接不在know_hosts文件中的主机ssh.set_missing_host_key_policy(paramiko.AutoAddPolicy())# 连接服务器ssh.connect(hostname='c1.salt.com', port=22, username='wupeiqi', key=private_key)# 执行命令stdin, stdout, stderr = ssh.exec_command('df')# 获取命令结果result = stdout.read()# 关闭连接ssh.close() |
 import paramiko

 private_key = paramiko.RSAKey.from_private_key_file('/home/auto/.ssh/id_rsa')

 transport = paramiko.Transport(('hostname', 22))

 transport.connect(username='wupeiqi', pkey=private_key)

 ssh = paramiko.SSHClient()

 ssh._transport = transport

 stdin, stdout, stderr = ssh.exec_command('df')

 transport.close()
SSHClient 封装 Transport
SFTPClient
用于连接远程服务器并执行上传下载
基于用户名密码上传下载
|
1
2
3
4
5
6
7
8
9
10
11
12
|
import paramikotransport = paramiko.Transport(('hostname',22))transport.connect(username='wupeiqi',password='123')sftp = paramiko.SFTPClient.from_transport(transport)# 将location.py 上传至服务器 /tmp/test.pysftp.put('/tmp/location.py', '/tmp/test.py')# 将remove_path 下载到本地 local_pathsftp.get('remove_path', 'local_path')transport.close() |
基于公钥密钥上传下载
|
1
2
3
4
5
6
7
8
9
10
11
12
13
14
|
import paramikoprivate_key = paramiko.RSAKey.from_private_key_file('/home/auto/.ssh/id_rsa')transport = paramiko.Transport(('hostname', 22))transport.connect(username='wupeiqi', pkey=private_key )sftp = paramiko.SFTPClient.from_transport(transport)# 将location.py 上传至服务器 /tmp/test.pysftp.put('/tmp/location.py', '/tmp/test.py')# 将remove_path 下载到本地 local_pathsftp.get('remove_path', 'local_path')transport.close() |
 #!/usr/bin/env python

 # -*- coding:utf-8 -*-

 import paramiko

 import uuid

 class Haproxy(object):

     def __init__(self):

         self.host = '172.16.103.191'

         self.port = 22

         self.username = 'wupeiqi'

         self.pwd = ''

         self.__k = None

     def create_file(self):

         file_name = str(uuid.uuid4())

         with open(file_name,'w') as f:

             f.write('sb')

         return file_name

     def run(self):

         self.connect()

         self.upload()

         self.rename()

         self.close()

     def connect(self):

         transport = paramiko.Transport((self.host,self.port))

         transport.connect(username=self.username,password=self.pwd)

         self.__transport = transport

     def close(self):

         self.__transport.close()

     def upload(self):

         # 连接,上传

         file_name = self.create_file()

         sftp = paramiko.SFTPClient.from_transport(self.__transport)

         # 将location.py 上传至服务器 /tmp/test.py

         sftp.put(file_name, '/home/wupeiqi/tttttttttttt.py')

     def rename(self):

         ssh = paramiko.SSHClient()

         ssh._transport = self.__transport

         # 执行命令

         stdin, stdout, stderr = ssh.exec_command('mv /home/wupeiqi/tttttttttttt.py /home/wupeiqi/ooooooooo.py')

         # 获取命令结果

         result = stdout.read()

 ha = Haproxy()

 ha.run()
Demo
堡垒机的实现
实现思路:
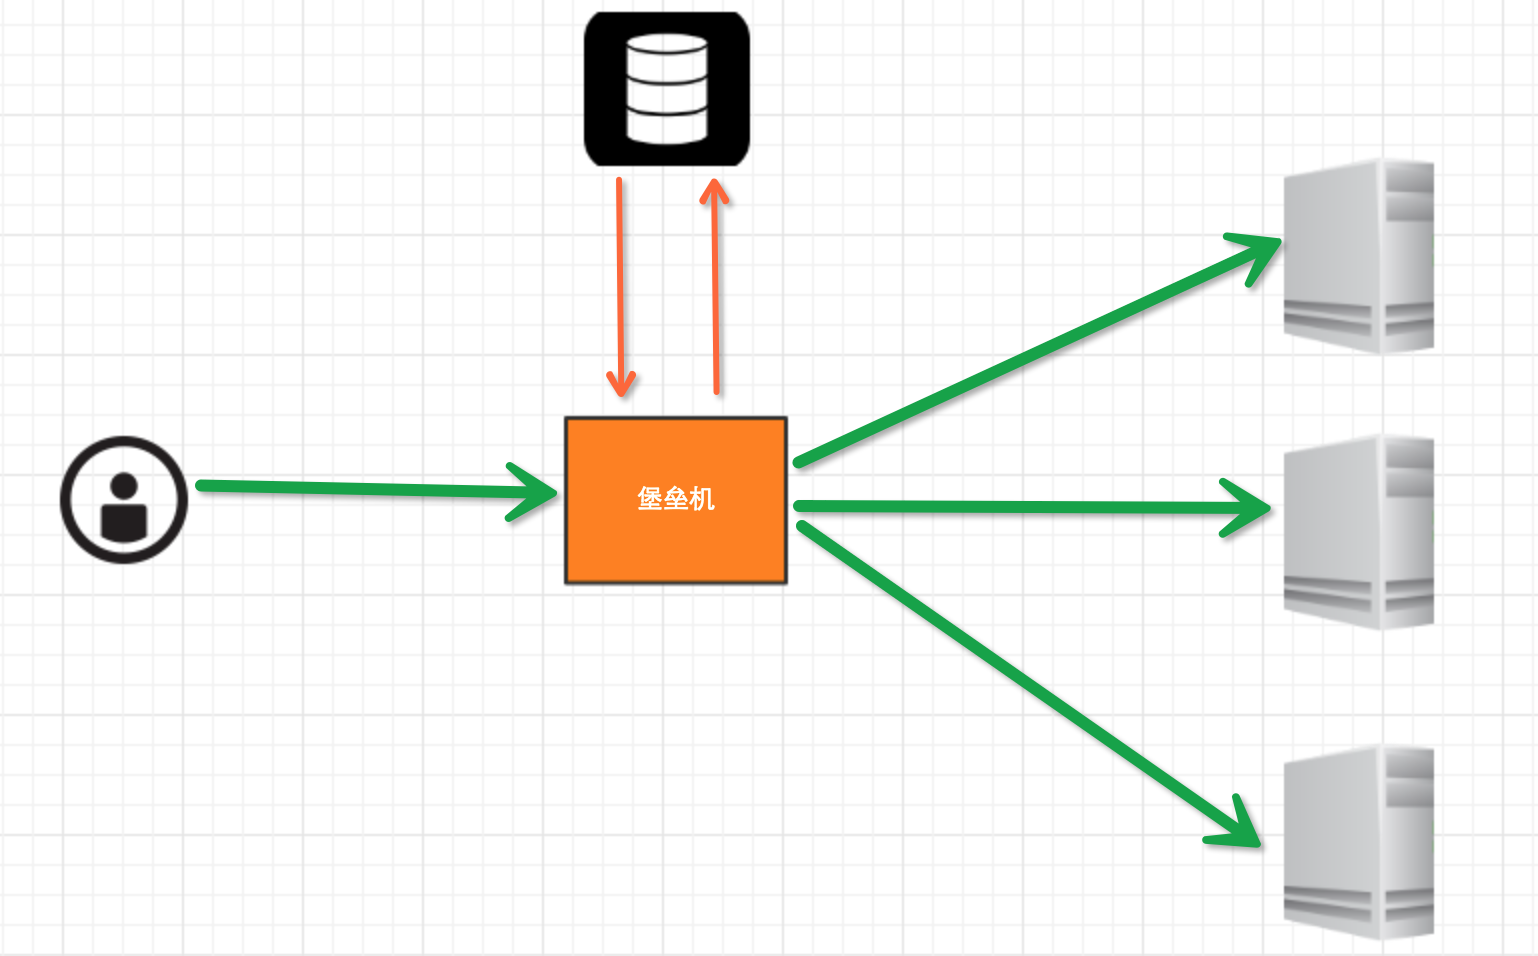
堡垒机执行流程:
- 管理员为用户在服务器上创建账号(将公钥放置服务器,或者使用用户名密码)
- 用户登陆堡垒机,输入堡垒机用户名密码,现实当前用户管理的服务器列表
- 用户选择服务器,并自动登陆
- 执行操作并同时将用户操作记录
注:配置.brashrc实现ssh登陆后自动执行脚本,如:/usr/bin/python /home/wupeiqi/menu.py
实现过程
步骤一,实现用户登陆
|
1
2
3
4
5
6
7
8
|
import getpassuser = raw_input('username:')pwd = getpass.getpass('password')if user == 'alex' and pwd == '123': print '登陆成功'else: print '登陆失败' |
步骤二,根据用户获取相关服务器列表
|
1
2
3
4
5
6
7
8
9
10
11
12
13
14
15
16
17
18
19
20
21
|
dic = { 'alex': [ '172.16.103.189', 'c10.puppet.com', 'c11.puppet.com', ], 'eric': [ 'c100.puppet.com', ]}host_list = dic['alex']print 'please select:'for index, item in enumerate(host_list, 1): print index, iteminp = raw_input('your select (No):')inp = int(inp)hostname = host_list[inp-1]port = 22 |
步骤三,根据用户名、私钥登陆服务器
|
1
2
3
4
5
6
7
8
9
10
11
12
13
14
15
16
17
18
19
20
21
22
|
tran = paramiko.Transport((hostname, port,))tran.start_client()default_path = os.path.join(os.environ['HOME'], '.ssh', 'id_rsa')key = paramiko.RSAKey.from_private_key_file(default_path)tran.auth_publickey('wupeiqi', key)# 打开一个通道chan = tran.open_session()# 获取一个终端chan.get_pty()# 激活器chan.invoke_shell()########## 利用sys.stdin,肆意妄为执行操作# 用户在终端输入内容,并将内容发送至远程服务器# 远程服务器执行命令,并将结果返回# 用户终端显示内容#########chan.close()tran.close() |
 while True:

     # 监视用户输入和服务器返回数据

     # sys.stdin 处理用户输入

     # chan 是之前创建的通道,用于接收服务器返回信息

     readable, writeable, error = select.select([chan, sys.stdin, ],[],[],1)

     if chan in readable:

         try:

             x = chan.recv(1024)

             if len(x) == 0:

                 print '\r\n*** EOF\r\n',

                 break

             sys.stdout.write(x)

             sys.stdout.flush()

         except socket.timeout:

             pass

     if sys.stdin in readable:

         inp = sys.stdin.readline()

         chan.sendall(inp)
肆意妄为方式一
# 获取原tty属性

oldtty = termios.tcgetattr(sys.stdin)

try:

    # 为tty设置新属性

    # 默认当前tty设备属性:

    #   输入一行回车,执行

    #   CTRL+C 进程退出,遇到特殊字符,特殊处理。

    # 这是为原始模式,不认识所有特殊符号

    # 放置特殊字符应用在当前终端,如此设置,将所有的用户输入均发送到远程服务器

    tty.setraw(sys.stdin.fileno())

    chan.settimeout(0.0)

    while True:

        # 监视 用户输入 和 远程服务器返回数据(socket)

        # 阻塞,直到句柄可读

        r, w, e = select.select([chan, sys.stdin], [], [], 1)

        if chan in r:

            try:

                x = chan.recv(1024)

                if len(x) == 0:

                    print '\r\n*** EOF\r\n',

                    break

                sys.stdout.write(x)

                sys.stdout.flush()

            except socket.timeout:

                pass

        if sys.stdin in r:

            x = sys.stdin.read(1)

            if len(x) == 0:

                break

            chan.send(x)

finally:

    # 重新设置终端属性

    termios.tcsetattr(sys.stdin, termios.TCSADRAIN, oldtty)
肆意妄为方式二
 def windows_shell(chan):

     import threading

     sys.stdout.write("Line-buffered terminal emulation. Press F6 or ^Z to send EOF.\r\n\r\n")

     def writeall(sock):

         while True:

             data = sock.recv(256)

             if not data:

                 sys.stdout.write('\r\n*** EOF ***\r\n\r\n')

                 sys.stdout.flush()

                 break

             sys.stdout.write(data)

             sys.stdout.flush()

     writer = threading.Thread(target=writeall, args=(chan,))

     writer.start()

     try:

         while True:

             d = sys.stdin.read(1)

             if not d:

                 break

             chan.send(d)

     except EOFError:

         # user hit ^Z or F6

         pass
肆意妄为方式三
注:密码验证 t.auth_password(username, pw)
详见:paramiko源码demo
最新文章
- linux shell程序
- java SHA1WithRSA 算法
- java中堆栈(stack)和堆(heap)
- hdu 1465:不容易系列之一(递推入门题)
- jQuery图片无缝滚动
- 训练趣题:黑与白 有A、B、C、D、E五人,每人额头上都帖了一张黑或白的纸。(此处用javascript实现)
- ActionScript GifPlayer的修改
- POJ-1861-NETWORK 解题报告
- 一、Android四大框架之ContentProvider的学习与运用,实现SQLite的增删改查。
- MySQL 字符集和校对
- 【zabbix教程系列】五、邮件报警设置(脚本方式)
- Y1S002 xshell脚本编写示意
- msf登陆Windows 1
- tar -P参数含义
- (93)Wangdao.com_第二十六天_鼠标事件
- java提高(4)---数组增删 list删除 map删除
- Eclipse创建web项目目录结构
- Spring 入门知识点笔记整理
- 使用pickle模块存储对象
- 经实测解决Access-Control-Allow-Origin多域名跨域问题