通用窗口类 Inventory Pro 2.1.2 Demo1(下续篇 ),物品消耗扇形显示功能
本篇想总结的是Inventory Pro中通用窗口的具体实现,但还是要强调下该插件的重点还是装备系统而不是通用窗口系统,所以这里提到的通用窗口类其实是通用装备窗口类(其实该插件中也有非装备窗口比如NoticeUI等)。
本篇涉及的功能用加出标出,具体的功能如下:
1、实现了两个窗口,通过点击键盘I来,打开或者关闭窗口也就是Toggle功能
2、装备窗口中的物品栏空格数量动态生成可控,可以在属性窗口手动配置
3、窗口具有拖拽功能
4、窗口物品具有拖拽,及窗口间拖拽
5、可以在窗口使用物品的功能,物品有消耗扇形显示功能
6、通用窗口的类体系结构
这里开动之前给自己提几个问题:
1、UGui原生实现使用物品扇形消耗效果(即冷却实现)是如何实现的?
这个比较简单,UGUI图片本身就有这种雷达效果的遮罩,这篇文章讲的很详细,这里就不用说了
2、装备格子是如何与1所提到的方法接合在一起的?
这里回忆下装备格子是用InventoryUItemWrapper这个UI类实现的,所以答案就在这个类里,但使用这个类并非易事,它是用ItemCollectionBase类(集合容器)动态生成的,在前篇讲过这里再温习一下,这里我们发现如果没有值得话,它取的InventorySettingsManager.itemButtonPrefab,也就是个装备格子预设
        protected virtual void FillUI()

        {

            if (manuallyDefineCollection == false)

            {

                items = new InventoryUIItemWrapperBase[initialCollectionSize];

                // Fill the container on startup, can add / remove later on

                for (uint i = ; i < initialCollectionSize; i++)

                {

                    items[i] = CreateUIItem<InventoryUIItemWrapper>(i, itemButtonPrefab != null ? itemButtonPrefab : InventorySettingsManager.instance.itemButtonPrefab);

                }

            }

            else

            {

                for (uint i = ; i < items.Length; i++)

                {

                    items[i].itemCollection = this;

                    items[i].index = i;

                }

            }

        }

        protected T CreateUIItem<T>(uint i, GameObject prefab) where T : InventoryUIItemWrapperBase

        {

            T item = GameObject.Instantiate<GameObject>(prefab).GetComponent<T>();

            item.transform.SetParent(container);

            item.transform.localPosition = new Vector3(item.transform.localPosition.x, item.transform.localPosition.y, 0.0f);

            item.itemCollection = this;

            item.transform.localScale = Vector3.one;

            item.index = i;

            return item;

        }
回忆一下这个配置是一个必填配置,必须在Setting中进行设置,
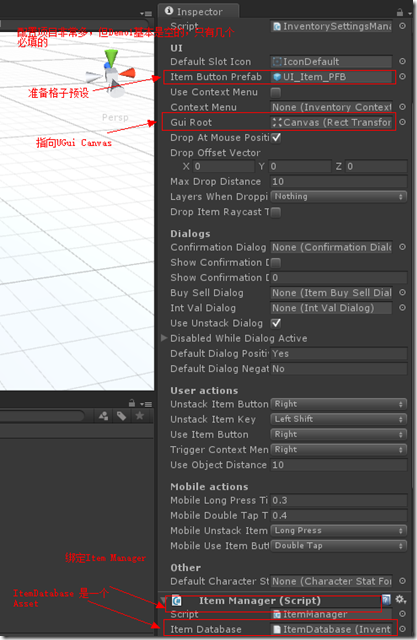
找到该预设,找到真相
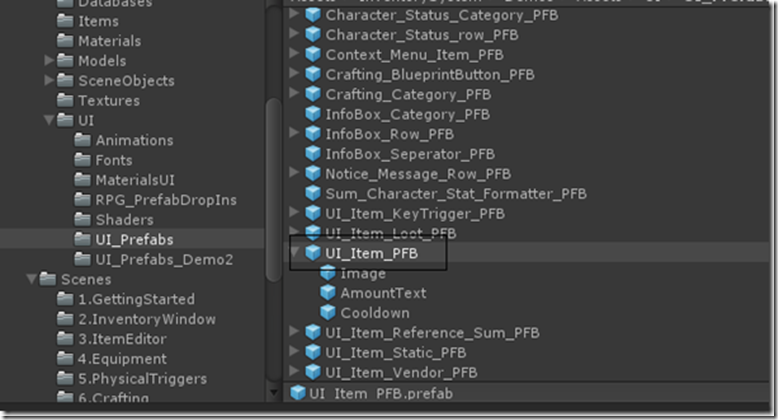

看的出来这个预设绑定了InventoryUIItemWrapper类,其公共的Field也以此列了出来分别是Amout Text物品数量,Item Name物品名称(None),Icon(Image)这就是物品的图标了比如苹果,Cooldown Image 就是图片表面的遮罩层,用来做雷达效果的。
3、装备格子是如何与苹果等可以吃的动态物品接合在一起的?
从上面的图片我们也看的出来,其实默认的Icon应该是装备格子的背景(黑底),它是如何变成苹果梨,或者刀剑的呢?这里比较简单的线索就是通过拾取地上的包裹,然后在背包里多了一个物品(这个过程不表述了比较复杂,留在以后专门分析),顺藤摸瓜,最终还是要加入到背包里面,这样我们去看看ItemCollectionBase类中的AddItem方法,这里这个方法本身很复杂主要是有类似20个血瓶1打东西放置的时候需要重新计算格子什么的比较麻烦,核心的函数是SetItem
        /// <summary>

        /// This function can be overridden to add custom behavior whenever an object is placed in the inventory.

        /// This happens when 2 items are swapped, items are merged, anytime an object is put in a slot.

        /// <b>Does not handle repainting</b>

        /// </summary>

        /// <param name="slot"></param>

        /// <param name="item"></param>

        /// <returns>Returns true if the item was set, false if not.</returns>

        public virtual bool SetItem(uint slot, InventoryItemBase item)

        {

            if (CanSetItem(slot, item) == false)

                return false;

            // _item ugly work around, but no other way to keep it safe...

            items[slot].item = item;

            return true;

        }
这里我们还记得InventoryUIItemWrapper是Item的包装,所以这里设置了其的Item为新增的Item,顺着这个思路剩下相关的就是绘制部分了,再去看看InventoryUIItemWrapper的绘制部分看看是如何显示的以及冷却效果是如何实现的
        public override void Repaint()

        {

            if (item != null)

            {

                if (amountText != null)

                {

                    // Only show when we have more then 1 item.

                    if (item.currentStackSize > )

                        amountText.text = item.currentStackSize.ToString();

                    else

                        amountText.text = string.Empty;

                }

                if (itemName != null)

                    itemName.text = item.name;

                if(icon != null)

                    icon.sprite = item.icon;

            }

            else

            {

                if (amountText != null)

                    amountText.text = string.Empty;

                if (itemName != null)

                    itemName.text = string.Empty;

                if(icon != null)

                    icon.sprite = startIcon != null ? startIcon : InventorySettingsManager.instance.defaultSlotIcon;

            }

            //RepaintCooldown(); // Already called by update loop

        }
icon.sprite = item.icon; 这一行代码我们看到了,其实icon这个Image Field 对应Item.icon,而且是一个sprite对象(原来sprite是Image的一个部分),再看下Update Loop的代码,只是在每一帧调用了
RepaintCooldown(),也就是执行冷却刷新,具体代码如下:
        public virtual void RepaintCooldown()

        {

            if (cooldownImage == null)

                return;

            if (item != null)

            {

                if(item.isInCooldown)

                {

                    cooldownImage.fillAmount = 1.0f - item.cooldownFactor;

                    return;

                }

            }

            // To avoid GC

            if (cooldownImage.fillAmount != 0.0f)

                cooldownImage.fillAmount = 0.0f;

        }
当然这里有控制cooldown的逻辑,isInCooldown是一个属性逻辑都在里面,包括同类型物品使用的冷却控制(有点复杂,这里先不表了)
4、物品是如何被触发使用的?
触发使用一定是在点击的时候触发的,接合UGui的事件机制,Inventory Pro 分别在OnPointerDown和OnPointerUP中进行了实现,有一些触控相关的判断见一下源码
        public virtual void OnPointerDown(PointerEventData eventData)

        {

            if (itemCollection == null)

                return;

            pointerDownOnUIElement = InventoryUIUtility.clickedUIElement;

            if (pointerDownOnUIElement == false)

                return;

            if (InventorySettingsManager.instance.useContextMenu && (eventData.button == InventorySettingsManager.instance.triggerContextMenuButton || Application.isMobilePlatform))

            {

                if (item != null)

                    TriggerContextMenu();

                return;

            }

            if (InventorySettingsManager.instance.mobileUnstackItemKey == MobileUIActions.SingleTap)

            {

                TriggerUnstack();

                return;

            }

            else if(InventorySettingsManager.instance.mobileUseItemButton == MobileUIActions.SingleTap)

            {

                TriggerUse();

                return;

            }

            if (item != null && pressing == false && Time.timeSinceLevelLoad - InventorySettingsManager.instance.mobileDoubleTapTime < lastDownTime)

            {

                // Did double tap

                if (InventorySettingsManager.instance.mobileUnstackItemKey == MobileUIActions.DoubleTap)

                {

                    TriggerUnstack();

                    return;

                }

                else if(InventorySettingsManager.instance.mobileUseItemButton == MobileUIActions.DoubleTap)

                {

                    TriggerUse();

                    return;

                }

            }

            lastDownTime = Time.timeSinceLevelLoad;

            pressing = true;

        }
物品的具体使用在TriggerUse() 实现
        public override void TriggerUse()

        {

            if (item == null)

                return;

            if (itemCollection.canUseFromCollection == false)

                return;

            int used = item.Use();

            if (used >= )

            {

                Repaint();

            }

        }
这里最终物品的使用时调用的Item Model中的Use()来实现的,这个应该是一种基类方法,需要特定的子类Item来实现,具体实现还要和容器有一定关系,比较复杂本文不表,有机会日后再展开,反正使用后调用了Repaint()方法也就是在使用完毕物品后装备格子进行了重绘刷新操作。
总结
把这四个问题回答完毕,基本本篇的主题也就清楚了,走人
最新文章
- CGContextRef 画线简单用法
- <%%>标签 什么意思
- 翻译qmake文档(一) qmake指南和概述
- 获取图片base64编码的几种方法
- HDU 1576 (乘法逆元)
- 转 Eric Raymond对于几大开发语言的评价
- 8 Regular Expressions You Should Know
- WPF 多线程处理(3)
- shared_ptr的简单实现
- Ubuntu 14.04 & ant: Unable to locate tools.jar. Expected to find it in /usr/lib/jvm/java-7-openjdk-i386/lib/tools.jar
- Learning JavaScript Design Patterns The Observer Pattern
- careercup-数学与概率 7.6
- 【python自动化第四篇:python入门进阶】
- jquery 核心
- 一段JAVA签名算法的PHP改写
- abstract class 和 interface区别
- ●BZOJ 1855 [Scoi2010]股票交易
- 理解性能的奥秘——应用程序中慢,SSMS中快(4)——收集解决参数嗅探问题的信息
- 机器学习入门18 - 生产机器学习系统(Production ML Systems)
- XBee PRO 900HP远距离无线模块