scrapy框架的解析
2024-09-08 09:25:23
1,scrapy框架的官网:https://scrapy.org/
什么是scrapy框架:
- scrapy 是一个为了爬取网站数据,提取结构性数据而编写的应用内框架,非常出名,所谓框架就是一个已经继承了各种功能(高性能异步下载, 队列,分布式,解析,持久化存储等)具有很强的项目模板,对于框架的学习,重点要学习器框架的特性,各个功能的用法.
2,安装scrapy框架
- Linux:pip install scrapy
- Windows:
- pip install wheel
- 下载twisted
http://www.lfd.uci.edu/~gohlke/pythonlibs/#twisted - 进入下载目录,执行
pip3 install Twisted‑17.1.0‑cp35‑cp35m‑win_amd64.whl - pip install pywin32
- pip install scrapy
3,基础使用
- 创建项目: scrapy startproject 项目名称
- 项目结构
project_name/

   scrapy.cfg:

   project_name/

       __init__.py

       items.py

       pipelines.py

       settings.py

       spiders/

           __init__.py

scrapy.cfg   项目的主配置信息。(真正爬虫相关的配置信息在settings.py文件中)

items.py     设置数据存储模板,用于结构化数据,如:Django的Model

pipelines    数据持久化处理

settings.py  配置文件,如:递归的层数、并发数,延迟下载等

spiders      爬虫目录,如:创建文件,编写爬虫解析规则
- 创建爬虫应用程序:
- cd project_name(进入项目目录)
- scrapy genspider 应用名称,爬取网页的其实url(例如: scrapy genspider qiubai www.xxx.com)
- 编写爬虫文件:在步骤2的基础完毕后,会在项目的spider中生成一个应用名的py爬虫文件
# -*- coding: utf-8 -*-

import scrapy

class QiubaidemoSpider(scrapy.Spider):

    name = 'qiubaiDemo'

    # allowed_domains = ['www.xxx.com']

    start_urls = ['https://www.qiushibaike.com/text/']

    def parse(self, response):

        # 获取到文本的每一个div

        div_list = response.xpath("//div[class='content-left']/div")  # 拿到每一个 内容框的div

        all_data = []

        # xpath返回的是列表元素类型为Selector类型

        for div in div_list:

            title = div.xpath("./div[1]/a[2]/h2/text() | ./div[1]/span[2]/h2/text()").extract_first()

            content = div.xpath("./div/a[1]/div/span/text() | ./div[1]/a/div[1]/span/text()").extract_first()

            # 构建一个字典

            dic = {

                "title": title,

                "content": content

            }

            # 把每一个字典放到列表中

            all_data.append(dic)

        # 基于终端指令的持久化存储,可以通过终端指令的形式将parse方法的返回值存储的数据进行本地磁盘的持久化存储

        return all_data
- 修改settings中的配置文件相关配置:
BOT_NAME = 'qiubai'

SPIDER_MODULES = ['qiubai.spiders']

NEWSPIDER_MODULE = 'qiubai.spiders'

# Crawl responsibly by identifying yourself (and your website) on the user-agent

USER_AGENT = 'Mozilla/5.0 (Windows NT 10.0; Win64; x64) AppleWebKit/537.36 (KHTML, like Gecko) Chrome/68.0.3440.106 Safari/537.36'

# Obey robots.txt rules

ROBOTSTXT_OBEY = False
- 执行程序命令:scrapy crawl 应用名称
4,爬取糗事百科
import scrapy

class QiubaidemoSpider(scrapy.Spider):

    name = 'qiubaiDemo'

    # allowed_domains = ['www.xxx.com']

    start_urls = ['https://www.qiushibaike.com/text/']

    def parse(self, response):

        # 获取到文本的每一个div

        div_list = response.xpath("//div[class='content-left']/div")  # 拿到每一个 内容框的div

        all_data = []

        # xpath返回的是列表元素类型为Selector类型

        for div in div_list:

            title = div.xpath("./div[1]/a[2]/h2/text() | ./div[1]/span[2]/h2/text()").extract_first()

            content = div.xpath("./div/a[1]/div/span/text() | ./div[1]/a/div[1]/span/text()").extract_first()

            # 构建一个字典

            dic = {

                "title": title,

                "content": content

            }

            # 把每一个字典放到列表中

            all_data.append(dic)

        # 基于终端指令的持久化存储,可以通过终端指令的形式将parse方法的返回值存储的数据进行本地磁盘的持久化存储

        return all_data
执行爬虫应用程序的两条命令(切记,scrapy框架只能在命令行执行)
- scrapy crawl 爬虫名称: 该种行形式会显示执行的日志信息
- scrapy crawl 爬虫程序 --nolog 该种执行形式不会显示执行的日志信息
5,CrawlSpider的应用:
一,简介:
- CrawlSpider其实是一个Spider的一个子类,除了继承到Spider的特性和功能外,还派生除了其自己独有的更加强大的特性功能,其中最显著的功能就是"LinkExtractors链接提取器".spider是所有爬虫的基类,其设计原则只是为了爬取start_url列表中的网页,而从爬取到提取出的url进行继续爬取工作使用CrawlSpider更合适
二,使用
- 创建scrapy项目: scrapy startproject 项目名称
- 创建爬虫文件:scrapy genspider -t crawl 爬虫应用名称 www.xxx.com
- --此命令对比以前的指令多了"-t crawl",表示创建的爬虫文件是基于CrawlSpider这个类的,而不再是Spider这个基类
# -*- coding: utf-8 -*-

import scrapy

from scrapy.linkextractors import LinkExtractor

from scrapy.spiders import CrawlSpider, Rule

class ChoutidemoSpider(CrawlSpider):

    name = 'choutiDemo'

    #allowed_domains = ['www.chouti.com']

    start_urls = ['http://www.chouti.com/']

    rules = (

        Rule(LinkExtractor(allow=r'Items/'), callback='parse_item', follow=True),

    )

    def parse_item(self, response):

        i = {}

        #i['domain_id'] = response.xpath('//input[@id="sid"]/@value').extract()

        #i['name'] = response.xpath('//div[@id="name"]').extract()

        #i['description'] = response.xpath('//div[@id="description"]').extract()

        return i
- 2,3行:导入CrawlSpider相关模块
- 7行:表示该爬虫程序是基于CrawlSpider类的
- 12行,13行,14行:表示为提取Link规则
- 16行:解析方法
- CrawlSpider类和Spider类最大不同就是CrawlSpider多了一个rules属性,其作用是定义"提取动作",在rules中可以包含一个或者多个Rule对象,在Rule对象中包含了LinkExtractor对象
LinkExtractor:顾明思议,链接提取器
- LinkExtractor(
- allow= r"Items/", # 满足括号中正则表达式的值会被提取,如果为空,则全部匹配
- deny=xxx, # 满足正则表达式则不会被提取.
- restrick_xpath=xxx, # 满足xpath表达式的值会被提取
- den_domains=xxx, # 不会被提取的链接的domains)
- 作用:提取response中符合规则的链接
Rule:规则解析器,根据链接中提取到的链接,根据指定规则提取解析器链接网页中的内容
- Rule(LinkExtractor(allow=r'Items/'), callback='parse_item', follow=True)
- 参数1:指定链接提取器
- 参数2:指定规则解析器解析数据的规则(回调函数)
- 参数3:是否将链接提取器继续作用到链接提取器提取出的链接网页中。当callback为None,参数3的默认值为true。
- rules=( ):指定不同规则解析器。一个Rule对象表示一种提取规则
- CrawlSpider整体爬取流程:
- 爬虫文件首先根据其实url,获取该urrl的网页内容
- 链接提取器会根据指定提取规则将不找1中网页中的连接进行提取
- 规则解析器会根据指定解析规则价格连接提取器中提取到的链接中的网页内容根据指定的规则进行解析
- 将解析数据封装到item中,然后提交给管道进行持久化存储
糗事百科的代码:
# -*- coding: utf-8 -*-
import scrapy

class QiubaidemoSpider(scrapy.Spider):
    name = 'qiubaiDemo'
    # allowed_domains = ['www.xxx.com']
    start_urls = ['https://www.qiushibaike.com/text/']

    def parse(self, response):
        # 获取到文本的每一个div
        div_list = response.xpath("//div[class='content-left']/div")  # 拿到每一个 内容框的div

        all_data = []
        # xpath返回的是列表元素类型为Selector类型
        for div in div_list:
            title = div.xpath("./div[1]/a[2]/h2/text() | ./div[1]/span[2]/h2/text()").extract_first()
            content = div.xpath("./div/a[1]/div/span/text() | ./div[1]/a/div[1]/span/text()").extract_first()

            # 构建一个字典
            dic = {
                "title": title,
                "content": content
            }

            # 把每一个字典放到列表中
            all_data.append(dic)
        # 基于终端指令的持久化存储,可以通过终端指令的形式将parse方法的返回值存储的数据进行本地磁盘的持久化存储
        return all_data
管道文件:
# -*- coding: utf-8 -*-

# Define your item pipelines here

#

# Don't forget to add your pipeline to the ITEM_PIPELINES setting

# See: https://doc.scrapy.org/en/latest/topics/item-pipeline.html

# 注意:只要涉及到持久化存储的相关操作,必须要写在管道文件中

# 管道文件中;需要接受爬虫文件提交过来的数据,并对数据进行持久化存储(IO操作)

class QiubaiPipeline(object):

    fp = None

    # 只要执行一次(开始爬虫的时候执行的时候执行一次)

    def open_spider(self, spider): pass

        # print("开始爬虫 !!!")

        # self.fp = open("./qiubai.csv", "w", encoding="utf-8")

    # 爬虫文件每提交一次item,该方法会被调用一次

    def process_item(self, item, spider):

        # self.fp.write(item)

        return item
settings中的文件
# -*- coding: utf-8 -*-

# Scrapy settings for qiubai project

#

# For simplicity, this file contains only settings considered important or

# commonly used. You can find more settings consulting the documentation:

#

#     https://doc.scrapy.org/en/latest/topics/settings.html

#     https://doc.scrapy.org/en/latest/topics/downloader-middleware.html

#     https://doc.scrapy.org/en/latest/topics/spider-middleware.html

BOT_NAME = 'qiubai'

SPIDER_MODULES = ['qiubai.spiders']

NEWSPIDER_MODULE = 'qiubai.spiders'

# Crawl responsibly by identifying yourself (and your website) on the user-agent

USER_AGENT = 'Mozilla/5.0 (Windows NT 10.0; Win64; x64) AppleWebKit/537.36 (KHTML, like Gecko) Chrome/68.0.3440.106 Safari/537.36'

# Obey robots.txt rules

ROBOTSTXT_OBEY = False

# Configure maximum concurrent requests performed by Scrapy (default: 16)

#CONCURRENT_REQUESTS = 32

# Configure a delay for requests for the same website (default: 0)

# See https://doc.scrapy.org/en/latest/topics/settings.html#download-delay

# See also autothrottle settings and docs

#DOWNLOAD_DELAY = 3

# The download delay setting will honor only one of:

#CONCURRENT_REQUESTS_PER_DOMAIN = 16

#CONCURRENT_REQUESTS_PER_IP = 16

# Disable cookies (enabled by default)

#COOKIES_ENABLED = False

# Disable Telnet Console (enabled by default)

#TELNETCONSOLE_ENABLED = False

# Override the default request headers:

#DEFAULT_REQUEST_HEADERS = {

#   'Accept': 'text/html,application/xhtml+xml,application/xml;q=0.9,*/*;q=0.8',

#   'Accept-Language': 'en',

#}

# Enable or disable spider middlewares

# See https://doc.scrapy.org/en/latest/topics/spider-middleware.html

#SPIDER_MIDDLEWARES = {

#    'qiubai.middlewares.QiubaiSpiderMiddleware': 543,

#}

# Enable or disable downloader middlewares

# See https://doc.scrapy.org/en/latest/topics/downloader-middleware.html

#DOWNLOADER_MIDDLEWARES = {

#    'qiubai.middlewares.QiubaiDownloaderMiddleware': 543,

#}

# Enable or disable extensions

# See https://doc.scrapy.org/en/latest/topics/extensions.html

#EXTENSIONS = {

#    'scrapy.extensions.telnet.TelnetConsole': None,

#}

# Configure item pipelines

# See https://doc.scrapy.org/en/latest/topics/item-pipeline.html

#ITEM_PIPELINES = {

#    'qiubai.pipelines.QiubaiPipeline': 300,

#}

# Enable and configure the AutoThrottle extension (disabled by default)

# See https://doc.scrapy.org/en/latest/topics/autothrottle.html

#AUTOTHROTTLE_ENABLED = True

# The initial download delay

#AUTOTHROTTLE_START_DELAY = 5

# The maximum download delay to be set in case of high latencies

#AUTOTHROTTLE_MAX_DELAY = 60

# The average number of requests Scrapy should be sending in parallel to

# each remote server

#AUTOTHROTTLE_TARGET_CONCURRENCY = 1.0

# Enable showing throttling stats for every response received:

#AUTOTHROTTLE_DEBUG = False

# Enable and configure HTTP caching (disabled by default)

# See https://doc.scrapy.org/en/latest/topics/downloader-middleware.html#httpcache-middleware-settings

#HTTPCACHE_ENABLED = True

#HTTPCACHE_EXPIRATION_SECS = 0

#HTTPCACHE_DIR = 'httpcache'

#HTTPCACHE_IGNORE_HTTP_CODES = []

#HTTPCACHE_STORAGE = 'scrapy.extensions.httpcache.FilesystemCacheStorage'
5,scrapy中的selenium的应用
在通过scrapy框架进行某些网站数据爬取的时候,往往会碰到页面动态数据加载情况发生,如果使用scrapy对其url发请求,是绝对获取不到那部分动态加载出来的数据,但是通过观察我们会发现,通过浏览器进行url请求发送则会加载出对应的动态加载出的数据,那么如果我们想要在scrapy也获取动态 加载出的数据,则必须使用selenium创建浏览器对象,然后通过该浏览器对象进行发请求,获取动态记载的数据
6,selenium在scrapy中使用的原理分析:
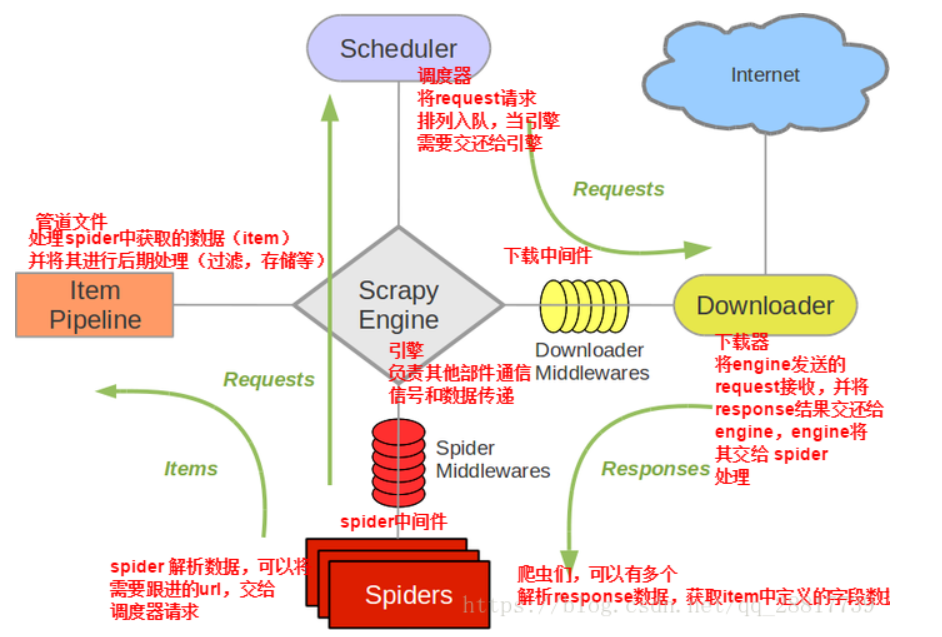
- 当引擎将调度器板块的url提交给下载器后,下载器进行网页数据的下载,然后将下载到的数据,封装到resposne中,提交给引擎,引擎将response在转交给Spider,Spider接收到的response对象中存储的页面数据里是没有动态加载的新闻数据的。要想获取动态加载的新闻数据,则需要在下载中间件中对下载器提交给引擎的response响应对象进行拦截,切对其内部存储的页面数据进行篡改,修改成携带了动态加载出的新闻数据,然后将被篡改的response对象最终交给Spiders进行解析操作。
- selenium在scrapy中的使用流程:
- 重写爬虫文件的构造方法,在该方法中使用selenium实例化一个浏览器对象(因为浏览器对象只需要被实例化一次)
- 重写爬虫文件的close(self,spider)方法,在其内部关闭浏览器对象,该方法是在爬虫结束时被调用
- 重写下载中间件的process_response方法,让该方法响应对象进行拦截,并篡改response中存储的页面上数据
- 在配置文件中开启下载中间件
代码展示:
# -*- coding: utf-8 -*-

import scrapy

from selenium import webdriver

from wangyiNewsPro.items import WangyinewsproItem

from aip import AipNlp

class WangyiSpider(scrapy.Spider):

    # 百度AI的接口

    """ 你的 APPID AK SK """

    APP_ID = '15425144'

    API_KEY = 'pevAHNiCeZHPuX7ecS4j6rZt'

    SECRET_KEY = 'SUGE3DdVGoe6bNQWGQm5qNOIUKfzc5Ss '

    client = AipNlp(APP_ID, API_KEY, SECRET_KEY)

    name = 'wangyi'

    # allowed_domains = ['www.xxx.com']

    start_urls = ['https://news.163.com/']

    # 存储四个板块的url

    news_url = []

    def __init__(self):

        # 实例化一个浏览器对象

        self.bro = webdriver.Chrome(executable_path='D:\chrome\chromedriver.exe')

    # 关闭浏览器

    def closed(self, spider):

        self.bro.quit()

    def parse(self, response):

        # 获取指定板块的连接(国内, 国际, 军事, 航空 ), 这是拿到的每一个半框新闻的li标签

        li_list = response.xpath('//*[@id="index2016_wrap"]/div[1]/div[2]/div[2]/div[2]/div[2]/div/ul/li')

        # (国内, 国际, 军事, 航空)对应的索引是[3,4,6,7]

        li = [3, 4, 6, 7]

        new_url = []

        for index in li:

            new_url.append(li_list[index])

        # 对四大板块的里标签进行解析

        for li in new_url:

            # 四大板块对应的url

            block_url = li.xpath('./a/@href').extract_first()

            # 将解析后的数据存放到news_url中

            self.news_url.append(block_url)

            yield scrapy.Request(url=block_url, callback=self.parseNews)

    # 解析方法

    def parseNews(self, response):

        # 拿到每一个板块内容形影回来的数据,再做解析

        # 拿到每一个板块的url

        div_list = response.xpath('//div[@class="ndi_main"]/div')

        # for循环拿到每一个div去拿标题,图片的url, 文章详情的url

        for div in div_list:

            # 实例化一个item对象

            item = WangyinewsproItem()

            item["title"] = div.xpath('./a/img/@alt').extract_first()

            item["img_url"] = div.xpath('./a/img/@src').extract_first()

            # 文章详情的url

            detail_url = div.xpath('./a/@href').extract_first()

            # /html/body/div[1]/div[3]/div[4]/div[1]/div/div/ul/li/div/div[7]/a

            # 抛出item 并且把详情url交给下一个回调函数执行,发请求

            yield scrapy.Request(url=detail_url, callback=self.parseDetail, meta={"item": item})

    # 解析详情url的方法

    def parseDetail(self, response):

        # 现货区到item

        item = response.meta["item"]

        # 解析详情的内容  //表示把所有的div文本下的内容都拿下来

        content = response.xpath('//div[@id="endText"]//text()').extract()

        item["content"] = "".join(content).strip("\n\t")

        # 调用百度的AI接口,提取文章的关键字, 和类型

        keys = self.client.keyword(item["title"].replace(u'\xa0', u''), item["content"].replace(u'\xa0', u""))

        key_list = []

        for dic in keys["items"]:

            # 拿到的是每一个关键字的得分

            key_list.append(dic["tag"])

        # 把文章的关键字添加到item中

        item["keys"] = "".join(key_list)

        # 获取到文章的分类

        kinds = self.client.topic(item["title"].replace(u'\xa0',u''), item["content"].replace(u'\xa0',u''))

        # 给item封装文章分类

        item["kind"] = kinds["item"]["lv1_tag_list"][0]["tag"]

        yield item
- Item代码:
# -*- coding: utf-8 -*-

# Define here the models for your scraped items

#

# See documentation in:

# https://doc.scrapy.org/en/latest/topics/items.html

import scrapy

class WangyinewsproItem(scrapy.Item):

    # define the fields for your item here like:

    # name = scrapy.Field()

    title = scrapy.Field()

    img_url = scrapy.Field()

    keys = scrapy.Field()

    kind = scrapy.Field()

    content = scrapy.Field()
- 中间件的代码
class WangyinewsproDownloaderMiddleware(object):

    # Not all methods need to be defined. If a method is not defined,

    # scrapy acts as if the downloader middleware does not modify the

    # passed objects.

    # @classmethod

    # def from_crawler(cls, crawler):

    #     # This method is used by Scrapy to create your spiders.

    #     s = cls()

    #     crawler.signals.connect(s.spider_opened, signal=signals.spider_opened)

    #     return s

    def process_request(self, request, spider):

        # Called for each request that goes through the downloader

        # middleware.

        # Must either:

        # - return None: continue processing this request

        # - or return a Response object

        # - or return a Request object

        # - or raise IgnoreRequest: process_exception() methods of

        #   installed downloader middleware will be called

        return None

    def process_response(self, request, response, spider):

        # Called with the response returned from the downloader.

        # Must either;

        # - return a Response object

        # - return a Request object

        # - or raise IgnoreRequest

        # 处理响应的中间件

        if request.url in spider.news_url:

            # 处理响应对象

            url = request.url  # 拿到板块的url地址

            bro = spider.bro  # 获取了在爬虫文件中创建好的浏览器对象

            bro.get(url=url)  # 向板块url发送请求

            time.sleep(2)

            js = "window.scrollTo(0, document.body.scrollHeight)"  # 使滑动条滚动加载页面(页面懒加载处理的一种方式)

            bro.execute_script(js)  # 执行js代码

            time.sleep(1)

            bro.execute_script(js)

            time.sleep(1)

            bro.execute_script(js)

            time.sleep(1)

            # 创建一个新的响应对象并且将上述获取的数据源加载到该 响应对象中,然后响应对象返回

            page_text = bro.page_source

            return HtmlResponse(url=bro.current_url, body=page_text, encoding="utf-8", request=request)

        return response
- 管道的代码:
# -*- coding: utf-8 -*-

# Define your item pipelines here

#

# Don't forget to add your pipeline to the ITEM_PIPELINES setting

# See: https://doc.scrapy.org/en/latest/topics/item-pipeline.html

import pymysql

class WangyinewsproPipeline(object):

    conn = None

    cursor = None

    # 打开爬虫文件

    def open_spider(self, spider):

        # 连接mysql

        self.conn = pymysql.Connect(host="127.0.0.1", port=3306, user="root", password="123456", db="spider")

        print(self.conn)

    def process_item(self, item, spider):

        print(item)

        # 建立cursor对象

        self.cursor = self.conn.cursor()

        # 写sql语句

        sql = 'insert into news values("%s", "%s", "%s", "%s", "%s")' % (item["title"], item["img_url"], item["content"], item["keys"], item["kind"])

        print(sql)

        try:

            # 执行sql语句

            self.cursor.execute(sql)

            # 提交sql语句

            self.conn.commit()

        except Exception as e:

            print(e)

            self.conn.rollback()

        return item

    # 关闭爬虫文件

    def close_spider(self, spider):

        self.cursor.close()

        self.conn.close()
- settings文件的代码
# -*- coding: utf-8 -*-

# Scrapy settings for wangyiNewsPro project

#

# For simplicity, this file contains only settings considered important or

# commonly used. You can find more settings consulting the documentation:

#

#     https://doc.scrapy.org/en/latest/topics/settings.html

#     https://doc.scrapy.org/en/latest/topics/downloader-middleware.html

#     https://doc.scrapy.org/en/latest/topics/spider-middleware.html

BOT_NAME = 'wangyiNewsPro'

SPIDER_MODULES = ['wangyiNewsPro.spiders']

NEWSPIDER_MODULE = 'wangyiNewsPro.spiders'

# Crawl responsibly by identifying yourself (and your website) on the user-agent

USER_AGENT = 'Mozilla/5.0 (Windows NT 10.0; Win64; x64) AppleWebKit/537.36 (KHTML, like Gecko) Chrome/68.0.3440.106 Safari/537.36'

# Obey robots.txt rules

ROBOTSTXT_OBEY = False

# Configure maximum concurrent requests performed by Scrapy (default: 16)

#CONCURRENT_REQUESTS = 32

# Configure a delay for requests for the same website (default: 0)

# See https://doc.scrapy.org/en/latest/topics/settings.html#download-delay

# See also autothrottle settings and docs

#DOWNLOAD_DELAY = 3

# The download delay setting will honor only one of:

#CONCURRENT_REQUESTS_PER_DOMAIN = 16

#CONCURRENT_REQUESTS_PER_IP = 16

# Disable cookies (enabled by default)

COOKIES_ENABLED = False

# Disable Telnet Console (enabled by default)

#TELNETCONSOLE_ENABLED = False

# Override the default request headers:

#DEFAULT_REQUEST_HEADERS = {

#   'Accept': 'text/html,application/xhtml+xml,application/xml;q=0.9,*/*;q=0.8',

#   'Accept-Language': 'en',

#}

# Enable or disable spider middlewares

# See https://doc.scrapy.org/en/latest/topics/spider-middleware.html

#SPIDER_MIDDLEWARES = {

#    'wangyiNewsPro.middlewares.WangyinewsproSpiderMiddleware': 543,

#}

# Enable or disable downloader middlewares

# See https://doc.scrapy.org/en/latest/topics/downloader-middleware.html

DOWNLOADER_MIDDLEWARES = {

   'wangyiNewsPro.middlewares.WangyinewsproDownloaderMiddleware': 543,

}

# Enable or disable extensions

# See https://doc.scrapy.org/en/latest/topics/extensions.html

#EXTENSIONS = {

#    'scrapy.extensions.telnet.TelnetConsole': None,

#}

# Configure item pipelines

# See https://doc.scrapy.org/en/latest/topics/item-pipeline.html

ITEM_PIPELINES = {

   'wangyiNewsPro.pipelines.WangyinewsproPipeline': 300,

}

# Enable and configure the AutoThrottle extension (disabled by default)

# See https://doc.scrapy.org/en/latest/topics/autothrottle.html

#AUTOTHROTTLE_ENABLED = True

# The initial download delay

#AUTOTHROTTLE_START_DELAY = 5

# The maximum download delay to be set in case of high latencies

#AUTOTHROTTLE_MAX_DELAY = 60

# The average number of requests Scrapy should be sending in parallel to

# each remote server

#AUTOTHROTTLE_TARGET_CONCURRENCY = 1.0

# Enable showing throttling stats for every response received:

#AUTOTHROTTLE_DEBUG = False

# Enable and configure HTTP caching (disabled by default)

# See https://doc.scrapy.org/en/latest/topics/downloader-middleware.html#httpcache-middleware-settings

#HTTPCACHE_ENABLED = True

#HTTPCACHE_EXPIRATION_SECS = 0

#HTTPCACHE_DIR = 'httpcache'

#HTTPCACHE_IGNORE_HTTP_CODES = []

#HTTPCACHE_STORAGE = 'scrapy.extensions.httpcache.FilesystemCacheStorage'

LOG_LEVEL = 'ERROR'

RETRY_ENABLED = False
最新文章
- python 生成器和递归
- shell命令从目录中循环匹配关键词
- nginx 流媒体 flv 播放 以及上传大小 配置文件设置
- asp.net EF model中的默认值设置
- 学习IT技术的技巧
- Unity 3D 进度条制作
- Database.SetInitializer的几种参数
- asp.net MVC Razor 语法(2)
- Windows 7安装Oracle 10g的方法
- Gentoo(贱兔)Linux安装笔记
- Count on a tree
- halcon预处理函数
- Unity外包团队:关于手机unity游戏开发的技术选型
- appium环境搭建及项目实战
- lgwr的两种模式(post/wait和polling)
- jq的ajax交互封装
- 深入研究sqlalchemy连接池
- TDate赋值给Variant时注意的问题
- java实现邮箱验证的功能
- 20155226 2016-2017-2 《Java程序设计》课程总结