02-kubeadm初始化Kubernetes集群
部署
使用 kubeadm 安装kubernetes集群。
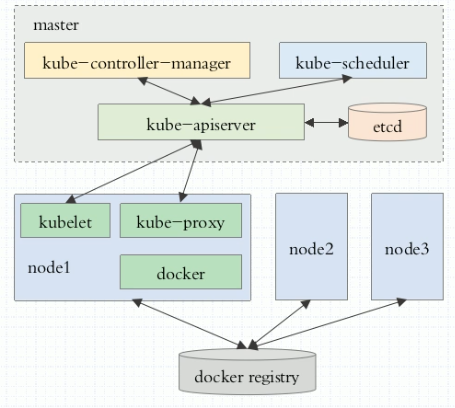
组件分布
部署环境

kubeadm 步骤
- master, node: 安装 kubelet, kubeadm, docker
- master: kubeadm init 初始化
- nodes: kubeadm join 加入集群 参考文章
基础环境
| 主机名 | 角色 | IP | 系统版本 | 内核版本 |
|---|---|---|---|---|
| master.kubernetes | master | 10.0.20.20 | CentOS 7.5 | 5.1.4-1.el7.elrepo.x86_64 |
| node01.kubernetes | node01 | 10.0.20.21 | CentOS 7.5 | 5.1.4-1.el7.elrepo.x86_64 |
| node02.kubernetes | node02 | 10.0.20.22 | CentOS 7.5 | 5.1.4-1.el7.elrepo.x86_64 |
| node03.kubernetes | node03 | 10.0.20.23 | CentOS 7.5 | 5.1.4-1.el7.elrepo.x86_64 |
基础配置
针对
所有机器操作
配置添加hosts
cat /etc/hosts

10.0.20.20 master master.kubernetes

10.0.20.21 node01 node01.kubernetes

10.0.20.22 node02 node02.kubernetes

10.0.20.23 node03 node03.kubernetes
关闭防火墙
systemctl disable firewalld

systemctl stop firewalld
禁用SELINUX
setenforce 0

vi /etc/selinux/config

SELINUX=disabled
创建/etc/sysctl.d/k8s.conf文件,添加如下内容
net.bridge.bridge-nf-call-ip6tables = 1

net.bridge.bridge-nf-call-iptables = 1

net.ipv4.ip_forward = 1

# 执行命令使修改生效

modprobe br_netfilter

sysctl -p /etc/sysctl.d/k8s.conf
kube-proxy开启ipvs的前置条件
在
node01,node02和node03上执行以下脚本
由于ipvs已经加入到了内核的主干,所以为kube-proxy开启ipvs的前提需要加载以下的内核模块
ip_vs

ip_vs_rr

ip_vs_wrr

ip_vs_sh

nf_conntrack_ipv4
cat > /etc/sysconfig/modules/ipvs.modules <<EOF

#!/bin/bash

modprobe -- ip_vs

modprobe -- ip_vs_rr

modprobe -- ip_vs_wrr

modprobe -- ip_vs_sh

modprobe -- nf_conntrack

EOF

chmod 755 /etc/sysconfig/modules/ipvs.modules && bash /etc/sysconfig/modules/ipvs.modules && lsmod | grep -e ip_vs -e nf_conntrack
上面脚本创建了的/etc/sysconfig/modules/ipvs.modules文件,保证在节点重启后能自动加载所需模块。 使用lsmod | grep -e ip_vs -e nf_conntrack命令查看是否已经正确加载所需的内核模块。
接下来还需要确保各个节点上已经安装了ipset软件包yum install ipset。 为了便于查看ipvs的代理规则,最好安装一下管理工具ipvsadm yum install ipvsadm。
如果以上前提条件如果不满足,则即使kube-proxy的配置开启了ipvs模式,也会退回到iptables模式。
安装基础组件
配置yum源
在所有节点上执行
# cat /etc/yum.repos.d/kubernetes.repo

[kubernetes]

name=Kubernetes Repo

baseurl=https://mirrors.aliyun.com/kubernetes/yum/repos/kubernetes-el7-x86_64/

gpgcheck=0
# cat /etc/yum.repos.d/docker-ce.repo

[docker-ce-stable]

name=Docker CE Stable - $basearch

baseurl=https://mirrors.aliyun.com/docker-ce/linux/centos/7/$basearch/stable

enabled=1

gpgcheck=1

gpgkey=https://mirrors.aliyun.com/docker-ce/linux/centos/gpg

[docker-ce-stable-debuginfo]

name=Docker CE Stable - Debuginfo $basearch

baseurl=https://mirrors.aliyun.com/docker-ce/linux/centos/7/debug-$basearch/stable

enabled=0

gpgcheck=1

gpgkey=https://mirrors.aliyun.com/docker-ce/linux/centos/gpg

[docker-ce-stable-source]

name=Docker CE Stable - Sources

baseurl=https://mirrors.aliyun.com/docker-ce/linux/centos/7/source/stable

enabled=0

gpgcheck=1

gpgkey=https://mirrors.aliyun.com/docker-ce/linux/centos/gpg

[docker-ce-edge]

name=Docker CE Edge - $basearch

baseurl=https://mirrors.aliyun.com/docker-ce/linux/centos/7/$basearch/edge

enabled=0

gpgcheck=1

gpgkey=https://mirrors.aliyun.com/docker-ce/linux/centos/gpg

[docker-ce-edge-debuginfo]

name=Docker CE Edge - Debuginfo $basearch

baseurl=https://mirrors.aliyun.com/docker-ce/linux/centos/7/debug-$basearch/edge

enabled=0

gpgcheck=1

gpgkey=https://mirrors.aliyun.com/docker-ce/linux/centos/gpg

[docker-ce-edge-source]

name=Docker CE Edge - Sources

baseurl=https://mirrors.aliyun.com/docker-ce/linux/centos/7/source/edge

enabled=0

gpgcheck=1

gpgkey=https://mirrors.aliyun.com/docker-ce/linux/centos/gpg

[docker-ce-test]

name=Docker CE Test - $basearch

baseurl=https://mirrors.aliyun.com/docker-ce/linux/centos/7/$basearch/test

enabled=0

gpgcheck=1

gpgkey=https://mirrors.aliyun.com/docker-ce/linux/centos/gpg

[docker-ce-test-debuginfo]

name=Docker CE Test - Debuginfo $basearch

baseurl=https://mirrors.aliyun.com/docker-ce/linux/centos/7/debug-$basearch/test

enabled=0

gpgcheck=1

gpgkey=https://mirrors.aliyun.com/docker-ce/linux/centos/gpg

[docker-ce-test-source]

name=Docker CE Test - Sources

baseurl=https://mirrors.aliyun.com/docker-ce/linux/centos/7/source/test

enabled=0

gpgcheck=1

gpgkey=https://mirrors.aliyun.com/docker-ce/linux/centos/gpg

[docker-ce-nightly]

name=Docker CE Nightly - $basearch

baseurl=https://mirrors.aliyun.com/docker-ce/linux/centos/7/$basearch/nightly

enabled=0

gpgcheck=1

gpgkey=https://mirrors.aliyun.com/docker-ce/linux/centos/gpg

[docker-ce-nightly-debuginfo]

name=Docker CE Nightly - Debuginfo $basearch

baseurl=https://mirrors.aliyun.com/docker-ce/linux/centos/7/debug-$basearch/nightly

enabled=0

gpgcheck=1

gpgkey=https://mirrors.aliyun.com/docker-ce/linux/centos/gpg

[docker-ce-nightly-source]

name=Docker CE Nightly - Sources

baseurl=https://mirrors.aliyun.com/docker-ce/linux/centos/7/source/nightly

enabled=0

gpgcheck=1

gpgkey=https://mirrors.aliyun.com/docker-ce/linux/centos/gpg
安装组件
在master上执行
yum install docker-ce kubelet kubeadm kubectl -y

# 安装完成后,配置忽略Swap

cat /etc/sysconfig/kubelet

KUBELET_EXTRA_ARGS="--fail-swap-on=false"
在node01 node02 node03 上执行
yum install docker-ce kubelet kubeadm -y
初始化 master
这里都在
master上操作
说明: 很重要,由于kubeadm 初始化的时候,默认拉取的镜像访问不了,我把master所需要的镜像已经准备好。
可以在 百度云盘地址 提取码:a4z9
导入镜像
先把下载好的镜像上传到
master服务器上,然后导入到docker中。
[root@master kubernetes.1.15]# ll

total 869812

-rw------- 1 root root  40542720 Jul  9 13:54 coredns-1.3.tar

-rw------- 1 root root 258365952 Jul  9 13:54 etcd-3.3.tar

-rw------- 1 root root  55390720 Jul  9 15:58 flannel-0.11.tar

-rw------- 1 root root 208382464 Jul  9 14:27 kube-apiserver-1.15.tar

-rw------- 1 root root 160282112 Jul  9 13:53 kube-controller-manager-1.15.tar

-rw------- 1 root root  84278272 Jul  9 13:52 kube-proxy-1.15.tar

-rw------- 1 root root  82671104 Jul  9 13:53 kube-scheduler-1.15.tar

-rw------- 1 root root    754176 Jul  9 13:54 pause-3.1.tar
# 导入镜像

docker load --input coredns-1.3.tar

docker load --input etcd-3.3.tar

docker load --input flannel-0.11.tar

docker load --input kube-apiserver-1.15.tar

docker load --input kube-controller-manager-1.15.tar

docker load --input kube-proxy-1.15.tar

docker load --input kube-scheduler-1.15.tar

docker load --input pause-3.1.tar
执行命令:
[root@master ~]# kubeadm init --kubernetes-version=1.15.0 --pod-network-cidr=10.244.0.0/16 --service-cidr=10.96.0.0/12 --ignore-preflight-errors=Swap

.....

Your Kubernetes control-plane has initialized successfully!

To start using your cluster, you need to run the following as a regular user:

  mkdir -p $HOME/.kube

  sudo cp -i /etc/kubernetes/admin.conf $HOME/.kube/config

  sudo chown $(id -u):$(id -g) $HOME/.kube/config

You should now deploy a pod network to the cluster.

Run "kubectl apply -f [podnetwork].yaml" with one of the options listed at:

  https://kubernetes.io/docs/concepts/cluster-administration/addons/

Then you can join any number of worker nodes by running the following on each as root:

kubeadm join 10.0.20.20:6443 --token cgw8vp.c2gw34c6lc2jvw18 \

    --discovery-token-ca-cert-hash sha256:ada6c11ac45aadf7581baab773e7ab172bed8fc0df85ff38299a0c5dcb6538ad
注意 最后会输出上面显示的,这里要保留好,之后添加node的时候,用到的,否则添加不了node
按照初始化最后的提示执行
[root@master ~]# mkdir -p $HOME/.kube

[root@master ~]# cp -i /etc/kubernetes/admin.conf $HOME/.kube/config
查看组件状态
[root@master ~]# kubectl get cs

NAME                 STATUS    MESSAGE             ERROR

scheduler            Healthy   ok

controller-manager   Healthy   ok

etcd-0               Healthy   {"health":"true"}
查看node状态
[root@master ~]# kubectl get nodes

NAME                STATUS   ROLES    AGE   VERSION

master.kubernetes   NoReady    master   66m   v1.15.0
这里看到master的状态是NoReady,是因为没有安装flannel导致的,下面安装
安装flannel网络
执行:
[root@master ~]# kubectl apply -f https://raw.githubusercontent.com/coreos/flannel/master/Documentation/kube-flannel.yml

podsecuritypolicy.extensions/psp.flannel.unprivileged created

clusterrole.rbac.authorization.k8s.io/flannel created

clusterrolebinding.rbac.authorization.k8s.io/flannel created

serviceaccount/flannel created

configmap/kube-flannel-cfg created
稍等后再次查看master状态
[root@master ~]# kubectl get nodes

NAME                STATUS   ROLES    AGE   VERSION

master.kubernetes   Ready    master   66m   v1.15.0
查看系统命名空间的pods状态
[root@master ~]# kubectl get pods -n kube-system

NAME                                        READY   STATUS    RESTARTS   AGE

coredns-5c98db65d4-8mzfz                    1/1     Running   0          4m

coredns-5c98db65d4-spjx8                    1/1     Running   0          4m6s

etcd-master.kubernetes                      1/1     Running   0          7m24s

kube-apiserver-master.kubernetes            1/1     Running   0          7m23s

kube-controller-manager-master.kubernetes   1/1     Running   0          7m32s

kube-flannel-ds-amd64-wjczq                 1/1     Running   0          48s

kube-proxy-rmckk                            1/1     Running   0          8m14s

kube-scheduler-master.kubernetes            1/1     Running   0          7m33s
此时master已经初始化完成。
初始化 node
同样,先导入node所需的镜像到docker中,然后在执行个初始化命令
本次在node01 node02 node03 上执行
三个node节点操作相同
[root@node01 kubernetes.1.15]# ll

total 612216

-rw------- 1 root root  55390720 Jul  9 15:58 flannel-0.11.tar

-rw------- 1 root root  82671104 Jul  9 13:53 kube-scheduler-1.15.tar

-rw------- 1 root root    754176 Jul  9 13:54 pause-3.1.tar

[root@node01 kubernetes.1.15]# docker image ls

REPOSITORY               TAG                 IMAGE ID            CREATED             SIZE

k8s.gcr.io/kube-proxy    v1.15.0             d235b23c3570        2 weeks ago         82.4MB

quay.io/coreos/flannel   v0.11.0-amd64       ff281650a721        5 months ago        52.6MB

k8s.gcr.io/pause         3.1                 da86e6ba6ca1        18 months ago       742kB
初始化
执行下列命令:
[root@node01 ~]# kubeadm join 10.0.20.20:6443 --token cgw8vp.c2gw34c6lc2jvw18     --discovery-token-ca-cert-hash sha256:ada6c11ac45aadf7581baab773e7ab172bed8fc0df85ff38299a0c5dcb6538ad

[preflight] Running pre-flight checks

	[WARNING IsDockerSystemdCheck]: detected "cgroupfs" as the Docker cgroup driver. The recommended driver is "systemd". Please follow the guide at https://kubernetes.io/docs/setup/cri/

[preflight] Reading configuration from the cluster...

[preflight] FYI: You can look at this config file with 'kubectl -n kube-system get cm kubeadm-config -oyaml'

[kubelet-start] Downloading configuration for the kubelet from the "kubelet-config-1.15" ConfigMap in the kube-system namespace

[kubelet-start] Writing kubelet configuration to file "/var/lib/kubelet/config.yaml"

[kubelet-start] Writing kubelet environment file with flags to file "/var/lib/kubelet/kubeadm-flags.env"

[kubelet-start] Activating the kubelet service

[kubelet-start] Waiting for the kubelet to perform the TLS Bootstrap...

This node has joined the cluster:

* Certificate signing request was sent to apiserver and a response was received.

* The Kubelet was informed of the new secure connection details.

Run 'kubectl get nodes' on the control-plane to see this node join the cluster.
看到上面的最后提示,则表示完成,然后等一会儿后,在master查看效果如下:
master 验证
[root@master ~]# kubectl get nodes

NAME                STATUS   ROLES    AGE   VERSION

master.kubernetes   Ready    master   84m   v1.15.0

node01.kubernetes   Ready    <none>   38m   v1.15.0

node02.kubernetes   Ready    <none>   38m   v1.15.0

node03.kubernetes   Ready    <none>   40m   v1.15.0
[root@master ~]# kubectl get pods -n kube-system

NAME                                        READY   STATUS    RESTARTS   AGE

coredns-5c98db65d4-8mzfz                    1/1     Running   0          80m

coredns-5c98db65d4-spjx8                    1/1     Running   0          80m

etcd-master.kubernetes                      1/1     Running   0          83m

kube-apiserver-master.kubernetes            1/1     Running   0          83m

kube-controller-manager-master.kubernetes   1/1     Running   0          83m

kube-flannel-ds-amd64-4szk7                 1/1     Running   0          40m

kube-flannel-ds-amd64-b4ssp                 1/1     Running   0          38m

kube-flannel-ds-amd64-nmklz                 1/1     Running   0          39m

kube-flannel-ds-amd64-wjczq                 1/1     Running   0          77m

kube-proxy-8fqsz                            1/1     Running   0          39m

kube-proxy-bkrw4                            1/1     Running   0          40m

kube-proxy-n75g8                            1/1     Running   0          38m

kube-proxy-rmckk                            1/1     Running   0          84m

kube-scheduler-master.kubernetes            1/1     Running   0          83m
[root@master ~]# kubectl get ns

NAME              STATUS   AGE

default           Active   85m

kube-node-lease   Active   85m

kube-public       Active   85m

kube-system       Active   85m
最新文章
- Solr学习总结(八)IK 中文分词的配置和使用
- lecture1-NN的简介
- Ubuntu Gnome 14.04.2 lts 折腾笔记
- 重新想象 Windows 8.1 Store Apps (91) - 后台任务的新特性: 下载和上传的新特性, 程序启动前预下载网络资源, 后台任务的其它新特性
- HDU 4857 Couple doubi(找循环节)
- taglib指令
- .NET调用Java写的WebServices(可能会碰到的问题)
- Java文件清单列表
- 注册界面的优化之ActionBar组件的应用之(二)ActionBar组件的事件处理
- Web开发者的10个最好的云开发环境
- BZOJ-1007-水平可见直线-HN2008
- 【转载】GPIO模拟i2c通信
- C#的Random到底该怎么使用
- 利用 keras_proprecessing.image 扩增自己的遥感数据(多波段)
- Mock Server 实现post方法的接口(三)
- Java集合:ConcurrentHashMap原理分析
- Linux apt-get命令
- 如何写好PPT
- 传入一个integer数组,取出最大、最小值
- echarts容器动态设置高度