使用Apache Tiles3.x构建界面布局
Tiles是一个免费的开源模板Java应用程序的框架。基于复合模式简化的用户界面的构建。对于复杂的网站仍是最简单、最优雅的方式与任何MVC技术一起工作。Struts2对Tiles提供了支持,如今Tiles发展已有13个年头,成为Apache的一个独立项目,我们可以单独使用Tiles来构建用户界面布局。
Tiles项目:http://tiles.apache.org/index.html
Tiles的配置DTD定义:http://tiles.apache.org/framework/tiles-core/dtddoc/index.html
本文主要通过构建一个简单的页面布局来认识Apache Tiles3.x(由于Tiles2.x和Tiles3.x存在较大差异)。
1.准备工作
1.1安装Apache Tiles3.x依赖的Jar
|
1
2
3
4
5
6
7
8
9
10
11
12
13
14
15
|
<dependency> <groupId>org.apache.tiles</groupId> <artifactId>tiles-extras</artifactId> <version>3.0.5</version> </dependency> <dependency> <groupId>org.apache.tiles</groupId> <artifactId>tiles-servlet</artifactId> <version>3.0.5</version> </dependency> <dependency> <groupId>org.apache.tiles</groupId> <artifactId>tiles-jsp</artifactId> <version>3.0.5</version> </dependency> |
注意:这里使用了Apache3.x完整包依赖。
1.2调试环境
安装jetty-maven-plugin来热部署web应用
|
1
2
3
4
5
6
7
8
9
10
11
12
13
14
15
16
17
|
<build> <finalName>tiles</finalName> <plugins> <plugin> <groupId>org.mortbay.jetty</groupId> <artifactId>jetty-maven-plugin</artifactId> <version>7.1.6.v20100715</version> <configuration> <scanIntervalSeconds>1</scanIntervalSeconds> <reload>automatic</reload> <webAppConfig> <contextPath>/tiles</contextPath> </webAppConfig> </configuration> </plugin> </plugins> </build> |
注意:运行mvn jetty:run -Djetty.port=9999 命名,访问http://localhost:9999/tiles 需要额外在Maven的settings.xml文件的插件组中添加插件组标识。
|
1
2
3
4
5
6
7
|
<pluginGroups> <!-- pluginGroup | Specifies a further group identifier to use for plugin lookup. <pluginGroup>com.your.plugins</pluginGroup> --> <pluginGroup>org.mortbay.jetty</pluginGroup> </pluginGroups> |
1.3配置web.xml
在web.xml中添加Tiles监听器
|
1
2
3
|
<listener> <listener-class>org.apache.tiles.extras.complete.CompleteAutoloadTilesListener</listener-class> </listener> |
关于Tiles的监听器可以自定义实现,参见:http://tiles.apache.org/framework/config-reference.html
2.分析界面组成,构建布局文件
假设本案例中的页面构成如图:

分析界面布局,找不通用部分,特殊部分。 在webapp下创建layout文件夹放在布局文件,snippet文件夹放置公共部分。
通过分析,将布局切割为header,body,footer,并且将HTML页面中的meta,script公共部分抽取出来。
/snippet/meta.jsp
|
1
2
3
|
<%@ page language="java" contentType="text/html; charset=UTF-8" pageEncoding="UTF-8"%><meta http-equiv="Content-Type" content="text/html; charset=UTF-8"> |
/snippet/script.jsp
|
1
2
3
4
5
6
7
8
9
10
11
12
13
14
15
16
17
|
<%@ page language="java" contentType="text/html; charset=UTF-8" pageEncoding="UTF-8"%><style>div { width: 480px; height: 80px; background: silver;}#body { background: lime;}</style><script type="text/javascript"> document.writeln("这句话是由JavaScript写入页面的。");</script> |
/snippet/header.jsp
|
1
2
3
4
5
|
<%@ page language="java" contentType="text/html; charset=UTF-8" pageEncoding="UTF-8"%><h3>这是头部</h3> |
/snippet/footer.jsp
|
1
2
3
|
<%@ page language="java" contentType="text/html; charset=UTF-8" pageEncoding="UTF-8"%><h3>这是页脚</h3> |
/snippet/index_body.jsp
|
1
2
3
4
5
|
<%@ page language="java" contentType="text/html; charset=UTF-8" pageEncoding="UTF-8"%><pre> 这是页面的主体部分</pre> |
通过上面的公共部分和主体,构建一个布局文件如下:
/layout/index_layout.jsp
|
1
2
3
4
5
6
7
8
9
10
11
12
13
14
15
16
17
18
19
20
21
22
23
|
<%@ page language="java" contentType="text/html; charset=UTF-8" pageEncoding="UTF-8"%><%@ taglib uri="http://java.sun.com/jsp/jstl/core" prefix="c"%><%@ taglib uri="http://tiles.apache.org/tags-tiles" prefix="tiles"%><!DOCTYPE html><html><head><tiles:insertAttribute name="meta" /><title><tiles:insertAttribute name="title" /></title><tiles:insertAttribute name="script" /></head><body> <div id="header"> <tiles:insertAttribute name="header" /> </div> <div id="body"> <tiles:insertAttribute name="body" /> </div> <div id="footer"> <tiles:insertAttribute name="footer" /> </div></body></html> |
3.Tiles的复合布局定义
Tiles是通过在xml文件中配置definition进行页面公共部分的重用,页面布局的组合。
/WEB-INF/tiles-defs.xml 定义好公共部分之后,通过配置definition来组合页面布局。
|
1
2
3
4
5
6
7
8
9
10
11
12
13
14
|
<?xml version="1.0" encoding="UTF-8" ?><!DOCTYPE tiles-definitions PUBLIC "-//Apache Software Foundation//DTD Tiles Configuration 3.0//EN" "http://tiles.apache.org/dtds/tiles-config_3_0.dtd"><!-- Definitions for Tiles documentation --><tiles-definitions> <definition name="tiles.base.definition"> <put-attribute name="meta" value="/snippet/meta.jsp" /> <put-attribute name="script" value="/snippet/script.jsp" /> <put-attribute name="header" value="/snippet/header.jsp" /> <put-attribute name="footer" value="/snippet/footer.jsp" /> </definition></tiles-definitions> |
上面的definition可以说是抽象的,仅仅作为基本的定义抽取了界面中最通用的部分,而且并未指定具体的模版文件(布局文件)。下面通过继承tiles.base.definition来定一个tiles.index.definition其布局模版为/layout/index_layout.jsp。
|
1
2
3
4
|
<definition name="tiles.index.definition" extends="tiles.base.definition" template="/layout/index_layout.jsp"> <put-attribute name="body" value="/snippet/index_body.jsp" /> </definition> |
上面定义tiles.index.definition,新增了body,其值为/snippet/index_body.jsp页面。
4.使用复合布局
到这里已经将页面的布局进行了分割,组合。现在应用definition来构建一个请求响应页面。
/example/index.jsp
|
1
2
3
4
5
6
|
<%@ page language="java" contentType="text/html; charset=UTF-8" pageEncoding="UTF-8"%><%@ taglib uri="http://tiles.apache.org/tags-tiles" prefix="tiles"%><tiles:insertDefinition name="tiles.index.definition"> <tiles:putAttribute name="title" value="这是一个有Apache Tiles构建的页面布局." /></tiles:insertDefinition> |
5.启动服务器,访问/example/index.jsp
页面展示效果:
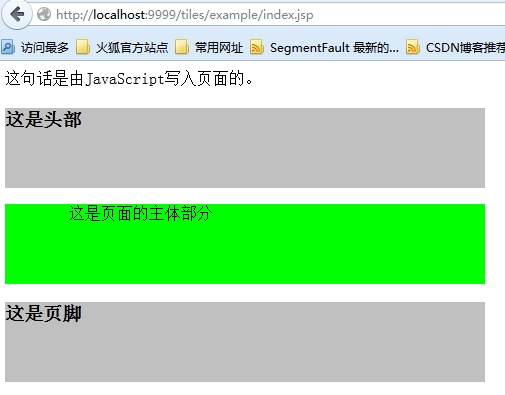
接下来看看页面的源代码:
|
1
2
3
4
5
6
7
8
9
10
11
12
13
14
15
16
17
18
19
20
21
22
23
24
25
26
27
28
29
30
31
32
33
34
35
36
37
38
39
40
41
42
|
<!DOCTYPE html><html><head><meta http-equiv="Content-Type" content="text/html; charset=UTF-8"><title>这是一个有Apache Tiles构建的页面布局.</title><style>div { width: 480px; height: 80px; background: silver;}#body { background: lime;}</style><script type="text/javascript"> document.writeln("这句话是由JavaScript写入页面的。");</script></head><body> <div id="header"> <h3>这是头部</h3> </div> <div id="body"> <pre> 这是页面的主体部分</pre> </div> <div id="footer"> <h3>这是页脚</h3> </div></body></html> |
该例子中布局index_layout.jsp中body是可变的,title对一个不同的页面有不同的标题设置。在tiles-defx.xml的tiles.index.definition继承了tiles.base.definition,并且添加了其body页面,接着在插入tiles.index.definition的index.jsp页面添加了title。这样做达到的效果是整个站点的header,footer,meta,script抽取到了一个definition,然后通过继承的方式进行扩展,丰富不同的布局的页面组成元素,在具体的响应页面来定义专属该页面的内容。从而达到对页面的布局的控制,公共部分的复用的效果。
6.总结
本文仅仅是一个简单的示例,然而大部分内容被抽取公共部分占去,这样的结果并非意外,对于页面布局的划分,组合,重用才是使用Tiles之前最为繁重和复杂的工作,这些工作能够做的合理,优雅,配置definition自然就轻松多了。
http://aiilive.blog.51cto.com/1925756/1596059
接着上一篇:使用Apache Tiles3.x构建界面布局(一)继续构建页面布局。
上一篇示例中已经对页面的公共部分进行了抽取,创建了布局,并且将使用的布局应用的响应页面了。
1.定义definition来改变公共部分
现在有个新变化,响应页面的footer部分需要发生点变化,这个时候仍然可以通过继承的方式来配置一个definition。
/WEB-INF/tiles-defs.xml 中新增definition
|
1
2
3
4
|
<definition name="tiles.override.definition" extends="tiles.index.definition"> <put-attribute name="footer" value="Copy Right <a href='http://aiilive.blog.51cto.com'>野马红尘</a>"></put-attribute> </definition> |
1.1创建响应页面/example/index_override.jsp
|
1
2
3
4
5
6
|
<%@ page language="java" contentType="text/html; charset=UTF-8" pageEncoding="UTF-8"%><%@ taglib uri="http://tiles.apache.org/tags-tiles" prefix="tiles"%><tiles:insertDefinition name="tiles.override.definition"> <tiles:putAttribute name="title" value="这是一个有Apache Tiles构建的页面布局." /></tiles:insertDefinition> |
1.2访问:/tiles/example/index_override.jsp
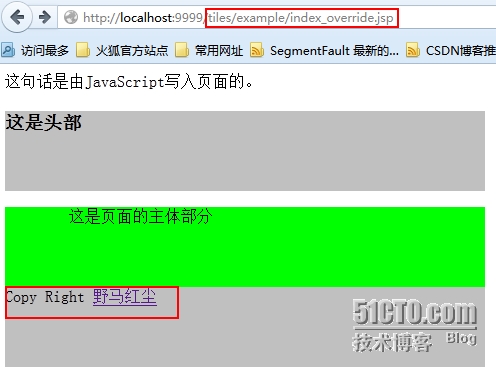
注意:footer部分发生了改变,使用了tiles.override.definition的footer属性。
2.响应页面中定义body
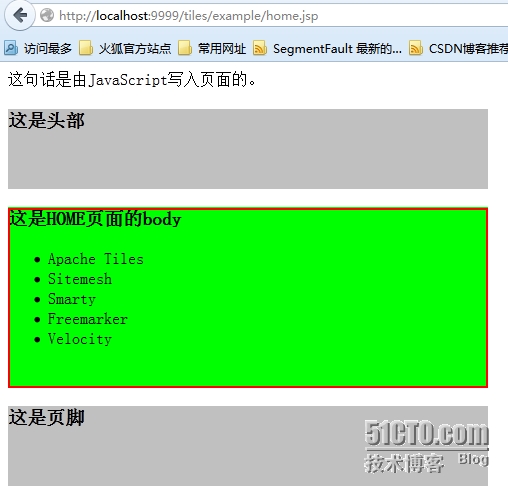
/example/home.jsp
|
1
2
3
4
5
6
7
8
9
10
11
12
13
14
15
16
|
<%@ page language="java" contentType="text/html; charset=UTF-8" pageEncoding="UTF-8"%><%@ taglib uri="http://tiles.apache.org/tags-tiles" prefix="tiles"%><tiles:insertDefinition name="tiles.index.definition"> <tiles:putAttribute name="title" value="HOME 页面." /> <tiles:putAttribute name="body"> <h3>这是HOME页面的body</h3> <ul> <li>Apache Tiles</li> <li>Sitemesh</li> <li>Smarty</li> <li>Freemarker</li> <li>Velocity</li> </ul> </tiles:putAttribute></tiles:insertDefinition> |
访问:/tiles/example/home.jsp
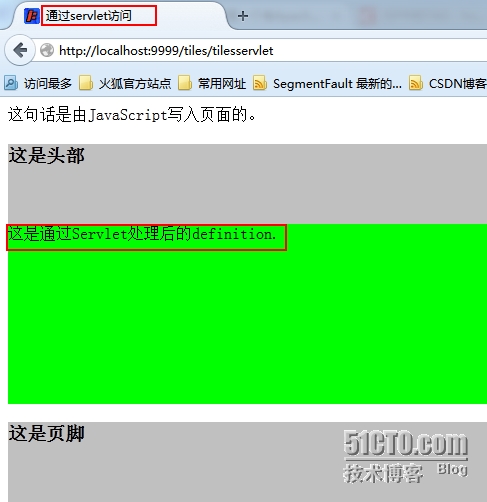
3.通过Servlet来访问definition(tiles.index.definition),可编程式!
|
1
2
3
4
5
6
7
8
9
10
11
12
13
14
15
16
17
18
19
20
21
22
23
24
25
26
27
28
29
30
31
32
33
34
35
36
37
38
39
40
41
42
43
44
45
46
47
48
49
50
51
|
package secondriver.tiles.servlet;import java.io.IOException;import javax.servlet.ServletException;import javax.servlet.http.HttpServlet;import javax.servlet.http.HttpServletRequest;import javax.servlet.http.HttpServletResponse;import org.apache.tiles.Attribute;import org.apache.tiles.Definition;import org.apache.tiles.TilesContainer;import org.apache.tiles.access.TilesAccess;import org.apache.tiles.request.ApplicationContext;import org.apache.tiles.request.Request;import org.apache.tiles.request.servlet.ServletRequest;import org.apache.tiles.request.servlet.ServletUtil;public class TilesServlet extends HttpServlet { private static final long serialVersionUID = 2721434552222217027L; @Override protected void service(HttpServletRequest request, HttpServletResponse response) throws ServletException, IOException { ApplicationContext applicationContext = ServletUtil .getApplicationContext(getServletContext()); TilesContainer container = TilesAccess.getContainer(applicationContext); Request currentRequest = new ServletRequest(applicationContext, request, response); Definition definition = container.getDefinition( "tiles.index.definition", currentRequest); definition.putAttribute("title", new Attribute("通过servlet访问")); definition.putAttribute("body", new Attribute( "这是通过Servlet处理后的definition.")); container.render(definition, currentRequest); /** * 不需要处理的时候可以直接使用definition的name * * tiles.index.definition没有定义title属性 * * 而template文件(布局)中用到所以需要在Servlet中进行添加 */ // container.render("tiles.index.definition", currentRequest); }} |
访问:/tiles/tilesservlet
注意:
这里使用了Servlet需要在web.xml中增加Servlet的配置
|
1
2
3
4
5
6
7
8
|
<servlet> <servlet-name>tilesservlet</servlet-name> <servlet-class>secondriver.tiles.servlet.TilesServlet</servlet-class> </servlet> <servlet-mapping> <servlet-name>tilesservlet</servlet-name> <url-pattern>/tilesservlet</url-pattern> </servlet-mapping> |
在pom.xml中添加servlet-api:
|
1
2
3
4
5
|
<dependency> <groupId>javax.servlet</groupId> <artifactId>servlet-api</artifactId> <version>2.5</version> </dependency> |
4.通过标签在响应页面上配置definition,并插入到页面中
|
1
2
3
4
5
6
7
8
9
10
11
12
13
|
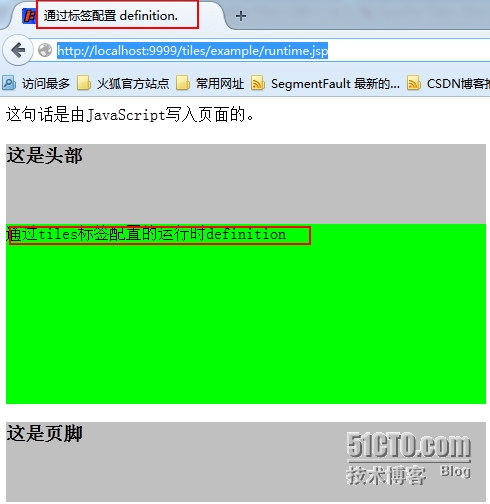
<%@ page language="java" contentType="text/html; charset=UTF-8" pageEncoding="UTF-8"%><%@ taglib uri="http://tiles.apache.org/tags-tiles" prefix="tiles"%><tiles:definition name="tiles.runtime.definiation" template="/layout/index_layout.jsp" extends="tiles.base.definition"> <tiles:putAttribute name="title" value="通过标签配置 definition." /> <tiles:putAttribute name="body"> 通过tiles标签配置的运行时definition </tiles:putAttribute></tiles:definition><tiles:insertDefinition name="tiles.runtime.definiation"></tiles:insertDefinition> |
访问:/tiles/example/runtime.jsp
本文通过多种方式展示了Tiles的使用和其灵活性。另外Tiles还可以和Freemarker,Velocity,Spring,Struts等多种框架集成使用。
具体可以参考官方文档:http://tiles.apache.org/framework/whats-new.html。
另外更多的示例:http://tiles.apache.org/download.html
http://aiilive.blog.51cto.com/1925756/1596069
最新文章
- JavaScript学习笔记之string
- django博客功能实现——标签功能
- ios UIScrollView 中控件自动增加间隔
- Linux系统日志及日志分析
- 直线相交 POJ 1269
- 单节点伪分布集群(weekend110)的Hive子项目启动顺序
- PS之放射背景
- PHP实现对MongoDB的基础操作
- css中的定位
- Ubuntu升级到14.04
- Laravel Migrate
- 微信小程序wx.uploadFile 上传文件 的两个坑
- AX2012 ERP Excel报表方案
- Mac gitk安装与优化
- Mysql宽字节注入(转)
- CF 494B 【Obsessive String】
- 生成器yield
- 如何发布自己的node模块
- 百度接口test
- java利用poi生成excel文件后下载本地