docker1-安装和使用
docker安装和使用
一、安装docker
1.1 centos7.2安装docker
环境:centos7.2
安装方法:https://docs.docker.com/engine/installation/linux/centos/
1)Make sure your existing yum packages are up-to-date.
CentOS使用yum update更新时不升级内核
cp /etc/yum.conf /etc/yum.confbak

方法一、修改yum的配置文件

vi /etc/yum.conf 在[main]的最后添加 exclude=kernel*

方法二、直接在yum的命令后面加上如下的参数:

yum --exclude=kernel* update

查看系统版本 cat /etc/issue

查看内核版本 uname -a
下面的命令,生产环境不要随便使用!
sudo yum --exclude=kernel* update
2)Add the yum repo.
sudo tee /etc/yum.repos.d/docker.repo <<-'EOF'

[dockerrepo]

name=Docker Repository

baseurl=https://yum.dockerproject.org/repo/main/centos/7/

enabled=1

gpgcheck=1

gpgkey=https://yum.dockerproject.org/gpg

EOF
3)Install the Docker package.
sudo yum -y install docker-engine
4)Start the Docker daemon.
sudo service docker start
5)Verify docker is installed correctly by running a test image in a container.
$ sudo docker run hello-world

Unable to find image 'hello-world:latest' locally

    latest: Pulling from hello-world

    a8219747be10: Pull complete

    91c95931e552: Already exists

    hello-world:latest: The image you are pulling has been verified. Important: image verification is a tech preview feature and should not be relied on to provide security.

    Digest: sha256:aa03e5d0d5553b4c3473e89c8619cf79df368babd1.7.1cf5daeb82aab55838d

    Status: Downloaded newer image for hello-world:latest

    Hello from Docker.

    This message shows that your installation appears to be working correctly.

。。。。。。
6)Run docker ps -a to show all containers on the system.
[root@bogon ~]# docker ps -a

CONTAINER ID        IMAGE               COMMAND             CREATED             STATUS                     PORTS               NAMES

30973426a4de        hello-world         "/hello"            3 minutes ago       Exited (0) 3 minutes ago                       adoring_mestorf
1.2 创建docker用户组
docker用root权限运行,所以普通用户总是加sudo来执行命令,所以我们创建docker用户组,有root的权限,然后把普通用户添加到docker组里,这样普通用户执行docker命令就不用加sudo 了。
1)Create the docker group.
sudo groupadd docker
2)Add your user to docker group.
sudo usermod -aG docker your_username
3)Log out and log back in.
This ensures your user is running with the correct permissions.
4)Verify your work by running docker without sudo.
$ docker run hello-world
1.3 uninstall
1)List the package you have installed.
$ yum list installed | grep docker

yum list installed | grep docker

docker-engine.x86_64   1.7.1-1.el7 @/docker-engine-1.7.1-1.el7.x86_64.rpm
2)Remove the package.
$ sudo yum -y remove docker-engine.x86_64

This command does not remove images, containers, volumes, or user-created configuration files on your host.
3)To delete all images, containers, and volumes, run the following command:
$ rm -rf /var/lib/docker
4)Locate and delete any user-created configuration files.
1.4 Learn about images & containers
An image is a filesystem and parameters to use at runtime. It doesn’t have state and never changes.
A container is a running instance of an image.
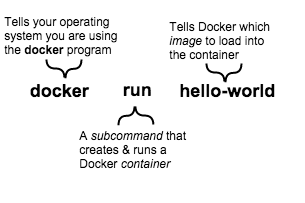
When you ran the command, Docker Engine:
- checked to see if you had the hello-world software image
- downloaded the image from the Docker Hub (more about the hub later)
- loaded the image into the container and “ran” it
二、Find and run the whalesay image
Step 1: Locate the whalesay image
浏览器打开:https://hub.docker.com
搜索:whalesay,回车
进入界面,就可以看到用法了。
https://hub.docker.com/r/mendlik/docker-whalesay
Usage:
# Print random fortune cookie message
$ docker run mendlik/docker-whalesay
# Print custom message
$ docker run mendlik/docker-whalesay "Your message"
# Let's see what's inside the container
$ docker run -it --entrypoint /bin/bash mendlik/docker-whalesay
Step 2: Run the whalesay image
我们在容器里,运行whalesay镜像:
docker run mendlik/docker-whalesay cowsay boo
查看本地所有的镜像:
[root@bogon ~]# docker images

REPOSITORY                TAG                 IMAGE ID            CREATED             SIZE

hello-world               latest              c54a2cc56cbb        7 weeks ago         1.848 kB

mendlik/docker-whalesay   latest              552104437e78        5 months ago        172.3 MB
Take a moment to play with the whalesay container a bit.
Try running the whalesay image again with a word or phrase. And you type a lot to get whalesay to talk..
[root@bogon ~]# docker run mendlik/docker-whalesay boo-boo

 _________

< boo-boo >

 ---------

    \

     \

      \

                    ##        .

              ## ## ##       ==

           ## ## ## ##      ===

       /""""""""""""""""___/ ===

  ~~~ {~~ ~~~~ ~~~ ~~~~ ~~ ~ /  ===- ~~~

       \______ o          __/

        \    \        __/

          \____\______/
三、Build your own image
Step 1: Write a Dockerfile
1)创建目录,这个目录包含所有你要自建的镜像
mkdir mydockerbuild

cd mydockerbuild
2)编辑文件内容
vi Dockerfile

添加内容:

FROM mendlik/docker-whalesay:latest
FROM关键字表示你的镜像是基于哪个镜像来做的。
现在我们把fortunes程序加入到镜像里,fortunes 程序会有一个命令,让whale说话。所以我们要安装它。
这行安装软件到镜像里。
Dockerfile添加内容:
RUN apt-get -y update && apt-get install -y fortunes
一旦镜像有需要的软件,你就指定:当镜像加载的时候,运行这个软件。
这一行表示fortune程序,把一个漂亮的quote传递给cowsay程序
CMD /usr/games/fortune -a | cowsay
所以,你的文件全部内容为:
$ cat Dockerfile

FROM mendlik/docker-whalesay:latest

RUN apt-get -y update && apt-get install -y fortunes

CMD /usr/games/fortune -a | cowsay
Step 2: Build an image from your Dockerfile
注意,一定要加点“.”
docker build -t docker-whalesay .
这个命令使用当前目录下的Dockerfile文件。
然后在你本机创建一个叫"docker-whalesay "的镜像
我们看看命令执行输出:
 [root@bogon mydockerbuild]# docker build -t docker-whalesay .

 Sending build context to Docker daemon 2.048 kB    # docker检查他需要创建的东西。

 Step  : FROM mendlik/docker-whalesay:latest        # docker下载mendlik/docker-whalesay镜像,因为之前已经下载,就不用下载了。

  ---> 552104437e78

 Step  : RUN apt-get -y update && apt-get install -y fortunes    # 先更新apt-get包

  ---> Running in ecb33156fc42

 Get: http://security.debian.org jessie/updates InRelease [63.1 kB]

 Get: http://security.debian.org jessie/updates/main amd64 Packages [385 kB]

 Ign http://httpredir.debian.org jessie InRelease

 Get: http://httpredir.debian.org jessie-updates InRelease [142 kB]

 Get: http://httpredir.debian.org jessie Release.gpg [2373 B]

 Get: http://httpredir.debian.org jessie-updates/main amd64 Packages [17.6 kB]

 Get: http://httpredir.debian.org jessie Release [148 kB]

 Get: http://httpredir.debian.org jessie/main amd64 Packages [9032 kB]

 Fetched  kB in 4min 47s (34.0 kB/s)

 Reading package lists...

 W: Size of file /var/lib/apt/lists/httpredir.debian.org_debian_dists_jessie_main_binary-amd64_Packages.gz is not what the server reported

 Reading package lists...

 Building dependency tree...

 Reading state information...

 fortunes is already the newest version.

  upgraded,  newly installed,  to remove and  not upgraded.

  ---> e78b54d7f981

 Removing intermediate container ecb33156fc42            # docker再安装fortunes程序

 Step  : CMD /usr/games/fortune -a | cowsay            # docker 完成创建镜像,并打印输出。

  ---> Running in 5ca72e7209e3

  ---> 7c8d26884c76

 Removing intermediate container 5ca72e7209e3

 Successfully built 7c8d26884c76
docker build -t docker-whalesay .
Step 3: Run your new docker-whale
查看本地有哪些镜像:
[root@bogon ~]# docker images

REPOSITORY                TAG                 IMAGE ID            CREATED             SIZE

docker-whalesay           latest              7c8d26884c76        About an hour ago   182.1 MB

hello-world               latest              c54a2cc56cbb        7 weeks ago         1.848 kB

mendlik/docker-whalesay   latest              552104437e78        5 months ago        172.3 MB
运行自建的镜像,可以看到docker不再下载任何东西了,因为可以用你本地的东西。
 [root@bogon ~]# docker run docker-whalesay

  ____________________________________

 / /bin/sh -c /usr/games/fortune -a | \

 \ cowsay                             /

  ------------------------------------

     \

      \

       \

                     ##        .

               ## ## ##       ==

            ## ## ## ##      ===

        /""""""""""""""""___/ ===

   ~~~ {~~ ~~~~ ~~~ ~~~~ ~~ ~ /  ===- ~~~

        \______ o          __/

         \    \        __/

           \____\______/
docker run docker-whalesay
四、Create a Docker Hub account & repository
浏览器打开:https://hub.docker.com/?utm_source=getting_started_guide&utm_medium=embedded_MacOSX&utm_campaign=create_docker_hub_account
点注册就好了
用户名/密码:w***/***
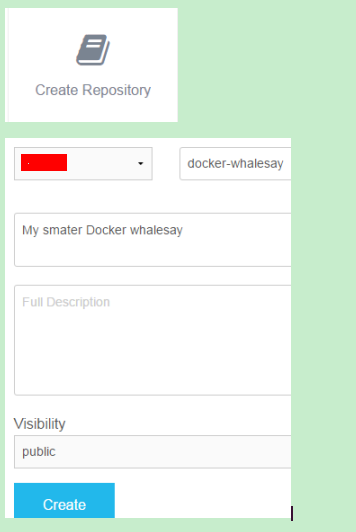
验证完邮箱之后,点击Create repository
五、Tag, push, and pull your image
你打tag,推送docker-whalesay 镜像到你新建的repository。
当你做完之后,你从repository中pull你的新镜像来测试。
Step 1: Tag and push the image
1)查看所有的镜像:
[root@bogon ~]# docker images

REPOSITORY                TAG                 IMAGE ID            CREATED             SIZE

docker-whalesay           latest              7c8d26884c76        About an hour ago   182.1 MB

hello-world               latest              c54a2cc56cbb        7 weeks ago         1.848 kB

mendlik/docker-whalesay   latest              552104437e78        5 months ago        172.3 MB
2)找到你自己的docker-whalesay的镜像id
这里的id是:
7c8d26884c76
注意:REPOSITORY展示的repo名字是docker-whalesay,不是命名空间,如果你想包含Docker Hub账户里的命名空间的话。
这个命名空间和你账户的名字是一样的。你需要重命名镜像为YOUR_DOCKERHUB_NAME/docker-whalesay
3)使用镜像ID和docker tag 命令来对你的docker-whalesay打标签。
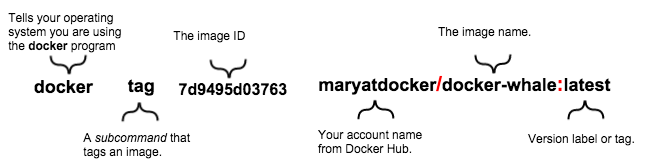
改成自己的账户和信息:
docker tag 7c8d26884c76 w**/docker-whalesay:latest
4)查看所有镜像,可以看到你最新的打过tag的镜像:
[root@bogon ~]# docker images

REPOSITORY                TAG                 IMAGE ID            CREATED             SIZE

w**/docker-whalesay     latest              7c8d26884c76        2 hours ago         182.1 MB

docker-whalesay           latest              7c8d26884c76        2 hours ago         182.1 MB

hello-world               latest              c54a2cc56cbb        7 weeks ago         1.848 kB

mendlik/docker-whalesay   latest              552104437e78        5 months ago        172.3 MB
5)在命令行使用docker login命令登录Docker Hub
docker login --username=w** --email=***@qq.com

输入密码,提示登陆成功:

Flag --email has been deprecated, will be removed in 1.13.

Password:

Login Succeeded
6)使用docker push命令把你的镜像push到你的新的repository上。
use docker push to push my images to docker hub:
[root@bogon ~]# docker push w**/docker-whalesay

The push refers to a repository [docker.io/w**/docker-whalesay]

4e41c767b863: Layer already exists

c156acae0765: Layer already exists

51c7a9fb7da1: Layer already exists

887b1e17f589: Layer already exists

284cb67cd312: Layer already exists

5f70bf18a086: Layer already exists

917c0fc99b35: Layer already exists

latest: digest: sha256:53bb6ecb63346c7916e7f68d942d754964fc176732ce93322cea2ef25a7b28af size: 1779
7)回到Docker Hub上然后看看你的新镜像
https://hub.docker.com/r/w**/

Step 2: Pull your new image
[root@bogon ~]# docker images

REPOSITORY                TAG                 IMAGE ID            CREATED             SIZE

docker-whalesay           latest              7c8d26884c76        18 hours ago        182.1 MB

w**/docker-whalesay     latest              7c8d26884c76        18 hours ago        182.1 MB

hello-world               latest              c54a2cc56cbb        7 weeks ago         1.848 kB

mendlik/docker-whalesay   latest              552104437e78        5 months ago        172.3 MB
为了做测试,我们从本地删除w**/docker-whalesay和docker-whalesay 镜像,然后从你的repository上docker pull镜像。
[root@bogon ~]# docker rmi -f 7c8d26884c76

[root@bogon ~]# docker images

REPOSITORY                TAG                 IMAGE ID            CREATED             SIZE

hello-world               latest              c54a2cc56cbb        7 weeks ago         1.848 kB

mendlik/docker-whalesay   latest              552104437e78        5 months ago        172.3 MB
现在你本地没有这个镜像了,我们下载它
[root@bogon ~]# docker run w**/docker-whalesay
Unable to find image 'w**/docker-whalesay:latest' locally

latest: Pulling from w**/docker-whalesay

fdd5d7827f33: Already exists

a3ed95caeb02: Already exists

7aff21647840: Already exists

6e3940ed972c: Already exists

d50bea27de75: Already exists

47ce71aadbde: Already exists

Digest: sha256:53bb6ecb63346c7916e7f68d942d754964fc176732ce93322cea2ef25a7b28af

Status: Downloaded newer image for w**/docker-whalesay:latest

 ____________________________________

/ /bin/sh -c /usr/games/fortune -a | \

\ cowsay                             /

 ------------------------------------

    \

     \

      \

                    ##        .

              ## ## ##       ==

           ## ## ## ##      ===

       /""""""""""""""""___/ ===

  ~~~ {~~ ~~~~ ~~~ ~~~~ ~~ ~ /  ===- ~~~

       \______ o          __/

        \    \        __/

          \____\______/
六、docker常用命令
6.1 镜像
|
命令 |
描述 |
|
inspect 镜像ID/标签 |
查看,镜像信息。 |
|
pull 标签 |
获取,镜像。 |
|
images |
查看,所有镜像。 |
|
search 标签 |
搜索,镜像。 默认搜索Docker Hub官网里的镜像 --automated=false仅显示自动创建的镜像(automated资源则允许用户验证镜像的来源和内容) --no-trunc=false 输出信息不截断显示 --filter=stars=0 指定仅显示评价为星级以上的镜像。 |
|
rmi 镜像ID/标签 |
删除,镜像。 rmi 标签 当同一个镜像有多个标签的时候,docker rmi标签名:只是删除了该镜像多个标签中的指定标签而已, 并不影响镜像文件。 但是当镜像只剩下一个标签的时候就要小心了,此时再使用“docker rmi 标签”会彻底删除该镜像 rmi 镜像ID 会删除镜像本身 注意:当该镜像创建的容器存在时,镜像文件默认无法被删除。 不推荐用-f,因被强制删除的镜像会换了新的ID继续存在系统中。 正确的做法:先删除依赖该镜像的所有容器,再来删除镜像。 docker rm e81 # 删除容器e81266565 docker rmi 8sdgw23sdwe # 删除镜像 docker images # 查看镜像 |
|
commit -m "Added a new file" -a "wangqiaomei" 容器ID 镜像标签名 |
创建新镜像:基于已有镜像的容器创建一个新的镜像。 -a, --author="" 作者信息。 -m, --message="" 提交信息。 -p, --pause=true 提交时暂停容器运行 1)首先,启动一个镜像,并在其中进行修改操作,例如创建一个test文件,之后推出: $ docker run -it --entrypoint /bin/bash mendlik/docker-whalesa root@146ec4ca5971:/# touch test.txt root@146ec4ca5971:/# exit 记住容器的ID为:146ec4ca5971 2)此时该容器跟原mendlik/docker-whalesa镜像相比,已经发生了改变,可以使用docker commit命令来提交为一个新的镜像。 提交时可以使用ID或名称来指定容器 [root@bogon ~]# docker commit -m "Added a new file" -a "wangqiaomei" 146ec4ca5971 test.txt 返回新镜像的ID: sha256:6968da90af9a141e1fc326535a3f9f47efa0ca7a27232da96372609bed15e279 查看新的镜像已经存在了: [root@bogon ~]# docker images REPOSITORY TAG IMAGE ID CREATED SIZE test.txt latest 6968da90af9a 39 seconds ago 172.3 MB |
|
import |
创建新镜像,基于本地模板导入。 推荐使用OpenVZ提供的模板来创建。OPENVZ模板下载地址: 说明:ubuntu:14.04 注意:ubuntu是repository名,14.04是tag名 sudo cat ubuntu-14.04-x86-minimal.tar.gz|docker import - ubuntu:14.04 返回镜像ID: sha256:5fcb7c50afe7f3985f1d94c8c2b30a1c89ba00b52fce3a295bc4905e27d41d0e [root@bogon tools]# docker images REPOSITORY TAG IMAGE ID CREATED SIZE ubuntu 14.04 5fcb7c50afe7 5 minutes ago 205.2 MB |
|
save |
存出镜像,为一个tar文件。 存出本地的ubuntu:14.04镜像为文件 ubuntu_14.04.tar docker images REPOSITORY TAG IMAGE ID CREATED SIZE ubuntu 14.04 5fcb7c50afe7 5 minutes ago 205.2 MB docker save -o ubuntu_14.04.tar ubuntu:14.04 |
|
load |
载入镜像 从本地文件ubuntu_14.04.tar导入到本地镜像库 docker load --input ubuntu_14.04.tar docker load < ubuntu_14.04.tar 这将导入镜像和元数据信息。 docker images查看 |
|
push |
上传镜像 docker push NAME[:TAG] 默认上传到DockerHub官方仓库 docker tag 7c8d26884c76 wqm71/docker-whalesay:latest docker push wqm71/docker-whalesay 然后提示你输入: Username: Password: |
最新文章
- 论文阅读(Weilin Huang——【TIP2016】Text-Attentional Convolutional Neural Network for Scene Text Detection)
- python fork 用法
- SQL Server 2008中查看锁信息
- Ubuntu12.04卡死的解决方案
- [改善Java代码]性能考虑,数组是首选
- asp.net中应用JQuery.pagination分页
- 【转】兼容性测试套件(CTS)框架用户手册
- Hadoop-2.2.0中国文档—— MapReduce 下一代 -- 公平调度
- TCP connect EADDRNOTAVAIL(99)错误原因分析
- linux web服务器及LAMP动态网站平台搭建
- 优先选择nullptr而不是0和NULL
- 获取AFP共享的文件夹及其权限
- 社交类APP原型模板分享——QQ
- grid网格的流动grid-auto-flow属性
- Linux下MySQL的安装和启动(转载)
- aspnetcore 认证相关类简要说明三
- LTE试题
- 在weka中添加libSVM或者HMM等新算法
- ruby 反射机制常用方法
- Call Mode feature