Centos7扩展磁盘空间(LVM管理)
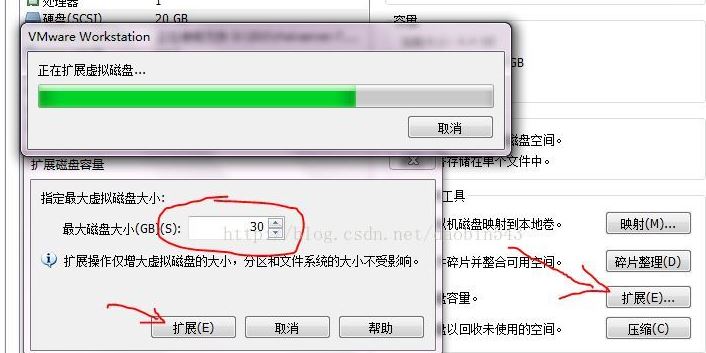
vmware或hyperv,扩容磁盘,本例中使用的是vmware,关闭系统,在vmware—>设置—>硬盘—>扩展—>输入数字大于当前系统内存—>点击扩展,如图:
1. 查看磁盘情况
fdisk -l /dev/sda
Disk /dev/sda: 536.9 GB,  bytes,  sectors

Units = sectors of  *  =  bytes

Sector size (logical/physical):  bytes /  bytes

I/O size (minimum/optimal):  bytes /  bytes

Disk label type: dos

Disk identifier: 0x000ac88a

   Device Boot      Start         End      Blocks   Id  System

/dev/sda1   *                       Linux

/dev/sda2                  8e  Linux LVM
2. 查看磁盘占用情况
df -lh
Filesystem           Size  Used Avail Use% Mounted on

/dev/mapper/cl-root   50G   24G   27G  % /

devtmpfs             .8G       .8G   % /dev

tmpfs                .8G   84K  .8G   % /dev/shm

tmpfs                .8G  8.8M  .8G   % /run

tmpfs                .8G       .8G   % /sys/fs/cgroup

/dev/sda1           1014M  173M  842M  % /boot

/dev/mapper/cl-home   69G  517M   68G   % /home

tmpfs                .2G   16K  .2G   % /run/user/

tmpfs                .2G       .2G   % /run/user/
3. 创建新分区
fdisk /dev/sda
弹出的命令行中输入对应的命令,命令说明如下:
Command action
a toggle a bootable flag
b edit bsd disklabel
c toggle the dos compatibility flag
d delete a partition
g create a new empty GPT partition table
G create an IRIX (SGI) partition table
l list known partition types
m print this menu
n add a new partition
o create a new empty DOS partition table
p print the partition table
q quit without saving changes
s create a new empty Sun disklabel
t change a partition's system id
u change display/entry units
v verify the partition table
w write table to disk and exit
x extra functionality (experts only)
a) 命令行输入 n 创建新分区
[root@lenmom ~]# fdisk /dev/sda

The device presents a logical sector size that is smaller than

the physical sector size. Aligning to a physical sector (or optimal

I/O) size boundary is recommended, or performance may be impacted.

Welcome to fdisk (util-linux 2.23.).

Changes will remain in memory only, until you decide to write them.

Be careful before using the write command.

Command (m for help): n
b) 命令行输入 p 设置分区类型为主分区
Command (m for help): n

Partition type:

   p   primary ( primary,  extended,  free)

   e   extended

Select (default p): p
c) 设置分区数量,这里输入为
Command (m for help): n

Partition type:

   p   primary ( primary,  extended,  free)

   e   extended

Select (default p): p

Partition number (,, default ):
d)修改分区大小,我们这里取默认大小,直接按两次回车即可(开始和结束位置)
Command (m for help): n

Partition type:

   p   primary ( primary,  extended,  free)

   e   extended

Select (default p): p

Partition number (,, default ):

First sector (-, default ):

Using default value

Last sector, +sectors or +size{K,M,G} (-, default ):

Using default value

Partition  of type Linux and of size  GiB is set
e) 输入t修改分区编号
Command (m for help): n

Partition type:

   p   primary ( primary,  extended,  free)

   e   extended

Select (default p): p

Partition number (,, default ):

First sector (-, default ):

Using default value

Last sector, +sectors or +size{K,M,G} (-, default ):

Using default value

Partition  of type Linux and of size  GiB is set

Command (m for help): t

Partition number (-, default ):
f)修改分区编号为3
Command (m for help): n

Partition type:

   p   primary ( primary,  extended,  free)

   e   extended

Select (default p): p

Partition number (,, default ):

First sector (-, default ):

Using default value

Last sector, +sectors or +size{K,M,G} (-, default ):

Using default value

Partition  of type Linux and of size  GiB is set

Command (m for help): t

Partition number (-, default ):

Hex code (type L to list all codes):
g) 选择分区格式,我们选择lvm,所以输入8e
Hex code (type L to list all codes):     L

   Empty             NEC DOS           Minix / old Lin bf  Solaris

   FAT12             Hidden NTFS Win   Linux swap / So c1  DRDOS/sec (FAT-

   XENIX root        Plan             Linux           c4  DRDOS/sec (FAT-

   XENIX usr       3c  PartitionMagic    OS/ hidden C:  c6  DRDOS/sec (FAT-

   FAT16 <32M        Venix        Linux extended  c7  Syrinx

   Extended          PPC PReP Boot     NTFS volume set da  Non-FS data

   FAT16             SFS               NTFS volume set db  CP/M / CTOS / .

   HPFS/NTFS/exFAT 4d  QNX4.x            Linux plaintext de  Dell Utility

   AIX             4e  QNX4.x 2nd part 8e  Linux LVM       df  BootIt

   AIX bootable    4f  QNX4.x 3rd part   Amoeba          e1  DOS access

 a  OS/ Boot Manag   OnTrack DM        Amoeba BBT      e3  DOS R/O

 b  W95 FAT32         OnTrack DM6 Aux 9f  BSD/OS          e4  SpeedStor

 c  W95 FAT32 (LBA)   CP/M            a0  IBM Thinkpad hi eb  BeOS fs

 e  W95 FAT16 (LBA)   OnTrack DM6 Aux a5  FreeBSD         ee  GPT

 f  W95 Ext'd (LBA) 54  OnTrackDM6      a6  OpenBSD         ef  EFI (FAT-12/16/

  OPUS              EZ-Drive        a7  NeXTSTEP        f0  Linux/PA-RISC b

  Hidden FAT12      Golden Bow      a8  Darwin UFS      f1  SpeedStor

  Compaq diagnost 5c  Priam Edisk     a9  NetBSD          f4  SpeedStor

  Hidden FAT16 <   SpeedStor       ab  Darwin boot     f2  DOS secondary

  Hidden FAT16      GNU HURD or Sys af  HFS / HFS+      fb  VMware VMFS

  Hidden HPFS/NTF   Novell Netware  b7  BSDI fs         fc  VMware VMKCORE

  AST SmartSleep    Novell Netware  b8  BSDI swap       fd  Linux raid auto

1b  Hidden W95 FAT3   DiskSecure Mult bb  Boot Wizard hid fe  LANstep

1c  Hidden W95 FAT3   PC/IX           be  Solaris boot    ff  BBT

1e  Hidden W95 FAT1   Old Minix

Hex code (type L to list all codes): 8e
Changed type of partition 'Linux' to 'Linux LVM'
h) 输入w保存分区并退出
Command (m for help): w

The partition table has been altered!

Calling ioctl() to re-read partition table.

WARNING: Re-reading the partition table failed with error : Device or resource busy.

The kernel still uses the old table. The new table will be used at

the next reboot or after you run partprobe() or kpartx()

Syncing disks.
4. 重启系统
reboot
5. 查看已有卷组名
vgdisplay
  --- Volume group ---

  VG Name               cl

  System ID

  Format                lvm2

  Metadata Areas

  Metadata Sequence No

  VG Access             read/write

  VG Status             resizable

  MAX LV

  Cur LV

  Open LV

  Max PV

  Cur PV

  Act PV

  VG Size               <126.00 GiB

  PE Size               4.00 MiB

  Total PE

  Alloc PE / Size        / 125.99 GiB

  Free  PE / Size        / 4.00 MiB

  VG UUID               zlg3Lh-rWHl-ozXP-FfIL-xs2w-yT7a-2k3VgA
在本机中卷组为cl.(后面会用到)
6. 为新分配的空间创建一个新的物理卷
pvcreate /dev/sda3
Physical volume "/dev/sda3" successfully created.
注意:如果出现错误说pvcreate命令找不到,则执行:
yum install pv
7. 使用新的物理卷来扩展 LVM 的 VolGroup
vgextend cl /dev/sda3
这里的cl即为第5步中查出来的卷组名. 命令执行输出如下:
[root@lenmom ~]# vgextend cl /dev/sda3

  Volume group "cl" successfully extended
8. 扩展 LVM 的逻辑卷 /dev/cl/home
a) 先查看逻辑卷集合
lvdisplay
输出如下:
[root@lenmom ~]# lvdisplay

  --- Logical volume ---

  LV Path                /dev/cl/swap

  LV Name                swap

  VG Name                cl

  LV UUID                LM5xZa-J1Af-XPIu-CQYK-2JTw-Cw9N-JOmqdm

  LV Write Access        read/write

  LV Creation host, time localhost.localdomain, -- :: +

  LV Status              available

  # open

  LV Size                <7.88 GiB

  Current LE

  Segments

  Allocation             inherit

  Read ahead sectors     auto

  - currently set to

  Block device           :

  --- Logical volume ---

  LV Path                /dev/cl/home

  LV Name                home

  VG Name                cl

  LV UUID                U2TrdQ-ihpb-SNr3-U1cq-qOKr-4gw0-rYNmOG

  LV Write Access        read/write

  LV Creation host, time localhost.localdomain, -- :: +

  LV Status              available

  # open

  LV Size                <68.12 GiB

  Current LE

  Segments

  Allocation             inherit

  Read ahead sectors     auto

  - currently set to

  Block device           :

  --- Logical volume ---

  LV Path                /dev/cl/root

  LV Name                root

  VG Name                cl

  LV UUID                xXKaHg-WKW0-H3e2-dtjx-MJLS-bUcm-PpPw3z

  LV Write Access        read/write

  LV Creation host, time localhost.localdomain, -- :: +

  LV Status              available

  # open

  LV Size                50.00 GiB

  Current LE

  Segments

  Allocation             inherit

  Read ahead sectors     auto

  - currently set to

  Block device           :
这里我们选择扩展/dev/cl/home逻辑卷
b)扩展逻辑卷/dev/cl/home空间
lvextend /dev/cl/home /dev/sda3
输出为:
[root@lenmom ~]# lvextend  /dev/cl/home  /dev/sda3

  Size of logical volume cl/home changed from <68.12 GiB ( extents) to 441.11 GiB ( extents).

  Logical volume cl/home successfully resized.
可以看到原有的磁盘空间从68G扩展到了441G,
lvextend参数-L是指定大小 如果不输入-L +10G 则默认使用全部
9)调整逻辑卷的大小
xfs_growfs /dev/cl/home
输出为:
[root@lenmom ~]# xfs_growfs /dev/cl/home
meta-data=/dev/mapper/cl-home isize=512 agcount=4, agsize=4464128 blks
= sectsz=4096 attr=2, projid32bit=1
= crc=1 finobt=0 spinodes=0
data = bsize=4096 blocks=17856512, imaxpct=25
= sunit=0 swidth=0 blks
naming =version 2 bsize=4096 ascii-ci=0 ftype=1
log =internal bsize=4096 blocks=8719, version=2
= sectsz=4096 sunit=1 blks, lazy-count=1
realtime =none extsz=4096 blocks=0, rtextents=0
data blocks changed from 17856512 to 115635200
注意:
有些地方说要使用resize2fs命令更新系统识别的文件系统大小,但是亲测要使用xfs_growfs命令。
10) 检验结果
[root@lenmom ~]# lvscan

  ACTIVE            '/dev/cl/swap' [<7.88 GiB] inherit

  ACTIVE            '/dev/cl/home' [441.11 GiB] inherit

  ACTIVE            '/dev/cl/root' [50.00 GiB] inherit
也可以使用下面的方式来检验
[root@palolenmom ~]# df -h

Filesystem           Size  Used Avail Use% Mounted on

/dev/mapper/cl-root   50G   14G   37G  % /

devtmpfs             .8G       .8G   % /dev

tmpfs                .8G   84K  .8G   % /dev/shm

tmpfs                .8G  8.7M  .8G   % /run

tmpfs                .8G       .8G   % /sys/fs/cgroup

/dev/sda1           1014M  173M  842M  % /boot

/dev/mapper/cl-home  442G   23G  419G   % /home

tmpfs                .2G   16K  .2G   % /run/user/

tmpfs                .2G       .2G   % /run/user/
最新文章
- $x^2+y^2=c^2$
- 如何在Web引用中使用项目自定义的类
- WINDOWS7(vs2012+wdk7.6) 配置驱动开发环境
- SpringMVC源码剖析(二)- DispatcherServlet的前世今生
- 面向.Net程序员的Sql版本管理
- VI打开和编辑多个文件的命令 分屏操作
- 多路转接之poll和select
- 发掘ListBox的潜力(二):鼠标拖放插入点提示
- IOS中TableView的用法
- uWSGI参考资料(1.0版本的配置选项列表)
- Java设计模式探讨之单例模式
- 逻辑回归为什么用sigmoid函数
- HTML5:定位
- JS截取字符串substr 和 substring方法的区别
- HanLP中的人名识别分析详解
- CentOS 7开启防火墙端口
- Anaconda+django写出第一个web app(十)
- Unknown column in 'field list'
- appium----adb shell输入中文/Emoji表情符(ADBKeyBoard)
- Mercurial