UIButton控件
UIButton继承关系如下:
UIButton-->UIControl-->UIView-->UIResponder-->NSObject
由于继承层次过多,下面只重点介绍UIButton中的常用方法和一些事件方法
1、创建一个UIButton对象
UIButton提供了如下类方法来创建一个指定类型的UIButton对象
+ (void)buttonWithType:(UIButtonType)buttonType
UIButtonType是一个枚举类型
 typedef enum{

     UIButtonTypeCustom = ; //此属性表明,该按钮的外观行为主要依靠开发者的设置

     UIButtonTypeSystem, //IOS系统默认的按钮风格

     UIButtonTypeDetailDisclosure, //用于显示当前列表项的详情

     UIButtonTypeInfoLight, //该按钮用于显示简短的说明

     UIButtonTypeInfoDark, //该按钮用户显示简短的说明

     UIButtonTypeContactAdd, //该按钮通常用于添加联系人

     UIButtonTypeRoundedRect, //圆角矩形的按钮

 } UIButtonType;
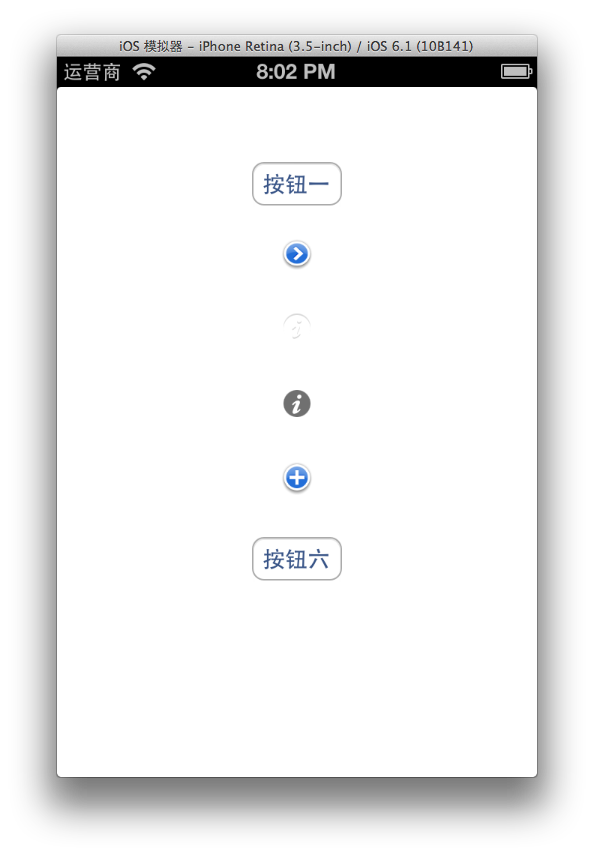
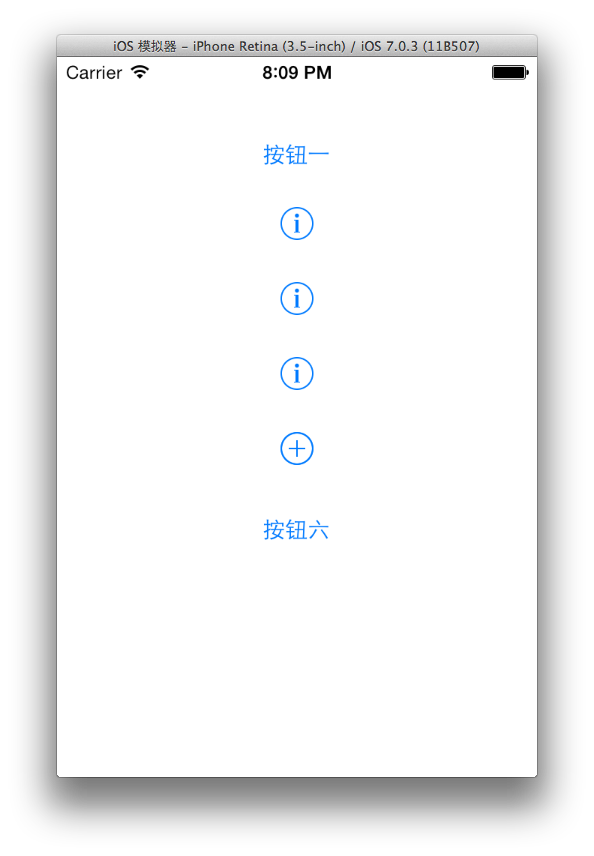
下面用代码来实现各种按钮 看一看效果吧
     UIButton *button1 = [UIButton buttonWithType:UIButtonTypeSystem];

     [button1 setFrame:CGRectMake(, , , )];

     [button1 setTitle:@"按钮一" forState:UIControlStateNormal];

     UIButton *button2 = [UIButton buttonWithType:UIButtonTypeDetailDisclosure];

     [button2 setFrame:CGRectMake(, , , )];

     UIButton *button3 = [UIButton buttonWithType:UIButtonTypeInfoLight];

     [button3 setFrame:CGRectMake(, , , )];

     UIButton *button4 = [UIButton buttonWithType:UIButtonTypeInfoDark];

     [button4 setFrame:CGRectMake(, , , )];

     UIButton *button5 = [UIButton buttonWithType:UIButtonTypeContactAdd];

     [button5 setFrame:CGRectMake(, , , )];

     UIButton *button6 = [UIButton buttonWithType:UIButtonTypeRoundedRect];

     [button6 setFrame:CGRectMake(, , , )];

     [button6 setTitle:@"按钮六" forState:UIControlStateNormal];
下面是各个按钮在IOS6和IOS7下的表现
2、配置UIButton的样式
2.1首先是一个只读属性
@property(nonatomic, readonly, retain) UILabel *titleLabel
尽管这个属性是只读的,但是它本身是一个UILable,UILabel的属性是可写、可读的。下面用这个属性演示修改按钮的文字效果。代码如下:
     UIButton *button1 = [UIButton buttonWithType:UIButtonTypeSystem];

     [button1 setFrame:CGRectMake(, , , )];

     [button1 setTitle:@"按钮一" forState:UIControlStateNormal];

     button1.titleLabel.font = [UIFont systemFontOfSize:];

     button1.titleLabel.text = @"按钮3";

     button1.titleLabel.textColor = [UIColor blueColor];
尽管上面代码用titleLable属性修改了按钮的文本和颜色,但根据官方文档中的说明,建议不要使用这个lable对象修改文本的颜色和阴影颜色,应该使用setTitleColor:forState:和setTitleShadowColor:forState:方法来代替做这些修改。
另外根据我自己的测试如果将上面的第三行注释掉,在给按钮设置文本会无效,不知道为什么。(希望哪位朋友可以告知原因,在下感激涕零)
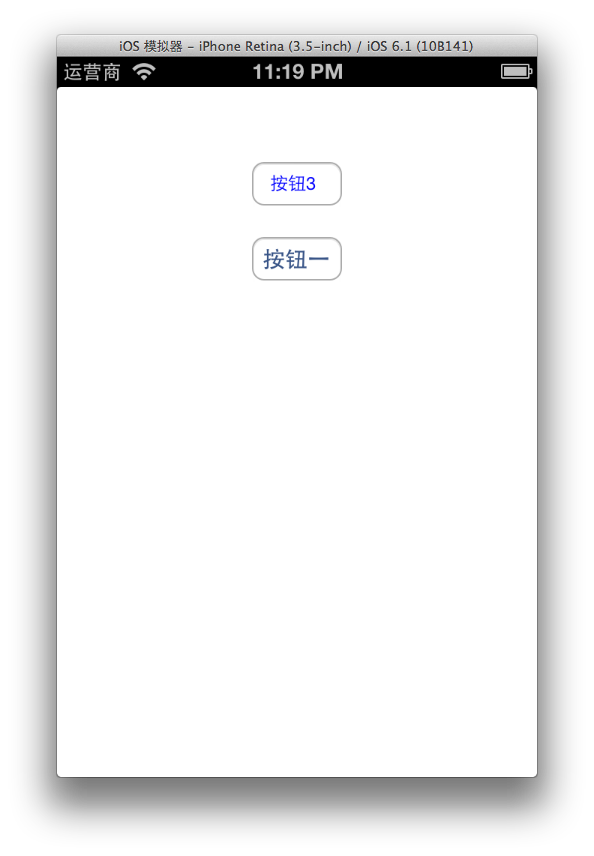
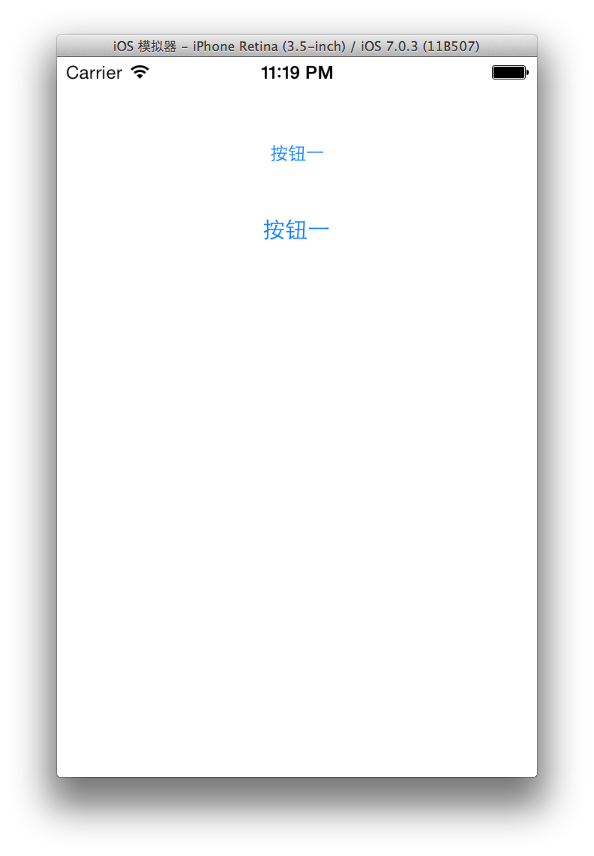
同样一段代码在IOS6和IOS7中的表现还不太一样,在IOS6中按钮文本已经修改过来啦但是IOS7中却不起作用,同样的设置大小都起作用啦,下面的按钮是默认的按钮用来对比修改效果的。看来这个tableLabel属性挺不好驾驭啊。
2.2 为不同状态的按钮设置文本标题
- (void)setTitle:(NSString *)title forState:(UIControlState)state
其中的UIControlState是一个NSUInteger类型的整数值,该参数可以接受如下定义的一个枚举值
 enum {

    UIControlStateNormal               = , //代表按钮的默认状态

    UIControlStateHighlighted          =  << , //代表按钮的高亮状态

    UIControlStateDisabled             =  << , //代表按钮的选中时的状态

    UIControlStateSelected             =  << , //代表按钮禁用后的状态

    UIControlStateApplication          = 0x00FF0000, (这是个啥,我母鸡啊)

    UIControlStateReserved             = 0xFF000000 //代表为内部框架使用而预留(不明觉厉啊)

 };
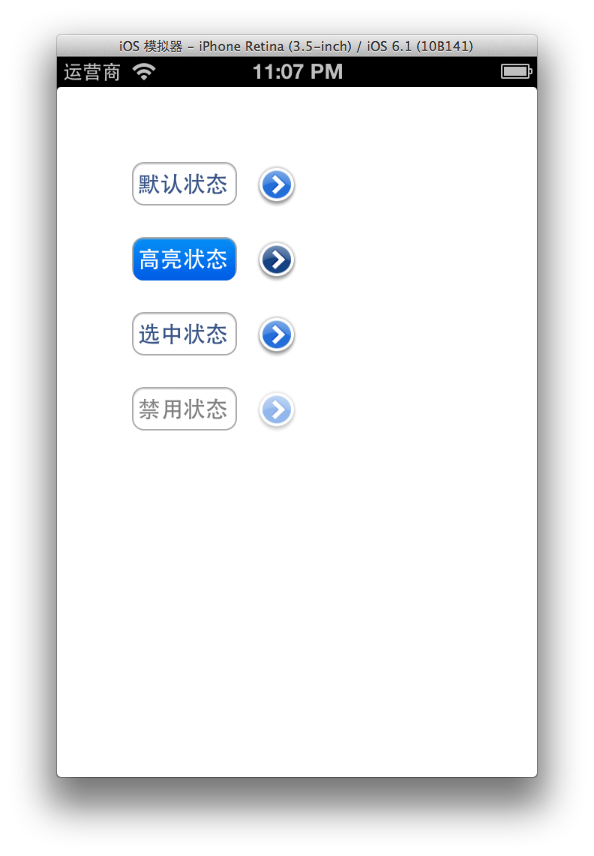
下面用代码来实现各种状态下的按钮看看是个什么模样的,Let‘s go!
     UIButton *button1 = [UIButton buttonWithType:UIButtonTypeSystem];

     [button1 setFrame:CGRectMake(, , , )];

     [button1 setTitle:@"默认状态" forState:UIControlStateNormal];

     UIButton *button2 = [UIButton buttonWithType:UIButtonTypeSystem];

     [button2 setFrame:CGRectMake(, , , )];

     [button2 setTitle:@"高亮状态" forState:UIControlStateHighlighted];

     [button2 setHighlighted:YES];

     UIButton *button3 = [UIButton buttonWithType:UIButtonTypeSystem];

     [button3 setFrame:CGRectMake(, , , )];

     [button3 setTitle:@"选中状态" forState:UIControlStateSelected];

     [button3 setSelected:YES];

     UIButton *button4 = [UIButton buttonWithType:UIButtonTypeSystem];

     [button4 setFrame:CGRectMake(, , , )];

     [button4 setTitle:@"禁用状态" forState:UIControlStateDisabled];

     [button4 setEnabled:NO];

     UIButton *button5 = [UIButton buttonWithType:UIButtonTypeDetailDisclosure];

     [button5 setFrame:CGRectMake(, , , )];

     [button5 setTitle:@"默认状态" forState:UIControlStateNormal];

     UIButton *button6 = [UIButton buttonWithType:UIButtonTypeDetailDisclosure];

     [button6 setFrame:CGRectMake(, , , )];

     [button6 setTitle:@"高亮状态" forState:UIControlStateHighlighted];

     [button6 setHighlighted:YES];

     UIButton *button7 = [UIButton buttonWithType:UIButtonTypeDetailDisclosure];

     [button7 setFrame:CGRectMake(, , , )];

     [button7 setTitle:@"选中状态" forState:UIControlStateSelected];

     [button7 setSelected:YES];

     UIButton *button8 = [UIButton buttonWithType:UIButtonTypeDetailDisclosure];

     [button8 setFrame:CGRectMake(, , , )];

     [button8 setTitle:@"禁用状态" forState:UIControlStateDisabled];
以上代码只实现了系统默认按钮和Detail按钮的各种状态 如果想查看其他按钮的状态可以修改buttonWithType:方法对应的参数来实现,请大家也亲自动手做一下加深印象,上面代码对应的效果如下:
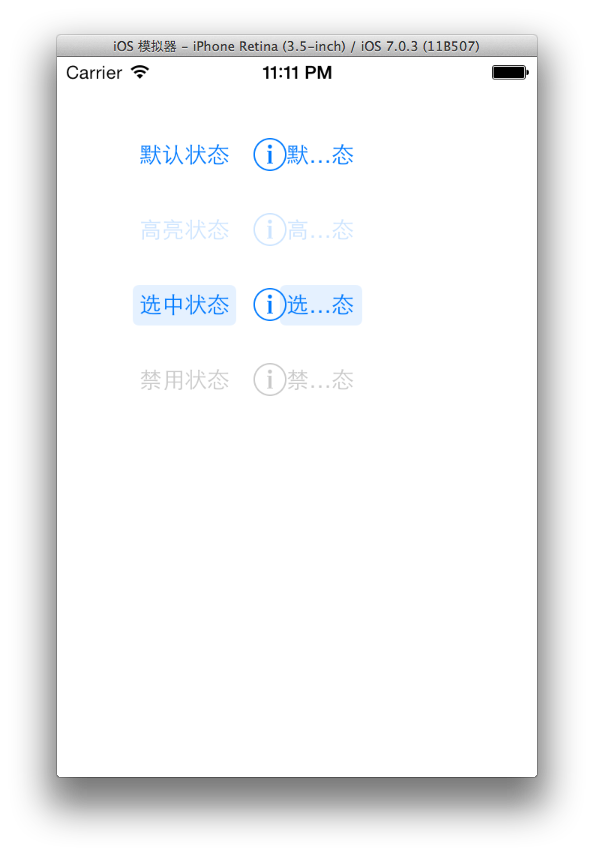
IOS7下的Detail按钮旁边可以显示文字,但是一般都不设置,图上的状态是按钮的宽度不够文字显示不下的效果。
2.3为不同状态的按钮设置文本标题的颜色以及阴影的颜色
 - (void)setTitleColor:(UIColor *)color forState:(UIControlState)state

 - (void)setTitleShadowColor:(UIColor *)color forState:(UIControlState)state
这两个方法都是与颜色有关的,就放在一起了。其中UIColor是一个类当中预定义了很多颜色的类方法将常用颜色都包括了,比如
 + (UIColor *)blackColor

 + (UIColor *)blueColor

 + (UIColor *)redColor
等等,假如以上颜色不能满足你的需要还可以使用UIColor中的
+ (UIColor *)colorWithRed:(CGFloat)red green:(CGFloat)green blue:(CGFloat)blue alpha:(CGFloat)alpha
使用RGB值和alpha值自定义各种颜色,其中的参数是CGFloat类型的,取值范围从0.0到1.0。好了关于颜色就到这里,下面给按钮文本设置颜色:
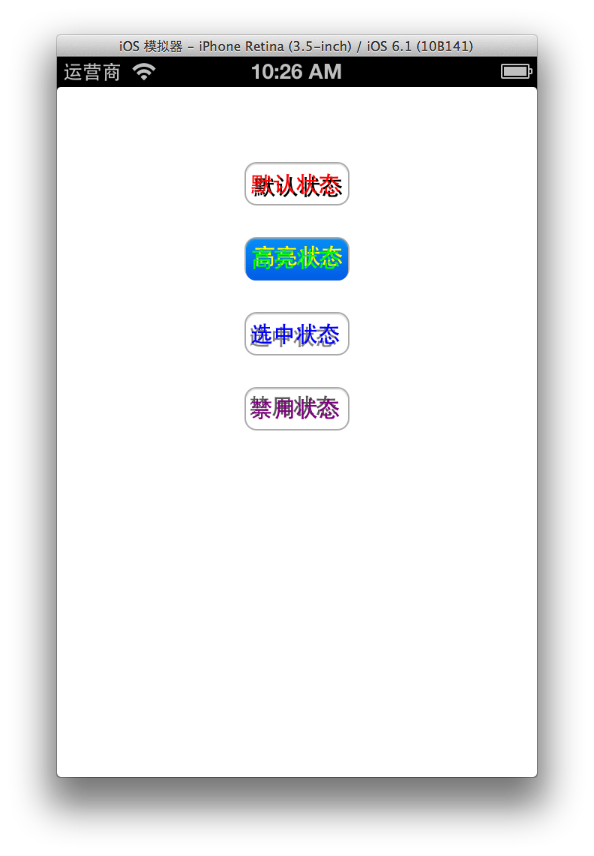
     UIButton *button1 = [UIButton buttonWithType:UIButtonTypeSystem];

     [button1 setFrame:CGRectMake(, , , )];

     [button1 setTitle:@"默认状态" forState:UIControlStateNormal];

     [button1 setTitleColor:[UIColor redColor] forState:UIControlStateNormal]; //为默认状态的按钮设置文本颜色为红色

     [button1 setTitleShadowColor:[UIColor blackColor] forState:UIControlStateNormal]; //为默认状态的按钮设置文本阴影颜色为黑色

     [button1.titleLabel setShadowOffset: CGSizeMake(, )]; //为按钮文本的阴影设置偏移量 右下

     UIButton *button2 = [UIButton buttonWithType:UIButtonTypeSystem];

     [button2 setFrame:CGRectMake(, , , )];

     [button2 setTitle:@"高亮状态" forState:UIControlStateHighlighted];

     [button2 setTitleColor:[UIColor greenColor] forState:UIControlStateHighlighted]; //为高亮状态的按钮设置文本颜色为绿色

     [button2 setTitleShadowColor:[UIColor yellowColor] forState:UIControlStateHighlighted]; //为高亮状态的按钮设置文本阴影颜色为黄色

     [button2.titleLabel setShadowOffset:CGSizeMake(, -)]; //为按钮文本的阴影设置偏移量 右上

     [button2 setHighlighted:YES];

     UIButton *button3 = [UIButton buttonWithType:UIButtonTypeSystem];

     [button3 setFrame:CGRectMake(, , , )];

     [button3 setTitle:@"选中状态" forState:UIControlStateSelected];

     [button3 setTitleColor:[UIColor blueColor] forState:UIControlStateSelected]; //为选中状态的按钮设置文本颜色为蓝色

     [button3 setTitleShadowColor:[UIColor grayColor] forState:UIControlStateSelected]; //为选中状态的按钮设置文本阴影颜色为灰色

     [button3.titleLabel setShadowOffset:CGSizeMake(-, )]; //为按钮文本的阴影设置偏移量 左下

     [button3 setSelected:YES];

     UIButton *button4 = [UIButton buttonWithType:UIButtonTypeSystem];

     [button4 setFrame:CGRectMake(, , , )];

     [button4 setTitle:@"禁用状态" forState:UIControlStateDisabled];

     [button4 setTitleColor:[UIColor purpleColor] forState:UIControlStateDisabled]; //为禁用状态的按钮设置文本颜色为紫色

     [button4 setTitleShadowColor:[UIColor darkGrayColor] forState:UIControlStateDisabled]; //为禁用状态的按钮设置文本阴影颜色为深灰色

     [button4.titleLabel setShadowOffset:CGSizeMake(-, -)]; //为按钮文本的阴影设置偏移量 左上

     [button4 setEnabled:NO];
以上代码对应的效果图如下:
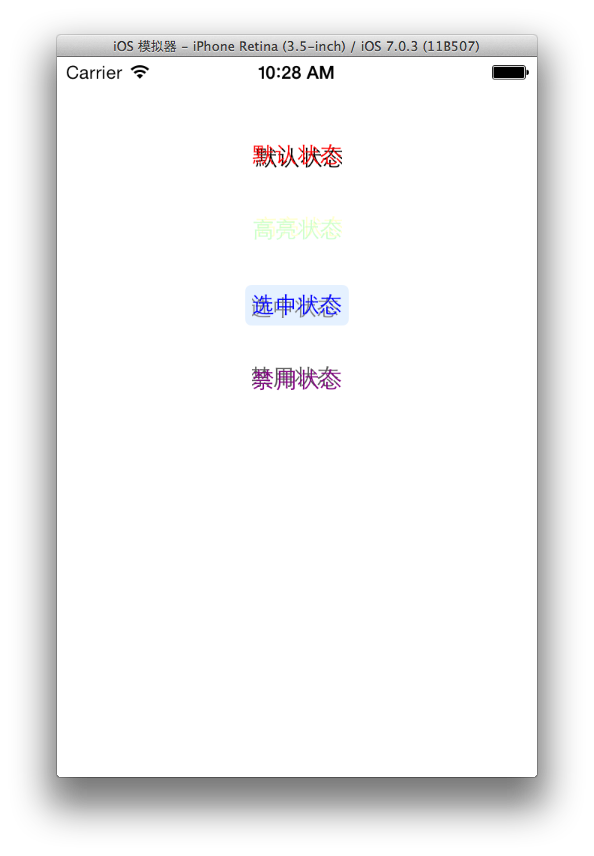
在IOS7中的按钮样式发生了很大改变,为高亮状态的按钮设置的阴影是黄色,有些看不清了。
2.4为不同状态的按钮设置背景图片和图片按钮
 - (void)setBackgroundImage:(UIImage *)image forState:(UIControlState)state //用于希望既有图片背景又有按钮文本的情况

 - (void)setImage:(UIImage *)image forState:(UIControlState)state //该方法会让按钮呈现为一个图片按钮,使前面为按钮设置的Title属性不起作用
我们首先准备两张图片用一个矩形的图片作为按钮背景,再来一个不是矩形的图片作为图片按钮:


就用上面的两个图片来实现一下看看效果,代码如下:
     UIButton *button1 = [UIButton buttonWithType:UIButtonTypeSystem];

     [button1 setFrame:CGRectMake(, , , )];

     [button1 setTitle:@"按钮一" forState:UIControlStateNormal];

     [button1 setTitleColor:[UIColor redColor] forState:UIControlStateNormal]; //为默认状态的按钮设置文本颜色为红色

     [button1 setBackgroundImage:[UIImage imageNamed:@"buttonBg.png"] forState:UIControlStateNormal]; //给图片设置一个背景图

     UIButton *button2 = [UIButton buttonWithType:UIButtonTypeCustom]; //创建一个自定义的按钮类型

     [button2 setFrame:CGRectMake(, , , )];

     [button2 setTitle:@"按钮二" forState:UIControlStateHighlighted]; //此语句不起作用

     [button2 setImage:[UIImage imageNamed:@"camaraBtn.png"] forState:UIControlStateNormal]; //因为我们使用了图片作为按钮,所以上面为按钮设置的文本就不起作用了。

     //另外还要将按钮的类型改为自定义才会显示出图片

     //还可以为不同状态的按钮设置不同的图片创造出自己的按钮
以上代码在IOS6和IOS7中是一样的所以就来一张IOS7中的图片好了。
3.按钮的事件处理
按钮最主要的作用不就是响应用户的的操作嘛,上面说了那么多设置按钮样式的方法,没有事件处理的方法叫什么按钮是不是。
UIButton继承了UIControl所以可以使用UIControl提供的事件处理方法,常用的有如下:
 - (void)addTarget:(id)target action:(SEL)action forControlEvents:(UIControlEvents)controlEvents //给目标添加事件

 - (void)removeTarget:(id)target action:(SEL)action forControlEvents:(UIControlEvents)controlEvents //移除目标上的事件
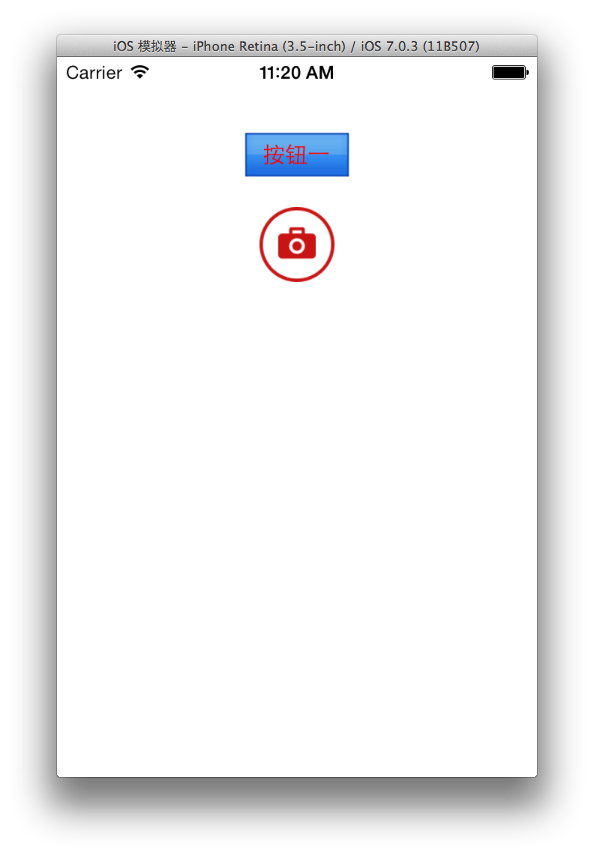
我们就用上面的照相机按钮例子给按钮添加一个事件,弹出一个警告对话框(UIAlertView),在警告对话框中的按钮再移除照相机按钮的事件,废话不多说开整:
按钮初始化及绑定事件部分
     self.camaraBtn = [UIButton buttonWithType:UIButtonTypeCustom]; //创建一个自定义的按钮类型

     [self.camaraBtn setFrame:CGRectMake(, , , )];

     [self.camaraBtn setTitle:@"按钮二" forState:UIControlStateHighlighted]; //此语句不起作用

     [self.camaraBtn setImage:[UIImage imageNamed:@"camaraBtn.png"] forState:UIControlStateNormal]; //因为我们使用了图片作为按钮,所以上面为按钮设置的文本就不起作用了。

     //另外还要将按钮的类型改为自定义才会显示出图片

     //还可以为不同状态的按钮设置不同的图片创造出自己的按钮

     [self.camaraBtn addTarget:self action:@selector(clicked:) forControlEvents:UIControlEventTouchUpInside]; //给按钮添加事件,目标位为self就是当前这个试图控制器,事件处理方法为clicked:,后面是事件名称,是当在按钮范围之中按下并抬起时触发,这个名字那么长其实就跟click差不多

     [self.view addSubview:self.camaraBtn]; //将按钮添加到当前视图中
这里我将camaraBtn作为了实例变量,以便事件处理方法可以引用到这个按钮,需要在头文件中写入:
@property (nonatomic,strong) UIButton *camaraBtn;
下面是事件处理方法了
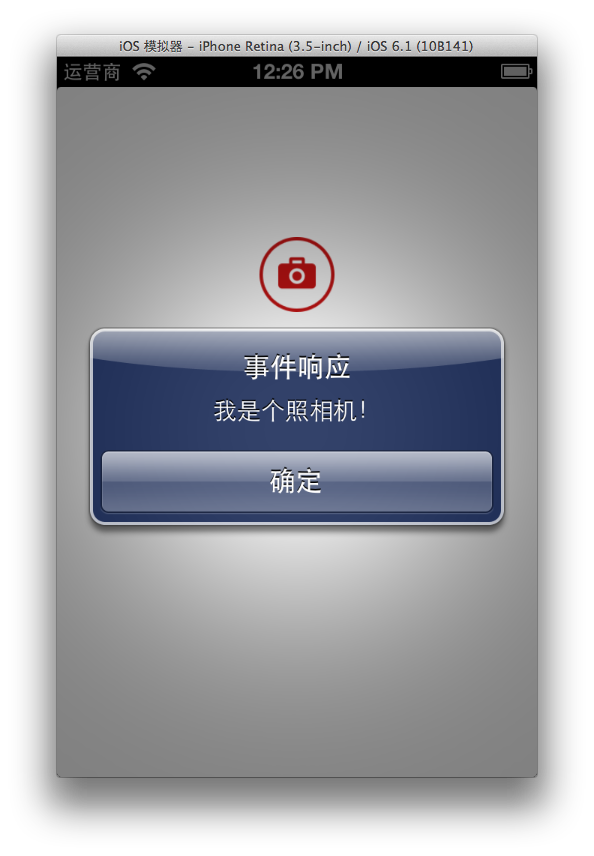
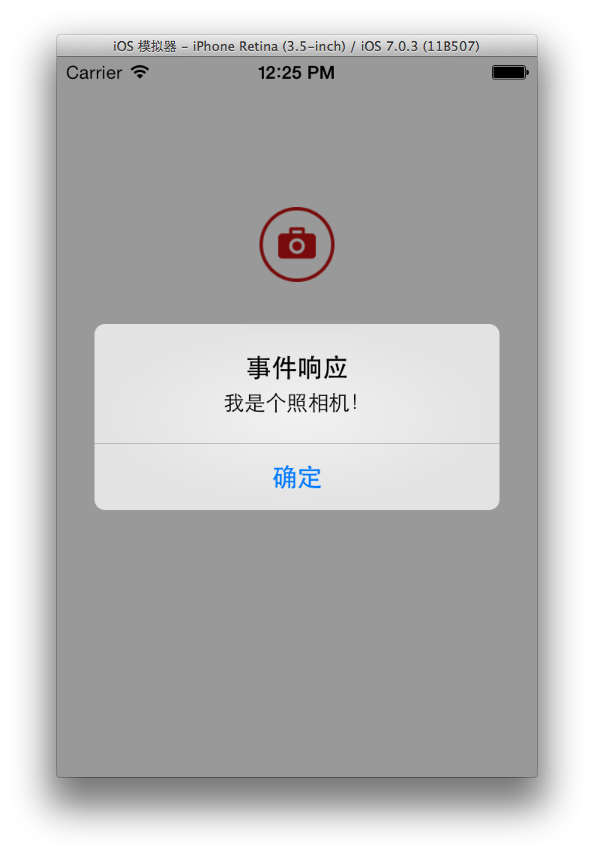
 //这个是照相机按钮的事件处理方法

 - (void)clicked:(id)sender

 {

     UIAlertView *alert = [[UIAlertView alloc] initWithTitle:@"事件响应" message:@"我是个照相机!" delegate:self cancelButtonTitle:@"确定" otherButtonTitles:nil];

     [alert show];//这里创建了一个警告框并显示了出来

 }

 //这个是警告框上按钮的事件处理方法,由于警告框(UIAlertView)没有继承UIControl所以必须实现UIAlertViewDelegate来重写这个方法实现事件处理

 - (void)alertView:(UIAlertView *)alertView clickedButtonAtIndex:(NSInteger)buttonIndex

 {

     if (!buttonIndex){

         //警告框中的确定按钮的index是0所以会执行这个移除事件方法

         [self.camaraBtn removeTarget:self action:@selector(clicked:) forControlEvents:UIControlEventTouchUpInside];

         //将照相机按钮上的事件移除

     }

 }
所以上面的照相机按钮弹出一个警告框后点击确定照相机按钮就无效了。来看看效果吧:
先写这么多常用的以后再更新..
最新文章
- 给jar包进行数字签名(2014-06-28记)
- WebStorm常用设置和常用快捷键
- Oracle的导入导出
- 拥抱 Android Studio 之四:Maven 仓库使用与私有仓库搭建
- Asp.Net BulletedList
- Join-Path(拼接路径)
- Android——监听开机启动,自启动应用程序
- JavaScript学习笔记(二)原型
- 1.1 Eclipse下载安装
- memcache command
- Python实现简单的三级菜单
- 【codevs 1911 孤岛营救问题】
- Vue评论组件案例
- SpringBoot系列: Maven多项目管理
- xcode10对应的xcode command line tool编译的坑
- 关于导入zepto出错的问题
- 学习yii2.0——事件
- inetd的工作流程
- SQL SERVER 中日期格式化,及GETDATE()、CONVERT()函数使用说明
- idea Cannot Resolve Symbol 问题解决