Particle Filters
|—粒子滤波原理
|—基础代码的建立—|—前进
| |—转弯
| |—噪音(误差)
|—创建粒子并模拟运动
|—粒子替换聚集编程—|—重要重量设置编程
| |—重采集(归一化后设阈值滤筛)
| |—新粒子组—|—重采集轮
|—对方向编程
|—eval()性能评估
|—一切背后的数学原理
|—车辆模型下的粒子滤波编程—|—motion
| |—sense
| |—将这个模型所有相关代码封装成类
粒子滤波器是用来估量系统状态的算法序列
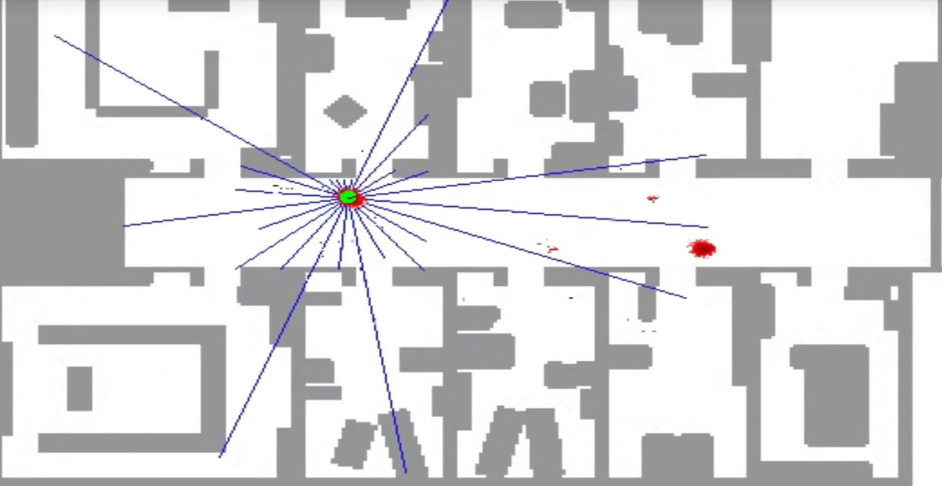
这里是机器人所在的环境的平面图,机器人必须执行全局定位。 全局定位是指当一个对象不知道它在空间中的位置,必须根据感官测量来确定它在哪里。
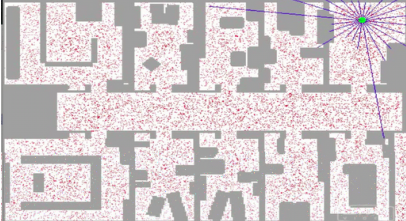
1.位于空间右上角的机器人具有由蓝色条纹表示的传感器范围。传感器能列表化与周围障碍物的距离,有助于得到好的定位后验分布。
2.环境中的红点是粒子,表示一个对机器人定位的离散猜测,单个猜测被结构化成了X轴,Y轴和一个运动朝向,然而单个猜测不是过滤器,而是数千个猜测的集合一起生成机器人的后验近似表示。
一开始粒子均匀分布(上图),但是粒子滤波器依据粒子和传感器测量的一致性让它们逐渐以一个比例存在
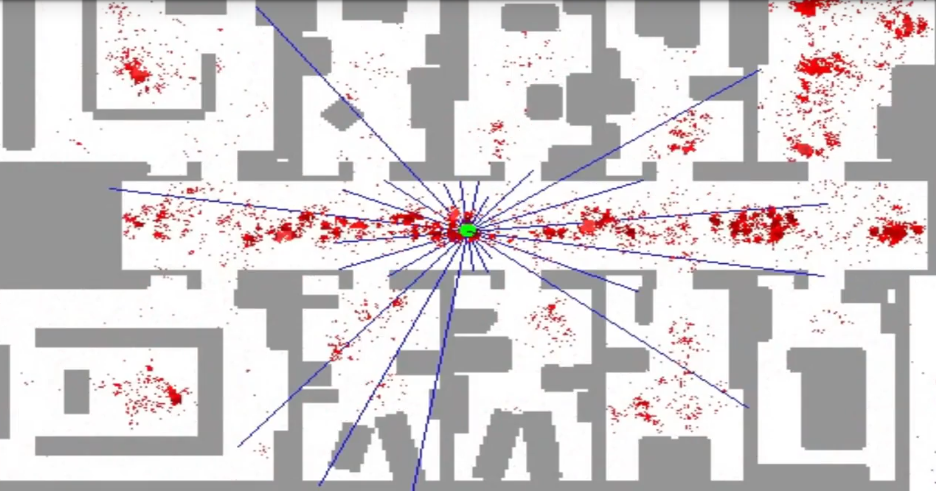


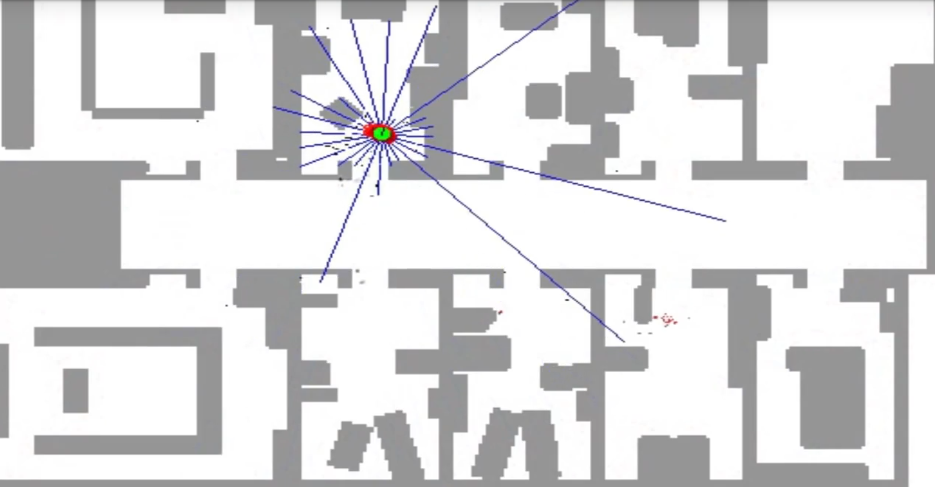
非常快机器人发现他在走廊上,但是有两个云(位置),因为这个走廊是对称的
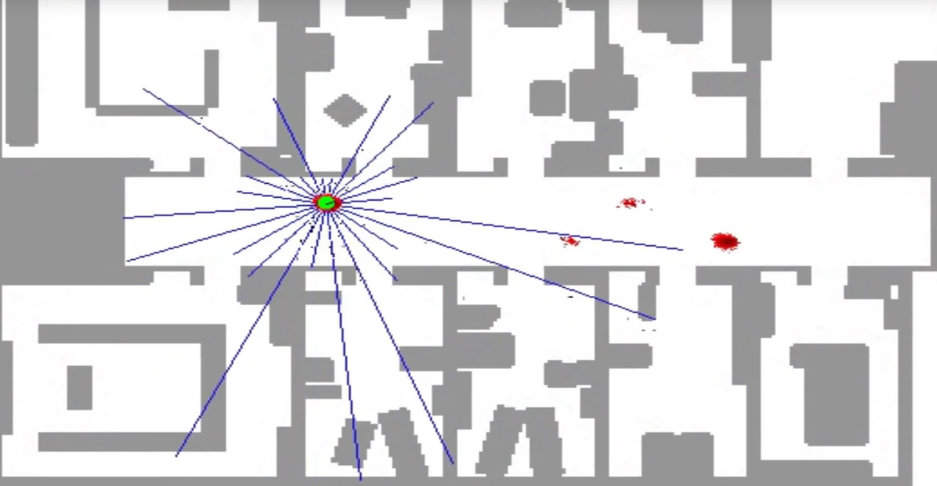
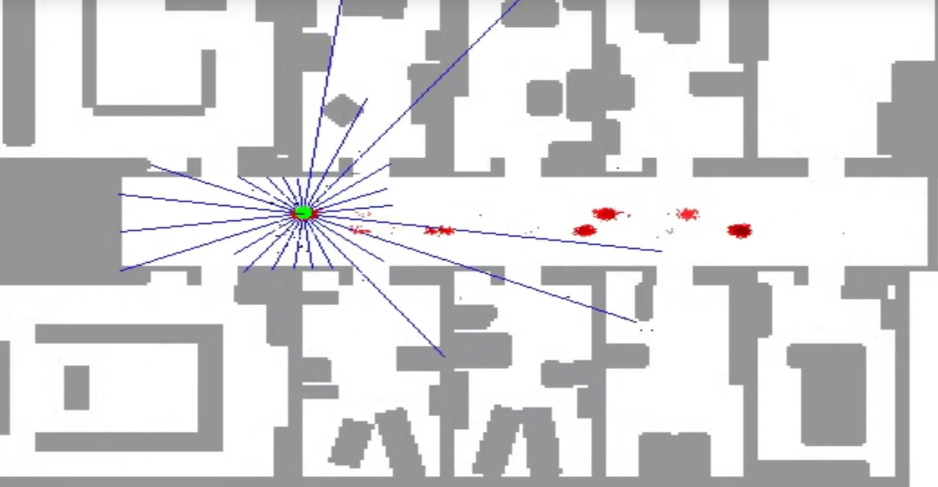
但随着机器人进入其中一个办公室,这种对称被打破了,正确的粒子集合会存在。
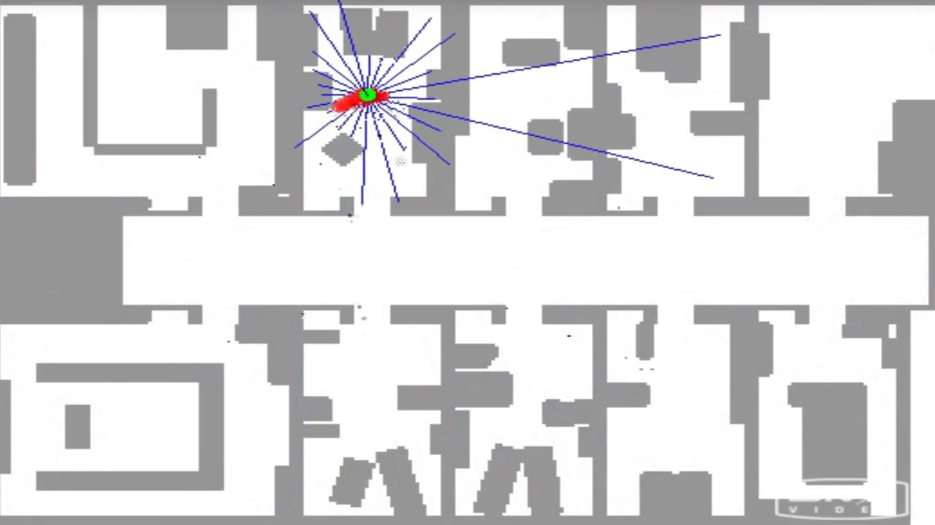
粒子滤波器的本质是让这些粒子猜测机器人可能在哪里移动,并且让适合的粒子存活,使得粒子和测量更加一致的粒子更有可能存活,结果就是高概率的地方会收集更多粒子,将会更好地代表机器人的后验信度,最后这数千个粒子被聚集在一个单独的位置,这些组成了机器人定位自身的信度。
下面是高手写的代码,主要是一个叫robot的类,这个机器人生活在一个100米*100米的二维世界里,有4个不同的地点坐标。
from math import *

import random

landmarks = [[20.0, 20.0],

[80.0, 80.0],

[20.0, 80.0],

[80.0, 20.0]]

world_size = 100.0

class robot:

      def __init__(self):

           self.x = random.random() * world_size   #random.random()生成0和1之间的随机浮点数

           self.y = random.random() * world_size

           self.orientation = random.random() * 2.0 * pi

           self.forward.noise = 0.0;

           self.turn_noise = 0.0;

           self.sense_noise = 0.0;
定义好了类,就可以用它来做一些事情,比如呢1.置位,包含(X轴,Y轴,方向);2.然后不转向地移动;3.之后90度转向移动
myrobot = robot()

myrobot.set(10.0, 10.0, 0.0)

myrobot = myrobot.move(0.0, 10.0)

myrobot = myrobot.move(pi/2, 10.0)

print myrobot

>>>[x=10.0 y=10.0 heading=0.0]

>>>[x=20.0 y=10.0 heading=0.0]

>>>[x=10.0 y=20.0 heading=1.5707]
sense()函数能测量与四个坐标的距离
myrobot = robot()

myrobot.set(10.0, 10.0, 0.0)

myrobot = myrobot.move(pi/2, 10.0)

print myrobot

print myrobot.sense()

>>>[x=20.0 y=10.0 heading=0.0]

   [x=10.0 y=20.0 heading=1.5707] [10.0,  92.195444572928878,60.87625302982199, 70.0]
以上代码是前进,转向和感知的代码
高手提供了几个要注意的函数的代码:
def set(self, new_x, new_y, new_orientation):

    if new_x < 0 or new_x >= world_size:

        raise ValueError, 'X coordinate out of bound'

    if new_y < 0 or new_y >= world_size:

        raise ValueError, 'Y coordinate out of bound'

    if new_orientation < 0 or new_orientation >= 2 *pi:
        raise ValueError, 'Orientation must be in [0..2pi]'
self.x = float(new_x)

self.y = float(new_y)

self.orientation = float(new_orientation)

def set_noise(self, new_f_noise, new_t_noise, new_s_noise):

     # 可以改变噪音参数,这在粒子滤波器里常用到

     self.forward_noise = float(new_f_noise);
     self.turn_noise = float(new_t_noise);

     self.sense_noise = float(new_s_noise);

def measurement_prob(self, measurement):
#这一步是“适者生存”的关键,判断测量是否合理
prob = 1.0;
for i in range(len(landmarks)):
dist = sqrt((self.x - landmarks[i][0]) ** 2 + (self.y - landmarks[i][1]) ** 2)
prob *= self.Gaussian(dist, self.sens_noise, measurement[i])
return prob
下面写个例子:
# forward_noise = 5.0, turn_noise = 0.1, sense_noise = 5.0

# starts at 30.0, 50.0, heading north (=pi/2)

# turns clockwise by pi/2, moves 15 meters

# senses

# turns clockwise by pi/2, moves 10 meters

# sense

myrobot = robot()

myrobot.set_noise(5.0, 0.1, 5.0) # here is where you add your code

myrobot.set(30.0, 50.0, pi/2)

myrobot = myrobot.move(-pi/2, 15.0)

print myrobot.sense()

myrobot = myrobot.move(-pi/2, 10.0)

print myrobot.sense()
现在,可以编程机器人转弯,直线移动,并感测到四个指定地标(L 1,L 2,L 3,L 4)的距离。 从地标到机器人的距离构成了机器人的测量向量。该
机器人将生活在一个100x100的世界中,所以如果它落在一端,那么它就会出现在另外一个世界。
粒子滤波器会保留一组1,000(N = 1000)的随机值去猜测机器人可能在哪里(相当于云点图),用点表示。 每个点都是一个包含x坐标,y坐标和前进方向的向量。该方向是机器人相对于x轴的角度(以弧度表示); 在代码中,每次调用函数robot()并将其分配给一个粒子p [i]时,元素p [i] .x,p [i]. y,p [i].orientation被随机初始化。现在随机创立1000个粒子,所谓的初始化。
然后取每个粒子并模拟机器人运动。 每个颗粒应先转0.1,然后向前移5.0米。 创建一个新的集合p,这是特定运动的结果。
N = 1000

p = []

for i in range(N):

x = robot()     #调用robot()创建对象

p.append(x)
p2 = []
for i in range(N):
p2.append(p[i].move(0.1, 5.0))
p = p2
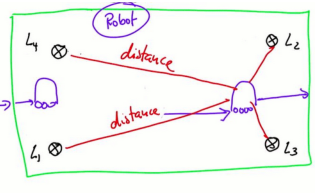
下面介绍粒子滤波器的后半部分怎么工作。假设机器人位于四个地标之中,并且能测量到到地标之间的确切位置,有一些测量噪音被建模为平均值为0的高斯,意味着测量过长或过短的概率由高斯控制给出。
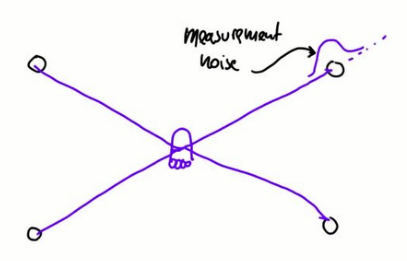
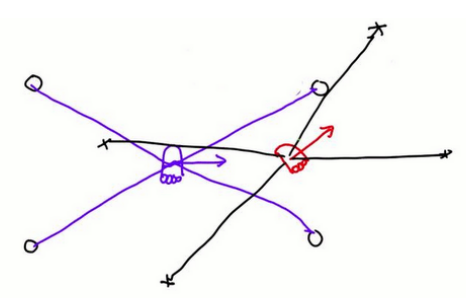
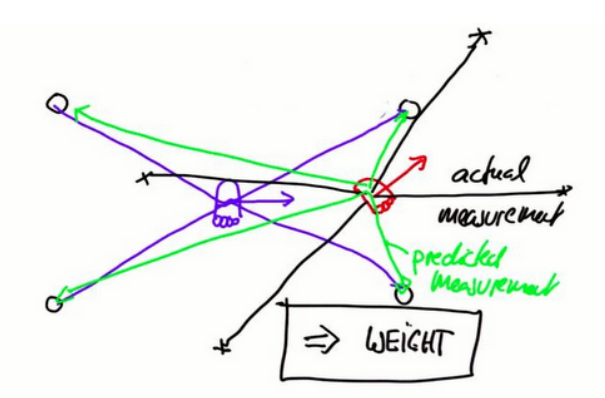
现在有一个由机器人到L 1~L 4四个距离值组成的测量矢量,假设有一个粒子,它的坐标是机器人实际在的地方(红色),假设粒子有方向,可以将测量矢量值用到粒子上(即用测量距离表示实际距离),但是这样得到的测量向量结果非常差,当然期望的结果是绿色这样离红色实际粒子近的测量向量,一个粒子滤波的诀窍:预测测量与实际测量的不匹配会引出一个important Weight,告诉特定粒子有多重要(Weight越大越important)。
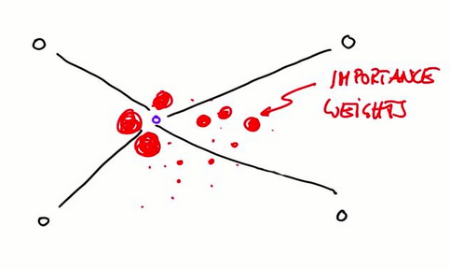
现在有许多许多不同的粒子和一个特定的测量,这些粒子一些看起来合理,一些看起来非常不可信,所以每个粒子都有自己的Weght,以圆形的尺寸大小表示。接下来让粒子随机生存,生存下来的概率与Weight成正比。这意味着每次重采样之后,随机地从旧的粒子中抽取新粒子,并且以重要性重量的比例替换,重要重量大的粒子将会生存下来,而较小的粒子会消失。这种选择方法的“替换”方面是重要的,因为它允许多次选择高概率粒子。 这导致颗粒聚集在具有高后验概率的区域周围。
到这里会想实现一个设置重要性权重的方法,这与测量的多半有关,并且你想实现一个重采样的方法,抓取的粒子与这些权重成正比。
初始化
# 这是一个机器人随机初始化,返回随机值

# 得到的随机值是与4个坐标的距离和位置方向参数

myrobot = robot()

myrobot = myrobot.move(0.1, 5.0)

Z = myrobot.sense()

print Z

print myrobot

>>>[69, 15, 53, 47]

   [x=33.657 y=48.869 heading=0.5567]
Importance Weight(以下内容高斯分配值、设噪音、最终得到包含1000个有噪音设置的Importance Weight值)
编制一个方法来为列表中的每个粒子分配重要权重。 列出1,000个元素,其中列表中的每个元素都包含与粒子重要性成正比的数字。
为了使事情变得更加容易高手已经写了一个measurement_probability函数。 该函数接受单个参数,即刚定义的测量向量Z,计算一个输出即测量Z有多相似。通过使用高斯函数,该函数计算预测测量与实际测量值有多远。
def measurement_prob(self, measurement):

      prob = 1.0;

      for i in range(len(landmarks)):

           dist = sqrt((self.x - landmarks[i][0]) ** 2 + (self.y - landmarks[i][1]))

           prob *= self.Gaussian(dist, self.sense_noise, measurement[i]) #这里的噪音设0,实际上噪音是存在的

return prob
为了使此功能正常运行,你必须假设有颗粒的测量噪声,因此我们需要更改粒子发生器:
N = 1000

p = []

for i in range(N):

    x = robot()

    x.set_noise(0.05, 0.05, 5.0) # 这行保证每个粒子有确定数量的噪音,三个参数分别是平移、转向、测量噪音

    p.append(x)
再来,编写一个包含1,000个元素的向量w,这个向量中的每个数字反映应用于测量Z上的函数measurement_prob的输出。这有助于重采样我们粒子以创建新的一组更符合机器人位置的粒子。
w = []

for i in range(N):

     w.append(p[i].measurement_prob(Z)) #这句的意思是考虑噪音的重要性权重添加到w向量重要性权重的最后一步是归一化,P[]里面是设的噪音值
print w

重采集Resampling
重采集是粒子滤波器里最有技巧性的部分,重采集是通过一些老粒子生还,杀掉另一些来生成一个新的粒子列表。N个需要重采集的粒子,每个都有三个值(x,y,orentation)和一个权重w。 可使用W(所有w之和)来归一化权重w,然后淘汰小值。
新粒子组
Resampling Wheel
不断产生新粒子组
 from math import *

 import random

 landmarks = [[20.0, 20.0], [80.0, 80.0], [20.0, 80.0], [80.0, 20.0]]

 world_size = 100.0

 class robot:

       def __init__(self):

             self.x = random.random() * world_size

             self.y = random.random() * world_size

             self.orientation = random.random() * 2.0 * pi

             self.forward_noise = 0.0;

             self.turn_noise = 0.0;

             self.sense_noise = 0.0;

       def set(self, new_x, new_y, new_orientation):

             if new_x < 0 or new_x >= world_size:

                  raise ValueError, 'X coordinate out of bound'

             if new_y < 0 or new_y >= world_size:

                  raise ValueError, 'Y coordinate out of bound'

             if new_orientation < 0 or new_orientation >= 2 * pi:

                  raise ValueError, 'Orientation must be in [0..2pi]'

             self.x = float(new_x)

             self.y = float(new_y)

             self.orientation = float(new_orientation)

       def set_noise(self, new_f_noise, new_t_noise, new_s_noise):

             # makes it possible to change the noise parameters

             self.forward_noise = float(new_f_noise);

             self.turn_noise = float(new_t_noise);

             self.sense_noise = float(new_s_noise);

       def sense(self):

             Z = []

             for i in range(len(landmarks)):

                  dist = sqrt((self.x - landmarks[i][0]) ** 2 + (self.y - landmarks[i][1]) ** 2)

                  dist += random.gauss(0.0, self.sense_noise)

                  Z.append(dist)

             return Z

       def move(self, turn, forward):

             if forward < 0:

                 raise ValueError, 'Robot cant move backwards'

             # turn, and add randomness to the turning command

             orientation = self.orientation + float(turn) + random.gauss(0.0, self.turn_noise)

             orientation %= 2 * pi

             # move, and add randomness to the motion command

             dist = float(forward) + random.gauss(0.0, self.forward_noise)

              x = self.x + (cos(orientation) * dist)

              y = self.y + (sin(orientation) * dist)

              x %= world_size # cyclic truncate

              y %= world_size

              # set particle

              res = robot()

              res.set(x, y, orientation)

              res.set_noise(self.forward_noise, self.turn_noise, self.sense_noise)

              return res

       def Gaussian(self, mu, sigma, x):

              # calculates the probability of x for 1-dim Gaussian with mean mu and var. sigma

              return exp(- ((mu - x) ** 2) / (sigma ** 2) / 2.0) / sqrt(2.0 * pi * (sigma ** 2))

       def measurement_prob(self, measurement):

             # calculates how likely a measurement should be

             prob = 1.0;

             for i in range(len(landmarks)):

                  dist = sqrt((self.x - landmarks[i][0]) ** 2 + (self.y - landmarks[i][1]) ** 2)

                  prob *= self.Gaussian(dist, self.sense_noise, measurement[i])

             return prob

       def __repr__(self):

            return '[x=%.6s y=%.6s orient=%.6s]' % (str(self.x), str(self.y), str(self.orientation))

       def eval(r, p):

             sum = 0.0;

             for i in range(len(p)): # calculate mean error

                  dx = (p[i].x - r.x + (world_size/2.0)) % world_size - (world_size/2.0)

                  dy = (p[i].y - r.y + (world_size/2.0)) % world_size - (world_size/2.0)

                  err = sqrt(dx * dx + dy * dy)

                  sum += err

             return sum / float(len(p))

 # ----------

 N = 1000

 T = 10

 myrobot = robot()

 p = []

 for i in range(N):

      r = robot()

      r.set_noise(0.05, 0.05, 5.0)#Sebastian's provided noise.

      p.append(r)

 for t in range(T):

      myrobot= myrobot.move(0.1, 5.0)

      Z = myrobot.sense()

 p2 = []

 for i in range(N):

      p2.append(p[i].move(0.1, 5.0))

      p = p2

 w = []

 for i in range(N):

      w.append(p[i].measurement_prob(Z))

 p3 = []

 index = int(random.random() * N)

 beta = 0.0

 mw = max(w)

 for i in range(N):

      beta += random.random() * 2.0 * mw

      while beta > w[index]:

            beta -= w[index]

            index = (index + 1) % N

      p3.append(p[index])

 p = p3

 print eval(myrobot, p)

 if eval(myrobot, p) > 15.0:

      for i in range(N):

           print '#', i, p[i]

      print 'R', myrobot
对方向编程
编写分别运行两次和十次的粒子滤波器:
#N = 1000 T = 2、10

N = 1000

T = 2、10

myrobot = robot()

p = []

for i in range(N):

     r = robot()

     r.set_noise(0.05, 0.05, 5.0)

     p.append(r)

for t in range(T):

     myrobot= myrobot.move(0.1, 5.0)

     Z = myrobot.sense()

...

print p # only print the final distribution
eval函数接收机器人位置r和一个粒子集p来计算每个粒子相对于机器人位置x和y的平均误差,但不考虑方向。 函数的作用方式是将粒子的x和y与机器人的x和y进行比较,并用x和y距离计算欧氏距离,然后平均所有这些值。这个函数能产生一串性能评估
def eval(r, p):

      sum = 0.0;

      for i in range(len(p)): # calculate mean error

           # the last part of this next line is normalization for a cyclical world

           dx = (p[i].x - r.x + (world_size/2.0)) % world_size - (world_size/2.0)

           dy = (p[i].y - r.y + (world_size/2.0)) % world_size -(world_size/2.0)

           err = sqrt(dx * dx + dy * dy)

           sum += err

     return sum / float(len(p))

print eval(myrobot, p)
2012版谷歌无人汽车用了蒙特卡洛滤波和粒子,谷歌无人汽车与以上所讲区别主要有三:Model、Sensor Data、addinal sensor ex.GSP and internal,
谷歌使用的是车辆模型,前轮有转向,做分析时可只关注一半就行。最大的不同是传感器数据,谷歌使用的是高精街道地图,单个快照与地图来匹配,越好的匹配有越高的分数
额外添加的传感器需要额外的方法,但现在的知识足以应付
所以要建立车辆模型、地图数据的相关函数来计算大量像素地图中归一化数据、
这就是完整的粒子滤镜!它使用地标作为测量的一种方式,并使用三维机器人坐标(x,y和方向)。 只需30行代码即可解决估计问题! 这是一个非常强大的东西只用少量代码。 可以在需要使用粒子滤镜的几乎所有可能研究的问题中重用这些代码行。
Google无人汽车与迄今为止所学到的知识之间的区别在于,谷歌汽车遵循车辆模型和传感器数据。 Google汽车不是像机器人那样使用地标,而是使用一个非常精细的路线图。 它需要一个快照,与地图匹配,匹配越好,得分越高。 附加的传感器,如GPS和惯性传感器等也是区别。虽然有些差异,但是也对谷歌汽车在哪和其他汽车在哪的要旨有了深刻的理解,当你建立一个系统时,必须潜入更精细的系统,这是可行的。
下面用车辆模型写一个更有趣更现实的车:

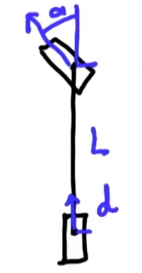
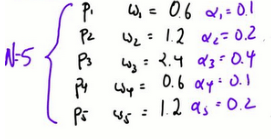
这是车辆前后轮的模型,
已知即将转向的轮胎角度alpha、车长L、即将移动距离d,
求一下车辆转向角度beta,x、y的增加量,
移动圆弧角度theta和半径R(转向围绕坐标系中一点(cx,cy))
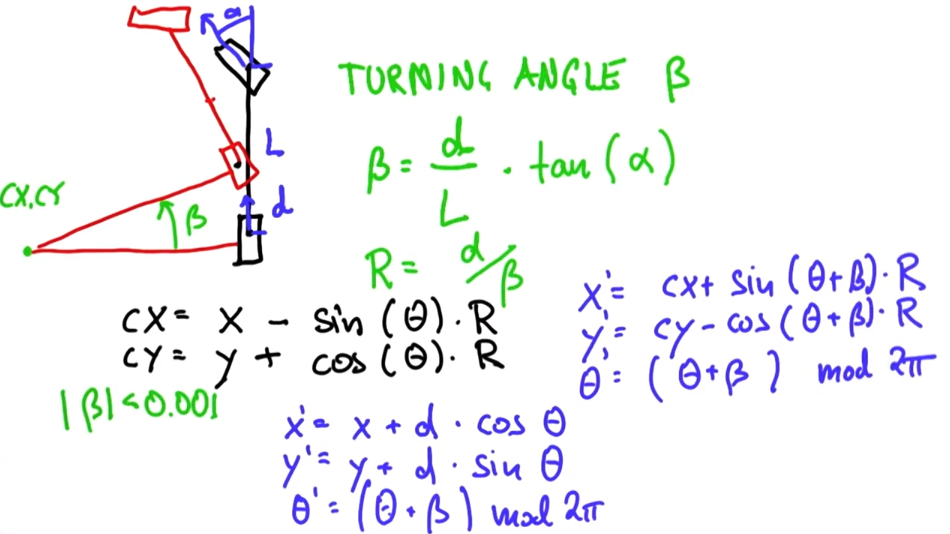 移动之后的两车轮位置以及相关参数计算
下面这个程序大部分前面已给出,写一个move()进这个类中来完善这个类:
#编写一个move(),self和motion vector(steering* angle,a distance)作为输入,返回给定运动后(x,y,orientation)类实例

#地标的坐标以(y,x)

from math import *

import random

landmarks  = [[0.0, 100.0], [0.0, 0.0], [100.0, 0.0], [100.0, 100.0]]

world_size = 100.0#这里设置的世界并非循环

max_steering_angle = pi/4 #不需用到这个值,但能保持现实车的限制、

# ------------------------------------------------

# this is the robot class

#-------------------------------------------------

class robot:

    # --------

    # init: creates robot and initializes location/orientation

    def __init__(self, length = 10.0):

            self.x = random.random() * world_size

            self.y = random.random() * world_size

            self.orientation = random.random() * 2.0 * pi

            self.length = length # length of robot

            self.bearing_noise  = 0.0

            self.steering_noise = 0.0

            self.distance_noise = 0.0

    # --------

    # set: sets a robot coordinate

    def set(self, new_x, new_y, new_orientation):

            if new_orientation < 0 or new_orientation >= 2 * pi:

                raise ValueError, 'Orientation must be in [0..2pi]'

                self.x = float(new_x)

                self.y = float(new_y)

                self.orientation = float(new_orientation)

    # --------

    # set_noise: sets the noise parameters

    def set_noise(self, new_b_noise, new_s_noise, new_d_noise):

            self.bearing_noise  = float(new_b_noise)

            self.steering_noise = float(new_s_noise)

            self.distance_noise = float(new_d_noise)

# ADD CODE HERE----------------------

def move(self, motion,tolerance=0.001):

        steering = motion[0]

        distance = motion[1]

        if abs(steering) > max_steering_angle:

             raise ValueError,'Exceeding max angle'

        if distance < 0.0:

             raise ValueError,'Moving Backwards is not valid'

        #make a new copy

        res = robot()

        res.length_noise = self.length_noise

        res.bearing_noise = self.bearing_noise

        res.steering_noise = self.steering_noise

        res.distance_noise = self.distance_noise

        #apply noise

        steering2 = random.gauss(steering,self.steering_noise)

        distance2 = random.gauss(distance,self.distance_noise)

        #Execute motion

        turn = tan(steering2)*distance2/res.length

        if abs(turn) < tolerance:

           res.x = self.x + (distance2*cos(self.orientation))

           res.y = self.y + (distance2*sin(self.orientation))

           res.orientation = (self.orientation + turn) % (2.0*pi)

        else:

           radius = distance2 / turn

           cx = self.x-(sin(self.orientation) * radius)

           cy = self.x+(cos(self.orientation) * radius)

           res.orientation = (self.orientation + turn) % (2*pi)

           res.x = cx +(sin(res.orientation) * radius)

           res.y = cy - (cos(res.orientation) * radius)

return res(ult)# of the robot class with the correct coordinates.

############## ONLY ADD/MODIFY CODE ABOVE HERE ####################
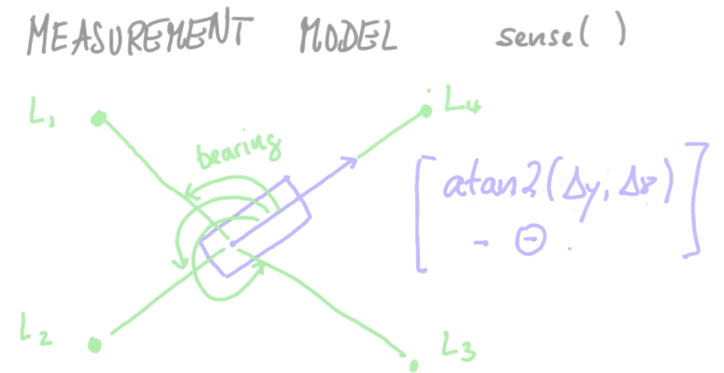
接下来完成一个测量模块sense()
这有一个机器人和一个地标,求机器人自身转角与这个地标的转向角度,现在有4个坐标,求这4个地标与机器人自身转向角间的角度,算式已给出,同样将这个函数加到类中(这里应该是应用4个角度来实现定位)
def sense(self):

      Z = []

      for i in range(len(landmarks))

           bearing = atan2(landmarks[i][0] - self.y,

                            atan2(landmarks[i][1]-self.x)-self.orientation

           if add_noise:

                 bearing+=random.gauss(0.0,self.bearing_noise)

                 bearing %=2.0*pi

                 Z.append(bearing)

      return Z
写到这里,好吧,来做一个融合,我相信写出来会是一个很nice的粒子滤波器:
现在只有sense()和move(),和一些从class中copy过来的code,现在,系统要在noise下run,
这个代码太长,我另外找了地方写,主要就是将这两个函数加入到robot的类中,然后在代码顶部加入噪音(用高斯模拟随机噪音),另外也加入了一些其他函数来深入完善这个模型
最新文章
- C#递归解决汉诺塔问题(Hanoi)
- Android Studio NDK 开发 问题记录
- C#中POST数据和接收的几种方式(抛砖引玉)
- Linux命令:screen
- 配置OpenCV产生flann\logger.h(66): error C4996: 'fopen': This function or variable may be unsafe问题[zz]
- [转]fastjson常见问题
- wamp 提示 Directive allow_call_time_pass_reference is no longer avaiable in PHP
- oracle报错ORA-01507
- 失效的URL访问限制(转)
- jenkins 通过批处理自动构建 非标准项目
- 三款经常使用IP发包工具介绍
- linux系统莫名被黑的诡异经历
- C语言结构体定义的几种方法
- 搭建spring cloud config
- python 机器学习
- Android Studio 安装与设置
- JavaScript:事件
- 将一个dropdownlist从一个div复制到另一个div
- win2016安装postgresql安装不了的问题
- [PY3]——logging
热门文章
- webconfig标签收集
- 基于WebGL架构的3D可视化平台—设备管理
- 安卓出现错误: java.lang.ClassCastException: android.widget.TextView cannot be cast to android.widget.EditText
- Vue+DataTables warning:table id=xxxx -Cannot reinitialize DataTable.报错解决方法
- 自制EF(iShare Demo版)
- java第三章多态
- C++ 深入理解 虚继承、多重继承和直接继承
- 部署NETCORE在LINUX上报Error -99 EADDRNOTAVAIL address not available
- unity导入TexturePacker处理
- netty服务器端启动