在windows上安装nginx并注册
在windows上安装nginx并注册
一、前言
最近自己也尝试了一下在windows上安装nginx,其实非常的简单,这里算是备忘一下。
二、在windows下面安装
首先需要到nginx的官网上下载最新版的nginx:http://nginx.org/en/download.html
找到最新版本下载即可:

至于后面的pgp,其实是一种密钥机制(pretty good privacy)。
下载之后,我们发现这个文件是不用安装的,也就是不需要在windows的注册表中注册的,因此我们可以直接使用,如果大家有使用过masm之类的汇编软件,相信大家会理解的,之后,我们就可以直接在cmd中运行了,这个时候可能会出现问题,其中一个问题是闪退。
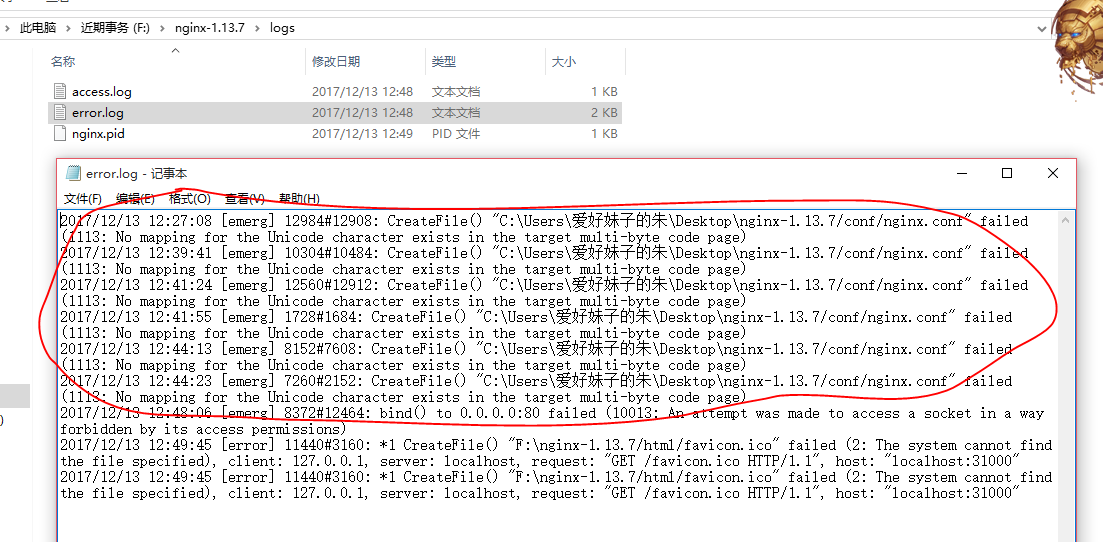
闪退的原因有很多种,我们要注意查看日志文件:
如果大家遇到下图中我画出的问题:

// :: [emerg] #: CreateFile() "C:\Users\爱好妹子的朱\Desktop\nginx-1.13.7/conf/nginx.conf" failed (: No mapping for the Unicode character exists in the target multi-byte code page)
那么原因其实很简单,我们读了日志之后就能理解,不能映射编码,说明我们肯定是在路径中有中文字符,也就是我们的文件存放目录一定不能是中文的,要不然肯定会闪退的。
解决办法就是把下载的文件放到全英文的目录之中。
还有一个错误是:

绑定端口异常,那肯定呀,80端口是默认让http协议使用的,我们这里肯定不能占用,同时我们也可以回忆一下常用的端口,比如HTTPS(443),ftp(20,21)等等。
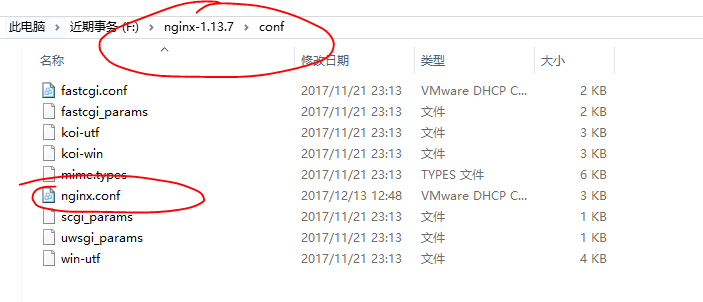
解决办法也很简单,只需要在NGINX中修改一下配置即可:

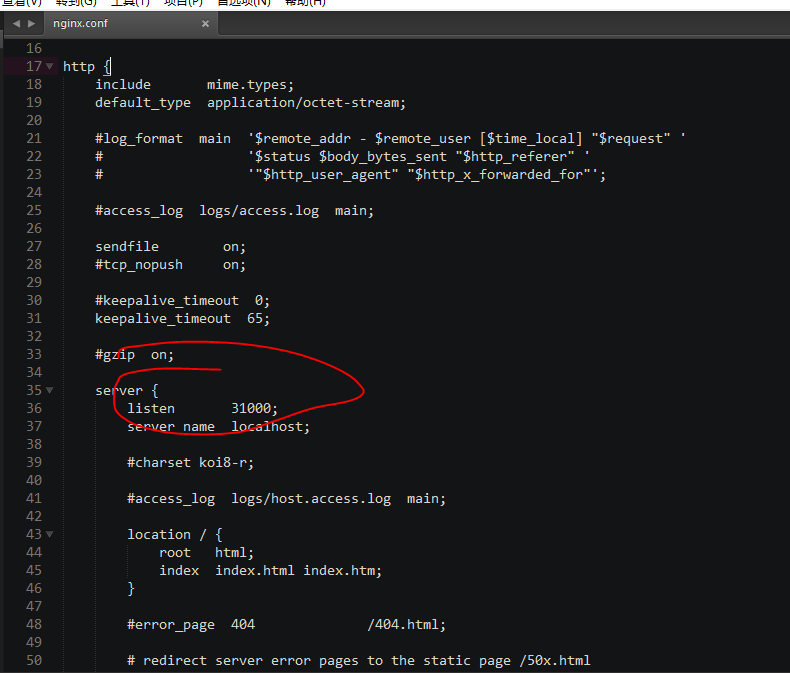
我们在sublime中打开该文件:

就可以看到相应的配置信息,比如IP地址和端口,这里笔者已经改成了一个大于1024的端口了(其他任意)。
让我们仔细看一下配置文件,我们以后的很多操作都可以从中配置:
   #user  nobody;

   worker_processes  ;

   #error_log  logs/error.log;

   #error_log  logs/error.log  notice;

   #error_log  logs/error.log  info;

   #pid        logs/nginx.pid;

  events {

      worker_connections  ;

  }

  http {

      include       mime.types;

      default_type  application/octet-stream;

      #log_format  main  '$remote_addr - $remote_user [$time_local] "$request" '

      #                  '$status $body_bytes_sent "$http_referer" '

      #                  '"$http_user_agent" "$http_x_forwarded_for"';

      #access_log  logs/access.log  main;

      sendfile        on;

      #tcp_nopush     on;

      #keepalive_timeout  ;

      keepalive_timeout  ;

      #gzip  on;

      server {

          listen       ;

          server_name  localhost;

          #charset koi8-r;

          #access_log  logs/host.access.log  main;

          location / {

              root   html;

              index  index.html index.htm;

          }

          #error_page                /.html;

          # redirect server error pages to the static page /50x.html

          #

          error_page        /50x.html;

          location = /50x.html {

              root   html;

          }

          # proxy the PHP scripts to Apache listening on 127.0.0.1:

          #

          #location ~ \.php$ {

          #    proxy_pass   http://127.0.0.1;

          #}

          # pass the PHP scripts to FastCGI server listening on 127.0.0.1:

          #

          #location ~ \.php$ {

          #    root           html;

          #    fastcgi_pass   127.0.0.1:;

          #    fastcgi_index  index.php;

          #    fastcgi_param  SCRIPT_FILENAME  /scripts$fastcgi_script_name;

          #    include        fastcgi_params;

          #}

          # deny access to .htaccess files, if Apache's document root

          # concurs with nginx's one

          #

          #location ~ /\.ht {

          #    deny  all;

          #}

      }

      # another virtual host using mix of IP-, name-, and port-based configuration

      #

      #server {

      #    listen       ;

      #    listen       somename:;

      #    server_name  somename  alias  another.alias;

      #    location / {

      #        root   html;

      #        index  index.html index.htm;

      #    }

      #}

      # HTTPS server

      #

      #server {

      #    listen        ssl;

      #    server_name  localhost;

     #    ssl_certificate      cert.pem;

     #    ssl_certificate_key  cert.key;

     #    ssl_session_cache    shared:SSL:1m;

     #    ssl_session_timeout  5m;

     #    ssl_ciphers  HIGH:!aNULL:!MD5;

     #    ssl_prefer_server_ciphers  on;

     #    location / {

     #        root   html;

     #        index  index.html index.htm;

     #    }

     #}

 }
三、将nignx注册成服务
如果我们经常使用,那么在cmd之中启动是非常不方便的,因此,我们可以将其注册成服务。
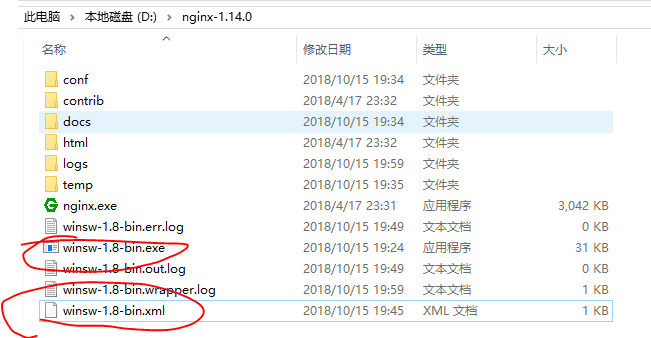
首先我们下载Windows Service Wrapper(比如winsw-1.8-bin.exe)服务注册工具,然后将这个工具放到ngnix安装目录之下,然后新建一个文件,这个文件的文件名需要和我们的服务注册工具一致,也就是说如果把服务注册工具重命名,那么这个文件也需要重命名(winsw-1.8-bin.xml):
 <?xml version="1.0" encoding="UTF-8" ?>

 <service>

 <id>nginx</id>

 <name>zyrNginx Service</name>

 <description>High Performance Nginx Service  朱彦荣 zyr</description>

 <executable>D:\nginx-1.14.\nginx.exe</executable>

 <logpath>D:\nginx-1.14.\</logpath>

 <logmode>roll</logmode>

 <depend></depend>

 <startargument>-p D:\nginx-1.14.</startargument>

 <stopargument>-p D:\nginx-1.14. -s stop</stopargument>

 </service>
注意上面的文件我们要修改nginx存放的目录,以及相关的配置。

然后我们在命令行(管理员模式,不然权限不够)中,将该服务注册到windows系统之中:

最后我们打开任务管理器中的服务,可以发现我们自己命名的服务已经出现了:


最新文章
- ecshop不同样式文章页调用不同文章模板
- Sqoop:Could not load db driver class: com.microsoft.sqlserver.jdbc.SQLServerDriver
- PHP实验三
- IntelliIDEA注册码
- 同时打开两个excel工作窗口
- JavaScript事件对象
- GIT安装完需要做以下配置
- Maven类包冲突终极解决方案
- [转]EasyUI——常见用法总结
- linux常用命令:3文件搜索命令
- Printf 格式化简要总结
- dom4j处理java中xml还是很方便的
- ural 1207 Median on the Plane
- Windows WDDM显卡驱动框架及GPUView工具的使用(1)
- FCKeditor 2.6.6在ASP中的安装及配置方法分享--ZZ转载自网络
- Spring Security入门(3-8)Spring Security获取session中的UserDetail
- Android缩放动画
- Springboot 定时任务,service层无法注入问题详细解决
- iptables log日志记录功能扩展应用:iptables自动配置临时访问策略,任意公网登录服务器
- 2018"百度之星"程序设计大赛 - 资格赛hdu6349三原色(最小生成树)