spring-cloud-oauth2 认证授权
什么是OAuth2?
OAuth2是一个关于授权的开放标准,核心思路是通过各类认证手段(具体什么手段OAuth2不关心)认证用户身份,并颁发token(令牌),使得第三方应用可以使用该令牌在限定时间、限定范围访问指定资源。主要涉及的RFC规范有RFC6749(整体授权框架),RFC6750(令牌使用),RFC6819(威胁模型)这几个,一般我们需要了解的就是RFC6749。获取令牌的方式主要有四种,分别是授权码模式,简单模式,密码模式和客户端模式。这里要先明确几个OAuth2中的几个重要概念:
- resource_owner : 拥有被访问资源的用户
- user-agent: 一般来说就是浏览器
- client : 第三方应用
- Authorization server : 认证服务器,用来进行用户认证并颁发token
- Resource server: 资源服务器,拥有被访问资源的服务器,需要通过token来确定是否有权限访问
我们在浏览器端或者APP端做登录的时候时常会遇到 QQ登录、微信登陆、微博登录 等等。这一类称之为第三方登录。在APP端 往往会采用OAuth2。以QQ登录为准,通常是点击了QQ登录,首先跳转到QQ登录授权页面进行扫码授权。然后跳回原来网页设定好的一个回调地址。这其实就完成了OAuth的整个授权流程。OAuth在"客户端"与"服务提供商"之间,设置了一个授权层(authorization layer)。"客户端"不能直接登录"服务提供商",只能登录授权层,以此将用户与客户端区分开来。"客户端"登录授权层所用的令牌(token),与用户的密码不同。用户可以在登录的时候,指定授权层令牌的权限范围和有效期。"客户端"登录授权层以后,"服务提供商"根据令牌的权限范围和有效期,向"客户端"开放用户储存的资料。
OAuth2 运行流程:
OAuth 2.0的运行流程如下图,摘自RFC6749。
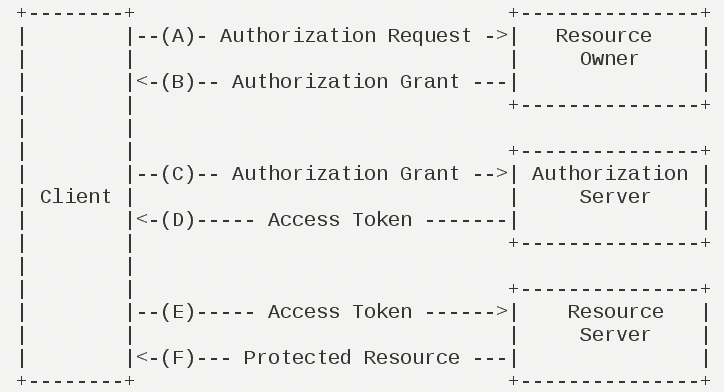
- 用户打开客户端以后,客户端要求用户给予授权。( QQ登录跳转到授权页面)
- 用户同意给予客户端授权。 (用户扫码确定授权)
- 客户端使用上一步获得的授权,向认证服务器申请令牌。(跳转到回调地址,且携带一个 code )
- 认证服务器对客户端进行认证以后,确认无误,同意发放令牌。 (通过上一步得到的code 进行授权码认证)
- 客户端使用令牌,向资源服务器申请获取资源。 (用换取到的 access_token 进行访问资源)
- 资源服务器确认令牌无误,同意向客户端开放资源。 (token 认证通过 返回数据)。
授权方式:
客户端必须得到用户的授权(authorization grant),才能获得令牌(access token)。OAuth 2.0定义了四种授权方式。
- 授权码模式(authorization code)
- 简化模式(implicit)
- 密码模式(resource owner password credentials)
- 客户端模式(client credentials)
本文主要介绍 授权码模式 跟 密码模式。
授权认证服务实现:
搭建认证服务 Authorization server:
1.导入依赖(包括后续要用到的一些依赖),这里 springboot 2.0.1 、springCloud 版本为 Finchley.SR3:
<dependencies>

        <dependency>

            <groupId>org.springframework.cloud</groupId>

            <artifactId>spring-cloud-starter-oauth2</artifactId>

        </dependency>

        <!-- https://mvnrepository.com/artifact/org.springframework.cloud/spring-cloud-starter-security -->

        <dependency>

            <groupId>org.springframework.cloud</groupId>

            <artifactId>spring-cloud-starter-security</artifactId>

            <version>2.2.1.RELEASE</version>

        </dependency>

        <dependency>

            <groupId>com.alibaba</groupId>

            <artifactId>fastjson</artifactId>

        </dependency>

        <dependency>

            <groupId>commons-lang</groupId>

            <artifactId>commons-lang</artifactId>

            <version>2.6</version>

        </dependency>

        <dependency>

            <groupId>commons-collections</groupId>

            <artifactId>commons-collections</artifactId>

            <version>3.2.1</version>

        </dependency>

        <dependency>

            <groupId>org.springframework.boot</groupId>

            <artifactId>spring-boot-starter-data-redis</artifactId>

        </dependency>

        <dependency>

            <groupId>org.springframework.session</groupId>

            <artifactId>spring-session-data-redis</artifactId>

        </dependency>

        <dependency>

            <groupId>org.springframework.security.oauth</groupId>

            <artifactId>spring-security-oauth2</artifactId>

            <version>2.3.3.RELEASE</version>

        </dependency>

        <dependency>

            <groupId>io.jsonwebtoken</groupId>

            <artifactId>jjwt</artifactId>

            <version>0.7.0</version>

        </dependency>

    </dependencies>
2. 认证服务器配置,要实现认证服务器其实很简单,只要打上 @EnableAuthorizationServer 注解,然后继承 AuthorizationServerConfigurerAdapter 进行一些简单的配置即可。
@Configuration

@EnableAuthorizationServer

public class WuzzAuthorizationServerConfig extends AuthorizationServerConfigurerAdapter {

    //http://localhost:8766/oauth/authorize?client_id=wuzzClientId&response_type=code&redirect_uri=http://www.baidu.com&scope=all

    @Override

    public void configure(ClientDetailsServiceConfigurer clients) throws Exception {

        clients.inMemory().withClient("wuzzClientId")//客户端得ID,比如我们在QQ互联中心申请得。可以写多个。配置 循环

                .secret(passwordEncoder().encode("wuzzSecret")) // 客户端密钥,需要进行加密

                .accessTokenValiditySeconds(7200)// token 有效时常  0 永久有效

                .authorizedGrantTypes("password", "implicit", "refresh_token", "authorization_code")// 支持得授权类型

                .redirectUris("http://www.baidu.com")//回调地址

                .scopes("all", "read", "write");//拥有的 scope  可选

    }

    @Override

    public void configure(AuthorizationServerEndpointsConfigurer endpoints) throws Exception {

        endpoints.userDetailsService(userDetailsService()) // 用户信息得服务,一版是都数据库

                .authenticationManager(authenticationManager())// 认证管理器。

                .allowedTokenEndpointRequestMethods(HttpMethod.GET, HttpMethod.POST);

    }

    @Override

    public void configure(AuthorizationServerSecurityConfigurer security) throws Exception {

        security.allowFormAuthenticationForClients()//允许表单登录

                .checkTokenAccess("permitAll()"); //开启/oauth/check_token验证端口认证权限访问

    }

    @Bean // 注入认证管理器

    public AuthenticationManager authenticationManager() {

        AuthenticationManager authenticationManager = new AuthenticationManager() {

            @Override

            public Authentication authenticate(Authentication authentication) throws AuthenticationException {

                return daoAuthenticationProvider().authenticate(authentication);

            }

        };

        return authenticationManager;

    }

    @Bean//注入认证器

    public AuthenticationProvider daoAuthenticationProvider() {

        DaoAuthenticationProvider daoAuthenticationProvider = new DaoAuthenticationProvider();

        daoAuthenticationProvider.setUserDetailsService(userDetailsService());

        daoAuthenticationProvider.setHideUserNotFoundExceptions(false);

        daoAuthenticationProvider.setPasswordEncoder(passwordEncoder());

        return daoAuthenticationProvider;

    }

    @Bean//注入 用户信息服务

    public UserDetailsService userDetailsService() {

        return new MyUserDetailService();

    }

    @Bean//注入密码加密

    public PasswordEncoder passwordEncoder() {

        return new BCryptPasswordEncoder();

    }

}
3.由于 OAuth2 依赖于 Security 得配置,所以我们这里还需要配置一下 Security :
@Configuration

public class WebSecurityConfig extends WebSecurityConfigurerAdapter {

    @Override

    protected void configure(HttpSecurity http) throws Exception {

        http.authorizeRequests().antMatchers("/**").fullyAuthenticated().and().httpBasic();

    }

}
4.自定义的用户信息服务类,由于Oauth 的用户需要有个 ROLE_USER 角色 才可以访问,所以这里写死。
public class MyUserDetailService implements UserDetailsService {

    private Logger logger = LoggerFactory.getLogger(getClass());

    @Autowired

    private PasswordEncoder passwordEncoder;

    @Override

    public UserDetails loadUserByUsername(String username) throws UsernameNotFoundException {

        logger.info("表单登录用户名:" + username);

        // 根据用户名查找用户信息

        //根据查找到的用户信息判断用户是否被冻结

        String password = passwordEncoder.encode("123456");

        logger.info("数据库密码是:" + password);

        return new User(username, password,

                true, true, true, true,

                AuthorityUtils.commaSeparatedStringToAuthorityList("admin,ROLE_USER"));

    }

}
5.启动主类即可进行访问。
授权码模式:
授权码需要访问接口 : http://localhost:8766/oauth/authorize?client_id=wuzzClientId&response_type=code&redirect_uri=http://www.baidu.com&scope=all
其中 client_id 为认证服务器为每个对接的第三方提供的唯一ID。response_type 返回类型,写死为 code 。redirect_uri 回调地址。
访问该地址,如果用户当前未登录将会跳转到用户登录页面进行登录。然后将会跳转到下面这个页面。询问用户是否为 wuzzClientId这个应用授权。

点击授权,将会跳转到回调地址页,由于没有备案域名,这里直接跳到百度:
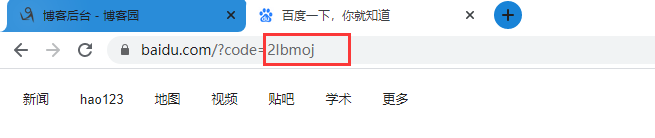
可以看到这里后面携带了 一个 code 参数,这个参数就是认证服务器为第三方提供的授权码。然后再用这个授权码去换取 access_token。我这里就用 postman 进行测试:
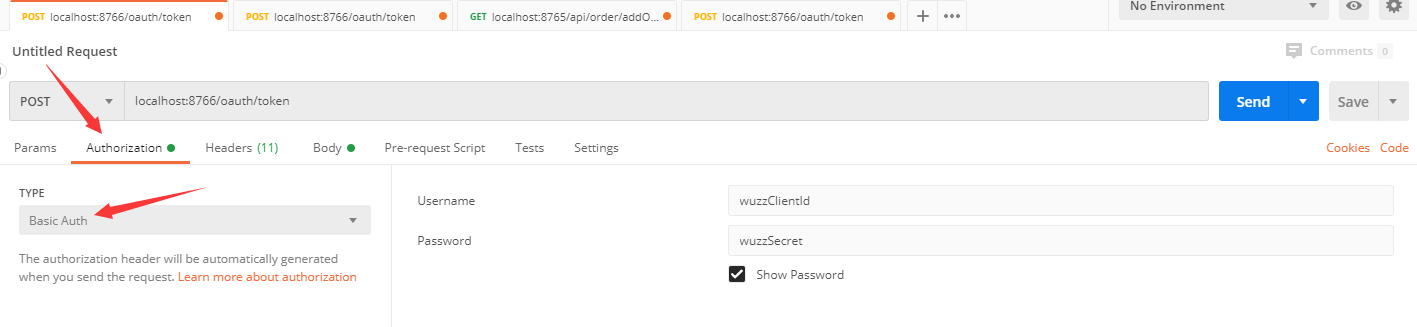
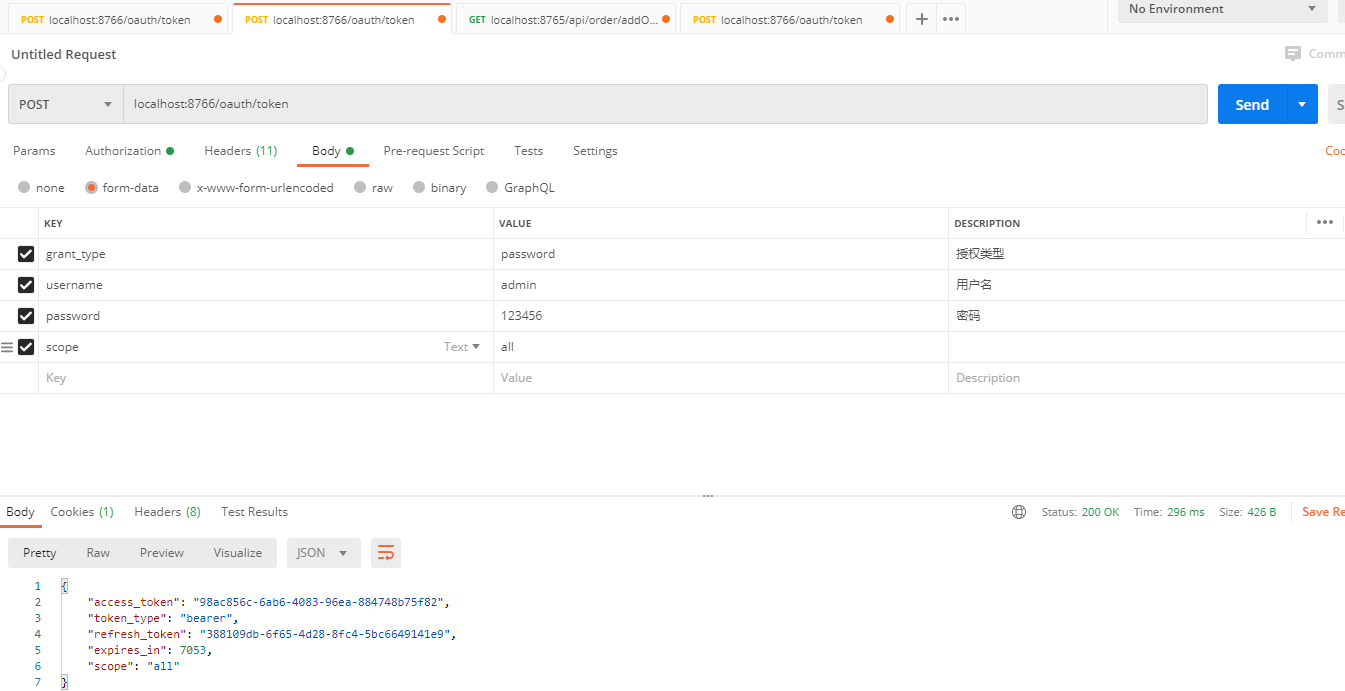
换取 access_token得地址为 /oauth/token,首先需要填入认证服务器颁发的 clientId、client-secret
然后填写参数 ,发送请求。注意这里前三个参数是必填的。
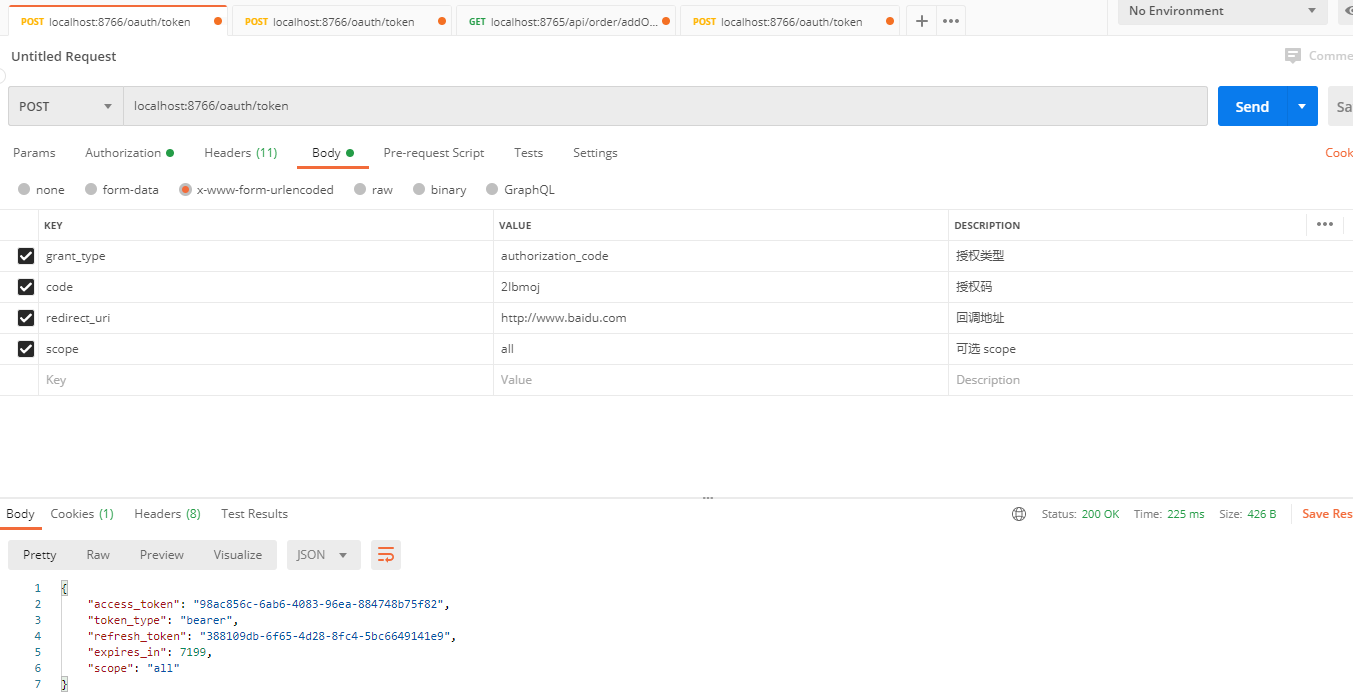
可以看到这样就可以成功的获取到 access_token 了。然后第三方用户就可以通过这个 token 去资源服务器上获取授权的用户信息了。后续会提到这个token 怎么用。
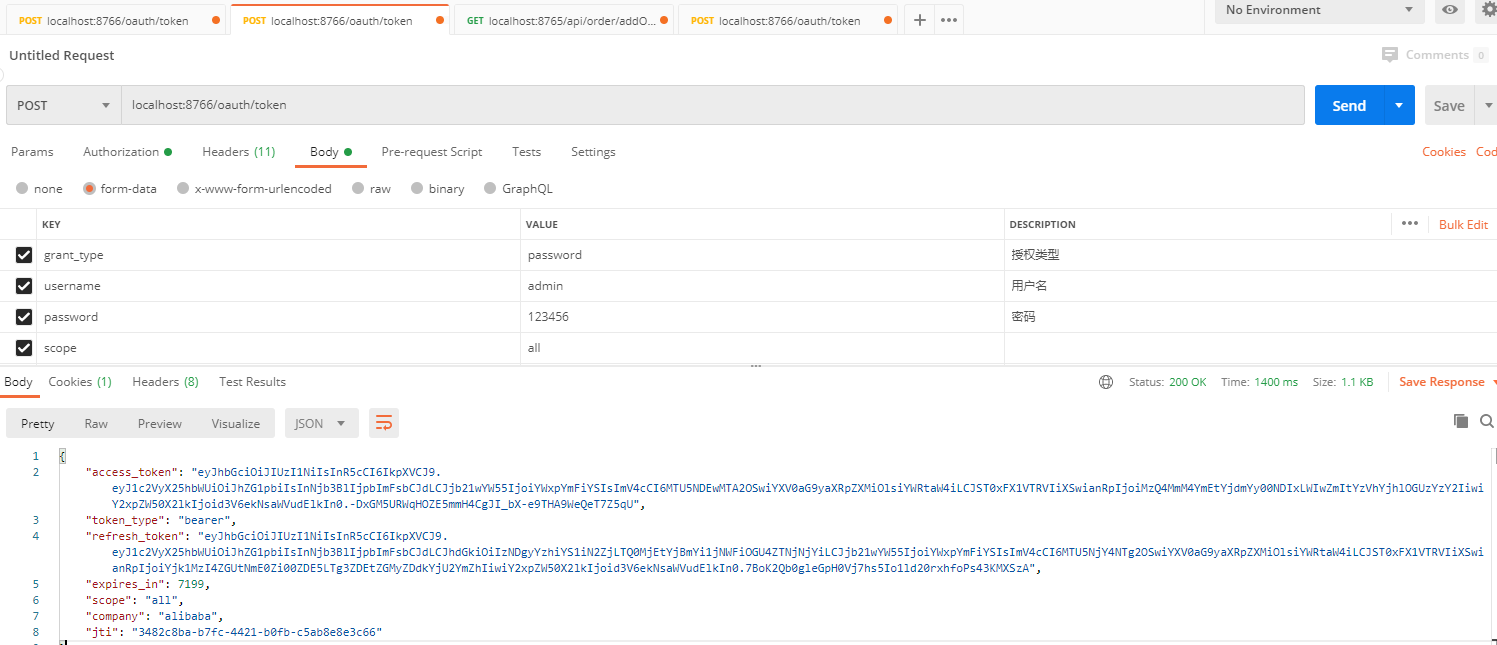
密码模式:
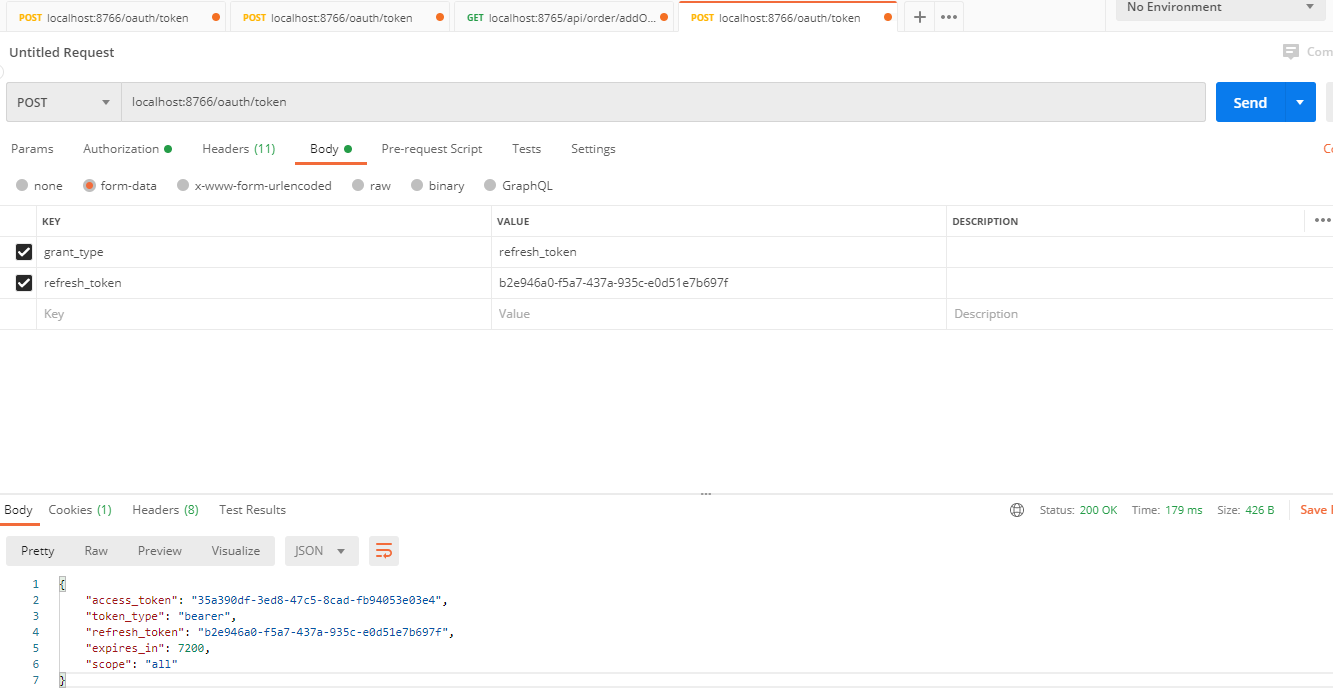
相比授权码授权方式来说,密码模式相对简单,我们只需要修改授权类型,增加 用户名、密码 字段:
细心的小伙伴可能会发现,我这里用的是同一个用户 admin 去获取token,获取到的 access_token、refresh_token 都是一样的 ,唯独 expires_in(过期时间)逐渐减少。这是Oauth 提供的机制。在这个 expires_in 时间内 access_token都是有效的。当然,refresh_token 用于刷新 access_token,避免了用户的频繁认证,刷新token请求如下:
资源服务器 Resource server:
1.配置资源服务器就更简单了,新建一个 Springboot 标准工程,导入与认证服务器一样的依赖,然后定义一个类,打上 @EnableResourceServer 注解,实现 ResourceServerConfigurerAdapter 进行简单配置:
@Configuration

@EnableResourceServer

public class WuzzResourceServerConfig extends ResourceServerConfigurerAdapter {

    @Override

    public void configure(HttpSecurity http) throws Exception {

        //配置受保护的资源

        http.authorizeRequests().antMatchers("/api/order/**").authenticated();

    }

}
2.配置文件:
server.port = 8765

#check_token url

security.oauth2.resource.token-info-uri= http://localhost:8766/oauth/check_token

security.oauth2.resource.prefer-token-info= true

# authorize url

security.oauth2.client.access-token-uri=http://localhost:8766/oauth/authorize

#用户认证地址 check_token

security.oauth2.client.user-authorization-uri=http://localhost:8766/oauth/check_token

security.oauth2.client.client-id=wuzzClientId

security.oauth2.client.client-secret=wuzzSecret
3.提供一个测试接口
@RestController

@RequestMapping("/api/order")

public class OrderController {


    @RequestMapping("addOrder")

    public String addOrder(){

        return "addOrder";

    }

}
4.启动服务,当然,你想直接访问这个接口显然是不行的
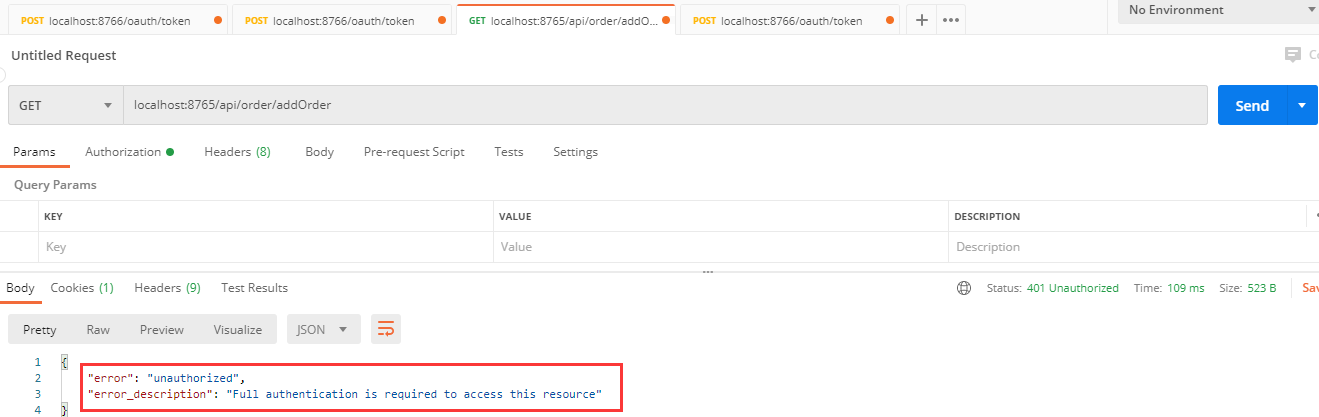
这个时候我们带上之前获取到的 token ,过期的话重新获取一个:
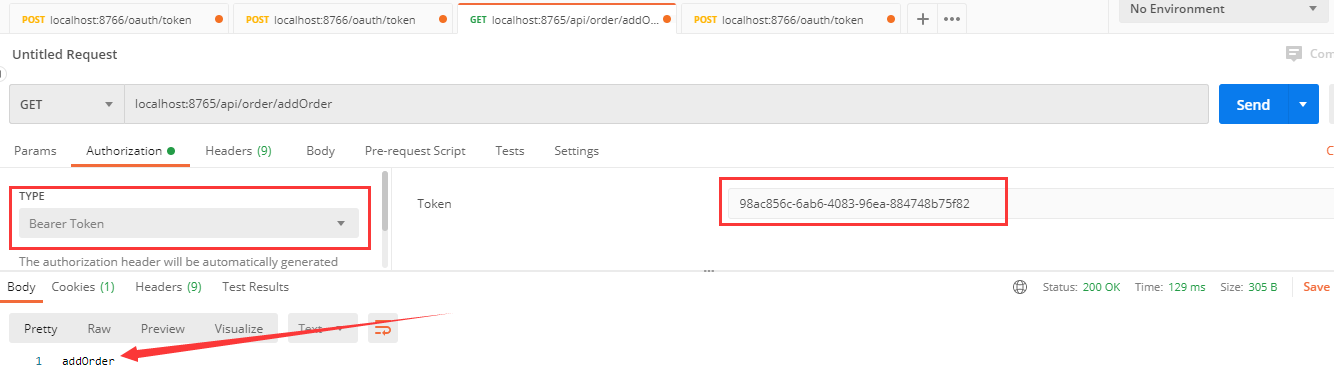
这样就实现了资源服务器与认证服务器的打通。
Token 存储:
OAuth2存储token值的方式由多种,所有的实现方式都是实现了TokenStore接口
- InMemoryTokenStore:token存储在本机的内存之中
- JdbcTokenStore:token存储在数据库之中
- JwtTokenStore:token不会存储到任何介质中
- RedisTokenStore:token存储在Redis数据库之中
这里使用 Redis 进行存储演示:
1.配置 redis :
# Redis服务地址

spring.redis.host=192.168.1.101

# Redis服务端口

spring.redis.port=6379

# Redis 连接密码

spring.redis.password=wuzhenzhao
2.新增Redis连接工厂:
@Configuration

public class TokenStoreConfig {

    @Autowired

    private RedisConnectionFactory redisConnectionFactory;

    @Bean

    public TokenStore redisTokenStore() {

        return new RedisTokenStore(redisConnectionFactory);

    }

}
3.配置,再 WuzzAuthorizationServerConfig 中新增如下配置。
// 自定义token存储类型

@Autowired

private TokenStore tokenStore;

@Override

public void configure(AuthorizationServerEndpointsConfigurer endpoints) throws Exception {

  endpoints.userDetailsService(userDetailsService()) // 用户信息得服务,一版是都数据库

    .authenticationManager(authenticationManager())// 认证管理器。

    .allowedTokenEndpointRequestMethods(HttpMethod.GET, HttpMethod.POST)

    .tokenStore(tokenStore);

}
4.启动服务并且通过密码授权获取 access_token.然后查看Redis 上的数据变化:

可以发现 token 已经被存储到了 redis上面,然后我们把认证服务器重启,然后拿着哲哥 access_token 去访问资源服务器,发现依旧可以访问得到。Redis token 配置成功。
JWT 整合:
JSON Web Token(JWT)是一个开放的行业标准(RFC 7519),它定义了一种自包含、可拓展、密签协议格式,用于在通信双方传递json对象,传递的信息经过数字签名可以被验证和信任。JWT可以使用HMAC算法或使用RSA的公钥/私钥对来签名,防止被篡改。
JWT 的几个特点
- JWT 默认是不加密,但也是可以加密的。生成原始 Token 以后,可以用密钥再加密一次。
- JWT 不加密的情况下,不能将秘密数据写入 JWT。
- JWT 不仅可以用于认证,也可以用于交换信息。有效使用 JWT,可以降低服务器查询数据库的次数。
- JWT 的最大缺点是,由于服务器不保存 session 状态,因此无法在使用过程中废止某个 token,或者更改 token 的权限。也就是说,一旦 JWT 签发了,在到期之前就会始终有效,除非服务器部署额外的逻辑。
- JWT 本身包含了认证信息,一旦泄露,任何人都可以获得该令牌的所有权限。为了减少盗用,JWT 的有效期应该设置得比较短。对于一些比较重要的权限,使用时应该再次对用户进行认证。
- 为了减少盗用,JWT 不应该使用 HTTP 协议明码传输,要使用 HTTPS 协议传输。
它是一个很长的字符串,中间用点(.)分隔成三个部分。注意,JWT 内部是没有换行的,这里只是为了便于展示,将它写成了几行。JWT 的三个部分依次如下。
- Header(头部)
- Payload(负载)
- Signature(签名)
如下就是一个 JWT :
eyJhbGciOiJIUzI1NiIsInR5cCI6IkpXVCJ9.
eyJ1c2VyX25hbWUiOiJhZG1pbiIsInNjb3BlIjpbImFsbCJdLCJjb21wYW55IjoiYWxpYmFiYSIsImV4cCI6MTU5NDEwMTA2OSwiYXV0aG9yaXRpZXMiOlsiYWRtaW4iLCJST0xFX1VTRVIiXSwianRpIjoiMzQ4MmM4YmEtYjdmYy00NDIxLWIwZmItYzVhYjhlOGUzYzY2IiwiY2xpZW50X2lkIjoid3V6ekNsaWVudElkIn0.
-DxGM5URWqHOZE5mmH4CgJI_bX-e9THA9WeQeT7Z5qU
像这个 token 我们可以借助第三方进行解码 : https://www.jsonwebtoken.io/ .通过该网址就可以看到包含的所有信息。
1.注入 Jwt 相关类:
@Configuration

public class TokenStoreConfig {

    @Autowired

    private RedisConnectionFactory redisConnectionFactory;

    @Bean

    @ConditionalOnProperty(prefix = "wuzz", name = "storeType", havingValue = "redis")

    public TokenStore redisTokenStore() {

        return new RedisTokenStore(redisConnectionFactory);

    }

    @Configuration

    @ConditionalOnProperty(prefix = "wuzz", name = "storeType", havingValue = "jwt", matchIfMissing = true)

    public static class JwtTokenConfig {

        //自包含、可拓展、密签

        //https://www.jsonwebtoken.io/  解码

        //{

        // "exp": 1593785308,

        // "user_name": "admin",

        // "authorities": [

        //  "admin",

        //  "ROLE_USER"

        // ],

        // "jti": "e2e5e811-b235-49b8-8678-5bf22e265415",

        // "client_id": "wuzzClientId",

        // "scope": [

        //  "all"

        // ]

        //}

        @Bean// 注入 jwt 存储 token

        public TokenStore jwtTokenStore() {

            return new JwtTokenStore(jwtAccessTokenConverter());

        }

        @Bean// 注入转换器

        public JwtAccessTokenConverter jwtAccessTokenConverter() {

            JwtAccessTokenConverter accessTokenConverter = new JwtAccessTokenConverter();

            accessTokenConverter.setSigningKey("wuzz");// 盐

            return accessTokenConverter;

        }

        @Bean//添加 token 包含信息

        @ConditionalOnMissingBean(name = "jwtTokenEnhancer")

        public TokenEnhancer jwtTokenEnhancer() {

            return new WuzzJwtTokenEnhancer();

        }

    }

}
2.配置文件新增:
wuzz.storeType=jwt
3.在 WuzzAuthorizationServerConfig 中配置:
// 自定义token存储类型

    @Autowired

    private TokenStore tokenStore;

    // jwt token

    @Autowired(required = false)

    private JwtAccessTokenConverter jwtAccessTokenConverter;

    //jwt token 附加信息

    @Autowired(required = false)

    private TokenEnhancer jwtTokenEnhancer;

    @Override

    public void configure(AuthorizationServerEndpointsConfigurer endpoints) throws Exception {

        endpoints.userDetailsService(userDetailsService()) // 用户信息得服务,一版是都数据库

                .authenticationManager(authenticationManager())// 认证管理器。

                .allowedTokenEndpointRequestMethods(HttpMethod.GET, HttpMethod.POST)

                .tokenStore(tokenStore);

        if (jwtAccessTokenConverter != null && jwtTokenEnhancer != null) {

            TokenEnhancerChain tokenEnhancerChain = new TokenEnhancerChain();

            List<TokenEnhancer> enhancers = new ArrayList<>();

            enhancers.add(jwtTokenEnhancer);

            enhancers.add(jwtAccessTokenConverter);

            tokenEnhancerChain.setTokenEnhancers(enhancers);

            endpoints.tokenEnhancer(tokenEnhancerChain)

                    .accessTokenConverter(jwtAccessTokenConverter);

        }

    }
4. 自定义 token 附加信息实现:
public class WuzzJwtTokenEnhancer implements TokenEnhancer {

    @Override

    public OAuth2AccessToken enhance(OAuth2AccessToken oAuth2AccessToken, OAuth2Authentication oAuth2Authentication) {

        Map<String, Object> info = new HashMap<String, Object>();

        info.put("company", "alibaba");

        ((DefaultOAuth2AccessToken) oAuth2AccessToken).setAdditionalInformation(info);

        return oAuth2AccessToken;

    }

}
5.启动认证服务器用密码认证方式获取一下 access_token ,发现token已经发生了变化,而且我们在token里增加的属性也显示出来了:
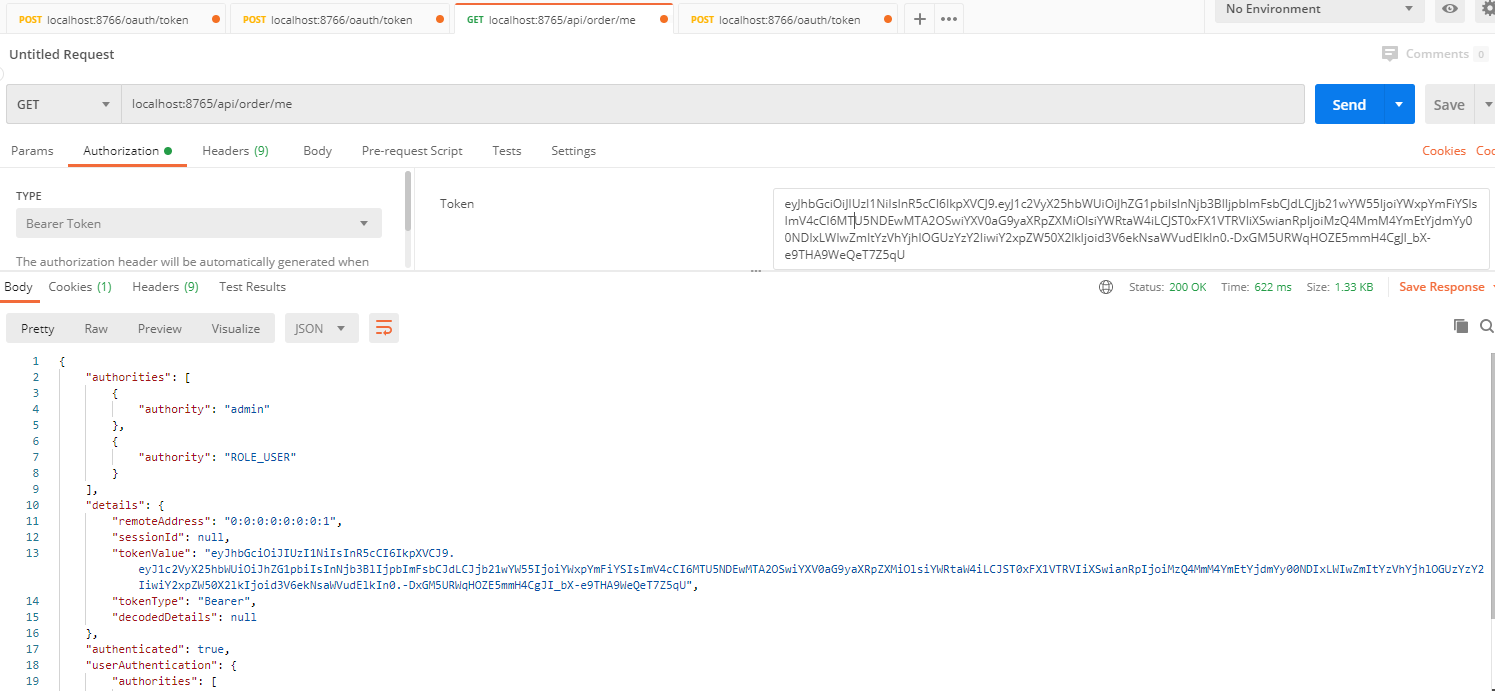
我们可以通过在资源服务器中写一个解析这个 token的方法:
@RequestMapping(value = "/me", method = {RequestMethod.GET})

    public Object me(Authentication user, HttpServletRequest request) throws UnsupportedEncodingException {

        String header = request.getHeader("Authorization");

        String token = StringUtils.substringAfter(header, "Bearer ");

        Claims claims = Jwts.parser().setSigningKey("wuzz".getBytes("UTF-8")).parseClaimsJws(token).getBody();

        String company = (String) claims.get("company");

        System.out.println(company);

        return user;

    }
然后请求该接口可以获取到相关的信息。
整合 JdbcClientDetailsService :
在上文中我们讲 client的信息都是写死在配置里面,显然在生产环境下是不合理的,OAuth2 提供了相应的配置。
1.导入依赖:
<dependency>

            <groupId>mysql</groupId>

            <artifactId>mysql-connector-java</artifactId>

        </dependency>

        <dependency>

            <groupId>org.springframework.boot</groupId>

            <artifactId>spring-boot-starter-jdbc</artifactId>

        </dependency>
2.修改配置:
@Autowired

private DataSource dataSource;

@Override

public void configure(ClientDetailsServiceConfigurer clients) throws Exception {

//        clients.inMemory().withClient("wuzzClientId")//客户端得ID,比如我们在QQ互联中心申请得。可以写多个。配置 循环

//                .secret(passwordEncoder().encode("wuzzSecret")) // 客户端密钥,需要进行加密

//                .accessTokenValiditySeconds(7200)// token 有效时常  0 永久有效

//                .authorizedGrantTypes("password", "implicit", "refresh_token", "authorization_code")// 支持得授权类型

//                .redirectUris("http://www.baidu.com")//回调地址

//                .scopes("all", "read", "write");//拥有的 scope  可选

  clients.withClientDetails(new JdbcClientDetailsService(dataSource));

}
3.新增数据库配置:
#解决springboot2.0 后内存数据库H2与actuator不能同时使用报datasource循环依赖

spring.cloud.refresh.refreshable=none

spring.datasource.driver-class-name=com.mysql.jdbc.Driver

spring.datasource.url=jdbc:mysql://192.168.1.101:3306/study?useUnicode=true&characterEncoding=utf-8

spring.datasource.username=root

spring.datasource.password=123456
4.数据库新增对应表,并添加一条数据:
-- ----------------------------

-- Table structure for oauth_client_details

-- ----------------------------

DROP TABLE IF EXISTS `oauth_client_details`;

CREATE TABLE `oauth_client_details`  (

  `client_id` varchar(48) CHARACTER SET utf8 COLLATE utf8_general_ci NOT NULL,

  `resource_ids` varchar(256) CHARACTER SET utf8 COLLATE utf8_general_ci NULL DEFAULT NULL,

  `client_secret` varchar(256) CHARACTER SET utf8 COLLATE utf8_general_ci NULL DEFAULT NULL,

  `scope` varchar(256) CHARACTER SET utf8 COLLATE utf8_general_ci NULL DEFAULT NULL,

  `authorized_grant_types` varchar(256) CHARACTER SET utf8 COLLATE utf8_general_ci NULL DEFAULT NULL,

  `web_server_redirect_uri` varchar(256) CHARACTER SET utf8 COLLATE utf8_general_ci NULL DEFAULT NULL,

  `authorities` varchar(256) CHARACTER SET utf8 COLLATE utf8_general_ci NULL DEFAULT NULL,

  `access_token_validity` int(11) NULL DEFAULT NULL,

  `refresh_token_validity` int(11) NULL DEFAULT NULL,

  `additional_information` varchar(4096) CHARACTER SET utf8 COLLATE utf8_general_ci NULL DEFAULT NULL,

  `autoapprove` varchar(256) CHARACTER SET utf8 COLLATE utf8_general_ci NULL DEFAULT NULL,

  PRIMARY KEY (`client_id`) USING BTREE

) ENGINE = InnoDB CHARACTER SET = utf8 COLLATE = utf8_general_ci ROW_FORMAT = Compact;

-- ----------------------------

-- Records of oauth_client_details

-- ----------------------------

INSERT INTO `oauth_client_details` VALUES ('wuzzClientId', NULL, '$2a$10$L2juyPBc606/9xkmFWu5S.5PBjfz6IXxtUnl8Bk9B2s9Bbn1TPO.2', 'all', 'password', 'http://www.baidu.com', NULL, NULL, NULL, NULL, NULL);
5.重启服务,按照原来的方式通过用户名密码进行授权,也是可以实现的。
最新文章
- 怎样写一个webpack loader
- angular开发单页面应用--页面资源部分
- 学习笔记:HTML5 Canvas绘制简单图形
- jQuery Length属性
- max-width实现图片的自适应
- 一、Maya API简介
- friend class
- jstack使用-倒出线程堆栈
- ARM-Linux驱动-触摸屏驱动分析
- c#中的整形类型
- Linux 常 用 命 令
- 爬虫之requests请求库高级应用
- 面向对象【林老师版】:特性(property)(十六)
- JavaEE 之 文件上传
- websocket是如何进行建立连接与通信的?(简单理解)
- Cannot change version of project facet Dynamic Web Module to 2.4问题解决
- git 命令篇
- 将文本文件中的\n字符串变成换行符
- Synchronize Ultimate
- UVa 1471 Defense Lines - 线段树 - 离散化