在Spring+MyBatis组合中使用事务
2024-08-26 21:18:48
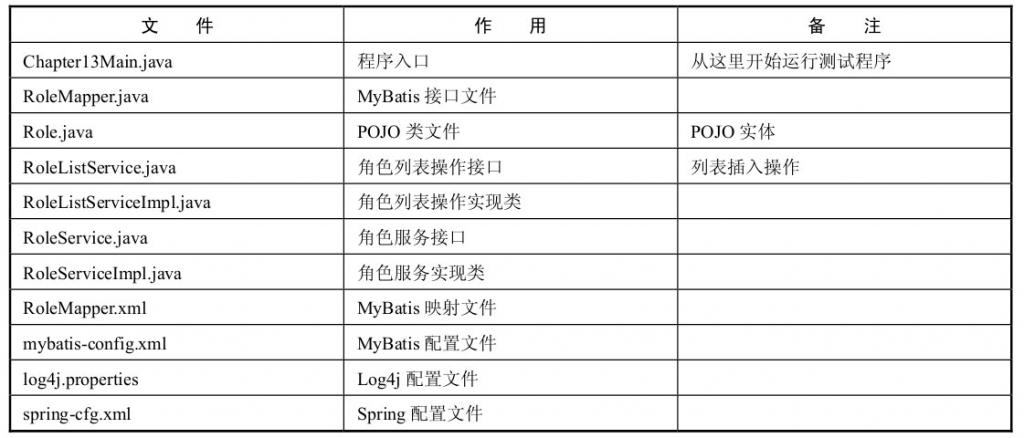
通过Spring和MyBatis的组合,给出一个较为详细的实例

代码清单:配置Spring+MyBatis测试环境
<?xml version='1.0' encoding='UTF-8' ?>
<beans xmlns="http://www.springframework.org/schema/beans" xmlns:xsi="http://www.w3.org/2001/XMLSchema-instance"
xmlns:p="http://www.springframework.org/schema/p" xmlns:aop="http://www.springframework.org/schema/aop"
xmlns:tx="http://www.springframework.org/schema/tx" xmlns:context="http://www.springframework.org/schema/context"
xsi:schemaLocation="http://www.springframework.org/schema/beans http://www.springframework.org/schema/beans/spring-beans-4.0.xsd
http://www.springframework.org/schema/aop http://www.springframework.org/schema/aop/spring-aop-4.0.xsd
http://www.springframework.org/schema/tx http://www.springframework.org/schema/tx/spring-tx-4.0.xsd
http://www.springframework.org/schema/context http://www.springframework.org/schema/context/spring-context-4.0.xsd"> <!--启用扫描机制,并指定扫描对应的包-->
<context:annotation-config/>
<context:component-scan base-package="com.ssm.chapter13.*"/> <!-- 数据库连接池 -->
<bean id="dataSource" class="org.apache.commons.dbcp.BasicDataSource">
<property name="driverClassName" value="com.mysql.cj.jdbc.Driver"/>
<property name="url" value="jdbc:mysql://localhost:3306/springmvc?useSSL=false&serverTimezone=Hongkong&characterEncoding=utf-8&autoReconnect=true"/>
<property name="username" value="root"/>
<property name="password" value="123456"/>
<property name="maxActive" value="255"/>
<property name="maxIdle" value="5"/>
<property name="maxWait" value="10000"/>
</bean> <!-- 集成MyBatis -->
<bean id="SqlSessionFactory" class="org.mybatis.spring.SqlSessionFactoryBean">
<property name="dataSource" ref="dataSource"/>
<!--指定MyBatis配置文件-->
<property name="configLocation" value="classpath:ssm/chapter13/mybatis-config.xml"/>
</bean> <!-- 事务管理器配置数据源事务 -->
<bean id="transactionManager" class="org.springframework.jdbc.datasource.DataSourceTransactionManager">
<property name="dataSource" ref="dataSource"/>
</bean> <!-- 使用注解定义事务 -->
<tx:annotation-driven transaction-manager="transactionManager"/> <!-- 采用自动扫描方式创建mapper bean -->
<bean class="org.mybatis.spring.mapper.MapperScannerConfigurer">
<property name="basePackage" value="com.ssm.chapter13"/>
<property name="SqlSessionFactory" ref="SqlSessionFactory"/>
<property name="annotationClass" value="org.springframework.stereotype.Repository"/>
</bean> </beans>
代码清单:POJO类——Role.java
package com.ssm.chapter13.pojo;

public class Role {

    private Long id;

    private String roleName;

    private String note;

}
代码清单:搭建MyBatis的RoleMapper.xml
<?xml version="1.0" encoding="UTF-8" ?>

<!DOCTYPE mapper   PUBLIC "-//mybatis.org//DTD Mapper 3.0//EN"   "http://mybatis.org/dtd/mybatis-3-mapper.dtd">

<mapper namespace="com.ssm.chapter13.mapper.RoleMapper">

    <insert id="insertRole" parameterType="com.ssm.chapter13.pojo.Role">

        insert into t_role (role_name, note)

        values (#{roleName}, #{note})

    </insert>

</mapper>
代码清单:RoleMapper接口
package com.ssm.chapter13.mapper;

import com.ssm.chapter13.pojo.Role;

import org.springframework.stereotype.Repository;

@Repository

public interface RoleMapper {

    public int insertRole(Role role);

}
代码清单:mybatis-config.xml
<?xml version="1.0" encoding="UTF-8"?>

<!DOCTYPE configuration PUBLIC "-//mybatis.org//DTD Config 3.0//EN" "http://mybatis.org/dtd/mybatis-3-config.dtd">

<configuration>

    <!-- 指定映射器路径 -->

    <mappers>

        <mapper resource="ssm/chapter13/mapper/RoleMapper.xml"/>

    </mappers>

</configuration>
代码清单:操作角色的两个接口
public interface RoleService {

    public int insertRole(Role role);

}

public interface RoleListService {

    public int insertRoleList(List<Role> roleList);

}
代码清单:两个接口的实现类
@Service

public class RoleServiceImpl implements RoleService {

    @Autowired

    private RoleMapper roleMapper;

    @Override

    @Transactional(propagation = Propagation.REQUIRES_NEW, isolation = Isolation.READ_COMMITTED)

    public int insertRole(Role role) {

        return roleMapper.insertRole(role);

    }

}

@Service

public class RoleListServiceImpl implements RoleListService {

    Logger log = Logger.getLogger(RoleListServiceImpl.class);

    @Autowired

    private RoleService roleService;

    @Override

    @Transactional(propagation = Propagation.REQUIRED, isolation = Isolation.READ_COMMITTED)

    public int insertRoleList(List<Role> roleList) {

        int count = 0;

        for (Role role : roleList) {

            try {

                count += roleService.insertRole(role);

            } catch (Exception ex) {

                log.info(ex);

            }

        }

        return count;

    }

}
代码清单:测试隔离级别和传播行为——Chapter13Main.java
public class Chapter13Main {

    public static void main(String[] args) {

        ApplicationContext ctx = new ClassPathXmlApplicationContext("ssm/chapter13/spring-cfg.xml");

        RoleListService roleListService = ctx.getBean(RoleListService.class);

        List<Role> roleList = new ArrayList<Role>();

        for (int i = 1; i <= 2; i++) {

            Role role = new Role();

            role.setRoleName("role_name_" + i);

            role.setNote("note_" + i);

            roleList.add(role);

        }

        int count = roleListService.insertRoleList(roleList);

        System.out.println(count);

    }

}
由于保存点技术并不是每一个数据库都能支持的,所以当你把传播行为设置为NESTED时,Spring会先去探测当前数据库是否能够支持保存点技术。如果数据库不予支持,它就会和REQUIRES_NEW一样创建新事务去运行代码,以达到内部方法发生异常时并不回滚当前事务的目的。
文章来源:ssm13.6
最新文章
- 深入浅出ES6(八):Symbols
- C++之vector中元素删除
- POJ 2349 Arctic Network (最小生成树)
- Windows 7 无线网络故障
- datagrid的基本操作-增删改
- Masonry + Ajax 实现无限刷新瀑布流
- UVa 11082 Matrix Decompressing(最大流)
- VS2013配置opencv3.0.0 (win8.1)
- JavaScript 使用Document记录cookie
- Python伊始——From Boring to Amazing
- day 7-18 mysql case when语句
- VS编译LESS插件
- CSS之display
- springboot springcloud 父项目pom工程创建pom文件
- ML(4)——逻辑回归
- 恢复word中审阅选项卡
- Arrow function restore
- sparkthriftserver启动及调优
- Python之L.pop()和del L[i]
- 无线wifi