zabbix自动停用与开启agent
2024-08-24 23:03:44
我们在升级环境时遇到了一个问题,那就是zabbix会自动发送邮件给领导,此时领导心里会嘎嘣一下,为了给领导营造一个良好的环境,减少不必要的告警邮件,减少嘎嘣次数,于是在升级之前,取消zabbix监控的agent,当升级完之后再恢复过去。
一、简介
zabbix提供了API接口,可满足基本使用需求,具体参考:zabbix API
有了API接口,我们就可以做到:
自动执行常规任务
将zabbix与第三方软件集成
创建新的应用程序以使用zabbix
zabbix API 是基于web API的,使用的是JSON-RPC2.0协议,客户端与API之间的请求使用的是JSON格式进行编码。
使用远程http请求调用api,需要向 api_jsonrpc.php 位于前端目录中的文件发送HTTP POST请求,url是http://zabbixserverIP/zabbix/api_jsonrpc.php。
请求的头部信息 必须是以下值之一:
application/json-rpc, application/json 或 application/jsonrequest
json中主要的对象有:
jsonrpc - API使用的JSON-RPC协议的版本; Zabbix API实现的JSON-RPC版本是2.0;

method - 被调用的API方法名;

params - 将被传递给API方法的参数;

id - 请求的任意标识符;

auth -用户认证令牌; 因为我们还没有一个,它的设置null。
二、思路整理
登陆zabbix,获取token
利用token获取agent的id
利用已获取的id和token调整agent的连接状态
三、具体实现
#!/usr/bin/python
import sys
import json
import requests if( len(sys.argv) < 2 ): #需强调传入3个以上的参数
print("[Usage] $1 is 0/1(0:open 1:off) ; $2 $3.... is agent name. ")
sys.exit(1) class Error(Exception): #定义自定义错误
def __init__(self,*args):
self.args = args def login(user,passwd,url,header): #登陆函数获取token
# return token
data = {
"jsonrpc": "2.0" ,
"method": "user.login" ,
"params": {
"user": user ,
"password": passwd
} ,
"id": 1 ,
}
r = requests.post ( url=url , headers=header , data=json.dumps ( data ) )
if ( r.status_code == 200 ):
return r.json ()['result']
else:
raise Error("return status code is not eq 200. login failed!") def gethostid(hostname,token,url,header): #获取id
#get dict { hostid , status}
data = {
"jsonrpc": "2.0" ,
"method": "host.get" ,
"params": {
"output": ['status'] ,
"filter": {
"host": [
hostname
]
}
} ,
"auth": token ,
"id": 1
}
r = requests.post ( url=url , headers=header , data=json.dumps ( data ) )
if( r.status_code == 200 ):
if( r.json()['result'] != [] ): #判断获取到的信息不为“[]”证明是有数据的
return r.json ()['result'][0]
else:
print(" %s hostname is wrong!!" % hostname)
exit(1)
else:
raise Error("return status code is not eq 200. gethostid failed!") def changestatus(hostid,token,url,header,onoroff): #修改agent的连接状态
# 0:open ; 1:off
data = {
"jsonrpc": "2.0" ,
"method": "host.update" ,
"params": {
"hostid": hostid ,
"status": onoroff
} ,
"auth": token ,
"id": 1
}
r = requests.post ( url=url , headers=header , data=json.dumps ( data ) )
r.close()
if ( r.status_code == 200 ):
return r.json ()['result']["hostids"]
else:
raise Error("return status code is not eq 200. changestatus failed!") if __name__ == '__main__':
allhostname = [ i for i in sys.argv[2:]]
onoroff = int(sys.argv[1])
#allhostname = ["agent1","agent2"]
#onoroff = 0
msg = {0:"on",1:"off"} #设定开关,0为开启,1为关闭
url = 'http://zabbixserverip/zabbix/api_jsonrpc.php' #后缀必须是 zabbix/api_jsonrpc.php
user = 'bill'
passwd = '123456'
header = {"Content-Type": "application/json"} try:
for hostname in allhostname:
token = login ( user , passwd , url , header )
dict = gethostid(hostname,token,url,header)
print(dict)
hostid = dict["hostid"]
status = dict["status"]
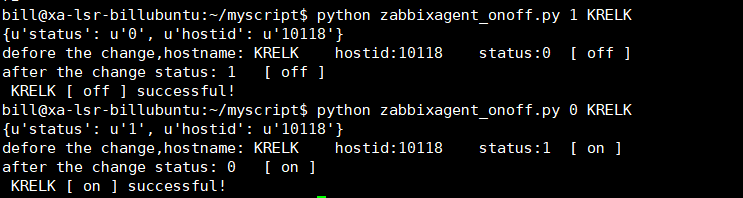
print("defore the change,hostname: %s hostid:%s status:%s [ %s ] " % (hostname,hostid,status,msg[onoroff]))
if( onoroff != int(status)):
res=changestatus(hostid,token,url,header,onoroff)
dict2 = gethostid ( hostname , token , url , header )
hostid2 = dict2["hostid"]
status2 = dict2["status"]
print("after the change status: %s [ %s ]" % (status2,msg[onoroff]) )
if (status != status2 ):
print(" %s [ %s ] successful!" % (hostname,msg[onoroff]))
else:
print(" %s [ %s ] failed!" % (hostname , msg[onoroff]) )
else:
print("current %s is %s ,No change." % (hostname,msg[onoroff])) except Exception as e:
print(e)
将文件移动到ubuntu上,文件名是zabbixagent_onoff.py,可以跟多个主机名,主机名host name,不是visible name

再将其加入jenkins等持续集成工具中,就可实现开关agent了
最新文章
- 答辩HTML5
- json_decode返回NULL
- 控制ASP.NET Web API 调用频率
- Linux文件和目录权限详细讲解
- jquery.UI.tabs
- jenkins + Git 搭建持续集成环境
- Jasmine测试ng Promises - Provide and Spy
- 16 IO操作文件读写
- Libgdx 开发指南(1) 应用框架
- 使用sqlldr将文件中的数据导入到数据库
- pc telnet 登录 android 系统
- 简单的实现QQ通信功能(二)
- php 写model层
- Notification (通知)的 新版和旧版用法
- a:hover和a:visited书写顺序的重要性
- WPF笔记(1.10 绘图)——Hello,WPF!
- 人脸对齐ASM-AAM-CLM的一些总结
- Android 混淆proguard的实现(图文)
- [ An Ac a Day ^_^ ] CodeForces 426C Sereja and Swaps 优先队列
- pyautogui