ByteBuf使用实例
之前我们有个netty5的拆包解决方案(参加netty5拆包问题解决实例),现在我们采用另一种思路,不需要新增LengthFieldBasedFrameDecoder,直接修改NettyMessageDecoder:
package com.wlf.netty.nettyapi.msgpack;

import com.wlf.netty.nettyapi.constant.Delimiter;

import com.wlf.netty.nettyapi.javabean.Header;

import com.wlf.netty.nettyapi.javabean.NettyMessage;

import io.netty.buffer.ByteBuf;

import io.netty.channel.ChannelHandlerContext;

import io.netty.handler.codec.ByteToMessageDecoder;

import java.util.List;

public class NettyMessageDecoder extends ByteToMessageDecoder {

    /**

     * 消息体字节大小:分割符字段4字节+长度字段4字节+请求类型字典1字节+预留字段1字节=10字节

     */

    private static final int HEAD_LENGTH = 10;

    @Override

    protected void decode(ChannelHandlerContext channelHandlerContext, ByteBuf byteBuf, List<Object> list) throws Exception {

        while (true) {

            // 标记字节流开始位置

            byteBuf.markReaderIndex();

            // 若读取到分割标识,说明读取当前字节流开始位置了

            if (byteBuf.readInt() == Delimiter.DELIMITER) {

                break;

            }

            // 重置读索引为0

            byteBuf.resetReaderIndex();

            // 长度校验,字节流长度至少10字节,小于10字节则等待下一次字节流过来

            if (byteBuf.readableBytes() < HEAD_LENGTH) {

                byteBuf.resetReaderIndex();

                return;

            }

        }

        // 2、获取data的字节流长度

        int dataLength = byteBuf.readInt();

        // 校验数据包是否全部发送过来,总字节流长度(此处读取的是除去delimiter和length之后的总长度)-

        // type和reserved两个字节=data的字节流长度

        int totalLength = byteBuf.readableBytes();

        if ((totalLength - 2) < dataLength) {

            // 长度校验,字节流长度少于数据包长度,说明数据包拆包了,等待下一次字节流过来

            byteBuf.resetReaderIndex();

            return;

        }

        // 3、请求类型

        byte type = byteBuf.readByte();

        // 4、预留字段

        byte reserved = byteBuf.readByte();

        // 5、数据包内容

        byte[] data = null;

        if (dataLength > 0) {

            data = new byte[dataLength];

            byteBuf.readBytes(data);

        }

        NettyMessage nettyMessage = new NettyMessage();

        Header header = new Header();

        header.setDelimiter(Delimiter.DELIMITER);

        header.setLength(dataLength);

        header.setType(type);

        header.setReserved(reserved);

        nettyMessage.setHeader(header);

        nettyMessage.setData(data);

        list.add(nettyMessage);

        // 回收已读字节

        byteBuf.discardReadBytes();

    }

}
我们的改动很小,只不过将原来的读索引改为标记索引,然后在拆包时退出方法前重置读索引,这样下次数据包过来,我们的读索引依然从0开始,delimiter的标记就可以读出来,而不会陷入死循环了。
ByteBuf是ByteBuffer的进化版,ByteBuffer(参见ByteBuffer使用实例)才一个索引,读写模式需要通过flip来转换,而ByteBuf有两个索引,readerIndex读索引和writerIndex写索引,读写转换无缝连接,青出于蓝而胜于蓝:
+-------------------+------------------+------------------+
| discardable bytes | readable bytes | writable bytes |
| | (CONTENT) | |
+-------------------+------------------+------------------+
| | | |
0 <= readerIndex <= writerIndex <= capacity
既然有两个索引,那么标记mask、重置reset必然也是两两对应,上面的代码中我们只需要用到读标记和读重置。
我们把客户端handler也修改下,先把LengthFieldBasedFrameDecoder去掉:
// channel.pipeline().addLast(new LengthFieldBasedFrameDecoder(1024 * 1024 * 1024, 4, 4, 2, 0));
再让数据包更大一些:
    /**

     * 构造PCM请求消息体

     *

     * @return

     */

    private byte[] buildPcmData() throws Exception {

        byte[] resultByte = longToBytes(System.currentTimeMillis());

        // 读取一个本地文件

        String AUDIO_PATH = "D:\\input\\test_1.pcm";

        try (RandomAccessFile raf = new RandomAccessFile(AUDIO_PATH, "r")) {

            int len = -1;

            byte[] content = new byte[1024];

            while((len = raf.read(content)) != -1)

            {

               resultByte = addAll(resultByte, content);

            }

        }

        return resultByte;

    }
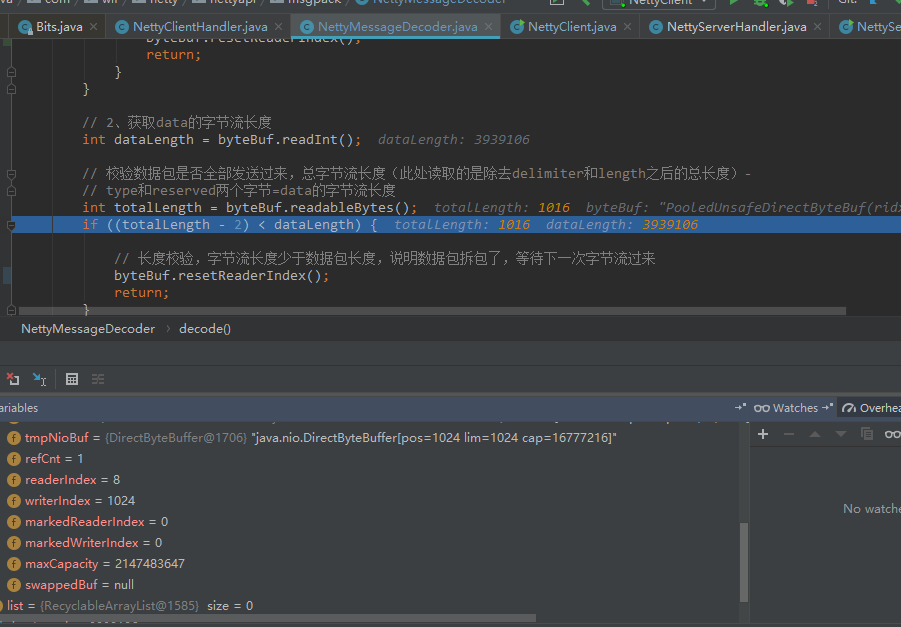
再debug下看看,第一次解析客户端发送的数据,读取1024字节,我们可以看到读索引是8(delimiter+length=8),写索引就是1024,我们的大包里有3939116个字节,去掉10个字节的header,剩下小包是3939106::
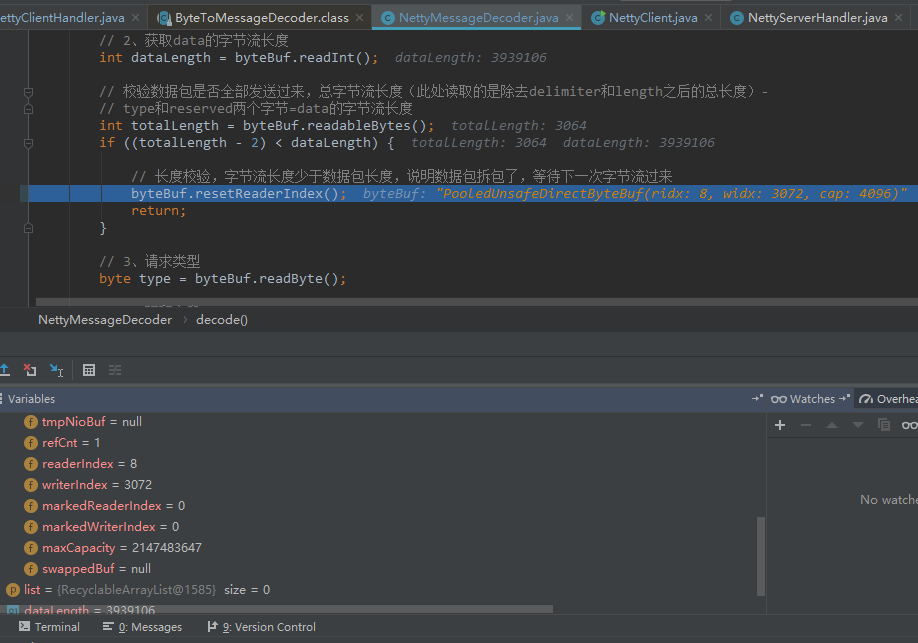
第二次再读1024,代码已经执行reset重置读索引了,所以读索引由8改为0,写索引累增到2048:

第三次再读1024,写索引继续累增到3072:
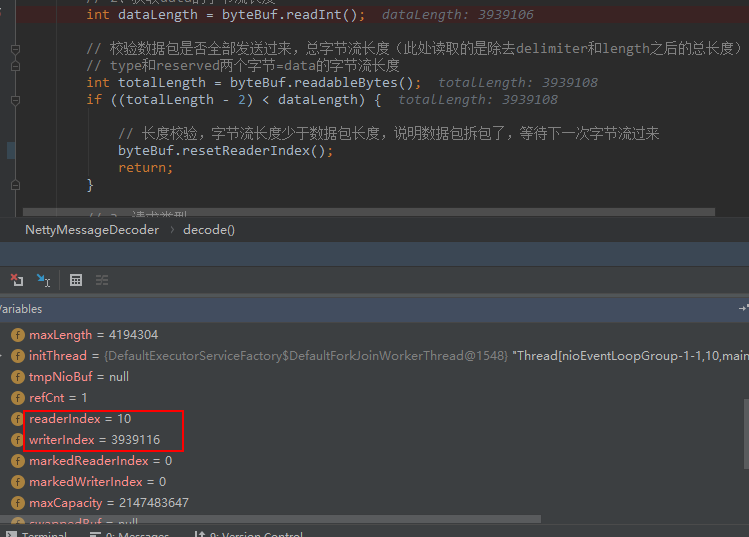
最后一次发1024,写索引已经到达3939116,大包传输结束了:
从上面看出,我们对ByteBuf的capacity一直在翻倍,读指针一直标记在大包的起始位置0,这样做的目的是每次都能读取小包的长度length(3939106),拿来跟整个ByteBuf的长度作比较,只要它取到的小包没到达到length,我们就继续接受新包,写索引不停的累加,直到整个大包长度>=3939116(也就是小包>=3939106),这时我们开始移动读索引,将字节流写入对象,最后回收已读取的字节(调用discardReaderBytes方法):
BEFORE discardReadBytes()
+-------------------+------------------+------------------+
| discardable bytes | readable bytes | writable bytes |
+-------------------+------------------+------------------+
| | | |
0 <= readerIndex <= writerIndex <= capacity
AFTER discardReadBytes()
+------------------+--------------------------------------+
| readable bytes | writable bytes (got more space) |
+------------------+--------------------------------------+
| | |
readerIndex (0) <= writerIndex (decreased) <= capacity
其他方法参见测试类:
package com.wlf.netty.nettyserver;

import io.netty.buffer.ByteBuf;

import io.netty.buffer.Unpooled;

import org.junit.Assert;

import org.junit.Test;

public class ByteBufTest {

    @Test

    public void byteBufTest() {

        ByteBuf byteBuf = Unpooled.buffer(10);

        byteBuf.writeInt(0xabef0101);

        byteBuf.writeInt(1024);

        byteBuf.writeByte((byte) 1);

        byteBuf.writeByte((byte) 0);

        // 开始读取

        printDelimiter(byteBuf);

        printLength(byteBuf);

        // 派生一个ByteBuf,取剩下2个字节,但读索引不动

        ByteBuf duplicatBuf = byteBuf.duplicate();

        printByteBuf(byteBuf);

        // 派生一个ByteBuf,取剩下2个字节,读索引动了

        ByteBuf sliceBuf = byteBuf.readSlice(2);

        printByteBuf(byteBuf);

        // 两个派生的对象其实是一样的

        Assert.assertEquals(duplicatBuf, sliceBuf);

    }

    private void printDelimiter(ByteBuf buf) {

        int newDelimiter = buf.readInt();

        System.out.printf("delimeter: %s\n", Integer.toHexString(newDelimiter));

        printByteBuf(buf);

    }

    private void printLength(ByteBuf buf) {

        int length = buf.readInt();

        System.out.printf("length: %d\n", length);

        printByteBuf(buf);

    }

    private void printByteBuf(ByteBuf buf) {

        System.out.printf("reader Index: %d, writer Index: %d, capacity: %d\n", buf.readerIndex(), buf.writerIndex(), buf.capacity());

    }

}
输出:
delimeter: abef0101

reader Index: 4, writer Index: 10, capacity: 10

length: 1024

reader Index: 8, writer Index: 10, capacity: 10

reader Index: 8, writer Index: 10, capacity: 10

reader Index: 10, writer Index: 10, capacity: 10
最新文章
- android copy项目后修改项目名
- MongoDB_C_Driver使用教程(2)高级连接
- 【所见即所得】textarea 精确限制字数、行数,中、英、全半角混检 。源码带注释
- alarm
- Python第十二章正则表达式(2)
- php变量判断为空的几种方法
- sqlserver 2008 服务器拒绝连接;拒绝访问指定的数据库
- [转]Ubuntu Tweak 0.8.7 发布:支持 Ubuntu 14.04
- .NET Core R2
- webAppbuilder微件使用教程3 地理处理微件
- 算法-java代码实现计数排序
- Windows elasticsearch1.5.1安装
- python基础--absl.flags
- Wannafly挑战赛1 C MMSet2 虚树
- c++_day5_成员指针
- C# 反射获取属性值、名称、类型以及集合的属性值、类型名称
- Linux内核剖析(二)Linux内核绪论
- 【iCore1S 双核心板_ARM】例程二十:UART_IAP_ARM实验——更新升级STM32
- [从零开始搭网站八]CentOS使用yum安装Redis的方法
- 常用css字体英文写法