SpringBoot起飞系列-国际化(六)
一、前言
国际化这个功能可能我们不常用,但是在有需要的地方还是必须要上的,今天我们就来看一下怎么在我们的web开发中配置国际化,让我们的网站可以根据语言来展示不同的形式。本文接续上一篇SpringBoot起飞系列-Web开发(五)来在此基础上进行国际化配置。
二、国际化配置
2.1 springboot中的自动配置
springboot已经自动配置好了管理国际化资源文件的组件:
@ConfigurationProperties(prefix = "spring.messages")

public class MessageSourceAutoConfiguration {

    /**

     * Comma-separated list of basenames (essentially a fully-qualified classpath

     * location), each following the ResourceBundle convention with relaxed support for

     * slash based locations. If it doesn't contain a package qualifier (such as

     * "org.mypackage"), it will be resolved from the classpath root.

     */

    private String basename = "messages";

    //我们的配置文件可以直接放在类路径下叫messages.properties;

    @Bean

    public MessageSource messageSource() {

        ResourceBundleMessageSource messageSource = new ResourceBundleMessageSource();

        if (StringUtils.hasText(this.basename)) {

            //设置国际化资源文件的基础名(去掉语言国家代码的)

            messageSource.setBasenames(StringUtils.commaDelimitedListToStringArray(

                    StringUtils.trimAllWhitespace(this.basename)));

        }

        if (this.encoding != null) {

            messageSource.setDefaultEncoding(this.encoding.name());

        }

        messageSource.setFallbackToSystemLocale(this.fallbackToSystemLocale);

        messageSource.setCacheSeconds(this.cacheSeconds);

        messageSource.setAlwaysUseMessageFormat(this.alwaysUseMessageFormat);

        return messageSource;

    }
从上边的源码我们可以看出,我们的国际化资源文件可以直接起名字为messages.properties,springboot就会自动识别,其实相当于在配置文件中添加了一个spring.messages.basename=messages,如果我们指定一个xxx.properties作为国际化文件,那么我们就指定
spring.messages.basename=xxx就可以了,springboot会自动的找到以xxx开头的properties,根据语言和国家代码,找到相应的xxx_zh_CN.properties(中文_中国)、xxx_en_US.properties(英文_美国)来选择其中的资源值作为当前页面中所要渲染的值。
2.2 添加资源文件
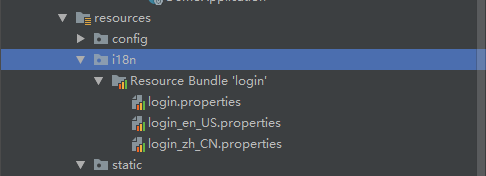
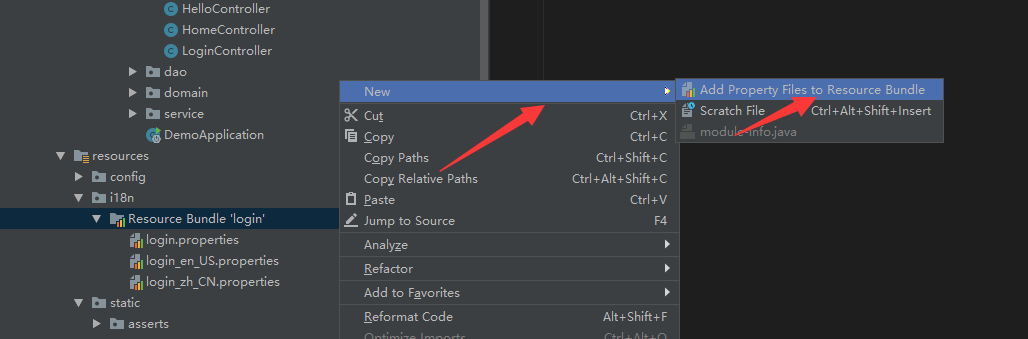
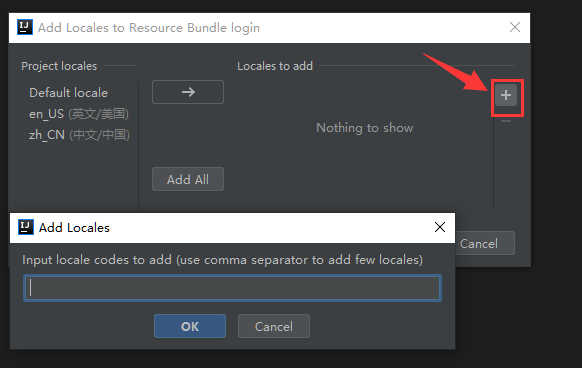
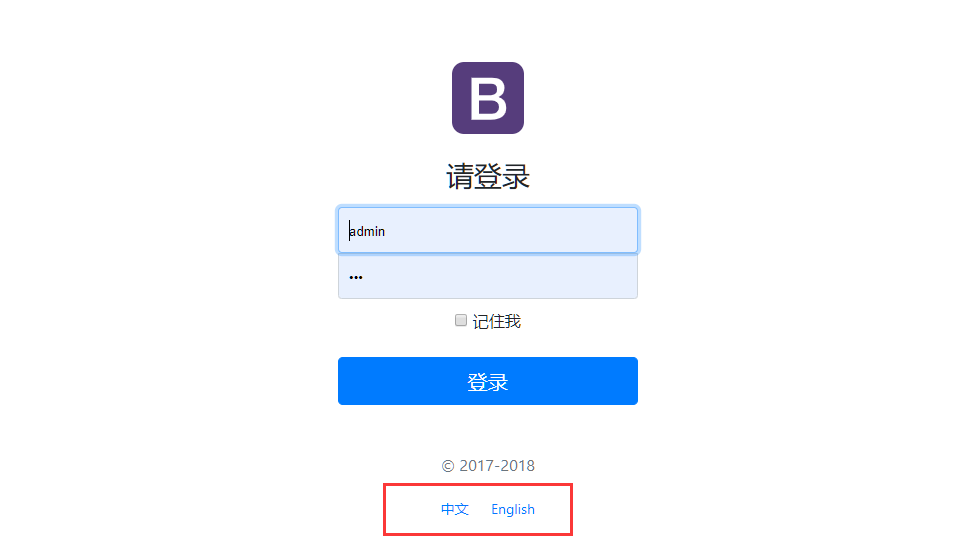
我们新建一个名称为i18n的文件夹,在里边添加3个配置文件,分别是login.properties(默认无语言选择时的配置),login_zh_CN.properties(中文语言配置),login_en_US.properties(英文语言配置),默认的格式为:文件名_区域_语言.properties;当我们这样命名生成文件后,IDEA也会帮我们识别这是个国际化配置包,自动转换成如下的模式,上边附带一个Resource Bundle 'login'的文件夹,右键在这个文件夹上点击,就可以方便的添加其他语言的配置:
分别在三个配置文件中写入配置:
login.properties:
login.btn=登陆~

login.password=密码~

login.remember=记住我~

login.tip=请登陆~

login.username=用户名~
login_zh_CN.properties:
login.tip=请登录

login.username=用户名

login.password=密码

login.btn=登录

login.remember= 记住我
login_en_US.properties:
login.tip=Please sign in

login.username=Username

login.password=Password

login.btn=Sign in

login.remember = Remember Me
然后我们的主配置文件application.properties中添加如下配置,启用我们自定义的资源文件:
spring.messages.basename=i18n.login
2.3 添加登录页面
这里我们以之前的thymeleaf语法来添加一个登录页面来进行测试:
<!DOCTYPE html>

<html lang="en"  xmlns:th="http://www.thymeleaf.org">

    <head>

        <meta http-equiv="Content-Type" content="text/html; charset=UTF-8">

        <meta name="viewport" content="width=device-width, initial-scale=1, shrink-to-fit=no">

        <meta name="description" content="">

        <meta name="author" content="">

        <title>Signin Template for Bootstrap</title>

        <!-- Bootstrap core CSS -->

        <link  th:href="@{/webjars/bootstrap/4.0.0/css/bootstrap.css}" rel="stylesheet">

        <!-- Custom styles for this template -->

        <link  th:href="@{/asserts/css/signin.css}" rel="stylesheet">

    </head>

    <body class="text-center">

        <form class="form-signin" action="dashboard.html" th:action="@{/user/login}" method="post">

            <img class="mb-4" th:src="@{/asserts/img/bootstrap-solid.svg}" src="asserts/img/bootstrap-solid.svg" alt="" width="72" height="72">

            <h1 class="h3 mb-3 font-weight-normal" th:text="#{login.tip}">Please sign in</h1>

            <!--判断-->

            <p style="color: red" th:text="${msg}" th:if="${not #strings.isEmpty(msg)}"></p>

            <label class="sr-only" th:text="#{login.username}">Username</label>

            <input type="text"  name="username" class="form-control" placeholder="Username" th:placeholder="#{login.username}" required="" autofocus="">

            <label class="sr-only" th:text="#{login.password}">Password</label>

            <input type="password" name="password" class="form-control" placeholder="Password" th:placeholder="#{login.password}" required="">

            <div class="checkbox mb-3">

                <label>

                      <input type="checkbox" value="remember-me"/> [[#{login.remember}]]

                </label>

            </div>

            <button class="btn btn-lg btn-primary btn-block" type="submit" th:text="#{login.btn}">Sign in</button>

            <p class="mt-5 mb-3 text-muted">© 2017-2018</p>

            <a class="btn btn-sm" th:href="@{/index.html(lang='zh_CN')}">中文</a>

            <a class="btn btn-sm" th:href="@{/index.html(lang='en_US')}">English</a>

        </form>

    </body>

</html>
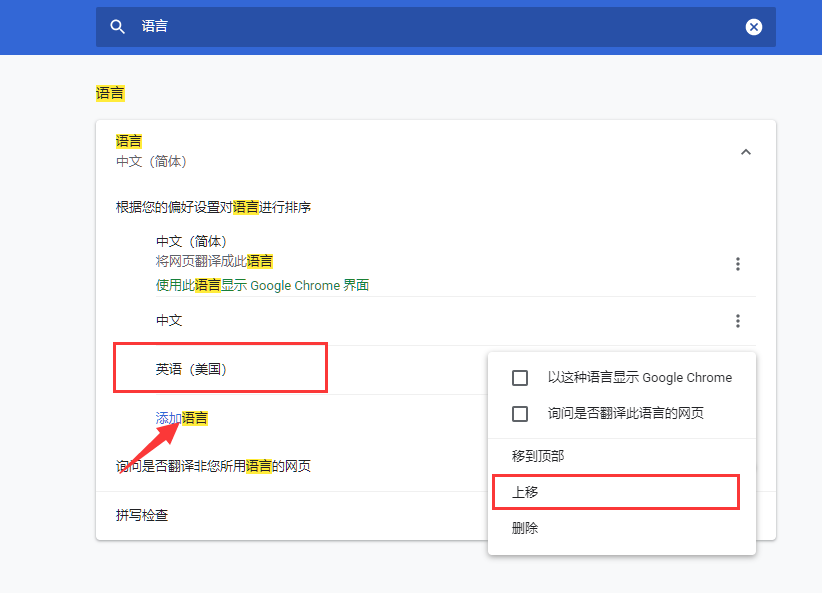
#{login.username} 会直接从国际化的资源文件中取到我们所配置的值,根据不同的语言会切换为不同的语言配置,默认是根据浏览器的语言来判断的,我们可以按照以下方式来设置浏览器的语言来查看效果,在谷歌浏览器的设置里边搜索语言,然后添加一个英文语言,设置语言的顺序来设置首选语言,如下所示:
我们也可以查看浏览器发送的请求头部分来确定语言是否 设置成功:

2.4 自定义语言文化解析器
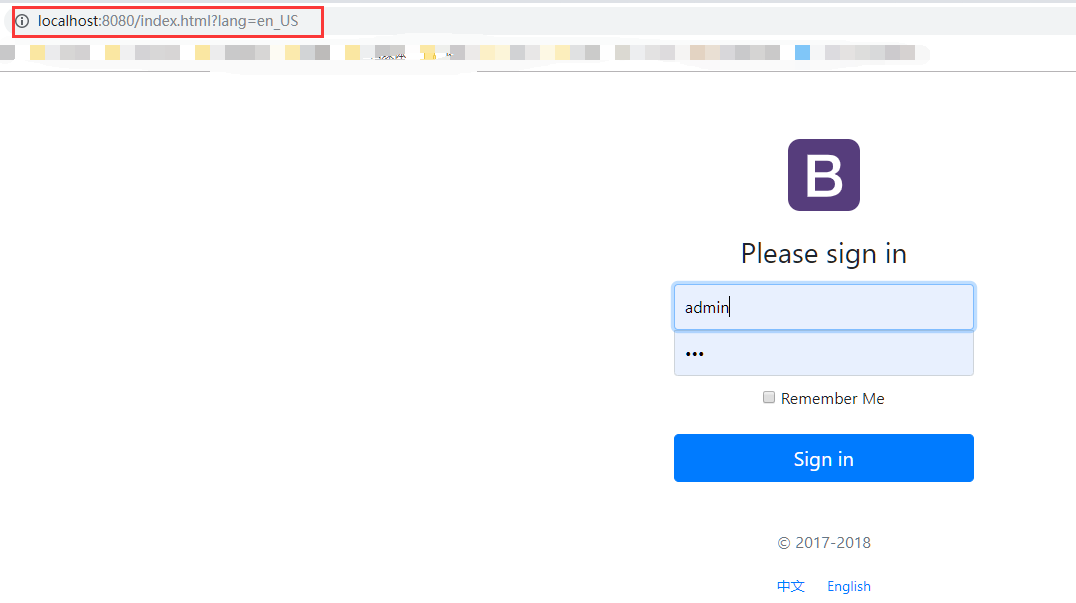
从上边我们可以看出,默认的是从请求头中解析语言文化的,我们可以设置自己的解析器,比如访问页面的查询参数中来解析语言,下边是我们的登录页面,我们可以添加两个按钮,当点击按钮的时候,重新跳转index.html页面,并附带上一个lang的参数:
可以查看网页源代码,我们生成的链接:

html关键代码,用thymeleaf生成,也可以自己手写:
<button class="btn btn-lg btn-primary btn-block" type="submit" th:text="#{login.btn}">Sign in</button>

<p class="mt-5 mb-3 text-muted">© 2017-2018</p>

<a class="btn btn-sm" th:href="@{/index.html(lang='zh_CN')}">中文</a>

<a class="btn btn-sm" th:href="@{/index.html(lang='en_US')}">English</a>
添加我们自己的解析器MyLocaleResolver,从请求参数中获取lang,根据lang的值来设置不同的Locale:
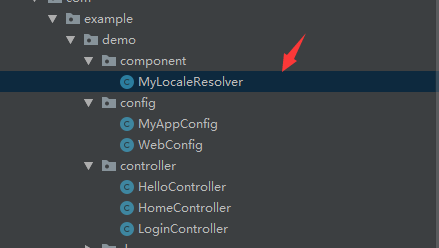
package com.example.demo.component;

import org.springframework.util.StringUtils;

import org.springframework.web.servlet.LocaleResolver;

import javax.servlet.http.HttpServletRequest;

import javax.servlet.http.HttpServletResponse;

import java.util.Locale;

public class MyLocaleResolver implements LocaleResolver {

    @Override

    public Locale resolveLocale(HttpServletRequest httpServletRequest) {

        String lang = httpServletRequest.getParameter("lang");

        Locale locale = Locale.getDefault();

        if(!StringUtils.isEmpty(lang)){

            String[] parts = lang.split("_");

            locale = new Locale(parts[0],parts[1]);

        }

        return locale;

    }

    @Override

    public void setLocale(HttpServletRequest httpServletRequest, HttpServletResponse httpServletResponse, Locale locale) {

    }

}
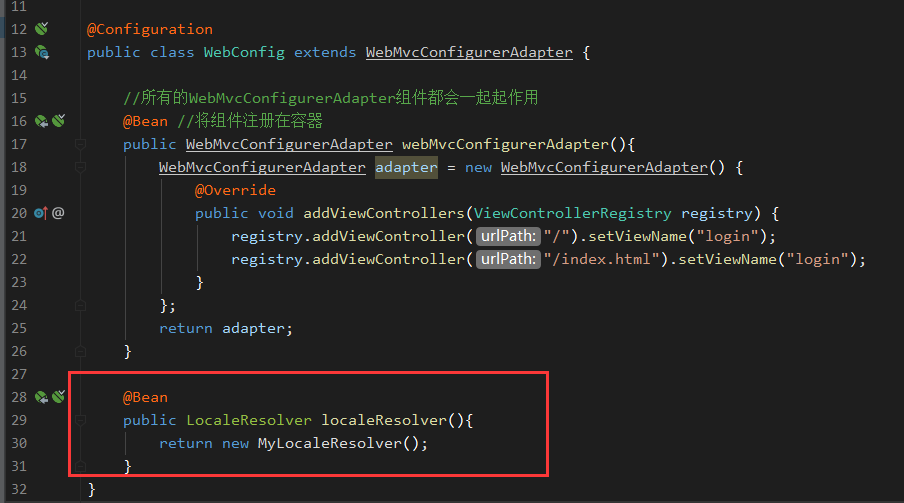
在WebConfig添加如下代码,把这个MyLocaleResolver添加到容器中去,springboot发现到有LocaleResolver的新实例,就会用这个解析器:
重新编译启动就可以了,点击不同语言跳转不同链接,显示不同的语言:
三、总结
springboot中的国际化配置还是比较简单的,虽然我们日常中用到很少,但是还是有必要了解一下的。
最新文章
- Transient的作用
- AppleWatch___学习笔记(二)UI布局和UI控件
- java 抽象类和接口总结
- 基于EF创建数据库迁移
- bzoj 1068: [SCOI2007]压缩 DP
- [教程] 神器i9100刷基带与内核的方法!(兼带ROOT方法)
- 2017-1-15-libubox analysis
- 开源解析库 - JSON
- Ionic3学习笔记(三)禁止横屏
- pytorch识别CIFAR10:训练ResNet-34(准确率80%)
- Vue技术内幕 出去看看吧
- Sleep和wait
- 弹窗查看内容时 内容滚动区域设置为body区
- canvas放射粒子效果
- 学习模型-视图-控制器MVC模式
- metasploit framework(十五):弱点扫描
- 关于Flag的定义
- as3 有趣现象 关于声明与变量
- 一些laravel博文
- Mac 搭建达尔文流媒体服务器