spring mvc中添加对Thymeleaf的支持
一、下载Thymeleaf
官方下载地址:https://dl.bintray.com/thymeleaf/downloads/thymeleaf/
我下载的是最新的3.0.11版本
把包里的jar包丢到项目中去:
dist/thymeleaf-3.0.11.RELEASE.jar

dist/thymeleaf-spring5-3.0.11.RELEASE.jar

lib/attoparser-2.0.5.RELEASE.jar

lib/slf4j-api-1.7.25.jar

lib/unbescape-1.1.6.RELEASE.jar
如果是基于maven的项目,在pom.xml中添加如下内容:
基于spring5的配置:
<dependency>

    <groupId>org.thymeleaf</groupId>

    <artifactId>thymeleaf-spring5</artifactId>

    <version>3.0.11.RELEASE</version>

</dependency>
基于spring4的配置:
<dependency>

    <groupId>org.thymeleaf</groupId>

    <artifactId>thymeleaf-spring4</artifactId>

    <version>3.0.11.RELEASE</version>

</dependency>
二、项目中添加对Thymeleaf的支持
修改springmvc的配置文件springMVC-servlet.xml,添加如下内容:
<bean id="templateResolver"

      class="org.thymeleaf.spring5.templateresolver.SpringResourceTemplateResolver">

    <property name="prefix" value="/WEB-INF/templates/"/>

    <property name="suffix" value=".html"/>

    <property name="characterEncoding" value="UTF-8"/>

    <property name="order" value="1"/>

    <property name="templateMode" value="HTML5"/>

    <property name="cacheable" value="false"/>

</bean>

<bean id="templateEngine"

      class="org.thymeleaf.spring5.SpringTemplateEngine">

    <property name="templateResolver" ref="templateResolver"/>

</bean>

<bean id="viewResolver" class="org.thymeleaf.spring5.view.ThymeleafViewResolver">

    <property name="templateEngine" ref="templateEngine"/>

    <property name="characterEncoding" value="UTF-8"/>

</bean>
在项目的/WEB-INF/templates/添加对应的模板文件,这个跟上面配置文件的内容是对应的,要在模板文件html标签添加xmlns:th属性:
<html lang="cn" xmlns:th="http://www.thymeleaf.org">
三、Eclipse中安装Thymeleaf的插件
在Eclipse Marketplace中找到Thymeleaf插件,然后直接安装即可
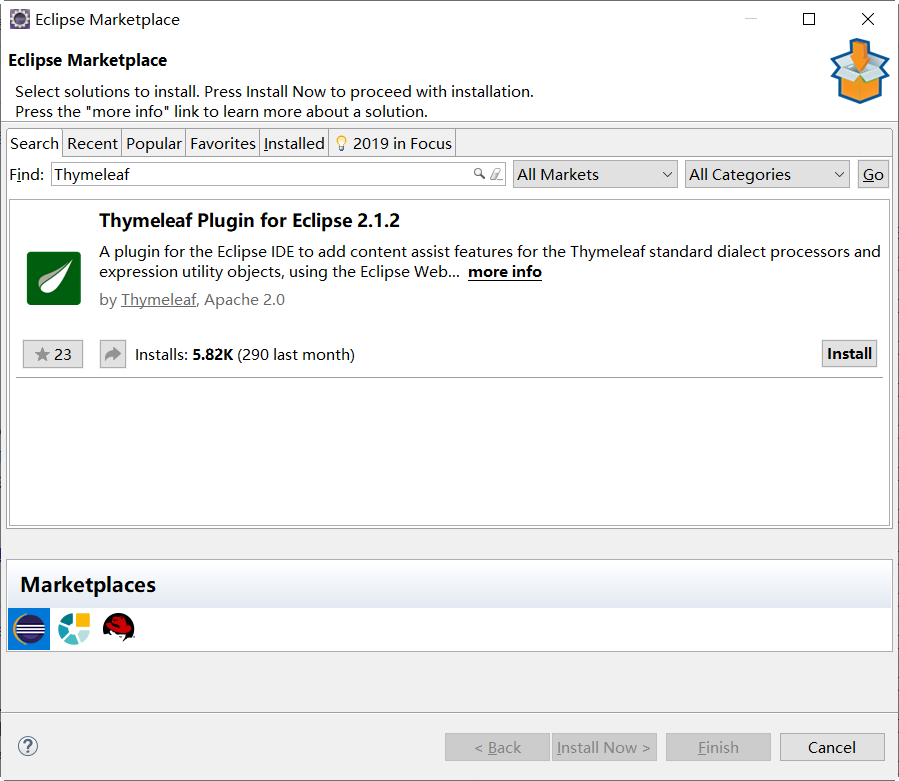
安装完以后,代码提示中就有Thymeleaf标签的提示了。
四、基础语法
1、在模板中引用变量:
${x}用于返回request作用域里的x值,或者Thymeleaf作用域里的x值${param.x}用于返回页面请求参数的x值(有可能会有多值)${session.x}用于返回session作用域里的x值${application.x}用于返回application作用域里的x值
2、字符串操作:
字符串拼接: +
文字替换: |The name is ${name}|
示例:
<a th:href="@{'edit?topicid=' + ${topic.topicid }}">编辑<a>
或:
<a th:href="@{|edit?topicid=${topic.topicid }|}">编辑<a>
3、链接表达式
@{...} 用来配合link src href使用的语法,对应的标签为 th:link、th:href和th:src
示例:
<a th:href="@{'edit?topicid=' + ${topic.topicid }}">编辑<a> <!-- 输出结果为:edit?topicid=1 -->
或:
<a th:href="@{edit(topicid=${topic.topicid })}">编辑<a> <!-- 输出结果为:edit?topicid=1 -->
多个参数:
<a th:href="@{edit(topicid=${topic.topicid },index=${index})}">编辑<a> <!-- 输出结果为:edit?topicid=1&index=1 -->
4、if判断
使用th:if表示满足条件,使用th:unless表示不满足条件
示例:
<divth:if="${session.user==null}">

<a href="login">登录</a> <a href="register">注册</a>

</div>

<divth:unless="${session.user==null}">

<span th:text="|欢迎您,${session.user.useralias }|"></span>

</div>
5、循环遍历
使用th:each
示例:
<!DOCTYPE HTML>

<html xmlns:th="http://www.thymeleaf.org">

<head>

    <title>hello</title>

    <meta http-equiv="Content-Type" content="text/html; charset=UTF-8"/>

</head>

<body>

    <!-- 不存在则忽略,显示hello null!(可以通过默认值进行设置)-->

    <p th:text="'Hello ' + (${name}?:'admin')">3333</p>

    <table>

        <tr>

            <th>ID</th>

            <th>NAME</th>

            <th>AGE</th>

        </tr>

        <tr th:each="emp : ${empList}">

            <td th:text="${emp.id}">1</td>

            <td th:text="${emp.name}">海</td>

            <td th:text="${emp.age}">18</td>

        </tr>

    </table>

</body>

</html>
使用序列的写法:
<!DOCTYPE HTML>

<html xmlns:th="http://www.thymeleaf.org">

<head>

    <title>hello</title>

    <meta http-equiv="Content-Type" content="text/html; charset=UTF-8"/>

</head>

<body>

    <!-- 不存在则忽略,显示hello null!(可以通过默认值进行设置)-->

    <p th:text="'Hello ' + (${name}?:'admin')">3333</p>

    <table>

        <tr>

            <th>INDEX</th>

            <th>NAME</th>

            <th>AGE</th>

        </tr>

        <tr th:each="emp,stat : ${empList}">

            <td th:text="${stat.index+1}">1</td>

            <td th:text="${emp.name}">海</td>

            <td th:text="${emp.age}">18</td>

        </tr>

    </table>

</body>

</html>
遍历指定次数:
<div class="pager" th:each="item:${#numbers.sequence(1,10)}">

    <div th:text="${item}"></div>

</div>
6、在javascript中访问Model中的变量
使用th:inline标签,然后把变量包在[[...]]或[()]中,我试了一下,[(...)]比较好用
示例:
<script th:inline="javascript">

function func() {

    var topicid = [(${param.topicid})];

}

</script>
7、声明局部变量
使用th:with标签
示例:
        <div class="desc" th:with="no=${stat.index + 1}">

            <div class="info" th:text="|${no}楼|">

            </div>

        </div>
8、格式化输出日期
使用#dates.format
示例:
<div th:text="${#dates.format(topic.createdate,'yyyy-MM-dd HH:mm')}"></div>
或者:
<div>[[${#dates.format(topic.createdate,'yyyy-MM-dd HH:mm')}]]</div>
9、模板的使用
使用th:fragment声明模板,使用th:insert、th:replace或th:include引用模板
模板文件footer.html
<footer th:fragment="copy">

   the content of footer

</footer>
fragment的引用
- th:insert:保留自己的主标签,保留th:fragment的主标签。
- th:replace:不要自己的主标签,保留th:fragment的主标签。
- th:include:保留自己的主标签,不要th:fragment的主标签。(官方3.0后不推荐)
模板文件名 :: fragment名称
导入片段:

<div th:insert="footer :: copy"></div>

<div th:replace="footer :: copy"></div>

<div th:include="footer :: copy"></div>

结果为:

<div>

    <footer>

       the content of footer

    </footer>

</div>

<footer>

    the content of footer

</footer>

<div>

    the content of footer

</div>
最新文章
- ip命令和ifconfig命令(转载)
- 数论 UVALive 2756
- entityframework lamda 使用where时的注意事项
- NOIP2004合并果子
- android开发之自定义组件
- Android中Bitmap和Drawable
- Android SeekBar自定义使用图片和颜色显示
- 节点文件将两个不同格式的XML文件,进行节点对照,并生成一个用于对照功能的XML
- python logging模块使用
- PHP 日期格式化 参数参考
- 神坑 关于&&的取值
- Delphi窗体最大化按钮不可用情况下的最大化
- css学习笔记三
- Java Sftp上传下载文件
- MVC bootstrap-table显示数据时显示No matching records found
- drf视图组件、认证组件
- zyupload四种不同的PHP上传demo
- 利用/dev/urandom文件创建随机数
- js中的变量作用域问题
- Final阶段第1周/共1周 Scrum立会报告+燃尽图 06