Java进阶知识13 Hibernate查询语言(HQL),本文以hibernate注解版为例讲解
1、简单概述
1.1、
1) SQL:面向的是数据库 select * from tableName;
2) HQL查询(Hibernate Query language): hibernate 提供的面向对象的查询语言。
例:Session.createQuery(“from tableName”) //和第1)点的SQL语句恒等的,查询出来的效果是一样的
3) Criteria 查询,完全面向对象的查询(Query By Criteria ,QBC)
4) SQLQuery, 本地SQL查询,逻辑比较复杂,HQL很难实现
缺点:不能跨数据库平台,如果改了数据库,sql语句有可能要改
使用场景: 对于复杂sql,hql实现不了的情况,可以使用本地sql查询
HQL查询要注意:
1、使用hql查询的时候 auto-import="true" 要设置true,如果是false,写hql的时候,要指定类的全名,例如:
1.1、 Query q = session.createQuery("from Employee"); //auto-import="true"的时候
1.2、Query q = session.createQuery("from com.shore.model.Employee"); //auto-import="false"的时候
2、用注解版时,auto-import="true" (默认为true),写不写类的全名,都是可以的。用xml 配置版时,需要指定 auto-import="true" ,这样省代码,不指定为true,则像上面第1点的第1.2小点那样写。
1.2、查询全部列
 Query query = session.createQuery("from Employee"); //OK

 Query query = session.createQuery("from com.shore.model.Employee"); //OK

 Query query = session.createQuery("select * from Employee"); //错误,不支持 *

 Query query = session.createQuery("select e from Employee e"); // OK

 System.out.println(query.list()); //把结果打印到控台上
1.3、查询指定的列
 Query query = session.createQuery("select name,sex,salary from Employee");

 System.out.println(query.list());
1.4、查询指定的列,自动封装为对象
 Query query = session.createQuery("select new com.shore.model.SubEmployee(name,sex,salary) from Employee");

 System.out.println(query.list());
1.5、条件查询
1.5.1、条件查询之占位符(?)
 Query query = session.createQuery("select new com.shore.model.SubEmployee(name,sex,salary) from Employee where department_id = ?");

 //query.setParameter(0, 1);//或者下面的setInteger(0, 1)方法也行

 query.setInteger(0, 1);

 System.out.println(query.list());
1.5.2、条件查询之命名参数(:)
 Query query = session.createQuery("select new com.shore.model.SubEmployee(name,sex,salary) from Employee where department_id = :deptID");

 query.setParameter("deptID", 1);

 System.out.println(query.list());
1.5.3、条件查询之范围查询(between .... and ... )
 Query query = session.createQuery("select new com.shore.model.SubEmployee(name,sex,salary) from Employee where department_id between :d1 and :d2");

 query.setParameter("d1", 1);   //也可以用占位符?实现

 query.setParameter("d2", 2);

 System.out.println(query.list());
1.5.4、条件查询之模糊查询 like
 Query query = session.createQuery("select new com.shore.model.SubEmployee(name,sex,salary)  from Employee where name like ?");

 query.setParameter(0, "%三%");

 System.out.println(query.list());
1.6、聚合函数统计
 Query query = session.createQuery("select count(*) from Employee where name like ?");

 query.setParameter(0, "%三%");

 System.out.println(query.list());
1.7、分组查询(group by)
1 //MySQL数据库写法:select department_id,count(*) from employee group by department_id;
2 Query query = session.createQuery("select department,count(*) from Employee group by department_id"); //根据部门外键

 System.out.println(query.list());
1.8、连接查询 (内连接、外连接、左/右连接等)
内连接:Join == inner join //交集
左连接:Left join,以左边的表为主表,如果没有join上,左边表数据完整,右边表的数据可能为空 。//左边表的所有数据+右边表的交集部分
右连接:Right join,以右边的表为主表,如果没有join上,右边表数据完整,左边表的数据可能为空。//右边表的所有数据+左边表的交集部分
外连接:Outer join //并集
 1) 内连接   【映射已经配置好了关系,关联的时候,直接写对象的属性即可】

 Query q = session.createQuery("from Employee e inner join e.department"); //department是Employee实体中映射的一个外键(Employee表中的department_id)

 2) 左外连接

 Query q = session.createQuery("from Employee e left join e.department");

 3) 右外连接

 Query q = session.createQuery("from Department d right join d.employee"); //映射的一个外键(employee_id)

 4) 迫切内连接    【使用fetch, 会把右表的数据,填充到左表对象中!】

 Query q = session.createQuery("from Employee e inner join fetch e.department");

 q.list();

 5) 迫切左外连接

 Query q = session.createQuery("from Employee e left join fetch e.department");
1.9、HQL查询优化
 Query query = session.getNamedQuery("getAllDept"); //定义一个参数名 getAllDept

 query.setParameter(0, 10);
然后在对应的xml 配置文件中 写SQL语句。(对于发杂的SQL语句,可以这样做,方便项目发布后,还可以修改)
 比如在:Employee.hbm.xml 在xml中存放sql语句      <query name="getAllDept">  //这里的参数名 getAllDept 要和上面的对应

         <![CDATA[

             from Employee d where department_id < ?;  //这里写SQL语句,不是HQL语句

         ]]>

     </query>
2、HQL查询语言 实例
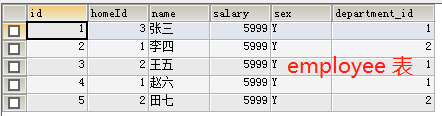
2.1、创建 Employee类、Department类、SubEmployee类、HomeTown类
 package com.shore.model;

 import javax.persistence.CascadeType;

 import javax.persistence.Entity;

 import javax.persistence.GeneratedValue;

 import javax.persistence.Id;

 import javax.persistence.ManyToOne;

 import org.hibernate.annotations.Type;

 /**

  * @author DSHORE/2019-9-25

  * 多对一,单向关联(注解版)

  */

 @Entity

 public class Employee {//员工  (“多”的一方),在多的一方加外键

     private Integer id;

     private String name;

     private Boolean sex;

     private Float salary;

     private Department department;

     private Integer homeId;

     @Id

     @GeneratedValue

     public Integer getId() {

         return id;

     }

     public void setId(Integer id) {

         this.id = id;

     }

     public String getName() {

         return name;

     }

     public void setName(String name) {

         this.name = name;

     }

     @Type(type="yes_no")

     public Boolean getSex() {

         return sex;

     }

     public void setSex(Boolean sex) {

         this.sex = sex;

     }

     public Float getSalary() {

         return salary;

     }

     public void setSalary(Float salary) {

         this.salary = salary;

     }

     @ManyToOne(cascade=CascadeType.ALL)

     public Department getDepartment() {

         return department;

     }

     public void setDepartment(Department department) {

         this.department = department;

     }

     @Override

     public String toString() {

         return "Employee [id=" + id + ", name=" + name + ", sex=" + sex

                 + ", salary=" + salary + ", department=" + department + "]";

     }

     public Integer getHomeId() {

         return homeId;

     }

     public void setHomeId(Integer homeId) {

         this.homeId = homeId;

     }

 }
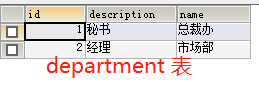
Department类
 package com.shore.model;

 import javax.persistence.Entity;

 import javax.persistence.GeneratedValue;

 import javax.persistence.Id;

 /**

  * @author DSHORE/2019-9-25

  * 多对一,单向关联(注解版)

  */

 @Entity

 public class Department {//部门 (“一”的一方)

     private Integer id;

     private String name;

     private String description;

     @Id

     @GeneratedValue

     public Integer getId() {

         return id;

     }

     public void setId(Integer id) {

         this.id = id;

     }

     public String getName() {

         return name;

     }

     public void setName(String name) {

         this.name = name;

     }

     public String getDescription() {

         return description;

     }

     public void setDescription(String description) {

         this.description = description;

     }

     @Override

     public String toString() {

         return "Department [id=" + id + ", name=" + name + ", description="

                 + description + "]";

     }

 }
SubEmployee类
 package com.shore.model;

 /**

  * @author DSHORE/2019-9-25

  *

  */

 public class SubEmployee {//查询指定的列,自动封装为对象时 用到(此处不需要创建数据库表)

     private String name;

     private Boolean sex;

     private Float salary;

     public SubEmployee(String name, Boolean sex, Float salary) {

         super();

         this.name = name;

         this.sex = sex;

         this.salary = salary;

     }

     public SubEmployee() {

         super();

     }

     public String getName() {

         return name;

     }

     public void setName(String name) {

         this.name = name;

     }

     public Boolean getSex() {

         return sex;

     }

     public void setSex(Boolean sex) {

         this.sex = sex;

     }

     public Float getSalary() {

         return salary;

     }

     public void setSalary(Float salary) {

         this.salary = salary;

     }

     @Override

     public String toString() {

         return "SubEmployee [name=" + name + ", sex=" + sex + ", salary="

                 + salary + "]";

     }

 }
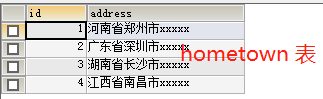
HomeTown类
 package com.shore.model;

 /**

  * @author DSHORE/2019-9-25

  *

  */

 //后来加入的,没配注解,数据库表和数据都是手动创建的

 public class HomeTown {//在使用“连接查询”时用到(内连接、外连接、左/右连接等)

     private Integer id;

     private String address;

     public Integer getId() {

         return id;

     }

     public void setId(Integer id) {

         this.id = id;

     }

     public String getAddress() {

         return address;

     }

     public void setAddress(String address) {

         this.address = address;

     }

 }
2.2、创建 hibernate.cfg.xml 核心配置文件
 <?xml version='1.0' encoding='utf-8'?>

 <!DOCTYPE hibernate-configuration PUBLIC

         "-//Hibernate/Hibernate Configuration DTD 3.0//EN"

         "http://www.hibernate.org/dtd/hibernate-configuration-3.0.dtd">

 <hibernate-configuration>

     <session-factory>

         <!-- Database connection settings -->

         <property name="connection.driver_class">com.mysql.jdbc.Driver</property>

         <property name="connection.url">jdbc:mysql://localhost:3306/hibernate</property>

         <property name="connection.username">root</property>

         <property name="connection.password">123456</property>

         <property name="dialect">org.hibernate.dialect.MySQLDialect</property>

         <property name="cache.provider_class">org.hibernate.cache.NoCacheProvider</property>

         <property name="show_sql">true</property>

         <property name="hbm2ddl.auto">update</property>

         <mapping class="com.shore.model.Employee" />

         <mapping class="com.shore.model.Department" />

     </session-factory>

 </hibernate-configuration>
2.3、开始测试
 package com.shore.test;

 import java.util.ArrayList;

 import java.util.List;

 import org.hibernate.Query;

 import org.hibernate.Session;

 import org.hibernate.SessionFactory;

 import org.hibernate.Transaction;

 import org.hibernate.cfg.AnnotationConfiguration;

 import org.junit.AfterClass;

 import org.junit.BeforeClass;

 import org.junit.Test;

 import com.shore.model.Department;

 import com.shore.model.Employee;

 /**

  * @author DSHORE/2019-9-19

  *

  */

 public class MyTest {

     public static SessionFactory sessionFactory = null;

     public static Session session = null;

     @BeforeClass

     public static void buildSessionFactory() {

         sessionFactory = new AnnotationConfiguration().configure()

                 .buildSessionFactory();

     }

     @AfterClass

     public static void close() {

         session.close();

         sessionFactory.close();

     }

     /**

      * 单向多对一:多个员工 对 一个部门

      */

     /*@Test

     public void testAdd() {//插入数据

         session = sessionFactory.openSession();

         Transaction transaction = session.beginTransaction();

         Department dept1 = new Department();

         Department dept2 = new Department();

         dept1.setName("总裁办");

         dept1.setDescription("秘书");

         dept2.setName("市场部");

         dept2.setDescription("经理");

         Employee em1 = new Employee();

         em1.setName("张三");

         em1.setSex(true);

         em1.setSalary(5999.00f);

         em1.setDepartment(dept1);

         Employee em2 = new Employee();

         em2.setName("李四");

         em2.setSex(true);

         em2.setSalary(5999.00f);

         em2.setDepartment(dept2);

         Employee em3 = new Employee();

         em3.setName("王五");

         em3.setSex(true);

         em3.setSalary(5999.00f);

         em3.setDepartment(dept1);

         Employee em4 = new Employee();

         em4.setName("赵六");

         em4.setSex(true);

         em4.setSalary(5999.00f);

         em4.setDepartment(dept1);

         Employee em5 = new Employee();

         em5.setName("田七");

         em5.setSex(true);

         em5.setSalary(5999.00f);

         em5.setDepartment(dept2);

         session.save(em1); // 先创建dept1并数据,后创建em1并插入数据

         session.save(em2); // 先创建dept2并数据,后插入em2的数据

         session.save(em3);

         session.save(em4);

         session.save(em5);

         transaction.commit();

     }*/

     /**

      * hql :1、查询全部列

      */

     @SuppressWarnings("unchecked")

     @Test

     public void testListAllEmployee() {

         session = sessionFactory.openSession();

         Transaction transaction = session.beginTransaction();

         List<Employee> list = new ArrayList<Employee>();

         Query query = session.createQuery("select e from Employee e");

         //或者这样写:Query query = session.createQuery("from Employee"); 效果是一样的

         list = query.list();

         transaction.commit();

         System.out.println("!!!!!!!!!!!!!!");

         if (list != null && list.size() > 0) {

             for (int j = 0; j < list.size(); j++) {

                 System.out.println(j + ":" + list.get(j));

             }

         }

         /** testListAllEmployee()运行结果:

          * !!!!!!!!!!!!!!

          * 0:Employee [id=1, name=张三, sex=true, salary=5999.0, department=Department [id=1, name=总裁办, description=秘书]]

          * 1:Employee [id=2, name=李四, sex=true, salary=5999.0, department=Department [id=2, name=市场部, description=经理]]

          * 2:Employee [id=3, name=王五, sex=true, salary=5999.0, department=Department [id=1, name=总裁办, description=秘书]]

          * 3:Employee [id=4, name=赵六, sex=true, salary=5999.0, department=Department [id=1, name=总裁办, description=秘书]]

          * 4:Employee [id=5, name=田七, sex=true, salary=5999.0, department=Department [id=2, name=市场部, description=经理]]

          */

     }

     /**

      * hql: 2、查询指定的列

      */

     @Test

     public void testListSubField() {

         session = sessionFactory.openSession();

         Transaction transaction = session.beginTransaction();

         Query query = session.createQuery("select name,sex,salary from Employee");

         System.out.println(query.list());

         transaction.commit();

         /** testListSubField()运行结果:

          * [[Ljava.lang.Object;@259a8416, [Ljava.lang.Object;@4355d3a3, [Ljava.lang.Object;@37b994de, [Ljava.lang.Object;@78dc9766, [Ljava.lang.Object;@5a57e787]

          */

     }

     /**

      * hql: 3、查询指定的列,自动封装为对象

      * 注意:必须要提供带参数构造器;必须在hql封装类前面要加上package名称

      */

     @Test

     public void testListSubFieldsToObj() {

         session = sessionFactory.openSession();

         Transaction transaction = session.beginTransaction();

         Query query = session.createQuery("select new com.shore.model.SubEmployee(name,sex,salary) from Employee");

         System.out.println(query.list());

         transaction.commit();

         /** testListSubFieldsToObj()运行结果:

          * [SubEmployee [name=张三, sex=true, salary=5999.0], SubEmployee [name=李四, sex=true, salary=5999.0], SubEmployee [name=王五, sex=true, salary=5999.0], SubEmployee [name=赵六, sex=true, salary=5999.0], SubEmployee [name=田七, sex=true, salary=5999.0]]

          */

     }

     /**

      * hql: 4 、条件查询

      *      4.1、条件查询之占位符(?)

      */

     @Test

     public void testListByConditions1() {

         session = sessionFactory.openSession();

         Transaction transaction = session.beginTransaction();

         Query query = session.createQuery("select new com.shore.model.SubEmployee(name,sex,salary) " +

                         "from Employee where department_id=?"); //用department_id或department都是可以的

         //query.setParameter(0, 1);//或者下面的setInteger(0, 1)方法也行

         query.setInteger(0, 1); //类似于JDBC中的 PreparedStatement

         System.out.println(query.list());

         transaction.commit();

         /** testListByConditions1()运行结果:

          * [SubEmployee [name=张三, sex=true, salary=5999.0], SubEmployee [name=王五, sex=true, salary=5999.0], SubEmployee [name=赵六, sex=true, salary=5999.0]]

          */

     }

     /**

      * hql: 4.2、条件查询之命名参数(:)

      */

     @Test

     public void testListByConditions2() {

         session = sessionFactory.openSession();

         Transaction transaction = session.beginTransaction();

         Query query = session.createQuery("select new com.shore.model.SubEmployee(name,sex,salary) " +

                         "from Employee where department_id=:deptID");

         query.setParameter("deptID", 1);

         System.out.println(query.list());

         transaction.commit();

         /** testListByConditions2()运行结果:

          * [SubEmployee [name=张三, sex=true, salary=5999.0], SubEmployee [name=王五, sex=true, salary=5999.0], SubEmployee [name=赵六, sex=true, salary=5999.0]]

          */

     }

     /**

      * hql: 4.3、条件查询之范围查询

      * between 1 and 10    []闭区间  mysql    1<=x<=10

      */

     @Test

     public void testListByConditions3() {

         session = sessionFactory.openSession();

         Transaction transaction = session.beginTransaction();

         Query query = session.createQuery("select new com.shore.model.SubEmployee(name,sex,salary) " +

                         "from Employee where department_id between :d1 and :d2");

         query.setParameter("d1", 1);   //也可以用占位符?实现

         query.setParameter("d2", 2);

         System.out.println(query.list());

         transaction.commit();

         /** testListByConditions3()运行结果:

          * [SubEmployee [name=张三, sex=true, salary=5999.0], SubEmployee [name=王五, sex=true, salary=5999.0], SubEmployee [name=赵六, sex=true, salary=5999.0]]

          */

     }

     /**

      * hql: 4.4、条件查询之模糊查询  like

      */

     @Test

     public void testListByConditions4() {

         session = sessionFactory.openSession();

         Transaction transaction = session.beginTransaction();

         Query query = session.createQuery("select new com.shore.model.SubEmployee(name,sex,salary) " +

                         "from Employee where name like ?");

         query.setParameter(0, "%三%");

         System.out.println(query.list());

         transaction.commit();

         /** testListByConditions4()运行结果:

          * [SubEmployee [name=张三, sex=true, salary=5999.0]]

          */

     }

     /**

      * hql: 5、聚合函数统计

      */

     @Test

     public void testListByCount() {

         session = sessionFactory.openSession();

         Transaction transaction = session.beginTransaction();

         Query query = session.createQuery("select count(*) " +

                         "from Employee where name like ?");

         query.setParameter(0, "%三%");

         System.out.println(query.list());

         transaction.commit();

         /** testListByCount()运行结果:

          * [1]

          */

     }

     /**

      * hql: 6、分组查询group by

      */

     @Test

     public void testListByDept() {

         session = sessionFactory.openSession();

         Transaction transaction = session.beginTransaction();

         Query query = session.createQuery("select department,count(*) " +

                         "from Employee group by department_id");

         System.out.println(query.list());

         transaction.commit();

         /** testListByDept()运行结果:

          * [[Ljava.lang.Object;@3b35b1f3, [Ljava.lang.Object;@4235e6e3]

          */

     }

     /**

      * hql: 7、连接查询

      *    7.1、内连接

      */

     @Test

     public void testListByInnerJoin() {

         session = sessionFactory.openSession();

         Transaction transaction = session.beginTransaction();

         Query query = session.createQuery("from Employee e inner join e.department");

         System.out.println(query.list());

         transaction.commit();

         /**

          * 运行结果:

          * [[Ljava.lang.Object;@60c9630a, [Ljava.lang.Object;@4585572a, [Ljava.lang.Object;@351daa0e, [Ljava.lang.Object;@2e879860, [Ljava.lang.Object;@4824de7d]

          */

     }

     /**

      * 7.2、左连接

      */

     @Test

     public void testListByLeftJoin() {

         session = sessionFactory.openSession();

         Transaction transaction = session.beginTransaction();

         Query query = session.createQuery("from Employee e left join e.department");

         System.out.println(query.list());

         transaction.commit();

         /**

          * 运行结果:

          * [[Ljava.lang.Object;@5d15126e, [Ljava.lang.Object;@126d2380, [Ljava.lang.Object;@3b35b1f3, [Ljava.lang.Object;@4235e6e3, [Ljava.lang.Object;@60c9630a]

          */

     }

     /**

      * 7.3、右连接

      */

     @Test

     public void testListByRightJoin() {

         session = sessionFactory.openSession();

         Transaction transaction = session.beginTransaction();

         Query query = session.createQuery("from Employee e right join e.department");

         System.out.println(query.list());

         transaction.commit();

         /**

          * 运行结果:

          * [[Ljava.lang.Object;@4235e6e3, [Ljava.lang.Object;@60c9630a, [Ljava.lang.Object;@4585572a, [Ljava.lang.Object;@351daa0e, [Ljava.lang.Object;@2e879860]

          */

     }

 }
数据库表的原数据图:
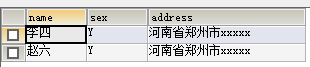
 SELECT

     a.name,a.sex,b.address

 FROM

    (SELECT NAME,sex,homeId FROM employee WHERE homeId=1) a

 LEFT JOIN

    (SELECT id,address FROM hometown WHERE id = 1) b

 ON

    a.homeId = b.id; --MySQL语言 左连接查询
结果图:
|
原创作者:DSHORE 作者主页:http://www.cnblogs.com/dshore123/ 原文出自:https://www.cnblogs.com/dshore123/p/11588358.html 欢迎转载,转载务必说明出处。(如果本文对您有帮助,可以点击一下右下角的 推荐,或评论,谢谢!) |
最新文章
- 测试docker不同主机间容器互相访问
- ios 微博登录 21338错误 sso package or sign error
- effective OC2.0 52阅读笔记(二 对象、消息、运行期)
- 【编程题目】有 4 张红色的牌和 4 张蓝色的牌,主持人先拿任意两张,再分别在 A、B、C 三人额头上贴
- jquery选择器(原创)<二>
- 20145211 《Java程序设计》第8周学习总结——自在飞花轻似梦
- c++关于接口机制和不完全类型的小问题
- Hibernate的常用关键类以及接口介绍
- PostgreSQL中,database,schema,table之间关系
- Jquery如何获取控件ID
- 【Egret】Lakeshore 使用中的一些疑难解决技巧!
- java mvc框架系列总结ssh,ssm,servlet
- FFmpeg在ubuntu下安装及使用
- token鉴权的一种实现方式图解
- Unity 3D 如何修改新建脚本中的 C# 默认创建的 Script 脚本格式
- nginx中root和alias的区别
- luogu2774 [网络流24题]方格取数问题 (最小割)
- Torch或Numpy
- [蓝桥杯]ALGO-84.算法训练_大小写转换
- 【转】利用线程更新ListView (2014-09-28 08:25:20)