数据持久化之bind Mounting
2024-10-06 05:56:37
一、默认情况
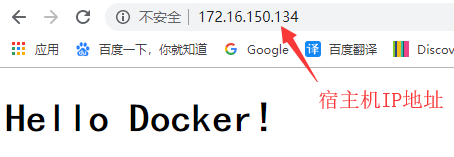
1.创建一个Nginx测试镜像
Dockerfile:
FROM nginx:latest

WORKDIR /usr/share/nginx/html

COPY index.html index.html   #使用当前目录下index.html文件
index.html
[root@localhost docker-nginx]# cat index.html

<!doctype html>

<html lang="en">

<head>

  <meta charset="utf-8">

  <title>hello</title>

</head>

<body>

  <h1>Hello Docker! </h1>

</body>

</html>
编译
[root@localhost docker-nginx]# docker build -t my_nginx:v1 .

[root@localhost docker-nginx]# docker image ls

REPOSITORY          TAG                 IMAGE ID            CREATED             SIZE

my_nginx            v1                  897d33067e21         seconds ago        MB
2.使用my_ingx镜像创建一个容器,并访问
[root@localhost docker-nginx]# docker run -d --name my_nginx -p : my_nginx:v1

2ff4ee3a55e500785b229527fc72a17b34b2ed96c7c9b419a23ab57644aada1d
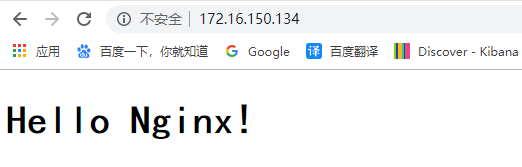
3.进入容器内部修改index.html,并访问查看结果
[root@localhost docker-nginx]# docker exec -it my_nginx /bin/bash

root@2ff4ee3a55e5:/usr/share/nginx/html# sed -i "s#Hello Docker#Hello Nginx#g" index.html
4.修改当前目录下index.html并访问查看结果
[root@localhost docker-nginx]# sed -i "s#Hello Docker#Hello Nginx on physics#g" index.html

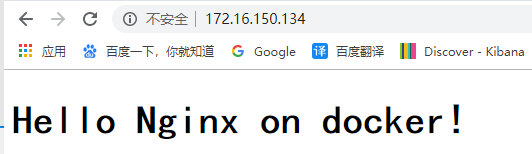
二、使用bind Mounting
1.删除旧容器再新建一个容器,并访问,注意结果
[root@localhost docker-nginx]# docker run -d --name my_nginx -v $(pwd):/usr/share/nginx/html -p : my_nginx:v1

24e94344b29c333fceec7f6164ac5757d4747fd4e71e9a6d45e373dfaf130013

2.进入容器内部修改index.html,并访问查看结果
[root@localhost docker-nginx]# docker exec -it my_nginx /bin/bash

root@24e94344b29c:/usr/share/nginx/html# sed -i "s#Hello Nginx on physics#Hello Nginx on docker#g" index.html
3.退出容器并修改当前目录下index.html,并访问
[root@localhost docker-nginx]# sed -i "s#Hello Nginx on docker#Hello Nginx, This is test page#g" index.html
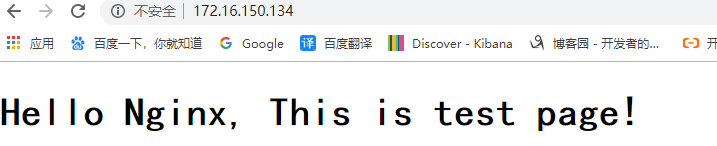
4.查看本地index.html和容器index.html
[root@localhost docker-nginx]# md5sum index.html  #查看宿主机与容器中index.html hash值

60cbc4142a556d3e5a1e812edf288757  index.html

[root@localhost docker-nginx]# docker exec -it my_nginx md5sum index.html

60cbc4142a556d3e5a1e812edf288757  index.html

[root@localhost docker-nginx]# cat index.html     #查看宿主机与容器中index.html 内容

<!doctype html>

<html lang="en">

<head>

  <meta charset="utf-8">

  <title>hello</title>

</head>

<body>

  <h1>Hello Nginx, This is test page! </h1>

</body>

</html>

[root@localhost docker-nginx]# docker exec -it my_nginx cat  index.html

<!doctype html>

<html lang="en">

<head>

  <meta charset="utf-8">

  <title>hello</title>

</head>

<body>

  <h1>Hello Nginx, This is test page! </h1>

</body>

</html>
总结及与Data Volume的区别:
.Data Volume 需要在 Dockerfile 内声明需要创建的 volume 目录。

  Bind Mounting 则不需要在 Dockerfile 声明 volume,只需要在创建容器的时候,也就是 run 的时候声明即可。

.使用Data Volume持久化的方式,是因为我们容器是一个数据源的产生地方,本身会产生文件和数据,而我们不想让我们的文件和数据随着容器的消失而消失,因此用这种方式持久化

  使用Bind Mounting 持久化的方式,则本地的目录文件和容器中的文件是同步的,如果本地的文件做了修改,那么容器中的文件也会修改。

  即:Bind mount会覆盖容器中的文件,而volume mount则不会,即如果容器中已有文件,则会将文件同步到主机的目录上
最新文章
- String高效编程优化(Java)
- window2012 64bit 安装sqlserver2012 64bit调用excel的驱动安装
- jint
- [swustoj 1095] 挖金子
- .NET多线程同步方法详解
- WIN7 64位配置Oracle SQL Developer工具
- CActiveForm提示中文化
- 常见dos命令
- 基于header的一些常用指令详解
- 95后实习生的远程办公体验(asp.net mvc\C#技术栈)
- zsh : command not found pip3 的解决方案
- pip install torch on windows, and the 'from torch._C import * ImportError: DLL load failed:' solution
- PHP安装pecl扩展--通用
- Cutterman - 最好用的切图工具
- Vue监听属性的变化
- Ubuntu下彻底卸载wine
- Word Ladder I & II
- 《Android源码设计模式》--享元模式
- 由SQL Server的job出错调查引起的思考
- 【Java面试题】1 Java中使用switch-case的用法及注意事项超全总结