[转]使用storyboard实现页面跳转,简单的数据传递
由于最近才接触到IOS,苹果已经建议storyboard来搭建所有界面了,于是我也追随时尚,直接开始使用storyboard。(不料在涉及到页面跳转的时候,遇到的问题是:点击后没有任何反应)众所周知,在storyboard中,界面的跳转是通过segue来实现的,利用它,省去了方法内写入跳转的代码。
一 视图跳转
《StoryBoard下的视图跳转》
我们知道:segue共有三种类型:push,modal,和custom。如下图://01

简单说下这三个的作用:使用导航栏压进新的控制器(push),模态的加载视图控制器(modal),自定义(custom)。
好了,废话少说,现在开始我们的旅行。
1,首先建立一个Single View 模板的项目,记得勾选上storyboard。然后打开它,在rootViewController(也就是我们的主视图)添加一些label和一个button。
2,在右边的库中拖入一个ViewController,也添加一个Label。具体如下图所示://02
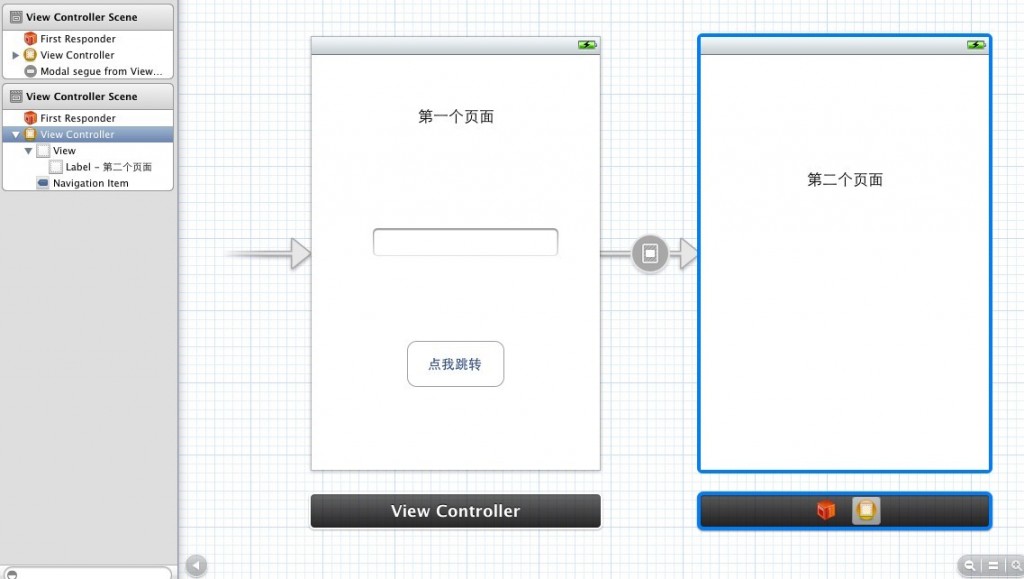
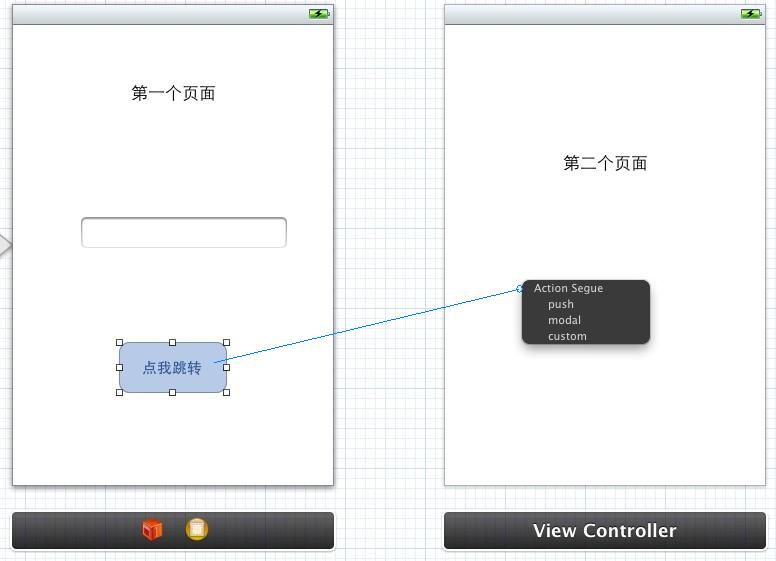
3,选中button,右键(或control+鼠标左键)拖拽到第二个ViewController中,选择:Modal,然后记得save。这个时候,运行模拟器,点击button,你会发现成功跳转到了第二个界面。我们没有在代码区做任何操作,甚至连button和第二个ViewController都没有创建,确实就是这么的简单。//03
好了,到了这里,简单说一下storyboard下,利用segue界面跳转一共有两种方式:
第一种就是以上我的例子,利用button组件,拖拽添加segue,直接运行就可以用。
第二种是利用ViewController与ViewController之间,拖拽添加segue。不过,这种方法就需要在相应需要跳转的方法内写入代码,手动去设置它的跳转。
4,把刚才例子设置button的segue删除(右键,点X),一切恢复了最初时的状态,我们给buttom添加一个点击的方法,然后在ViewController.m中实现此方法,在方法体内写入这样的代码://04

5,注意看方法参数:@"second",这个second是我自命名的一个标示符,一会你就会遇到。
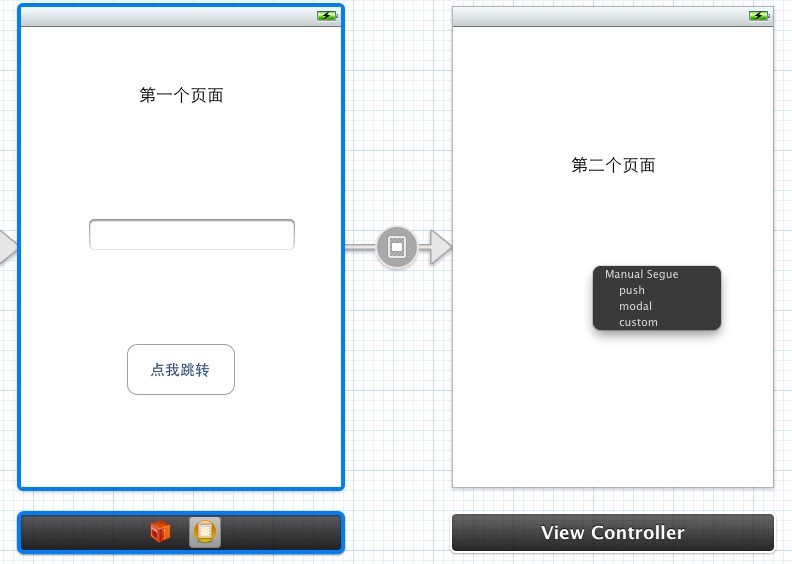
6,save保存,打开storyboard,选中rootViewController,右键拖拽到第二个ViewController,在弹出的界面同样选择:modal。//05
7,打开这个segue的设置页面:设置其identifier为second,就是我在代码中的那个自命名参数。
8,save保存,运行模拟器,你会惊奇的发现,实现了同样的跳转。
到现在为止,我们一共用两种简单的方式实现了视图的跳转:1是设置button的segue,2是设置viewcontroller与viewcontroller之间的segue,只是后者需要在代码中手动管理跳转。
看似很简单的事情,却让我耽误一些时间,主要是因为我在网上看的好多例子都是以UINavigationController为rootviewController(这样省事省时,跳转后还可以利用系统为我们创建的返回按钮返回到rootViewController),然后用button拖拽到第二个视图时选择的push,由于当时不理解push相关的类型含义,所以在写的时候,我总是选择push,造就了点击后无法跳转。现在终于明朗了,记录下来,供不明白的同学学习。
----------------------------------------------------------------------------------------------------
//根据 segue Identifier跳转界面
[self performSegueWithIdentifier:@"GotoTwo" sender:self];
//以modal 方式跳转
[self presentModalViewController:nil animated:YES];
//压进一个viewcontroller
[self.navigationController pushViewController:nil animated:YES];
//弹出一个viewcontroller 相当与返回上一个界面
[self.navigationController popViewControllerAnimated:YES];
// 以 modal跳转的返回方法
[self dismissModalViewControllerAnimated:YES];
-----------------------------------------------------------------------------------------------------
再写一下关于segue三个类型的详解:
----------------------------------------------------------------------------------------------------------------------------------------------------------------------------------------
在storyboard中,segue有几种不同的类型,在iphone和ipad的开发中,segue的类型是不同的。
在iphone中,segue有:push,modal,和custom三种不同的类型,这些类型的区别在与新页面出现的方式。
而在ipad中,有push,modal,popover,replace和custom五种不同的类型。
modal
最常用的场景,新的场景完全盖住了旧的那个。用户无法再与上一个场景交互,除非他们先关闭这个场景。
是在viewController中的标准切换的方式,包括淡出什么的,可以选切换动画。
Modalview:就是会弹出一个view,你只能在该view上操作,而不能切换到其他view,除非你关闭了modalview.
Modal View对应的segue type就是modal segue。
*Modal:Transition to another scene for the purposes of completing a task.当user在弹出的modalview里操作完后,就应该dismiss the modal view scene然后切换回the originalview.
push
Push类型一般是需要头一个界面是个Navigation Controller的。
是在navigation View Controller中下一级时使用的那种从右侧划入的方式
*Push:Create a chain of scenes where the user can move forward or back.该segue type是和navigation viewcontrollers一起使用。
popover(iPad only)
popover 类型,就是采用浮动窗的形式把新页面展示出来
*Popover(iPad only):Displays the scene in a pop-up “window” over top of the current view.
Replace (iPad only):
替换当前scene,
Replace the current scene with another. This is used in some specialized iPad viewcontrollers (e.g. split-view controller).
custom
就是自定义跳转方式啦。
*Custom:Used for programming a customtransition between scenes.
在Storyboard中使用自定义的segue类型
参考http://ryan.easymorse.com/?p=72
----------------------------------------------------------------------------------------------------------------------------------------------------------------------------------------
《Xib下的视图跳转》
现在说一下,没有使用Storyboard,直接创建xib时的页面跳转,其实也很简单,只要理解了,都不是问题。我也是从java刚转过来,起初感觉很不适应,但是现在发现interface builder真的是太强大了。
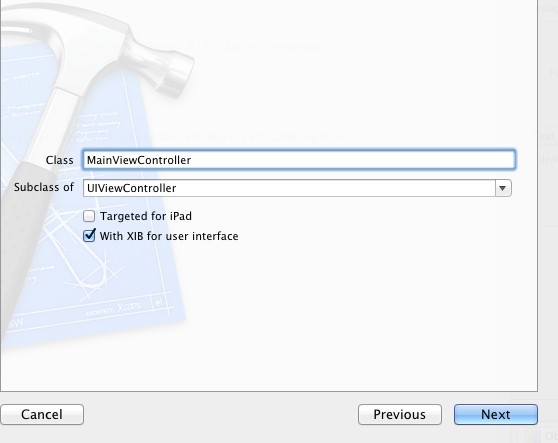
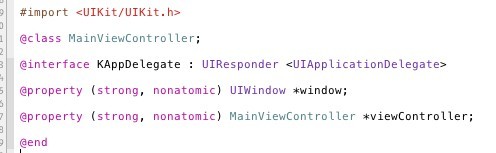
1,创建一个项目,我用的是Empty Application模版,这种模版创建出来的项目只包含一个Appdelegate.h和Appdelegate.m文件,rootviewController需要我们自行创建。(注意:最新的版本,apple把MainWindow.xib文件取消了,所以无法打开xib查看包含的图标)此时运行模拟器只会显示空白的界面。好了,File-newFile 创建一个Object-C class,打开后,subclass of 选择默认的UIViewController,注意,需要勾选上With XIB for user interface,不然一会无法创建主视图。
2,创建好后,打开其xib文件,简单添加一些button组件。此时保存运行程序还是无法显示我们创建的RootViewController。【有时如果你在项目清单下的user interface 选择此MainViewController运行后台还会报:Applications are expected to have a root view controller at the end of application launch的错误,原因都是项目的Delegate无法发现一个rootViewContrller】所以这就需要我们手动在AppDelegate中让它们关联起来。
AppDelegate.h
AppDelegate.m

[self.viewController就是我们在.h文件中声明的]
3,好了,保存后,这个时候运行就能显示我们的界面了~同样也很简单吧!好了,我们现在参照以上的方法,再创建一个SecondViewController(记得勾选xib),然后我们给rootviewcontroller视图的 button添加一个事件方法,可以让它点击后跳转到SecondViewController。

(首先创建了一个SecondViewController并实例化,intitWithNibName的参数一定要正确写控制器配对的xib文件的名称,调用presentModalViewController:controller 就可以跳转啦。)
发现了把,其实都挺简单的,本来可以创建single View Application模板的,这样就省去创建rootViewController和在Delegate中写那些代码了,我这样也就是让大家感受一下,xib,delagate,stroyboard之间的区别和联系,都尝试一下,你们就会明白他们之间的机制,至少可以会写界面和跳转的方法啦。哈哈,有什么问题大家一起交流,我也是初学者,可以给我留言噢。~~~
二 页面传值
方法一使用segue传递数据,继续上面的项目例子。
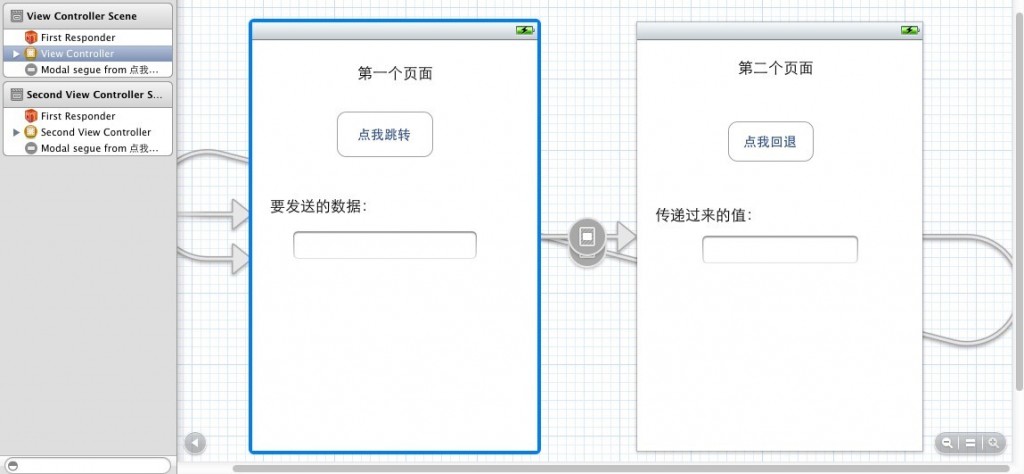
1,在rootViewController声明一个UITextField并与storyboard关联上。File-add添加一个SecondViewController(继承UIViewController),然后在keyboard第二个viewcontroller的属性设置其class关联。同样在SecondViewController声明一个UITextField并关联。如图所示://06
2,然后在rootViewController.m的文件中覆盖名称为:prepareForSegue:(UIStoryboardSegue *)segue sender:(id)sender的方法,并写入如下语句,如图://07

3,我们获取了主视图的文本框内容,并通过segue的方法发送了出去,接下来要做的就是在secondViewController声明一个@property NSString * 类型,名称为data的字符串,然后在其.m文件中的-(void) viewDidLoad方法中写入如下代码://08
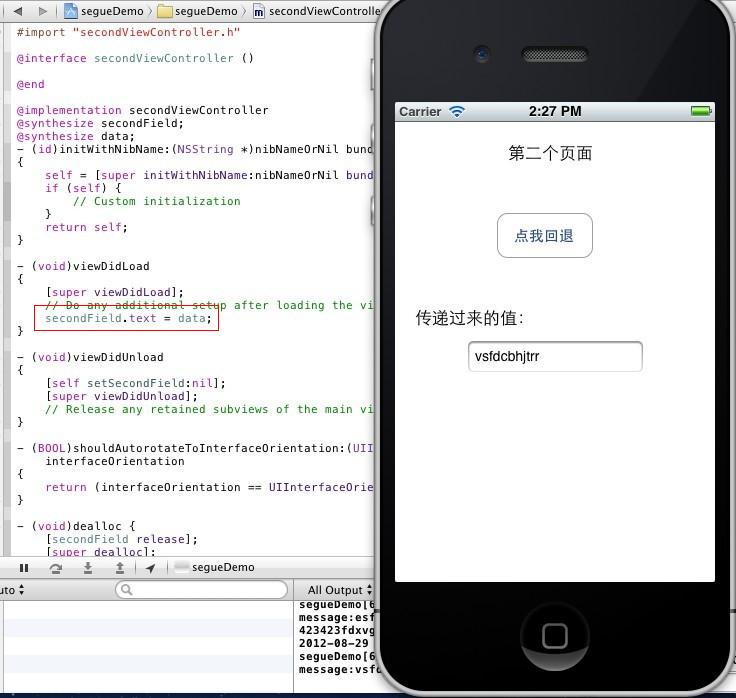
注意:发送数据时,[send setValue:msg forKey:@"data"]; 这个"data"名称一定要与跳转后界面的声明的类型对象的命名一致,不然的话,跳转后的界面是收不到传递的值的。
方法二,使用notification广播实现视图跳转传递数据,继续上面的项目展开。
广播机制分为:注册----发送------------接收(接收方),具体请看一下代码。
1,在要发送数据的视图页面.m文件处理发送逻辑的方法里注册+发送
- - (IBAction)pressed:(id)sender {
- // [self performSegueWithIdentifier:@"second" sender:self];
- NSLog(@"send message:%@",firstField.text);
- //页面跳转传值方法二:利用notification
- NSDictionary *dicts = [NSDictionary dictionaryWithObjectsAndKeys:@"one1",@"one",@"two2",@"two",@"three3",@"three", nil];
- //注册(第一步)
- NSNotification *notification =[NSNotification notificationWithName:@"mynotification" object:firstField.text];
- //发送(第二步)
- [[NSNotificationCenter defaultCenter] postNotification:notification];
- //注册+发送也可以一行完成(等效于以上两行)
- [[NSNotificationCenter defaultCenter] postNotificationName:@"mynotification2" object:dicts];//发送一个字典过去
- }
notificationWithName:参数的值是自己定义,接收方以此名称为接收标识。
2,在跳转后,接收数据视图页面.m文件中处理逻辑的方法里 接收
- - (void)viewDidLoad
- {
- [super viewDidLoad];
- // Do any additional setup after loading the view.
- //接受端:接受(第一步)
- [[NSNotificationCenter defaultCenter] addObserver:self selector:@selector(notificationHandler:) name:@"mynotification" object:nil];
- [[NSNotificationCenter defaultCenter] addObserver:self selector:@selector(notificationHandler2:) name:@"mynotification2" object:nil];
- }
- //自定义接收信息和处理的方法(第二步)
- -(void) notificationHandler:(NSNotification *) notification{
- secondField.text = [notification object];//收到消息后在UItextField中显示出来
- }
- //自定义接收字典信息的方法
- -(void) notificationHandler2:(NSNotification *) notification2{
- NSDictionary *dict = [notification2 object];
- NSLog(@"receive dict :%@,forkey:%@",dict,[dict objectForKey:@"one"]);
- }
注意:如果注册的notification在目标视图没有收到或名称写错,目标视图的相关方法就不会执行
国外参考论坛【传送门】http://blog.isotoma.com/2009/11/on-objective-c-delegates-and-nsnotification-objects/
方法三,通过Delegate委托传递数据
此方法我测试完后,感觉不是太好用,有一些局限性,相当于自定义读取方法:无非是在A对象里保存了一个B对象的指针,然后在A的某个函数里去设置B对象某个属性的值。
具体看教程把。
1,首先add a File-- Objective-C protocol,然后声明一个传递数值的方法:
- //<1>自定义一个用来传递数值的delegate
- @protocol ViewPassValueDelegate <NSObject>
- -(void) passValue :( NSString *) value;
- @end
2,然后在要发送数据的视图的.h文件下声明一个自定义的delegate
- #import <UIKit/UIKit.h>
- #import "ViewPassValueDelegate.h"
- @interface ViewController : UIViewController{
- NSObject<ViewPassValueDelegate> *delegte ;
- }
- - (IBAction)pressed:(id)sender;//主视图button点击出发的Action
- @property (retain, nonatomic) IBOutlet UITextField *firstField;
- @end
3,在要发送数据的视图的事件处理方法里声明一个secondViewController实例,然后赋值给 delegate,同时执行协议的 passValue方法
- - (IBAction)pressed:(id)sender {
- secondViewController *secondController = [[secondViewController alloc] init];//实例化一个视图2的对象
- delegte = secondController;
- [delegte passValue:firstField.text];
- }
4,然后在接收数据视图(secondViewController).h文件实现自定义协议
- //<2> 视图1实现自定义协议
- @interface secondViewController : UIViewController<ViewPassValueDelegate>
5,在接收数据视图(secondViewController).m文件中实现协议中的passValue方法:
- //<3>实现自定义delege的方法
- -(void) passValue:(NSString *)value{
- secondField.text= value;
- NSLog(@"passValue method get Value : %@ secondField.text:%@",value,secondField.text);
- }
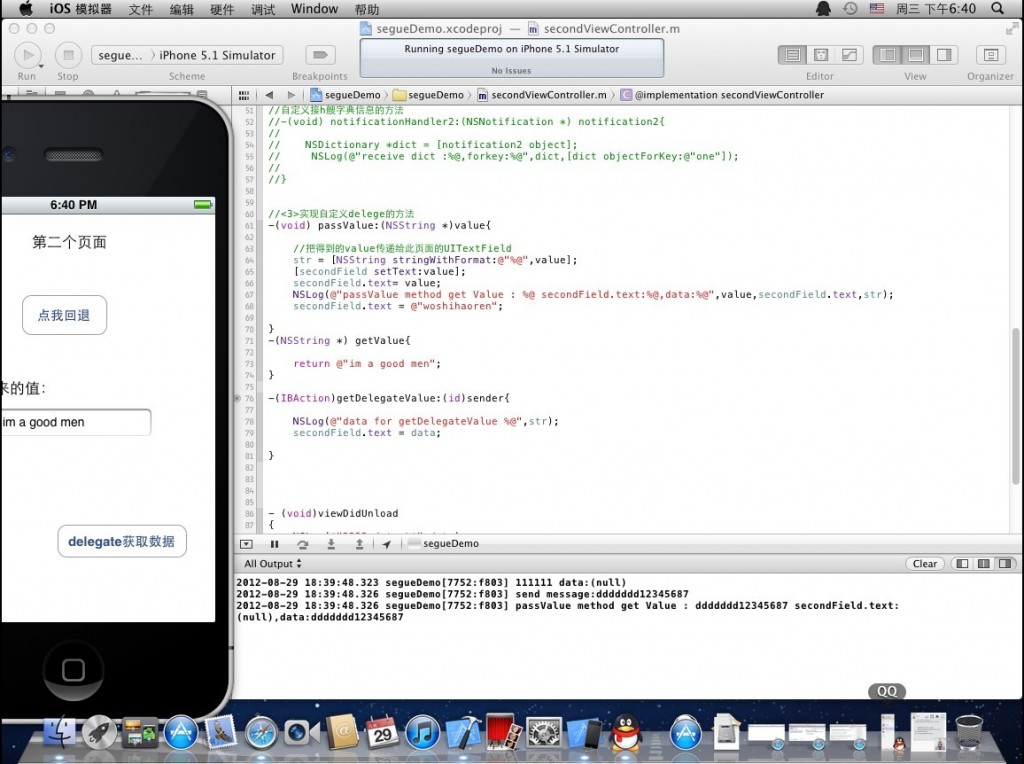
至此,大功告成,打印输出会显示你在第一个界面发送的数据,但是我把此数据赋值于页面的UITextField对象,但是此对象得到的值总是null,无法在界面展示出来,我也很苦恼,什么方法都尝试完了,发现此接收方法总是会在ViewDidLoad方法之后执行,并且方法体内设置UITextField任意值都无法成功。
目前总结是,以上value只是对视图1对象赋值时的一个指针引用,出了方法范围,就无效了。所以在方法体内打印都是有数据的,出了方法体,就没有持有的引用了。
具体原因有待考察。
最新文章
- 程序员的成长与规划 | 送签名书啦 | StuQ专访foruok
- Android 通过 Wifi 调试 Debug (Android Studio)
- 每日学习心得:Js基本数据类型常用方法扩展
- 如何调试R程序(转载)
- IOS 本地通知UILocalNotification
- 双显卡笔记本安装CUDA+theano、tensorflow环境
- Java—javac Hello.java找不到文件
- SSH整合配置文件概括
- Homestead的安装配置
- Gradle更小、更快构建APP的奇淫技巧
- rhel 配置centos源
- 第一章javascript词法结构笔记摘要
- jQuery 3.1 参考手册.CHM离线版下载
- 微信公众号H5支付
- python 创建项目
- if....else的基本用法
- LTIB for ubuntu12.04
- HDU 5298 Solid Geometry Homework 暴力
- Tkinter学习
- #!/System/Library/Frameworks/Ruby.framework/Versions/Current/usr/bin/ruby