spring——自动装配【非常详细】
什么是自动装配?
自动装配就是让应用程序上下文为你找出依赖项的过程。说的通俗一点,就是Spring会在上下文中自动查找,并自动给bean装配与其关联的属性!
spring中实现自动装配的方式有两种,一种是通过xml文件、另一种是通过注解。下面将为大家介绍这两种方式实现自动装配。
为了更简单的让大家理解,我们通过例子来说明:
有以下三个实体类,People类,Dog类,Cat类,分别代表人、狗、猫。人养了一只狗和一只猫,猫和狗都会叫。
public class Cat {

    public void shout(){

        System.out.println("miao~");

    }

}
Cat类
public class Dog {

    public void shout(){

        System.out.println("wang wang~");

    }

}
Dog类
public class Peopel {

    private Cat cat;

    private Dog dog;

    private String name;

    public Cat getCat() {

        return cat;

    }

    public void setCat(Cat cat) {

        this.cat = cat;

    }

    public Dog getDog() {

        return dog;

    }

    public void setDog(Dog dog) {

        this.dog = dog;

    }

    public String getName() {

        return name;

    }

    public void setName(String name) {

        this.name = name;

    }

    @Override

    public String toString() {

        return "Peopel{" +

                "cat=" + cat +

                ", dog=" + dog +

                ", name='" + name + '\'' +

                '}';

    }

}
people类
手动装配
讲自动装配之前,我们先来说一下手动装配,手动装配又是什么?手动装配就是手动的将bean中所关联的其他bean装配进去。用代码表示:
<?xml version="1.0" encoding="UTF-8"?>
    <beans xmlns="http://www.springframework.org/schema/beans"
           xmlns:xsi="http://www.w3.org/2001/XMLSchema-instance"
           xsi:schemaLocation="http://www.springframework.org/schema/beans
        https://www.springframework.org/schema/beans/spring-beans.xsd">
    <bean id="cat" class="com.kuang.pojo.Cat"/>

    <bean id="dog" class="com.kuang.pojo.Dog"/>

    <bean id="people" class="com.kuang.pojo.Peopel">

        <property name="name" value="张三"/>

        <property name="cat" ref="cat"/>

        <property name="dog" ref="dog"/>

    </bean>
</beans>
在id=people的bean(以后id=xx的bean我们就叫xxBean)中,我们给peopleBean手动装配了与之关联的catBean和dogBean,这就叫做手动装配。
那么有没有什么办法,我们可以不用去手动装配关联的bean,让spring帮我们自动把关联的bean装配进去呢?答案是肯定的。自动装配就可以帮助我们解决这个问题。实现自动装配有两种方式。一种是使用注解的方式、另一种是通过xml文件的方式。下面我们俩讲实现自动装配的两种方式。
方式一:通过xml文件实现自动装配
我们只需要在xml配置文件中的bean标签中加入一个属性autowire即可,例如:
<bean id="people" class="com.kuang.pojo.Peopel" autowire="byName">

        <property name="name" value="张三"/>

</bean>
使用autowire关键字声明bean的自动装配方式。其可选值为byName、byType、constructor,default,no;这里讲前边两个。
1.byName
设置autowire属性为byName,那么Spring会根据class属性找到实体类,然后查询实体类中所有setter方法的名字,根据setter方法后面的名字(例如SetDog,则setter方法后面的名字为dog)再到配置文件中寻找一个与该名字相同id的Bean,注入进来。如图:

2.byType
设置autowire属性为byType,那么Spring会自动寻找一个与该属性类型相同的Bean,注入进来。

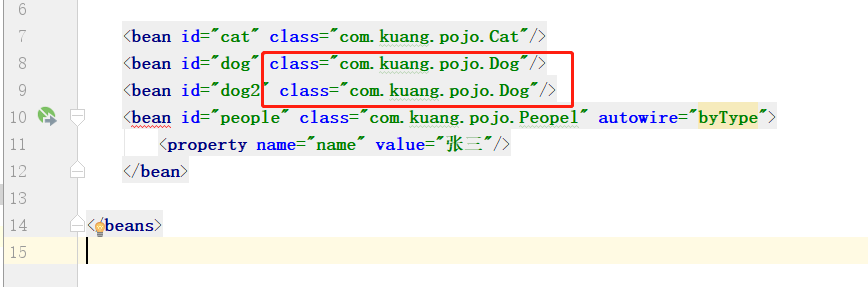
*注意:使用byType这种方式,必须保证配置文件中所有bean的class属性的值是唯一的,否则就会报错
例如:下边这种方式是错误的,因为两个bean中的class属性的值重复了,会报错
方式二:通过注解实现自动装配
注解是通过反射来实现的。
1.使用注解前的准备:
要使用注解,xml文件要使用如下的文件头:
<?xml version="1.0" encoding="UTF-8"?>

<beans xmlns="http://www.springframework.org/schema/beans"

       xmlns:xsi="http://www.w3.org/2001/XMLSchema-instance"

       xmlns:context="http://www.springframework.org/schema/context"

       xsi:schemaLocation="http://www.springframework.org/schema/beans

        https://www.springframework.org/schema/beans/spring-beans.xsd

        http://www.springframework.org/schema/context

        https://www.springframework.org/schema/context/spring-context.xsd">

    <context:annotation-config/>

</beans>
注意:
<conteext:annotation-config/> 必须要写在xml中,这是用来开启注解的支持,如果不加上注解就无效。

2.使用

2.1  Autowired注解【常用】
首先xml配置文件如下:
<?xml version="1.0" encoding="UTF-8"?>

<beans xmlns="http://www.springframework.org/schema/beans"

       xmlns:xsi="http://www.w3.org/2001/XMLSchema-instance"

       xmlns:context="http://www.springframework.org/schema/context"

       xsi:schemaLocation="http://www.springframework.org/schema/beans

        https://www.springframework.org/schema/beans/spring-beans.xsd

        http://www.springframework.org/schema/context

        https://www.springframework.org/schema/context/spring-context.xsd">

    <context:annotation-config/>

    <bean id="cat" class="com.kuang.pojo.Cat"/>

    <bean id="dog" class="com.kuang.pojo.Dog"/>

    <bean id="people" class="com.kuang.pojo.Peopel">

        <property name="name" value="张三"/>

    </bean>

</beans>
然后在实体类的对应属性上添加@Autowired注解(也可以把注解放到对应属性的setter上),people类中依赖Dog类和Cat类。所以在people类中的dog和cat属性上要加上@Autowired,实现自动装配。
例如:
public class Peopel {

    @Autowired

    private Cat cat;

    @Autowired

    private Dog dog;

    private String name;

    public Cat getCat() {

        return cat;

    }

    public void setCat(Cat cat) {

        this.cat = cat;

    }

    public Dog getDog() {

        return dog;

    }

    public void setDog(Dog dog) {

        this.dog = dog;

    }

    public String getName() {

        return name;

    }

    public void setName(String name) {

        this.name = name;

    }

    @Override

    public String toString() {

        return "Peopel{" +

                "cat=" + cat +

                ", dog=" + dog +

                ", name='" + name + '\'' +

                '}';

    }

}
**重点:
(1)注解方法装配属性的过程:spring会默认优先根据(被注解修饰的)属性类型去容器中找对应的组件(bean),找到就赋值;若找到多个相同类型的组件,再将属性的名称作为组件(bean)的id去容器中查找。
(2)@Qualifier注解可以和使用Autowired搭配使用:@Qualifier指定需要装配的组件的id,而不是使用属性名。例如下边例子,spring就会优先在容器中查找id为“abcd”的组件。
public class Peopel {

    @Autowired

    @Qualifier(value = "cat")

    private Cat cat;

}
什么情况会使用到@Qualifier注解:当ioc容器根据属性类型去容器中找找到多个相同类型的组件,再将属性的名称作为组件(bean)的id去容器中查找找不到时就是用这两个注解搭配,指定需要装配的bean的id。
(3)在默认情况下使用 @Autowired 注释进行自动注入时,Spring 容器中匹配的候选 Bean 数目必须有且仅有一个。当找不到一个匹配的 Bean 时,Spring 容器将抛出 BeanCreationException 异常,并指出必须至少拥有一个匹配的 Bean。当不能确定 Spring 容器中一定拥有某个类的 Bean 时,可以在需要自动注入该类 Bean 的地方可以使用@Autowired(required= false)。这等于告诉 Spring:在找不到匹配 Bean 时也不报错。
2.2. Resource注解【不常用】
@Resource:可以和@Autowired一样实现自动装配功能,但是跟@Autowired不一样的是,它默认是按照组件名称进行装配的,按照组件名称找不到在根据属性类型去查找,再找不到就报错;他们另一个不同的地方就是@Autowired是Spring定义的; @Resource是java规范。
最新文章
- Redis系列(4)_持久化方式-RDB
- <实训|第二天>掌握linux6.7中安装vmware、vmware安装linux发行版本以及遇到的问题最后libreoffice的安装
- ubuntu遇到的命令
- 【linux】linux启动过程
- Linq to XML 之XElement的Descendants方法的新发现
- android 设置半透明
- javascript 内置对象 第17节
- dojo.create\dojo.place\dojo.empty\dojo.destroy\dojo.body
- html---id,name和value
- ansible模块
- Bootstrap介绍
- Leaflet+heatmap实现离线地图加载和热力图应用
- getResources提取资源文件
- Create 命令详解
- WEB部分题目writeup
- SimpleDateFormat将月/日/年 时分秒转换为年-月-日 时:分:秒
- C#反射の反射泛型
- WEB服务器----Apache 安装配置
- XML和JSON优缺点
- Nodejs学习笔记(十二)—定时任务(node-schedule)