mysql基础之mysql主从架构
2024-10-20 08:40:40
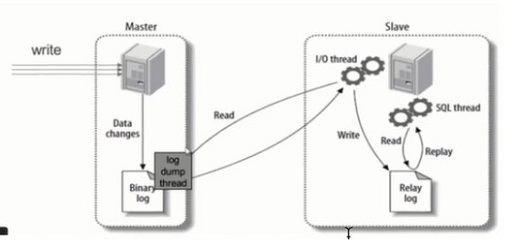
一、概念
主从多用于网站架构,因为主从的同步机制是异步的,数据的同步有一定延迟,也就是说有可能会造成数据的丢失,但是性能比较好,因此网站大多数用的是主从架构的数据库,读写分离必须基于主从架构来搭建
二、配置主节点
1、配置准备
(1)yum源配置
[mysql57-community]

name=MySQL 5.7 Community Server

baseurl=http://repo.mysql.com/yum/mysql-5.7-community/el/7/$basearch/

enabled=1

gpgcheck=0
(2)服务器1:192.168.11.7(主)
服务器2:192.168.11.8(从)
2、下载mysql,修改配置文件(5.7版本与mariadb冲突,需要先删除mariadb)
yum -y install mysql-com*server
[root@ren7 ~]# vim /etc/my.cnf.d/server.cnf
[mysqld]

server-id=1    <<主从节点必须保证不能一样

log-bin=mysql-bin   <<定义二进制日志文件保存文件和格式
binlog_format=row  <<主从节点保持一致,要么都是row,要么都是mixed
3、重启mysql服务
[root@ren7 ~]# systemctl restart mysql
4、主节点上授权具有复制权限的用户(创建主从连接账号与授权)
mysql [(none)]> create user 'slave'@'%' identified by 'Slave123/';

Query OK, 0 rows affected (0.00 sec)

mysql [(none)]> grant replication slave on *.* to 'slave'@'%';

Query OK, 0 rows affected (0.00 sec)

mysql [(none)]> flush privileges;

Query OK, 0 rows affected (0.00 sec)
5、查看当前二进制日志文件
mysql [(none)]> show master status;

+------------------+----------+--------------+------------------+

| File             | Position | Binlog_Do_DB | Binlog_Ignore_DB |

+------------------+----------+--------------+------------------+

| mysql-bin.000001 |      781 |              |                  |

+------------------+----------+--------------+------------------+

1 row in set (0.00 sec)
三、配置从节点(修改从节点和主节点时间同步,可以使用NTP服务或者date直接设置)
1、修改配置文件
[root@ren8 ~]# vim /etc/my.cnf.d/server.cnf

###########################

[mysqld]

server-id=2
binlog_format=row
log-bin=mysql-bin

##########################
2、重启mysql服务
[root@ren8 ~]# service mysql restart

Redirecting to /bin/systemctl restart mysql
3、登录数据库
[root@ren8 ~]# mysql_secure_installation

[root@ren8 ~]# mysql -u root -p123

Welcome to the mysql monitor.  Commands end with ; or \g.

Your mysql connection id is 24

Server version: 10.2.26-MariaDB mysql Server

Copyright (c) 2000, 2018, Oracle, mysql Corporation Ab and others.

Type 'help;' or '\h' for help. Type '\c' to clear the current input statement.
4、建立主从连接
格式:CHANGE MASTER TO 选项

选项:

MASTER_HOST = 'host_name'         指定主服务的ip或者主机名

MASTER_USER = 'user_name'         指定主服务器的用户名

MASTER_PASSWORD = 'password'      指定用户名的密码

MASTER_PORT = port_num            指定连接的端口,默认是3306

MASTER_CONNECT_RETRY = interval   指定连接失败的时候的重试间隔时间
mysql [(none)]> change master to master_host='192.168.11.7', master_user='slave', master_password='Slave123/', master_log_file='mysql-bin.000001', master_log_pos=781;

Query OK, 0 rows affected (0.03 sec)
5、启动从节点
mysql [(none)]> start slave;

Query OK, 0 rows affected (0.00 sec)
6、查看从节点连接状态
主要看IO以及SQL线程是否启动
mysql [(none)]> show slave status\G;

*************************** 1. row ***************************

               Slave_IO_State: Connecting to master

                  Master_Host: 192.168.11.7

                  Master_User: slave01

                  Master_Port: 3306

                Connect_Retry: 60

              Master_Log_File: mysql-bin.000001

          Read_Master_Log_Pos: 781

               Relay_Log_File: ren8-relay-bin.000001

                Relay_Log_Pos: 4

        Relay_Master_Log_File: mysql-bin.000001

             Slave_IO_Running: Connecting     <<IO线程正在连接

            Slave_SQL_Running: Yes            <<SQL线程启动成功

              Replicate_Do_DB:

          Replicate_Ignore_DB:

           Replicate_Do_Table:

       Replicate_Ignore_Table:

      Replicate_Wild_Do_Table:

  Replicate_Wild_Ignore_Table:

                   Last_Errno: 0

                   Last_Error:

                 Skip_Counter: 0

          Exec_Master_Log_Pos: 781

              Relay_Log_Space: 256

              Until_Condition: None

               Until_Log_File:

                Until_Log_Pos: 0

           Master_SSL_Allowed: No

           Master_SSL_CA_File:

           Master_SSL_CA_Path:

              Master_SSL_Cert:

            Master_SSL_Cipher:

               Master_SSL_Key:

        Seconds_Behind_Master: NULL

Master_SSL_Verify_Server_Cert: No

                Last_IO_Errno: 2003

                Last_IO_Error: error connecting to master 'slave@192.168.11.7:3306' - retry-time: 60  maximum-retries: 86400  message: Can't connect to MySQL server on '192.168.11.7' (113 "No route to host")

               Last_SQL_Errno: 0

               Last_SQL_Error:

  Replicate_Ignore_Server_Ids:

             Master_Server_Id: 0

               Master_SSL_Crl:

           Master_SSL_Crlpath:

                   Using_Gtid: No

                  Gtid_IO_Pos:

      Replicate_Do_Domain_Ids:

  Replicate_Ignore_Domain_Ids:

                Parallel_Mode: conservative

                    SQL_Delay: 0

          SQL_Remaining_Delay: NULL

      Slave_SQL_Running_State: Slave has read all relay log; waiting for the slave I/O thread to update it

1 row in set (0.00 sec)

ERROR: No query specified
问题解决:
slave_IO_Running:Connecting一直处于连接状态
错误原因:

1、网络不通

2、账户密码错误

3、防火墙

4、mysql配置文件问题

5、连接服务器时语法错误

6、主服务器mysql权限
此处是防火墙的原因,在主从服务器上添加防火墙端口即可;
[root@ren7 ~]# firewall-cmd --add-port=3306/tcp

success

[root@ren7 ~]# firewall-cmd --add-port=3306/tcp --permanent

success

[root@ren8 ~]# firewall-cmd --add-port=3306/tcp

success

[root@ren8 ~]# firewall-cmd --add-port=3306/tcp --permanent

success
mysql [(none)]> stop slave;
Query OK, 0 rows affected (0.00 sec)
mysql [(none)]> start slave;
Query OK, 0 rows affected (0.00 sec)
mysql [(none)]> show slave status\G;

*************************** 1. row ***************************

             Slave_IO_Running: Yes

            Slave_SQL_Running: Yes
7、测试
--在主节点创建一个新表

mysql [(none)]> create database zhong;

Query OK, 1 row affected (0.00 sec)

--在从节点查看是否创建成功

mysql [(none)]> show databases;

+--------------------+

| Database           |

+--------------------+

| information_schema |

| mysql              |

| performance_schema |

| zhong              |

+--------------------+

4 rows in set (0.00 sec)
--如果出现不同步可以执行以下步骤
stop slave

set GLOBAL SQL_SLAVE_SKIP_COUNTER=1;

start slave
最新文章
- .net 开发---windows服务
- SQLServer针对排名函数ROWNUMBER()、RANK()、DENSE_RANK()、NTILE的研究!~
- Python遍历文件夹
- 复制代理JOB
- ceph placement group状态总结
- Math对象常用方法汇总
- linux:计算机概论
- XManager介绍、安装、使用
- Delphi中GUID相等检查中经典指针应用
- Node.js和MongoDB - MongoJS入门
- https://lua-toolbox.com/
- angularjs使用ng-messages的注册表单实例
- html5画饼形图
- Android实现动画循环的方式
- 伯克利推出世界最快的KVS数据库Anna:秒杀Redis和Cassandra
- ajax请求window.open()被拦截
- vue和react的介绍
- 在CentOS-6.9里安装openvswitch-2.5.4
- Java的起源和发展
- iOS: UUID and SSKeyChain