NCNN优化实时面部关键点检测
效果图
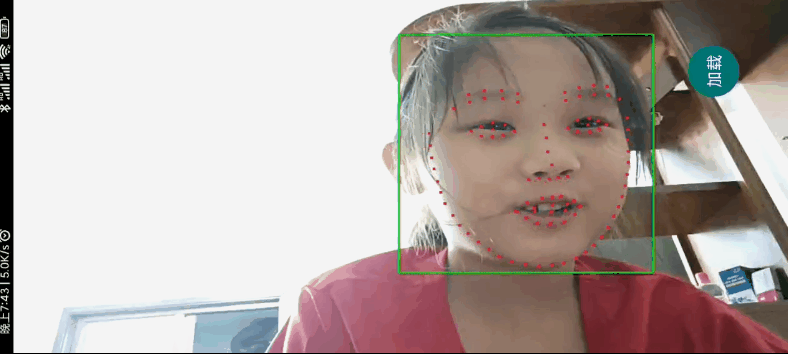
演示手机为红米10X pro,可以实时跑人脸检测+关键点识别二个模型.
主要优化
上次看见有人讨论人脸检测与关键点识别,用的是opencv相关,于是想看下深度神经网络相关部分的进展,先选定了推理框架ncnn,支持window/android等多种平台,然后在github参照多个ncnn+人脸检测/关键点识别的项目,大部分都是ncnn前期处理图像大小与改成rgb三平面格式,然后经过ncnn处理后再经opencv画矩形与多点.
在本机PC平台下,先用相关的人脸检测demo测试了下,Release下ncnn前期图像处理时间就需要ncnn(vulkan版本)推理时间的一半,有点奇怪,明明分辨率才那么点,不知是否更有效CPU前期图像处理方式,我能想到就是改为GPU处理,于是就有了本次优化,主要是把ncnn前期图像处理与opencv后期画矩形与多点全改成vulkan的computeshader处理,整个过程理想情况下全在GPU下处理,只有中间CPU-GPU传输数据占用大头,顺便去掉相关opencv的所有调用.
ncnn前期图像处理
首先ncnn前期图像处理主要就是三步,一是缩放,二是把数据交叉格式变成平面格式,三是数据的归一化,其相关过程改为如下vulkan的computeshader.
#version 450

layout (local_size_x = 16, local_size_y = 16) in;

layout (binding = 0) uniform sampler2D inSampler;

layout (binding = 1) buffer outBuffer{

    float dataOut[];

};

layout (std140, binding = 2) uniform UBO {

    int outWidth;

    int outHeight;

    float meanX;

    float meanY;

    float meanZ;

    float meanW;

    float scaleX;

    float scaleY;

    float scaleZ;

    float scaleW;

} ubo;

void main(){

    ivec2 uv = ivec2(gl_GlobalInvocationID.xy);

    if(uv.x >= ubo.outWidth || uv.y >= ubo.outHeight){

        return;

    }

    vec2 suv = (vec2(uv)+vec2(0.5f))/vec2(ubo.outWidth,ubo.outHeight);

    vec4 inColor = textureLod(inSampler,suv,0)*255.0f;

    int size = ubo.outWidth*ubo.outHeight;

    int index = uv.y*ubo.outWidth+uv.x;

    vec4 mean = vec4(ubo.meanX,ubo.meanY,ubo.meanZ,ubo.meanW);

    vec4 scale = vec4(ubo.scaleX,ubo.scaleY,ubo.scaleZ,ubo.scaleW);

    inColor = inColor*scale-mean;

#if NCNN_BGR

    dataOut[index] = inColor.b;

    dataOut[index+size] = inColor.g;

    dataOut[index+2*size] = inColor.r;

#endif

#if NCNN_RGB

    dataOut[index] = inColor.r;

    dataOut[index+size] = inColor.g;

    dataOut[index+2*size] = inColor.b;

#endif

}
关键点模型的识别需要在面部识别的RECT区域上进行识别,相关代码修改为.
#version 450

layout (local_size_x = 16, local_size_y = 16) in;

layout (binding = 0) uniform sampler2D inSampler;

layout (binding = 1) buffer outBuffer{

    float dataOut[];

};

layout (std140, binding = 2) uniform UBO {

    int outWidth;

    int outHeight;

    float meanX;

    float meanY;

    float meanZ;

    float meanW;

    float scaleX;

    float scaleY;

    float scaleZ;

    float scaleW;

    float x1;

    float x2;

    float y1;

    float y2;

} ubo;

void main(){

    ivec2 uv = ivec2(gl_GlobalInvocationID.xy);

    if(uv.x >= ubo.outWidth || uv.y >= ubo.outHeight){

        return;

    }

    vec2 isize = vec2(ubo.x2-ubo.x1,ubo.y2-ubo.y1);

    vec2 suv = (vec2(uv)+vec2(0.5f))/vec2(ubo.outWidth,ubo.outHeight);

    vec2 isuv = suv*isize+vec2(ubo.x1,ubo.y1);

    vec4 inColor = textureLod(inSampler,isuv,0)*255.0f;

    int size = ubo.outWidth*ubo.outHeight;

    int index = uv.y*ubo.outWidth+uv.x;

    vec4 mean = vec4(ubo.meanX,ubo.meanY,ubo.meanZ,ubo.meanW);

    vec4 scale = vec4(ubo.scaleX,ubo.scaleY,ubo.scaleZ,ubo.scaleW);

    inColor = inColor*scale-mean;

#if NCNN_BGR

    dataOut[index] = inColor.b;

    dataOut[index+size] = inColor.g;

    dataOut[index+2*size] = inColor.r;

#endif

#if NCNN_RGB

    dataOut[index] = inColor.r;

    dataOut[index+size] = inColor.g;

    dataOut[index+2*size] = inColor.b;

#endif

}
opencv矩形与多点绘制
画矩形与多点,我在移植GPUImage里相关滤镜时考虑过这个,当时想的是把渲染管线这一套集成就容易了,但是渲染管线本身,以及和计算管线的通用交互设计又是很多东东.
暂时决定先简单点来,画矩形,这种写法算力肯定有点浪费.
#version 450

layout (local_size_x = 16, local_size_y = 16) in;// gl_WorkGroupSize

layout (binding = 0, rgba8) uniform readonly image2D inTex;

layout (binding = 1, rgba8) uniform image2D outTex;

layout (binding = 2) uniform UBO {

	int radius;

    float x1;

    float x2;

    float y1;

    float y2;

    float colorR;

    float colorG;

    float colorB;

    float colorA;

} ubo;

void main(){

    ivec2 uv = ivec2(gl_GlobalInvocationID.xy);

    ivec2 size = imageSize(inTex);

    if(uv.x >= size.x || uv.y >= size.y){

        return;

    }

    int xmin = int(ubo.x1 * size.x);

    int xmax = int(ubo.x2 * size.x);

    int ymin = int(ubo.y1 * size.y);

    int ymax = int(ubo.y2 * size.y);

    ivec4 xx = ivec4(uv.x, xmax, uv.y, ymax);

    ivec4 yy = ivec4(xmin, uv.x, ymin, uv.y);

    ivec4 xy = abs(xx - yy);

    float sum =  step(xy.x, ubo.radius) + step(xy.y, ubo.radius) + step(xy.z, ubo.radius) + step(xy.w, ubo.radius);

	vec2 lr = vec2(xy.x + xy.y, xy.z + xy.w);

	vec2 rl = vec2(xmax - xmin, ymax - ymin);

    vec4 color = imageLoad(inTex,uv);

	if (sum > 0 && length(lr - rl) < ubo.radius) {

		vec3 drawColor = vec3(ubo.colorR,ubo.colorG,ubo.colorB);

        color.rgb = color.rgb*(1.0f - ubo.colorA) + drawColor*ubo.colorA;

	}

    imageStore(outTex,uv,color);

}
画多点也是有渲染管线就很容易实现,在这还好,固定多点,简单来说,针对多个UV,在图上对应UV标记,然后和原图混合.
#version 450

layout (local_size_x = 240, local_size_y = 1) in;

layout (binding = 0) buffer inBuffer{

    vec2 points[];

};

layout (binding = 1, rgba8) uniform image2D outTex;

layout (binding = 2) uniform UBO {

	int showCount;

    int radius;

    float colorR;

    float colorG;

    float colorB;

    float colorA;

} ubo;

void main(){

    int index = int(gl_GlobalInvocationID.x);

    ivec2 size = imageSize(outTex);

    if(index >= ubo.showCount){

        return;

    }

    ivec2 uv = ivec2(points[index] * size);

    vec4 drawColor = vec4(ubo.colorR,ubo.colorG,ubo.colorB,ubo.colorA);

    int radius = max(1,ubo.radius);

    for(int i = 0; i< radius; ++i){

        for(int j= 0; j< radius; ++j){

            int x = uv.x - 1 + j;

            int y = uv.y - 1 + i;

            // REPLICATE border

            x = max(0,min(x,size.x-1));

            y = max(0,min(y,size.y-1));

            imageStore(outTex, ivec2(x,y), drawColor);

        }

    }

}
有大佬有更好的想法欢迎指点.
编译与运行
如上glsl逻辑封装与组合逻辑主要代码在aoce_ncnn,
win端测试demo主要在ncnntest,其目录下CMakeLists.txt提供选项NCNN_VULKAN_WINDOW,决定是用vulkan绘制还是opencv绘制.android端demo主要封装逻辑在aocencnntest.
大家可以自己下载相关ncnn编译,调试,测试其中的细节,也可以直接使用我配置好的目录aoce_thirdparty,把下载的thirdparty文件夹下文件放入aoce目录下thirdparty文件夹下,位置正确CMake会自动查找链接相关dll.
在android下,需要先用swig自动把aoce提供的接口转化成java,详细请看android build,现在需要把手机横着检测才有比较好的效果,这个后期应该会调整.
最后是比较遗憾的地方,原计划是把vulkan前期处理完的buffer直接和ncnn进行显存交互对接,不像现在用的VK_MEMORY_PROPERTY_HOST_COHERENT_BIT类型的buffer做中转,其中测试一些写法,暂时都没成功,有做过类似的大佬欢迎指点.
参照:
Face-Detector-1MB-with-landmark
Ultra-Light-Fast-Generic-Face-Detector-1MB
人脸检测之Ultra-Light-Fast-Generic-Face-Detector-1MB
最新文章
- 流形学习之等距特征映射(Isomap)
- Reinforcement Learning
- System.Threading.ThreadAbortException: 正在中止线程。
- hadoop集群基本配置
- MFC消息映射的原理:笔记
- [kuangbin带你飞]专题四 最短路练习 POJ 2253 Frogger
- 【dotNet Core】Swagger下简单的给WebApi分组
- Python之切片操作
- Linux(以centos7为例)下自动挂载NTFS硬盘
- linux中内存使用原理
- 支付宝集成遇到"_EVP_DecodeBlock",referenced from:报错
- axios ajax fetch 区别
- ArcGIS Earth1.9最新版安装和使用教程
- tomcatserver解析(五)-- Poller
- Git之hotfix热修复分支
- 虚拟机中安装 centOS,本地安装 SSH 连接 - 02
- Orchard运用 - 为博客启用Markdown编辑器
- gemspec和Gemfile的不同角色作用
- SpringMVC的HelloWorld快速入门!
- 对象API