ng-book札记——依赖注入
2024-10-20 13:47:31
依赖注入是一种使程序的一部分能够访问另一部分的系统,并且可以通过配置控制其行为。
“注入”可以理解为是“new”操作符的一种替代,不再需要使用编程语言所提供的"new"操作符,依赖注入系统管理对象的生成。
依赖注入的最大好处是组件不再需要知道如何建立依赖项。它们只需要知道如何与依赖项交互。
在Angular的依赖注入系统中,不用直接导入并创建类的实例,而是使用Angular注册依赖,然后描述如何注入依赖,最后注入依赖。
依赖注入组件
为了注册一个依赖项,需要使用依赖标记(token)与之绑定。比如,注册一个API的URL,可以使用字符串API_URL作为其标记;如果是注册一个类,可以用类本身作为标记。
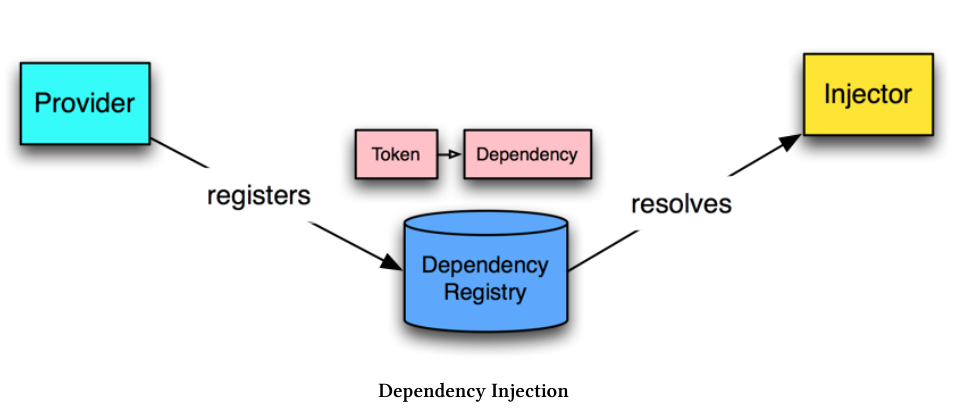
Angular中的依赖注入系统分为三部分:
- 提供者(Provider)(也被作为一个绑定)映射一个标记到一系列的依赖项,其告知Angular如何创建一个对象并给予一个标记。
- 注入器(Injector)持有一系列绑定,并负责解析依赖项,且在创建对象的时候注入它们。
- 依赖项(Dependency)是所注入的对象。
依赖注入方式
手动方式
通过ReflectiveInjector的resolveAndCreate方法解析并创建对象,这种方式不常用。
import { Injectable } from '@angular/core';

@Injectable()

export class UserService {

  user: any;

  setUser(newUser) {

    this.user = newUser;

  }

  getUser(): any {

    return this.user;

  }

}
import {

  Component,

  ReflectiveInjector

} from '@angular/core';

import { UserService } from '../services/user.service';

@Component({

  selector: 'app-injector-demo',

  templateUrl: './user-demo.component.html',

  styleUrls: ['./user-demo.component.css']

})

export class UserDemoInjectorComponent {

  userName: string;

  userService: UserService;

  constructor() {

    // Create an _injector_ and ask for it to resolve and create a UserService

    const injector: any = ReflectiveInjector.resolveAndCreate([UserService]);

    // use the injector to **get the instance** of the UserService

    this.userService = injector.get(UserService);

  }

  signIn(): void {

    // when we sign in, set the user

    // this mimics filling out a login form

    this.userService.setUser({

      name: 'Nate Murray'

    });

    // now **read** the user name from the service

    this.userName = this.userService.getUser().name;

    console.log('User name is: ', this.userName);

  }

}
* 注意UserService类上的@Injectable()装饰器,这说明了这个类是可以作为注入对象的。
NgModule方式
使用NgModule注册将要用到的依赖项(在providers中),并用装饰器(一般是构造器)指定哪些是正在使用的。
import { NgModule } from '@angular/core';

import { CommonModule } from '@angular/common';

// imported here

import { UserService } from '../services/user.service';

@NgModule({

  imports: [

    CommonModule

  ],

  providers: [

    UserService // <-- added right here

  ],

  declarations: []

})

export class UserDemoModule { }
import { Component, OnInit } from '@angular/core';

import { UserService } from '../services/user.service';

@Component({

  selector: 'app-user-demo',

  templateUrl: './user-demo.component.html',

  styleUrls: ['./user-demo.component.css']

})

export class UserDemoComponent {

  userName: string;

  // removed `userService` because of constructor shorthand below

  // Angular will inject the singleton instance of `UserService` here.

  // We set it as a property with `private`.

  constructor(private userService: UserService) {

    // empty because we don't have to do anything else!

  }

  // below is the same...

  signIn(): void {

    // when we sign in, set the user

    // this mimics filling out a login form

    this.userService.setUser({

      name: 'Nate Murray'

    });

    // now **read** the user name from the service

    this.userName = this.userService.getUser().name;

    console.log('User name is: ', this.userName);

  }

}
Providers
类标记
providers: [ UserService ]是以下方式的的简写:
providers: [

  { provide: UserService, useClass: UserService }

]
provide是标记,useClass是所依赖的对象。两者为映射关系。
值标记
providers: [

  { provide: 'API_URL', useValue: 'http://my.api.com/v1' }

]
使用时需要加上@Inject:
import { Inject } from '@angular/core';

export class AnalyticsDemoComponent {

  constructor(@Inject('API_URL') apiUrl: string) {

    // works! do something w/ apiUrl

  }

}
工厂方式
绑定依赖项时还可以通过工厂方式实现更复杂的绑定逻辑,并且这种方式下可以传入必要参数以创建所需的对象。
import { NgModule } from '@angular/core';

import { CommonModule } from '@angular/common';

import {

  Metric,

  AnalyticsImplementation

} from './analytics-demo.interface';

import { AnalyticsService } from '../services/analytics.service';

// added this ->

import {

  HttpModule,

  Http

} from '@angular/http';

@NgModule({

  imports: [

    CommonModule,

    HttpModule, // <-- added

  ],

  providers: [

    // add our API_URL provider

    { provide: 'API_URL', useValue: 'http://devserver.com' },

    {

      provide: AnalyticsService,

      // add our `deps` to specify the factory depencies

      deps: [ Http, 'API_URL' ],

      // notice we've added arguments here

      // the order matches the deps order

      useFactory(http: Http, apiUrl: string) {

        // create an implementation that will log the event

        const loggingImplementation: AnalyticsImplementation = {

          recordEvent: (metric: Metric): void => {

            console.log('The metric is:', metric);

            console.log('Sending to: ', apiUrl);

            // ... You'd send the metric using http here ...

          }

        };

        // create our new `AnalyticsService` with the implementation

        return new AnalyticsService(loggingImplementation);

      }

    },

  ],

  declarations: [ ]

})

export class AnalyticsDemoModule { }
最新文章
- Git更新到最新版本
- Java Web整合开发实战:基于Struts 2+Hibernate+Spring 目录
- PAT-乙级-1054. 求平均值 (20)
- js防止表单重复提交的两种方法
- 一、Bitmap的recycle问题
- html基础标签-2-textarea文本域
- 浅谈tomcat的配置及数据库连接池的配置
- Navicat for mysql 11.1.20激活
- Sql语句varchar或nvarchar字段条件前加N的性能差异
- 31.Linux-wm9876声卡驱动(移植+测试)
- 浅谈IM(InstantMessaging) 即时通讯/实时传讯【理论篇】
- Java当中的线程
- JS加密对应的c#解码
- 平安银行在开源技术选型上的思考和实践 RocketMQ
- 支持pc和移动端的手写签批功能
- linux的文档和目录结构
- Educational Codeforces Round 55 (Rated for Div. 2) B. Vova and Trophies
- UOJ#62. 【UR #5】怎样跑得更快 数论 莫比乌斯反演
- Eureka多机高可用
- 关于select的默认样式问题
热门文章
- antd 主题色
- centos系统升级PHP版本程序
- 改变textField的placeholder的颜色和位置
- Java-Maven(八):IDEA使用本地maven,并配置远程中央仓库
- 给定了经纬度的一张my_latlng表,和一个my_grid表,怎么实现my_latlng表回mygrid中的id?
- linux下的mysql安装
- 使用Navicat Premium 链接本地数据库的方法(二)
- springaop问题——Cannot subclass final class org.springframework.boot.autoconfigure.AutoConfigurationPackages$BasePackages
- 前端面试送命题-JS三座大山
- 解决将/etc/passwd文件中1000改为0后只能guest进入系统的问题