zabbix 监控linux tcp连接数
2024-08-28 20:18:55
zabbix 监控linux tcp连接数
作者:尹正杰
版权声明:原创作品,谢绝转载!否则将追究法律责任。
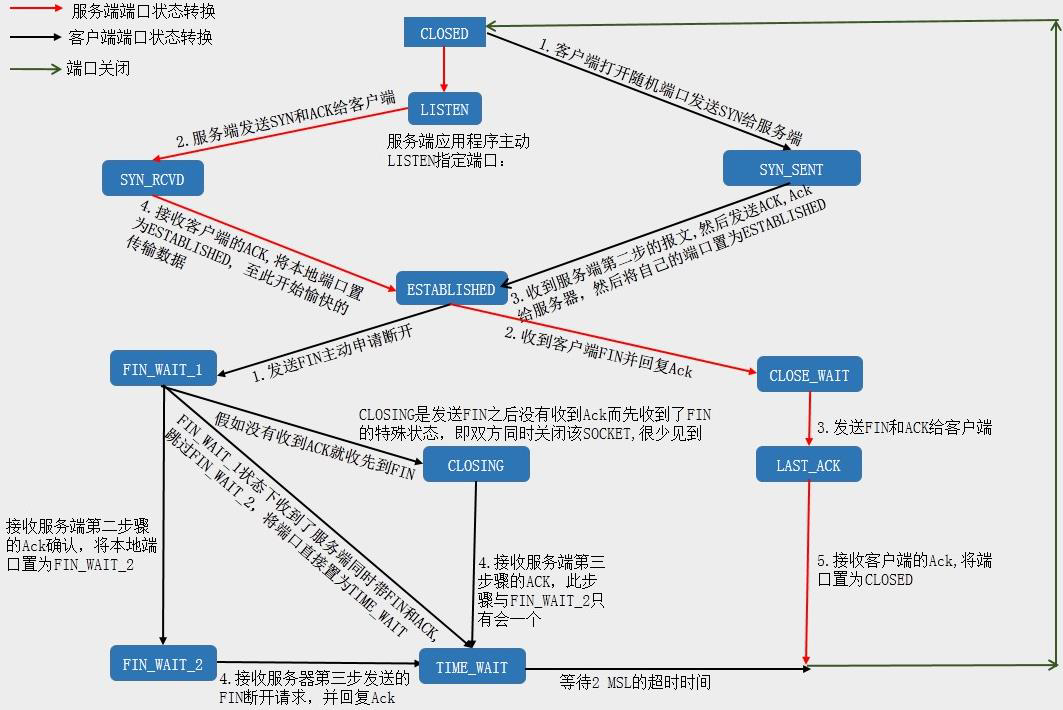
一.TCP的状态概述
1>.端口状态转换
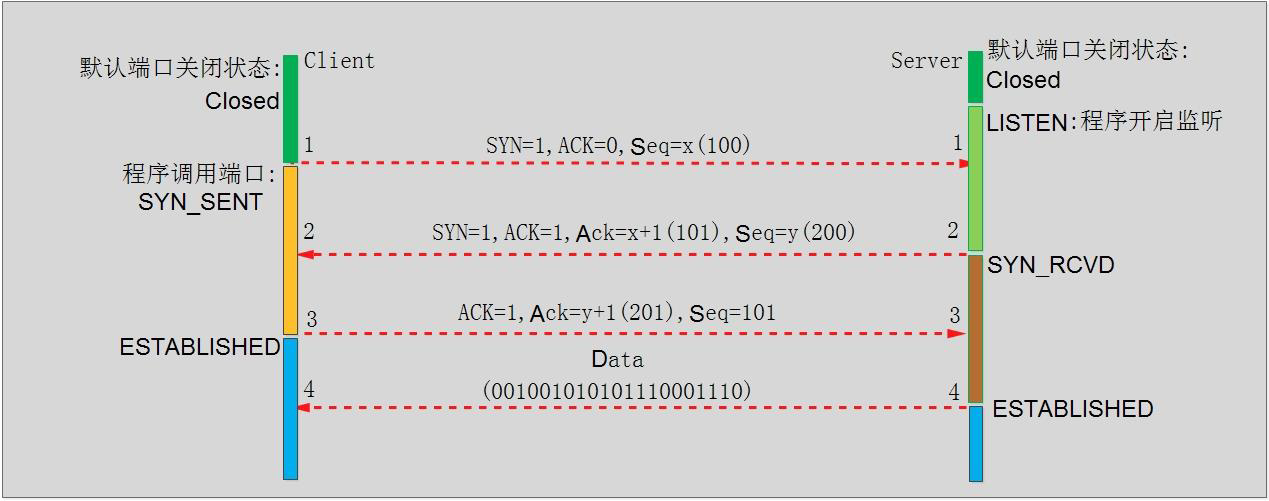
2>.TCP 三次握手
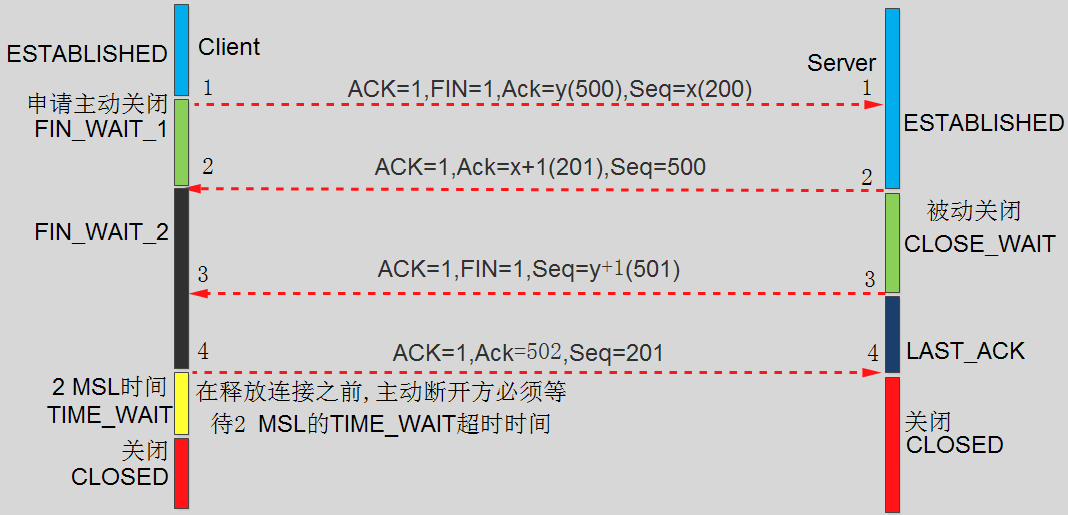
3>.四次断开
二.zabbix agent端配置监控TCP的脚本
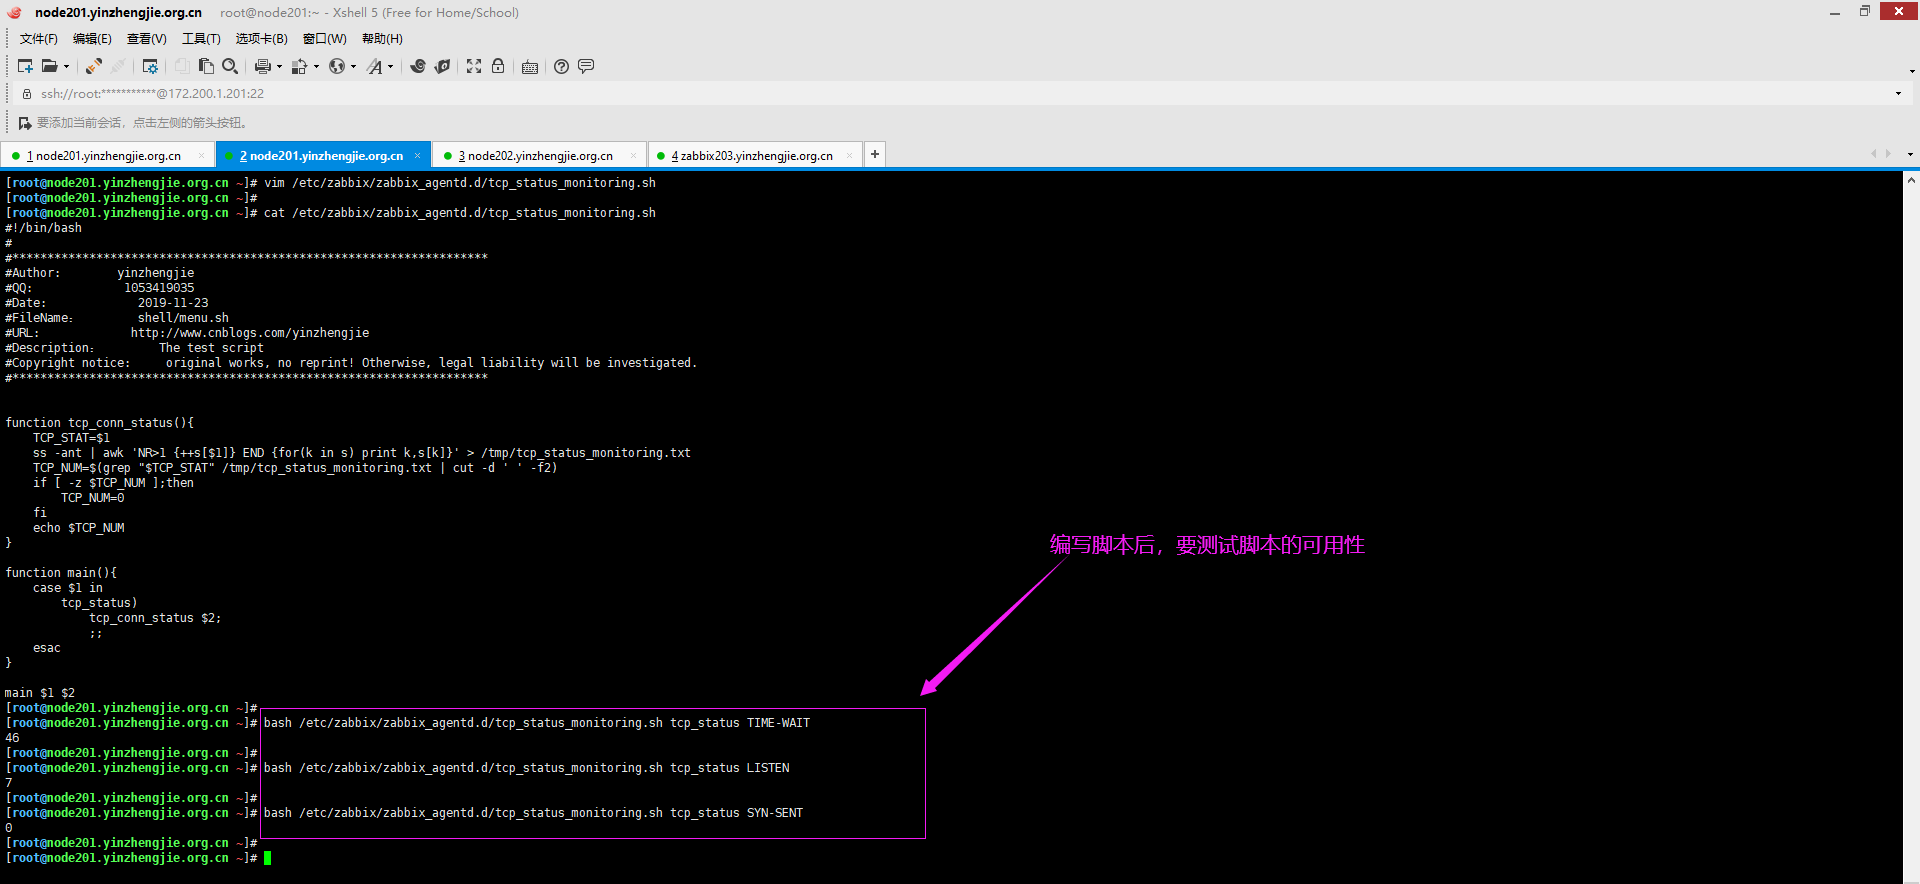
1>.自定义脚本
[root@node201.yinzhengjie.org.cn ~]# vim /etc/zabbix/zabbix_agentd.d/tcp_status_monitoring.sh

[root@node201.yinzhengjie.org.cn ~]#

[root@node201.yinzhengjie.org.cn ~]# cat /etc/zabbix/zabbix_agentd.d/tcp_status_monitoring.sh

#!/bin/bash

#

#********************************************************************

#Author:        yinzhengjie

#QQ:

#Date:             --

#FileName:        shell/menu.sh

#URL:             http://www.cnblogs.com/yinzhengjie

#Description:        The test script

#Copyright notice:     original works, no reprint! Otherwise, legal liability will be investigated.

#********************************************************************

function tcp_conn_status(){

    TCP_STAT=$

    ss -ant | awk 'NR>1 {++s[$1]} END {for(k in s) print k,s[k]}' > /tmp/tcp_status_monitoring.txt

    TCP_NUM=$(grep "$TCP_STAT" /tmp/tcp_status_monitoring.txt | cut -d ' ' -f2)

    if [ -z $TCP_NUM ];then

        TCP_NUM=

    fi

    echo $TCP_NUM

}

function main(){

    case $ in

        tcp_status)

            tcp_conn_status $;

            ;;

    esac

}

main $ $

[root@node201.yinzhengjie.org.cn ~]#

[root@node201.yinzhengjie.org.cn ~]#
2>.为脚本添加执行权限
[root@node201.yinzhengjie.org.cn ~]# ll /etc/zabbix/zabbix_agentd.d/tcp_status_monitoring.sh

-rw-r--r--  root root  Feb  : /etc/zabbix/zabbix_agentd.d/tcp_status_monitoring.sh

[root@node201.yinzhengjie.org.cn ~]#

[root@node201.yinzhengjie.org.cn ~]#

[root@node201.yinzhengjie.org.cn ~]# chmod +x /etc/zabbix/zabbix_agentd.d/tcp_status_monitoring.sh                 #为自定义监控脚本添加执行权限

[root@node201.yinzhengjie.org.cn ~]#

[root@node201.yinzhengjie.org.cn ~]# ll /etc/zabbix/zabbix_agentd.d/tcp_status_monitoring.sh

-rwxr-xr-x  root root  Feb  : /etc/zabbix/zabbix_agentd.d/tcp_status_monitoring.sh

[root@node201.yinzhengjie.org.cn ~]#

[root@node201.yinzhengjie.org.cn ~]#

[root@node201.yinzhengjie.org.cn ~]# /etc/zabbix/zabbix_agentd.d/tcp_status_monitoring.sh tcp_status LISTEN            #测试脚本的可用性,测试有数据说明脚本是可用的

[root@node201.yinzhengjie.org.cn ~]#

[root@node201.yinzhengjie.org.cn ~]# /etc/zabbix/zabbix_agentd.d/tcp_status_monitoring.sh tcp_status TIME-WAIT

[root@node201.yinzhengjie.org.cn ~]#

[root@node201.yinzhengjie.org.cn ~]# ll /tmp/

total

drwx------  root root  Feb  : systemd-private-911f89b1c3ee4635acad4ca6cdb6b581-chronyd.service-XgssdE

-rw-r--r--  root root  Feb  : tcp_status_monitoring.txt

[root@node201.yinzhengjie.org.cn ~]#

[root@node201.yinzhengjie.org.cn ~]#

[root@node201.yinzhengjie.org.cn ~]# rm -f /tmp/tcp_status_monitoring.txt                                  #使用root用户昨做完删除测试后记得删除文件,否则默认的zabbix用户是没有写入权限的哟~

[root@node201.yinzhengjie.org.cn ~]#
3>. 修改zabbix agent的配置文件并重启服务
[root@node201.yinzhengjie.org.cn ~]# grep "# UserParameter=" /etc/zabbix/zabbix_agentd.conf

# UserParameter=

[root@node201.yinzhengjie.org.cn ~]#

[root@node201.yinzhengjie.org.cn ~]# sed -r -i 's@# (UserParameter=)@\1tcp_status_monitoring[*],/etc/zabbix/zabbix_agentd.d/tcp_status_monitoring.sh $1 $2@' /etc/zabbix/zabbix_agentd.conf

[root@node201.yinzhengjie.org.cn ~]#

[root@node201.yinzhengjie.org.cn ~]# grep ^UserParameter= /etc/zabbix/zabbix_agentd.conf

UserParameter=tcp_status_monitoring[*],/etc/zabbix/zabbix_agentd.d/tcp_status_monitoring.sh $ $

[root@node201.yinzhengjie.org.cn ~]#

[root@node201.yinzhengjie.org.cn ~]# systemctl restart zabbix-agent.service

[root@node201.yinzhengjie.org.cn ~]#
三.zabbix webUI进行配置
1>.在zabbix server测试是否可以获取数据
[root@zabbix203.yinzhengjie.org.cn ~]# /yinzhengjie/softwares/zabbix/bin/zabbix_get -s node201.yinzhengjie.org.cn -p  -k "tcp_status_monitoring[tcp_status SYN-SENT]"

[root@zabbix203.yinzhengjie.org.cn ~]#

[root@zabbix203.yinzhengjie.org.cn ~]# /yinzhengjie/softwares/zabbix/bin/zabbix_get -s node201.yinzhengjie.org.cn -p  -k "tcp_status_monitoring[tcp_status TIME-WAIT]"

[root@zabbix203.yinzhengjie.org.cn ~]#
2>.在zabbix WebUI上自定义TCP的监控模板
  其实自定义监控模板过程和之前自定义Nginx的监控模板类似,此处我就懒得截图啦,成功添加监控项后如下图所示。

  博主推荐阅读:

    自定义Nginx监控项模板(https://www.cnblogs.com/yinzhengjie2020/p/12340063.html)
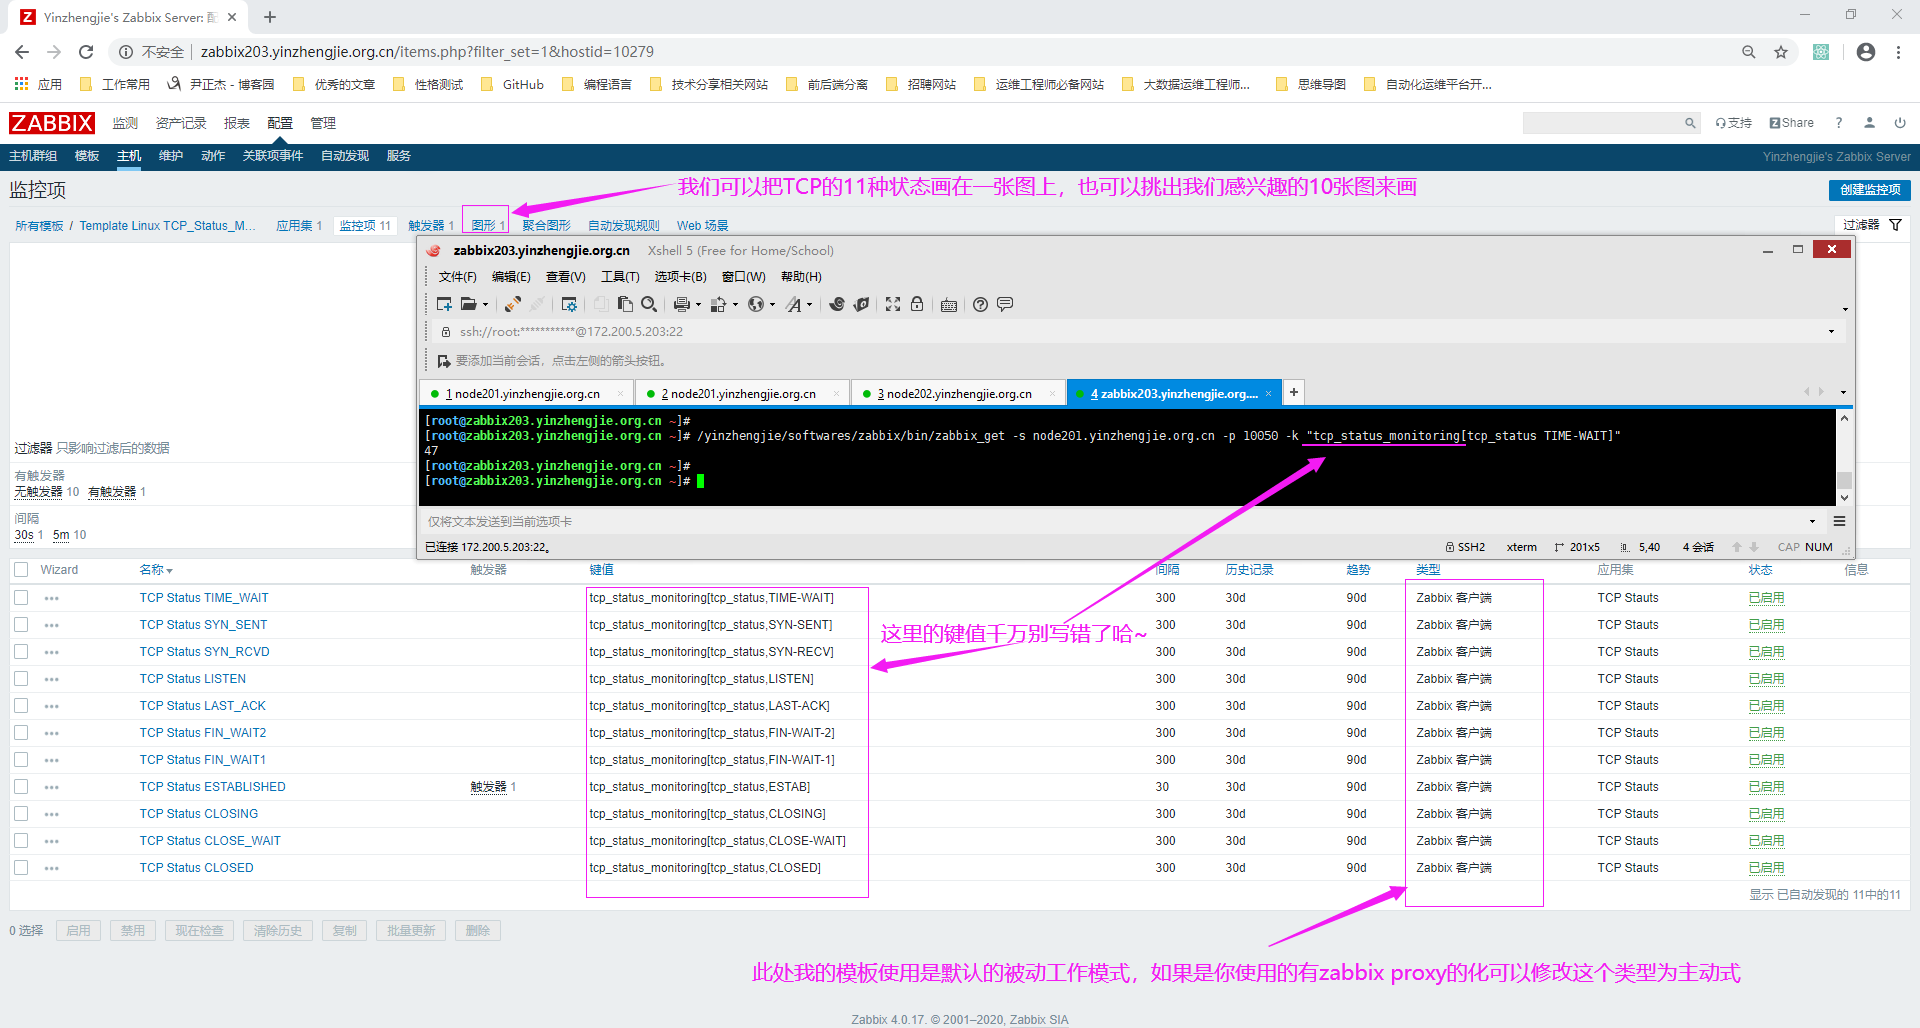
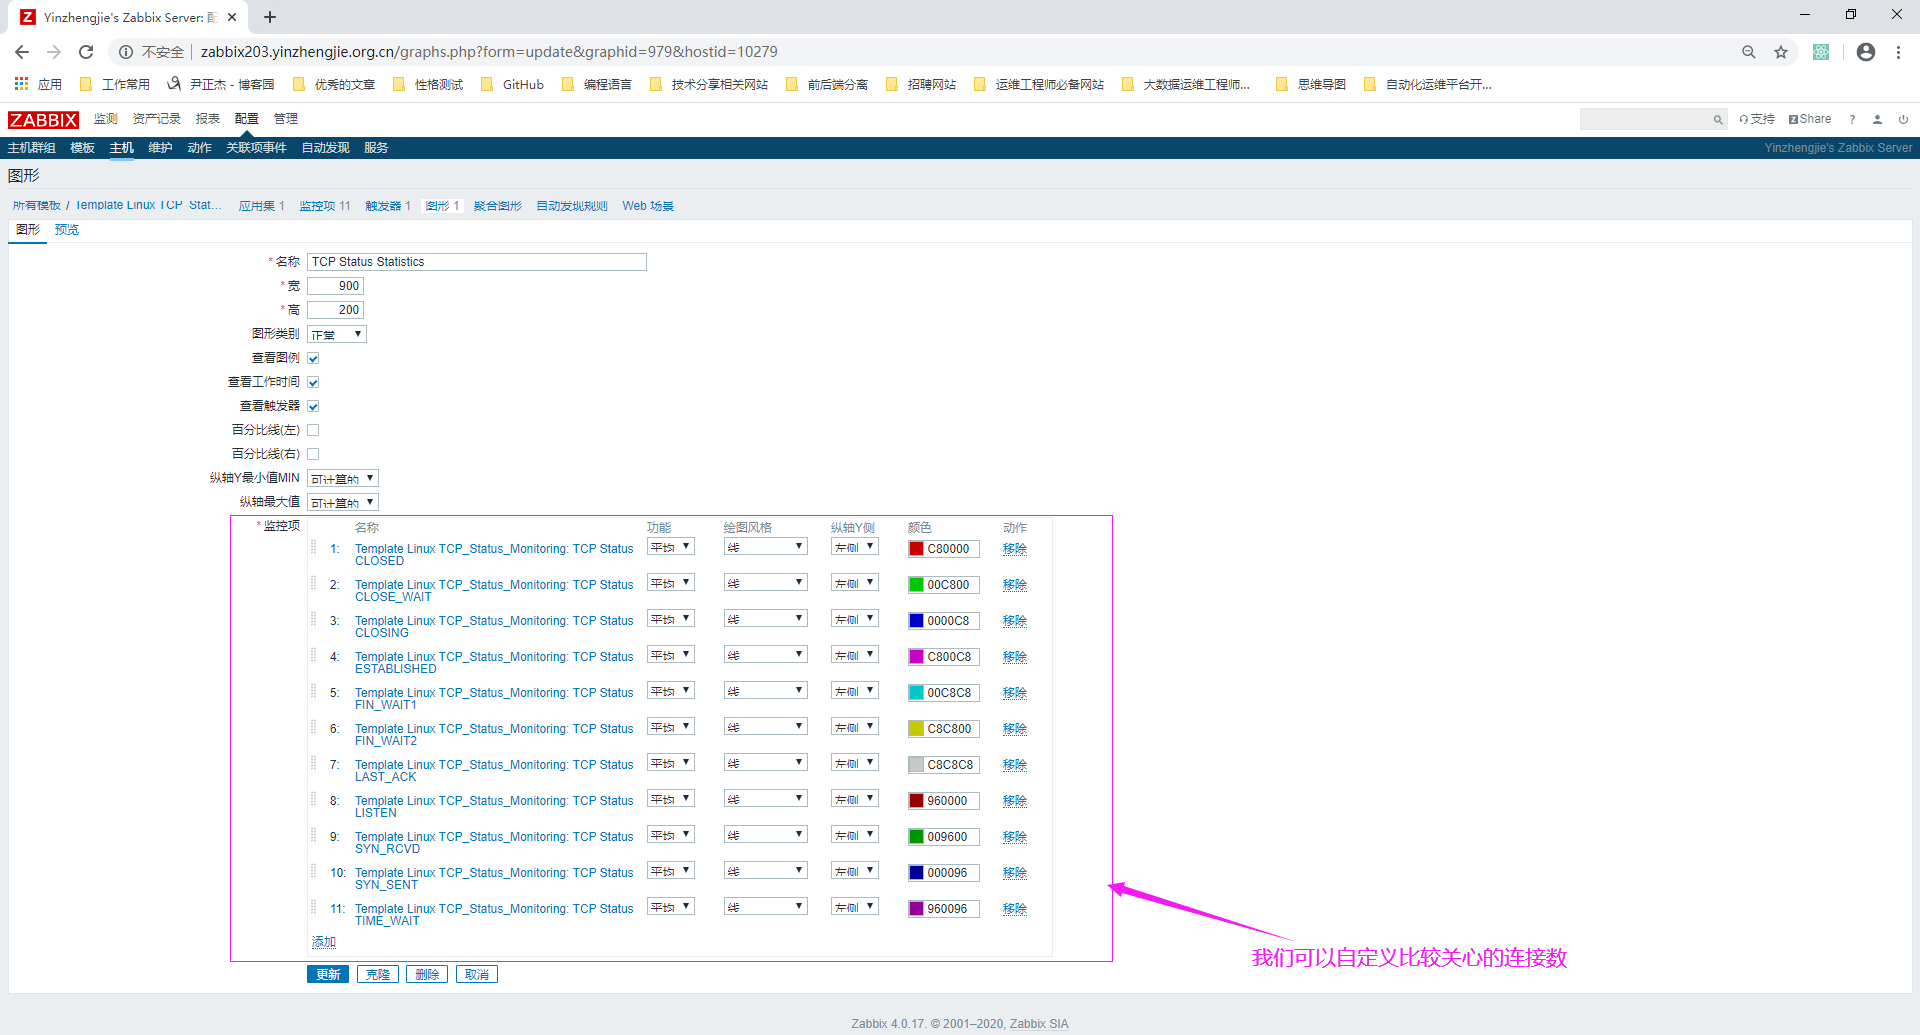
3>.将TCP的11个监控项画在同一个图像中
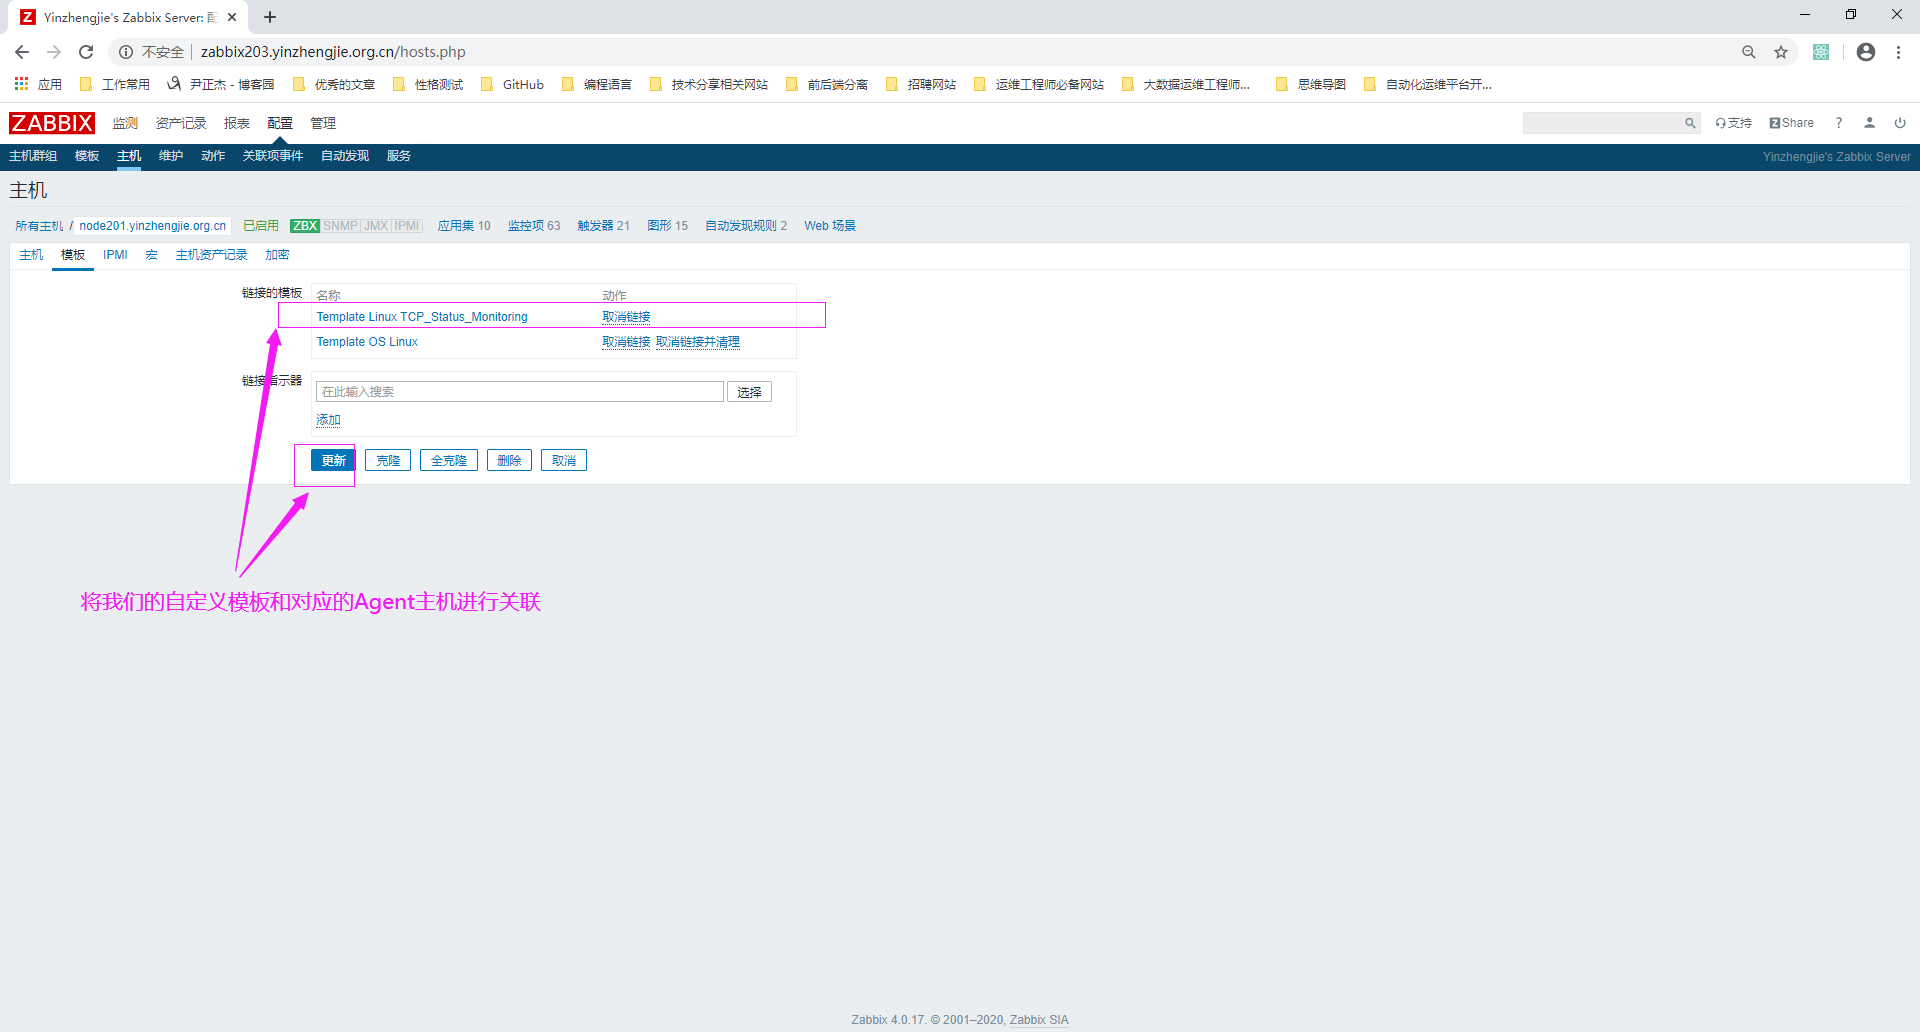
4>.将自定义模板和对应的agent主机进行关联
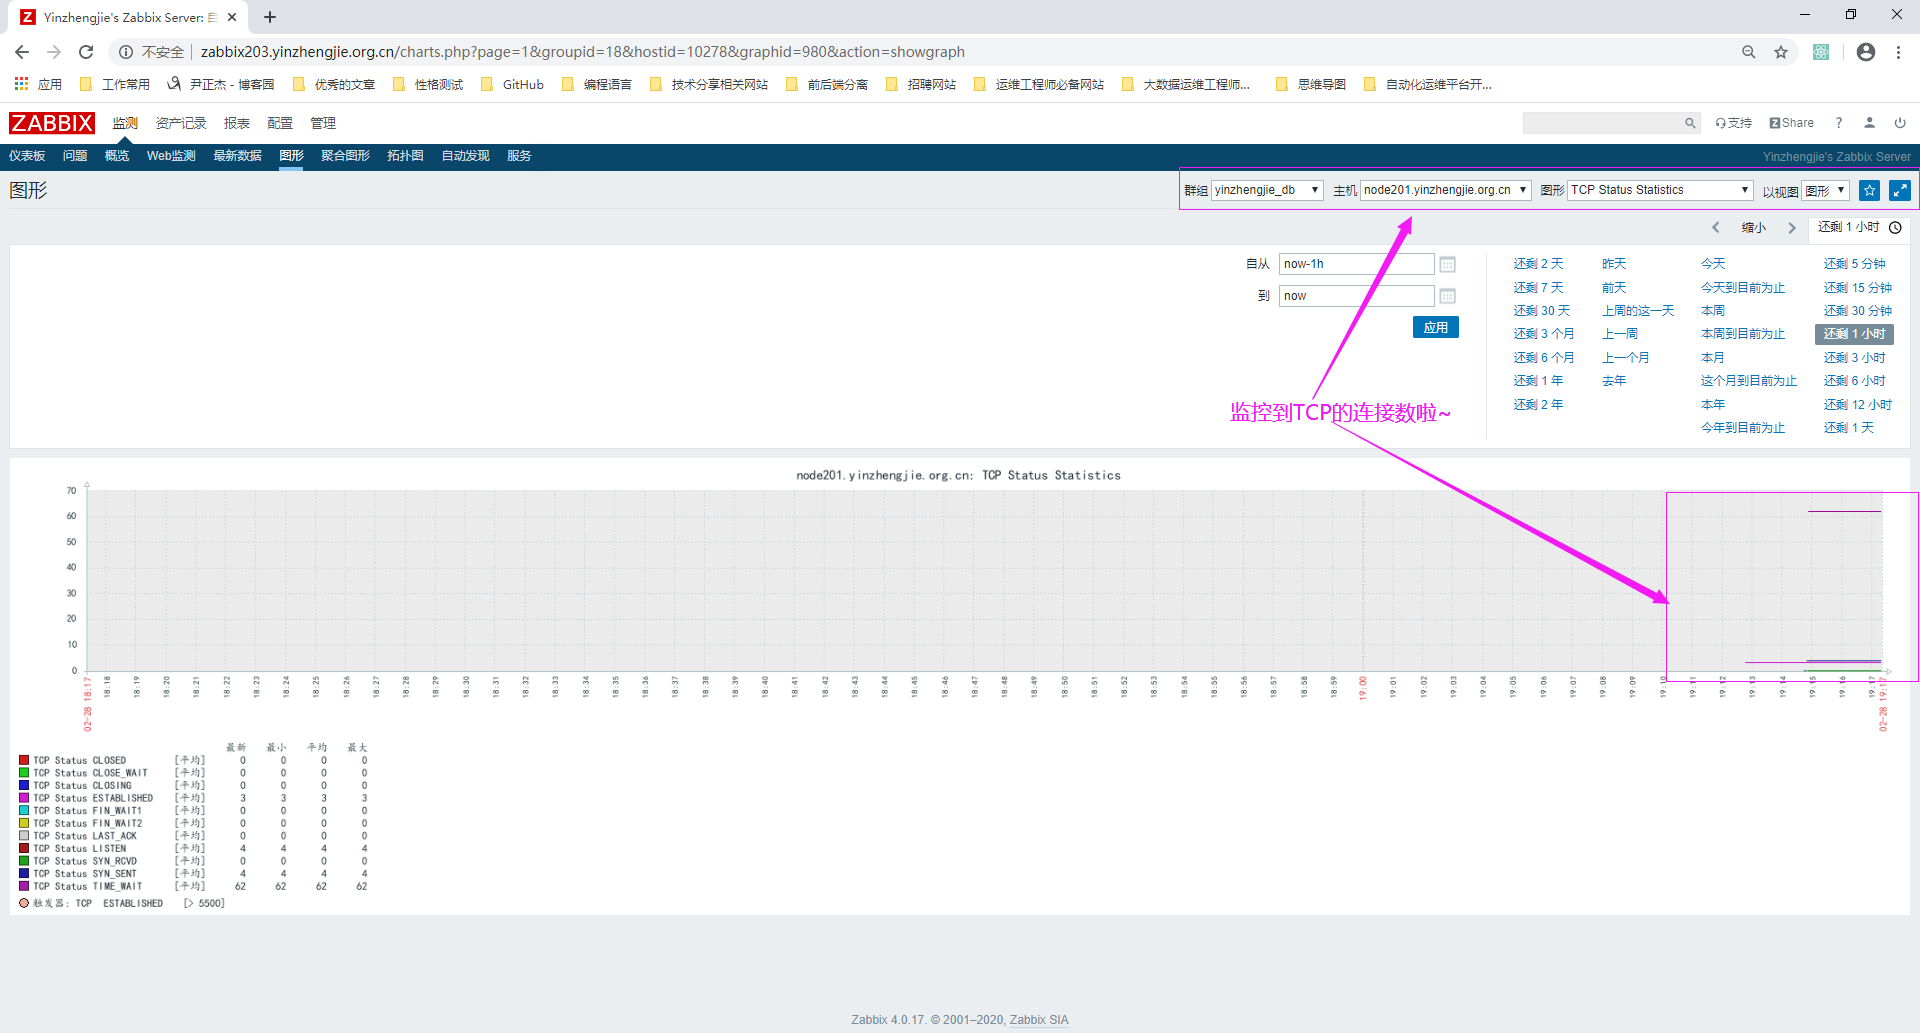
5>.间隔一段时间后,查看图形
最新文章
- 人工智能AI-机器视觉CV-数据挖掘DM-机器学习ML-神经网络-[资料集合贴]
- 配置apache和nginx的tomcat负载均衡
- MapReduce原理与设计思想
- Java Selenium封装--RemoteWebDriver
- web单页应用(1)--第一个SPA
- 一个令人蛋疼的 Microsoft.AspNet.FriendlyUrls
- Lnmp环境的自搭建
- 51nod 最长递增子序列
- LINQ To SQL在N层应用程序中的CUD操作、批量删除、批量更新
- 接口速度慢问题查找(TTFB时间长)
- Vue.js 计算属性的秘密
- 【BZOJ4002】[JLOI2015]有意义的字符串(数论,矩阵快速幂)
- css 常用的绝对定位元素水平垂直居中的方法
- linux第四次读书笔记
- WebSocket 实战之——【WebSocket 原理】
- [转]使用python来操作redis用法详解
- log4net 未生成log 原因分析
- C#:安装Windows服务,动态指定服务名及描述(转载)
- python爬虫之requests库
- RabbitMQ的基础介绍