AOP中获取自定义注解的参数值
2024-08-28 04:11:54
目录
1.2、创建一个service,使用上面定义的注解来指定切点
1.3、创建Aspect,增加业务逻辑
1.4、创建Spring配置类
1.5、测试
2.1、创建带属性的自定义注解
2.3、创建Aspect的错误示例
2.4、创建Aspect的正确做法
2.5、测试
三、总结
一、利用注解实现AOP的基本流程
如果特别熟悉自定义注解实现AOP,可以直接转到第二部分:跳转。
Spring中,可以通过自定义注解的方式来实现AOP,比较简单,流程如下:
1.1、创建一个注解,用来注解切点(pointcut)
|
1
2
3
4
5
6
7
8
9
10
11
12
|
package cn.ganlixin.annotation;import java.lang.annotation.ElementType;import java.lang.annotation.Retention;import java.lang.annotation.RetentionPolicy;import java.lang.annotation.Target;@Retention(RetentionPolicy.RUNTIME)@Target(ElementType.METHOD)public @interface DemoAnnotation { //注意这里没有定义属性} |
1.2、创建一个service,使用上面定义的注解来指定切点
这里为了节约篇幅,就不创建service接口,再创建serviceImpl来实现接口了,直接写在service中:
|
1
2
3
4
5
6
7
8
9
10
11
12
13
|
package cn.ganlixin.service;import cn.ganlixin.annotation.DemoAnnotation;import org.springframework.stereotype.Service;@Servicepublic class DemoService { @DemoAnnotation // 使用自定义的注解,声明该方法为切点方法 public void demo() { System.out.println("this is DemoService.demo()"); }} |
1.3、创建Aspect,增加业务逻辑
|
1
2
3
4
5
6
7
8
9
10
11
12
13
14
15
|
package cn.ganlixin.aspect;import org.aspectj.lang.annotation.Aspect;import org.aspectj.lang.annotation.Before;import org.springframework.stereotype.Component;@Component@Aspectpublic class DemoAspect { @Before("@annotation(cn.ganlixin.annotation.DemoAnnotation)") public void demoBefore() { System.out.println("this is before output message"); }} |
1.4、创建Spring配置类
主要做的是:指定包扫描路径
|
1
2
3
4
5
6
7
8
9
10
11
12
|
package cn.ganlixin;import org.springframework.context.annotation.ComponentScan;import org.springframework.context.annotation.Configuration;import org.springframework.context.annotation.EnableAspectJAutoProxy;@Configuration@ComponentScan("cn.ganlixin")@EnableAspectJAutoProxypublic class AppConfig { } |
1.5、测试
|
1
2
3
4
5
6
7
8
9
10
11
12
13
14
15
16
17
|
package cn.ganlixin;import cn.ganlixin.service.DemoService;import org.junit.Test;import org.springframework.context.ApplicationContext;import org.springframework.context.annotation.AnnotationConfigApplicationContext;public class AppTest { @Test public void testAOP1() { ApplicationContext context = new AnnotationConfigApplicationContext(AppConfig.class); DemoService demoService = context.getBean(DemoService.class); demoService.demo(); }} |
输出:
|
1
2
|
this is before output messagethis is DemoService.demo() |
二、获取自定义注解的参数
2.1、创建带属性的自定义注解
要获取自定义注解参数,就需要在自定义注解中增加几个属性,下面自定义的TestAnnotation中有两个属性:value和description。
|
1
2
3
4
5
6
7
8
9
10
11
12
13
|
package cn.ganlixin.annotation;import java.lang.annotation.ElementType;import java.lang.annotation.Retention;import java.lang.annotation.RetentionPolicy;import java.lang.annotation.Target;@Retention(RetentionPolicy.RUNTIME)@Target(ElementType.METHOD)public @interface TestAnnotation { String value(); String description() default "default description";} |
2.2、创建service使用带属性的自定义注解
service中有两个方法,分别使用了自定义注解:
|
1
2
3
4
5
6
7
8
9
10
11
12
13
14
15
16
17
18
|
package cn.ganlixin.service;import cn.ganlixin.annotation.TestAnnotation;import org.springframework.stereotype.Service;@Servicepublic class TestService { @TestAnnotation("this is value") public void test1() { System.out.println("this is TestService.test1()"); } @TestAnnotation(value = "this is another value", description = "this is description") public void test2() { System.out.println("this is TestService.test2()"); }} |
2.3、创建Aspect的错误示例
在写博客之前,我也搜过相关的博客,但是发现很多博客中写的都是利用@Around来实现获取注解信息,但是我如果需要在@Before中,@After中获取又怎么办呢?虽然可以通过以下骚操作,通过@Around来模拟@Before和@After,但是还是感觉不好。
下面还是使用@Before来实现的。
|
1
2
3
4
5
6
7
8
9
10
11
12
13
14
15
16
17
|
package cn.ganlixin.aspect;import cn.ganlixin.annotation.TestAnnotation;import org.aspectj.lang.annotation.Aspect;import org.aspectj.lang.annotation.Before;import org.springframework.stereotype.Component;@Component@Aspectpublic class TestAspect { @Before("@annotation(cn.ganlixin.annotation.TestAnnotation)") public void one(TestAnnotation testAnonotation) { System.out.println(testAnonotation.value()); System.out.println(testAnonotation.description()); }} |
上面的代码看似没有问题,one()方法中接收一个TestAnnotation的参数,以为能够获取到切点方法的注解信息,但是,IDE会告诉你如下错误:

2.4、创建Aspect的正确做法
|
1
2
3
4
5
6
7
8
9
10
11
12
13
14
15
16
17
18
19
20
21
22
23
24
25
|
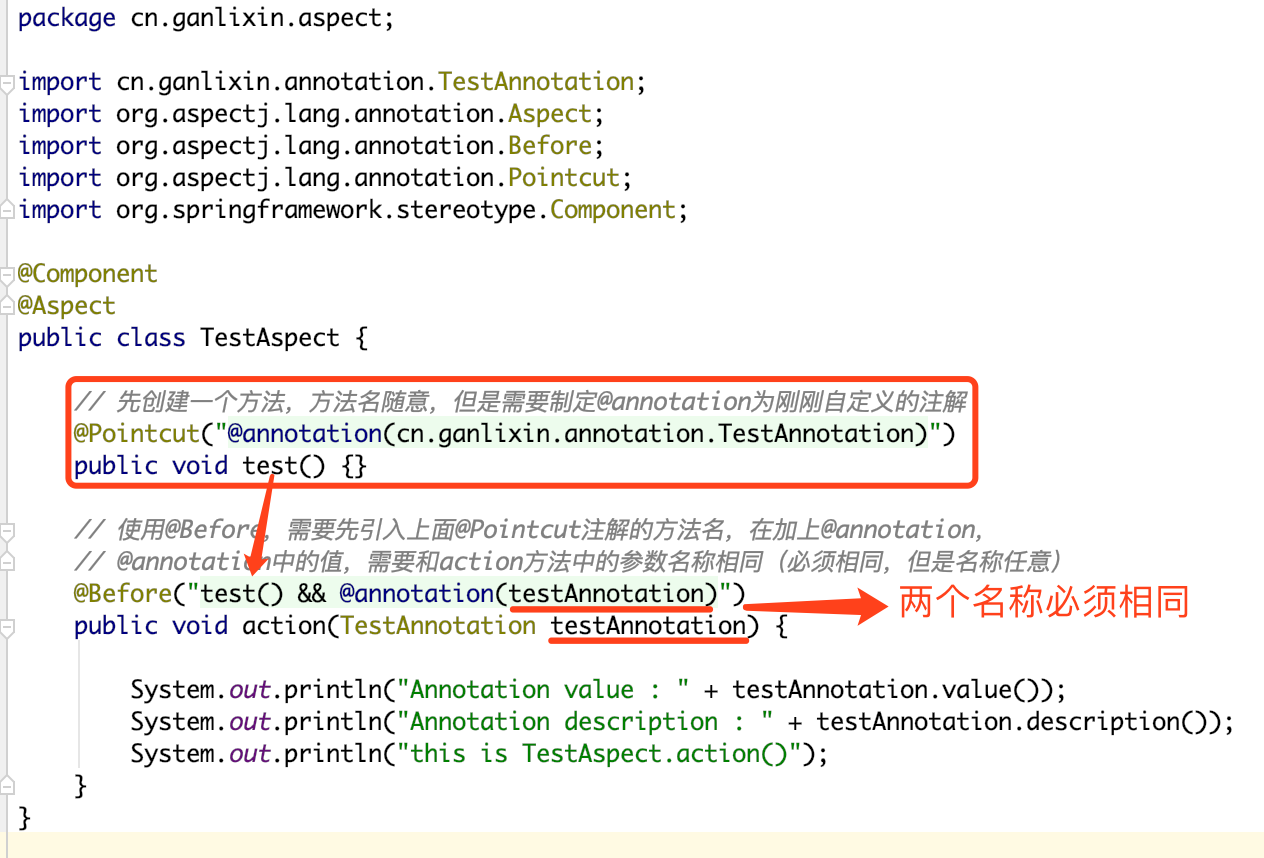
package cn.ganlixin.aspect;import cn.ganlixin.annotation.TestAnnotation;import org.aspectj.lang.annotation.Aspect;import org.aspectj.lang.annotation.Before;import org.aspectj.lang.annotation.Pointcut;import org.springframework.stereotype.Component;@Component@Aspectpublic class TestAspect { // 先创建一个方法,方法名随意,但是需要制定@annotation为刚刚自定义的注解 @Pointcut("@annotation(cn.ganlixin.annotation.TestAnnotation)") public void test() {} // 使用@Before,需要先引入上面@Pointcut注解的方法名,在加上@annotation, // @annotation中的值,需要和action方法中的参数名称相同(必须相同,但是名称任意) @Before("test() && @annotation(testAnnotation)") public void action(TestAnnotation testAnnotation) { System.out.println("Annotation value : " + testAnnotation.value()); System.out.println("Annotation description : " + testAnnotation.description()); System.out.println("this is TestAspect.action()"); }} |
划重点:
|
1
2
3
4
5
6
7
|
// 第2个示例,强调@annotation中的值,需要和方法参数名相同@Before("test() && @annotation(abcdef)")public void action2(TestAnnotation abcdef) { System.out.println("Annotation value : " + abcdef.value()); System.out.println("Annotation description : " + abcdef.description()); System.out.println("this is TestAspect.action()");} |
2.5、测试
Spring的配置类不用更改,测试代码如下:
|
1
2
3
4
5
6
7
8
9
10
11
12
13
14
15
16
17
18
|
package cn.ganlixin;import cn.ganlixin.service.TestService;import org.junit.Test;import org.springframework.context.ApplicationContext;import org.springframework.context.annotation.AnnotationConfigApplicationContext;public class AppTest { @Test public void testAOP2() { ApplicationContext context = new AnnotationConfigApplicationContext(AppConfig.class); TestService testService = context.getBean(TestService.class); testService.test1(); System.out.println("----------------------------"); testService.test2(); }} |
输出:
|
1
2
3
4
5
6
7
8
9
|
Annotation value : this is valueAnnotation description : default descriptionthis is TestAspect.action()this is TestService.test1()----------------------------Annotation value : this is another valueAnnotation description : this is descriptionthis is TestAspect.action()this is TestService.test2() |
三、总结
要想是获取AOP中自定义注解的参数值,主要就一点:
如需转载,请注明文章出处,谢谢!!!
分类: Spring
最新文章
- [日常训练]yayamao的神题
- Uploadify 上传插件引起Chrome崩溃解决方法
- ld returned 1 exit status"的解决办法
- PHP:array_chunk()数组分割
- Inside The C++ Object Model - 01
- Asp.net发布的CheckList
- eq相等 ne、neq不相等, gt大于, lt小于 gte、ge大于等于 lte、le 小于等于 not非 mod求模 等
- 新浪SAEStorage图片上传的demo和说明
- kakfa源码编译打包
- 40 JavaScript Chart and Graph Libraries for Developers--reference
- Tomcat 管理页面
- hdu 1576 A/B
- C++ 实现Trim
- Yii2设计模式——Yii2中用到哪些设计模式?
- leetcode刷题五<最长回文子串>
- 设计简单的VB程序
- vue 自定义组件销毁
- haproxy admin_stats端口启动错误解决
- ubuntu安装git
- 重装win7,win10,Ubuntu