Android笔记--LayoutInflator源码和使用分析
LayoutInflator源码分析
获取LayoutInflator对象
获取LayoutInflator的方式有两种:
- 使用LayoutInflator.from(Context context)可以获取到LayoutInflator对象。
- (LayoutInflater)context.getSystemService(Context.LAYOUT_INFLATER_SERVICE)
第一种本质也是调用第二种方式。
从本质上看context无论是以何种形式传入,最终都是利用binder获取的远程Service的能力
进行XML文件的填装工作。
LayoutInflator方法
LyaoutInflator含有的方法如下:
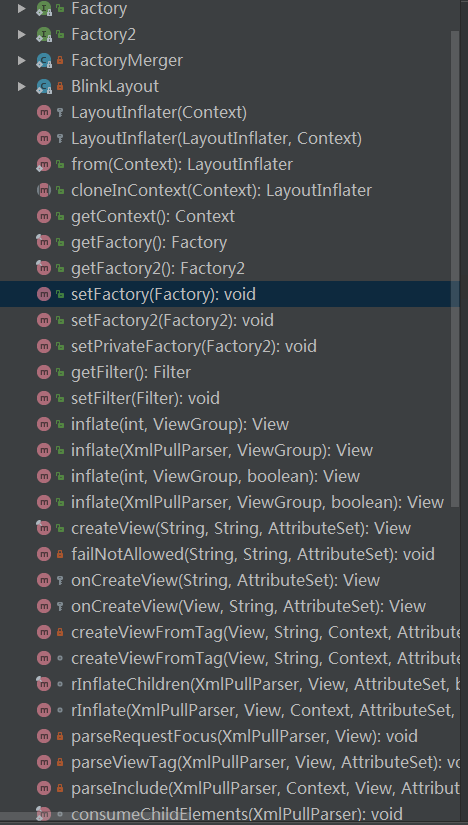
其中核心功能地一个系列就是inflate方法和rInflate方法
inflate方法 | 作用是把XML文件以View形式实例化到内存中
rInflate方法 | 作用是递归调用把XML中相应的嵌套布局结构也实例化出来并添加到XML的根布局中
inflate方法
inflate系列方法最终调用的都是:
public View inflate(XmlPullParser parser, @Nullable ViewGroup root, boolean attachToRoot)
方法
但是实际上最常用的是:
public View inflate(@LayoutRes int resource, @Nullable ViewGroup root, boolean attachToRoot)

public View inflate(@LayoutRes int resource, @Nullable ViewGroup root)
因为XmlPullParser对象并不是普通的XML的来的。而是在编译器XML预编译出来的文件得到的。所以普通的XML在这里转换成
XmlPullParser对象并不允许。所以必须借助Resource得到布局id进行相关操作。
参数代表的含义:
- int resource | XML布局资源的id.(e.g. R.layout.main_activity)
- ViewGroup root | 父root对象,若attachTRoot==true, 则把resource代表的布局对象填充到root.
若attachToRoot == false,则resource代表的布局只是利用root的LayoutParams即布局参数,但是不往root里添加。 - attachToRoot | true 则返回父布局root, false 则返回XML对应得视图对象(源码中为temp对象)
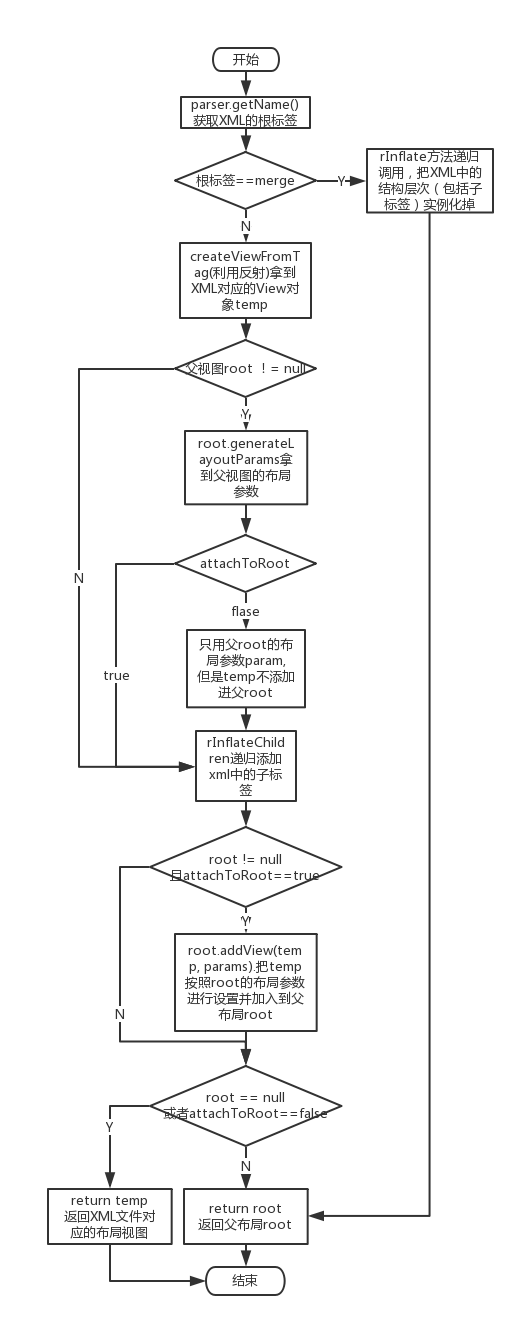
inflate方法的调用流程如下:
下面用代码做一些试验:
这个是activity_main.xml:
<LinearLayout

    xmlns:android="http://schemas.android.com/apk/res/android"

    xmlns:tools="http://schemas.android.com/tools"

    android:layout_width="match_parent"

    android:layout_height="match_parent"

    android:id="@+id/mainView"

    tools:context="com.example.myapplication.MainActivity"

    android:orientation="vertical">

</LinearLayout>
这个是一个textview 在layout文件夹命名为pink.xml
<?xml version="1.0" encoding="utf-8"?>

<TextView xmlns:android="http://schemas.android.com/apk/res/android"

          android:layout_width="100dp"

          android:layout_height="100dp"

            android:background="@color/colorAccent"

          android:text="red">

</TextView>
MainActivity.java
public class MainActivity extends AppCompatActivity {

    private TextView view;

    @Override

    protected void onCreate(Bundle savedInstanceState) {

        super.onCreate(savedInstanceState);

        setContentView(R.layout.activity_main);

        ViewGroup parent = (ViewGroup) findViewById(R.id.mainView);

        // result: layout_height=wrap_content layout_width=match_parent

        view = (TextView) LayoutInflater.from(this).inflate(R.layout.pink, null);

        parent.addView(view);

        // result: layout_height=100 layout_width=100

        view = (TextView) LayoutInflater.from(this).inflate(R.layout.pink, null);

        parent.addView(view, 100, 100);

        // result: layout_height=25dp layout_width=25dp

        // view=textView due to attachRoot=false

        view = (TextView) LayoutInflater.from(this).inflate(R.layout.pink, parent, false);

        parent.addView(view);

        // result: layout_height=25dp layout_width=25dp

        // parent.addView not necessary as this is already done by attachRoot=true

        // view=root due to parent supplied as hierarchy root and attachRoot=true

        ViewGroup p = LayoutInflater.from(this).inflate(R.layout.pink, parent, true);

    }

}
在开发者眼里这个inflate有时候显得很诡异。下面就意义分析一下上面的结果的原因:
inflate(R.layout.pink, null) 父布局addView(view)
// result: layout_height=wrap_content layout_width=match_parent

            view = (TextView) LayoutInflater.from(this).inflate(R.layout.pink, null);

            parent.addView(view);
这里的结果是宽match_parent 高wrap_content
刚开始肯定心里满是WTF,因为这里根本没有给pink布局文件指定一个父root.那pink在父布局中是怎么判定自己的布局参数的呢?
其实秘密就在addView方法中
/**
*
Adds a child view. If no layout parameters are already set on the child, the
* default parameters for this ViewGroup are set on the child.
*
*
Note: do not invoke this method from
* {@link #draw(android.graphics.Canvas)}, {@link #onDraw(android.graphics.Canvas)},
* {@link #dispatchDraw(android.graphics.Canvas)} or any related method.
*
* @param child the child view to add
*
* @see #generateDefaultLayoutParams()
*/
public void addView(View child) {
addView(child, -1);
}
  /**

      * Adds a child view. If no layout parameters are already set on the child, the

      * default parameters for this ViewGroup are set on the child.

      *

      * <p><strong>Note:</strong> do not invoke this method from

      * {@link #draw(android.graphics.Canvas)}, {@link #onDraw(android.graphics.Canvas)},

      * {@link #dispatchDraw(android.graphics.Canvas)} or any related method.</p>

      *

      * @param child the child view to add

      * @param index the position at which to add the child

      */

     public void addView(View child, int index) {

         if (child == null) {

             throw new IllegalArgumentException("Cannot add a null child view to a ViewGroup");

         }

         LayoutParams params = child.getLayoutParams();

         if (params == null) {

             params = generateDefaultLayoutParams();//这里是关键,不通的ViewGroup会重新此方法

             if (params == null) {

                 throw new IllegalArgumentException("generateDefaultLayoutParams() cannot return null");

             }

         }

         addView(child, index, params);

     }

     @Override//此处我们用的LinearLayout 这里是他的重新实现

         protected LayoutParams generateDefaultLayoutParams() {

             if (mOrientation == HORIZONTAL) {

                 return new LayoutParams(LayoutParams.WRAP_CONTENT, LayoutParams.WRAP_CONTENT);

             } else if (mOrientation == VERTICAL) {

                 return new LayoutParams(LayoutParams.MATCH_PARENT, LayoutParams.WRAP_CONTENT);

             }

             return null;

         }
通过源码可以看出addView对于要添加的View的默认布局参数是依据不同的ViewGroup来的。ViewGroup默认宽高都是wrap_content
。而LinearLayout对子View要求的默认布局参数是根据布局方向定的:
- 水平布局 | 宽高均为wrap_content
- 垂直布局 | 宽是match_parent 高是warp_content
所以就可以解释为什么在指定root为null的时候addView得到的是宽是match_parent 高是warp_content了。因为我么用了垂直布局
inflate(R.layout.pink, null) 父布局parent.addView(view, 100, 100)
这里依旧没有为pink指定其在父布局中的布局参数。但是父布局调用了parent.addView(view, 100, 100)。
/**

     * Adds a child view with this ViewGroup's default layout parameters and the

     * specified width and height.

     *

     * <p><strong>Note:</strong> do not invoke this method from

     * {@link #draw(android.graphics.Canvas)}, {@link #onDraw(android.graphics.Canvas)},

     * {@link #dispatchDraw(android.graphics.Canvas)} or any related method.</p>

     *

     * @param child the child view to add

     */

    public void addView(View child, int width, int height) {

        final LayoutParams params = generateDefaultLayoutParams();

        params.width = width;

        params.height = height;

        addView(child, -1, params);

    }
源码也很明确,虽然布局参数依旧是父布局默认的。但是为布局参数重新指定了宽高,覆盖了默认值。所以这样指定可以改掉
pink在父布局中的布局参数。
inflate(R.layout.pink, parent, false)
这里为pink指定了其在父布局中应当使用的布局参数是parent的布局参数。但是并不把pink布局加载到parent视图中。
返回的依旧是pink对应的布局。
这个过程其实就是上面的流程图中的过程。
这里不再分析。
inflate(R.layout.pink, parent, true)
这里同样是上述的流程图过程。pink的布局参数用parent的布局参数。并且把pink布局视图放到parent中。返回的是
parent。
这里需要注意,因为这里是传入的parent是mian_view对应的视图,所以返回的也是parent.但是如果这里传入的是
另外的ViewGroup,那么返回的就是那个ViewGroup了。
最具有迷惑性的属性是root 和attachToRoot
root相对来好解释一点:
root就仅仅是为xml文件提供一个布局参数LayoutParams。用于限定大小和位置。不论attachToRoot true或者false
这个布局参数都会实实在在的应用在xml对应的视图对象上。
attachToRoot | true xml布局对应的对象利用root的布局参数限定来填充到root对象中。返回的是root对象。
attachToRoot | false xml布局对应的对象利用root的布局参数但是返回的是xml对应对象的根布局对象。要想把返回的View
加到父布局中就要用其他的办法。
但是什么时候用true 什么时候用false呢?
用true的场景:
假如父布局是一个LinearLayout,在父布局上加一个button,那么直接用true即可
下面这两种方式是等价的
inflater.inflate(R.layout.custom_button, mLinearLayout, true);
inflater.inflate(R.layout.custom_button, mLinearLayout);
在root不空时,attachToRoot是true自定义View
自定义View初始化的时候,目的就是为了给自定义的View加一个自己的布局上去。
private void init() {
LayoutInflater inflater = LayoutInflater.from(getContext());
inflater.inflate(R.layout.view_with_merge_tag, this);
}
总结: 总结一下就是,在我们只是需要往root上加布局对象。而不需要的到返回的XML布局对象时。使用true即可
需要false的场景:
比如有个button的布局文件。想在加到父布局之前做一些定制。那么这是肯定需要先拿到符合父布局布局参数的button
的。做完定制以后再添加到父布局中
Button button = (Button) inflater.inflate(R.layout.custom_button, mLinearLayout, false);
。。。。。
mLinearLayout.addView(button);RecyclerView 子类中onCreateViewHolder方法中需要使用false
public ViewHolder onCreateViewHolder(ViewGroup parent, int viewType) {
LayoutInflater inflater = LayoutInflater.from(getActivity());
View view = inflater.inflate(android.R.layout.list_item_recyclerView, parent, false);
return new ViewHolder(view);
}
因为RecyclerView负责呈现和填充XML布局的时机
Fragment 中onCreateView方法要使用false
FragmentManager fragmentManager = getSupportFragmentManager();
Fragment fragment = fragmentManager.findFragmentById(R.id.root_viewGroup);if (fragment == null) {
fragment = new MainFragment();
fragmentManager.beginTransaction()
.add(R.id.root_viewGroup, fragment)
.commit();
}//这里的root_viewGroup就是fragment中onCreateView方法第二个参数的视图对象。
//而fragment_layout填充附加到parentViewGroup的过程是FragmentManager 来做的
//所以你一定不能为同一个parentViewGroup添加两次,所以下面要传false
public View onCreateView(LayoutInflater inflater, ViewGroup parentViewGroup, Bundle savedInstanceState) {
View view = inflater.inflate(R.layout.fragment_layout, parentViewGroup, false);
…
return view;
}
当然root参数也可以传null。但是可能会带来不符合预期的结果。因为root为null的情况要有ViewGroup及其子类自己决定。
而你在XML布局中指定的参数就会失效。所以为了保证XML中的布局参数就是我们想要XML展示的。那就需要传入root.
例外情况:AlertDialog。inflater.inflate(R.layout.custom_alert_dialog, null);这是合理的。
因为AlertDialog会为所有的布局都采取match_parent
总结
为了保证结果是符合预期的。需要尽量按照下面的方案来操作:
- 只要有父布局,就一定穿进去父布局当root.
- 避免给root传null因为不同的viewGroup实现的generateDefaultLayoutParams不同
- 只要我们不负责把xml附加到root上,attachToRoot 参数传false.
- 同一个XML不要为同一个ViewGroup传两次true,否则報异常
- 自定义View attachToRoot传true
参考:
https://www.bignerdranch.com/blog/understanding-androids-layoutinflater-inflate/
最新文章
- 【记录】EF Code First 实体关联,如何添加、修改实体?
- JavaEE SpringMVC 基础概念(如需详细资料请留言)
- CF 208A Dubstep(简单字符串处理)
- [转]一个简单的Linux多线程例子 带你洞悉互斥量 信号量 条件变量编程
- string函数分析
- PE文件结构深入详解
- C++函数转换成C#函数
- C/C++中memset函数
- Java 编程的动态性 第1 部分: 类和类装入--转载
- Div在BOdy中居中
- asp.net 5.0微信支付
- 解决 lispbox macOS 不兼容问题
- 积分图实现均值滤波的CUDA代码
- rabbitmq之确保消息不丢失
- Windows平台下载、安装、配置Apache全攻略
- Django--CRM--菜单排序等
- freeRTOS中文实用教程3--中断管理之中断嵌套
- JS中DOM以及BOM
- Android开发中实现https校验
- Bluedroid协议栈HCI线程分析