SpringCloud之Feign
2024-09-01 07:47:25
【前面的话】书接上文,本文的某些知识依赖我的第一篇SpringCLoud的文章:SpringCloud之Eureka,如果没有看过可以先移步去看一下。另外在微服务架构中,业务都会被拆分成一个个独立的服务,服务与服务的通讯是基于http restful的。Spring cloud有两种服务调用方式,一种是ribbon+restTemplate,另一种是feign。上一篇文章已经讲过ribbon+rest这种方式了,这一片博文主要讲feign的应用。
壹、Feign的简介
Feign是一个声明式的伪Http客户端,它使得写Http客户端变得更简单。使用Feign,只需要创建一个接口并注解。它具有可插拔的注解特性,可使用Feign 注解和JAX-RS注解。Feign支持可插拔的编码器和解码器。Feign默认集成了Ribbon,并和Eureka结合,默认实现了负载均衡的效果。
简而言之:
- Feign 采用的是基于接口的注解
- Feign 整合了ribbon
贰、准备工作
新建一个feign子工程lovin-feign-client,用于后面的操作。下面是主要的pom依赖:
<parent>

        <artifactId>lovincloud</artifactId>

        <groupId>com.eelve.lovincloud</groupId>

        <version>1.0-SNAPSHOT</version>

    </parent>

    <modelVersion>4.0.0</modelVersion>

    <artifactId>lovin-feign-client</artifactId>

    <version>0.0.1</version>

    <name>lovinfeignclient</name>

    <description>feignclient测试</description>

    <dependencies>

        <dependency>

            <groupId>org.springframework.cloud</groupId>

            <artifactId>spring-cloud-starter-netflix-eureka-client</artifactId>

        </dependency>

        <dependency>

            <groupId>org.springframework.boot</groupId>

            <artifactId>spring-boot-starter-web</artifactId>

        </dependency>

        <dependency>

            <groupId>org.springframework.boot</groupId>

            <artifactId>spring-boot-starter-security</artifactId>

        </dependency>

        <dependency>

            <groupId>org.springframework.cloud</groupId>

            <artifactId>spring-cloud-starter-openfeign</artifactId>

        </dependency>

        <dependency>

            <groupId>org.springframework.cloud</groupId>

            <artifactId>spring-cloud-starter-hystrix</artifactId>

            <version>1.4.7.RELEASE</version>

        </dependency>

    </dependencies>

    <build>

        <plugins>

            <plugin>

                <groupId>org.springframework.boot</groupId>

                <artifactId>spring-boot-maven-plugin</artifactId>

            </plugin>

        </plugins>

    </build>
- 这里为了安全,我这里还是添加spring-boot-starter-security
server:

  port: 8806   # 服务端口号

spring:

  application:

    name: lovinfeignclient     # 服务名称

  security:

    basic:

      enabled: true

    user:

      name: lovin

      password: ${REGISTRY_SERVER_PASSWORD:lovin}

eureka:

  client:

    serviceUrl:

      defaultZone: http://lovin:lovin@localhost:8881/eureka/   # 注册到的eureka服务地址

feign:

  hystrix:

    enabled: true
- 配置spring-boot-starter-security,这里为了方便我这里放开所有请求
package com.eelve.lovin.config;

import org.springframework.context.annotation.Configuration;

import org.springframework.security.config.annotation.web.builders.HttpSecurity;

import org.springframework.security.config.annotation.web.configuration.WebSecurityConfigurerAdapter;

/**

 * @ClassName SecurityConfig

 * @Description TDO

 * @Author zhao.zhilue

 * @Date 2019/8/16 14:13

 * @Version 1.0

 **/

@Configuration

public class WebSecurityConfig extends WebSecurityConfigurerAdapter {

    @Override

    protected void configure(HttpSecurity http) throws Exception {

        http.authorizeRequests().anyRequest().permitAll()

                .and().csrf().disable();

    }

}
- 在主类上添加@EnableFeignClients和@EnableHystrix ,当然也需要注册到注册中心:
package com.eelve.lovin;

import org.springframework.boot.SpringApplication;

import org.springframework.boot.autoconfigure.SpringBootApplication;

import org.springframework.cloud.client.discovery.EnableDiscoveryClient;

import org.springframework.cloud.netflix.hystrix.EnableHystrix;

import org.springframework.cloud.openfeign.EnableFeignClients;

/**

 * @ClassName LovinFeignClientApplication

 * @Description TDO

 * @Author zhao.zhilue

 * @Date 2019/8/15 17:17

 * @Version 1.0

 **/

@SpringBootApplication

@EnableFeignClients

@EnableDiscoveryClient

@EnableHystrix

public class LovinFeignClientApplication {

    public static void main(String[] args) {

        SpringApplication.run(LovinFeignClientApplication.class,args);

    }

}
- 添加一个远程调用的服务端FeignRemoteService,并且配置feign调用信息:
package com.eelve.lovin.service;

import com.eelve.lovin.hystrix.FeignRemoteServiceImpl;

import org.springframework.cloud.openfeign.FeignClient;

import org.springframework.web.bind.annotation.RequestMapping;

import org.springframework.web.bind.annotation.RequestMethod;

/**

 * @ClassName FeignRemoteService

 * @Description TDO

 * @Author zhao.zhilue

 * @Date 2019/8/15 17:18

 * @Version 1.0

 **/

@FeignClient(value = "lovineurkaclient",fallback = FeignRemoteServiceImpl.class)

public interface FeignRemoteService {

    @RequestMapping(value = "/hello",method = RequestMethod.GET)

    public String hello();

}
- 添加熔断器调用方法:新建FeignRemoteServiceImpl实现FeignRemoteService接口:
package com.eelve.lovin.hystrix;

import com.eelve.lovin.service.FeignRemoteService;

import org.springframework.stereotype.Component;

/**

 * @ClassName FeignRemoteServiceImpl

 * @Description TDO

 * @Author zhao.zhilue

 * @Date 2019/8/15 17:31

 * @Version 1.0

 **/

@Component

public class FeignRemoteServiceImpl implements FeignRemoteService {

    @Override

    public String hello() {

        return "hystrix起作用了";

    }

}
- 最后新建FeignController,来消费服务:
package com.eelve.lovin.controller;

import com.eelve.lovin.service.FeignRemoteService;

import org.springframework.beans.factory.annotation.Autowired;

import org.springframework.web.bind.annotation.GetMapping;

import org.springframework.web.bind.annotation.RequestParam;

import org.springframework.web.bind.annotation.RestController;

/**

 * @ClassName FeignController

 * @Description TDO

 * @Author zhao.zhilue

 * @Date 2019/8/15 17:21

 * @Version 1.0

 **/

@RestController

public class FeignController {

    @Autowired

    FeignRemoteService feignRemoteService;

    @GetMapping(value = "/getHello")

    public String getHello() {

        return feignRemoteService.hello();

    }

}
叁、启动测试
- 依次启动eureka的服务端和两个客户端,以及新建的lovin-feign-client

我们可以看到服务已经全部启动成功 - 然后访问http://localhost:8806/getHello
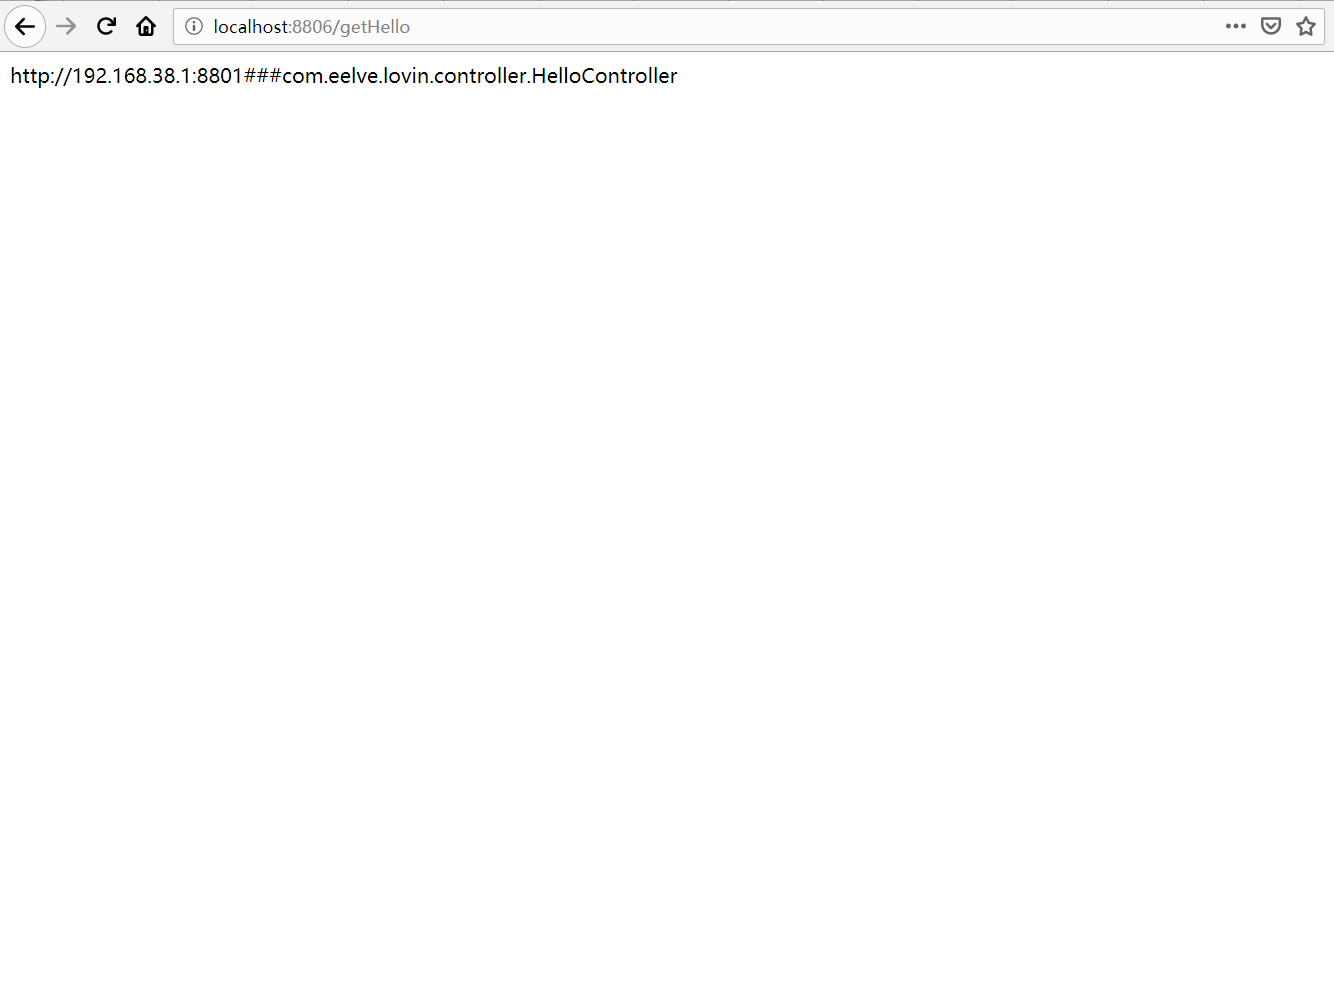
我们可以看到已经可以通过feign调到我们建立的eureka客户端了 - 再次请求接口观察返回

我们可以看到我们调到了通过feign调用ribbon负载的另外一个接口了,到这里我们就已经弄好了一个简单的ribbon负载。
肆、添加Hystrix Dashboard断路器监控
- 添加需要的pom依赖
<dependency>

    <groupId>org.springframework.boot</groupId>

    <artifactId>spring-boot-starter-actuator</artifactId>

</dependency>

<dependency>

    <groupId>org.springframework.cloud</groupId>

    <artifactId>spring-cloud-starter-netflix-hystrix-dashboard</artifactId>

    <version>2.1.2.RELEASE</version>

</dependency>
- 在主类上添加@EnableHystrixDashboard,开启断路器监控,并且配置HystrixMetricsStreamServlet
package com.eelve.lovin;

import com.netflix.hystrix.contrib.metrics.eventstream.HystrixMetricsStreamServlet;

import org.springframework.boot.SpringApplication;

import org.springframework.boot.autoconfigure.SpringBootApplication;

import org.springframework.boot.web.servlet.ServletRegistrationBean;

import org.springframework.cloud.client.discovery.EnableDiscoveryClient;

import org.springframework.cloud.netflix.hystrix.EnableHystrix;

import org.springframework.cloud.netflix.hystrix.dashboard.EnableHystrixDashboard;

import org.springframework.cloud.openfeign.EnableFeignClients;

import org.springframework.context.annotation.Bean;

/**

 * @ClassName LovinFeignClientApplication

 * @Description TDO

 * @Author zhao.zhilue

 * @Date 2019/8/15 17:17

 * @Version 1.0

 **/

@SpringBootApplication

@EnableFeignClients

@EnableDiscoveryClient

@EnableHystrix

@EnableHystrixDashboard

public class LovinFeignClientApplication {

    public static void main(String[] args) {

        SpringApplication.run(LovinFeignClientApplication.class,args);

    }

    @Bean

    public ServletRegistrationBean getServlet(){

        HystrixMetricsStreamServlet streamServlet = new HystrixMetricsStreamServlet();

        ServletRegistrationBean registrationBean = new ServletRegistrationBean(streamServlet);

        registrationBean.setLoadOnStartup(1);

        registrationBean.addUrlMappings("/actuator/hystrix.stream");

        registrationBean.setName("HystrixMetricsStreamServlet");

        return registrationBean;

    }

}
- 访问http://localhost:8806/hystrix
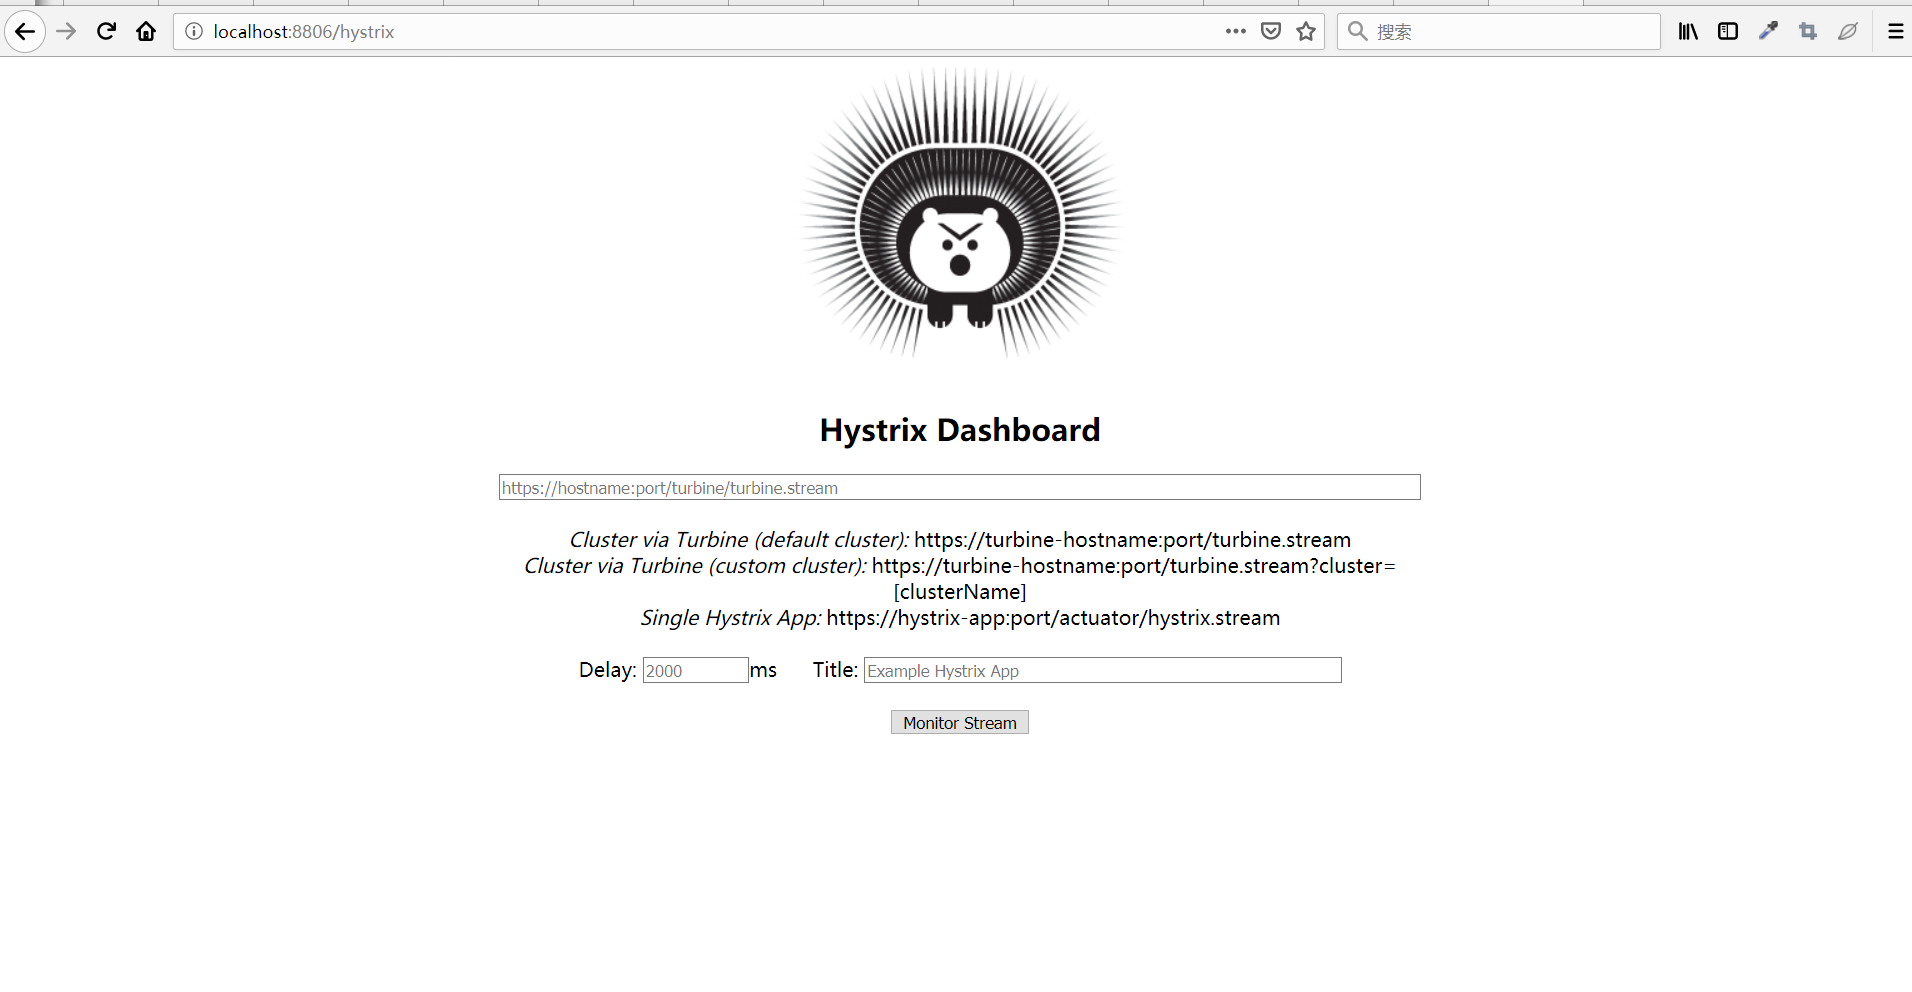
这里我们通过首页可以看到:
默认的集群监控:通过URL http://turbine-hostname:port/turbine.stream开启,实现对默认集群的监控。

指定的集群监控:通过URL http://turbine-hostname:port/turbine.stream?cluster=[clusterName]开启,实现对clusterName的监控。

单体应用监控:通过URL http://hystrix-app:port/hystrix.stream开启,实现对某个具体的服务监控
- 添加监控模式查看详情,这里选择第三个单体应用
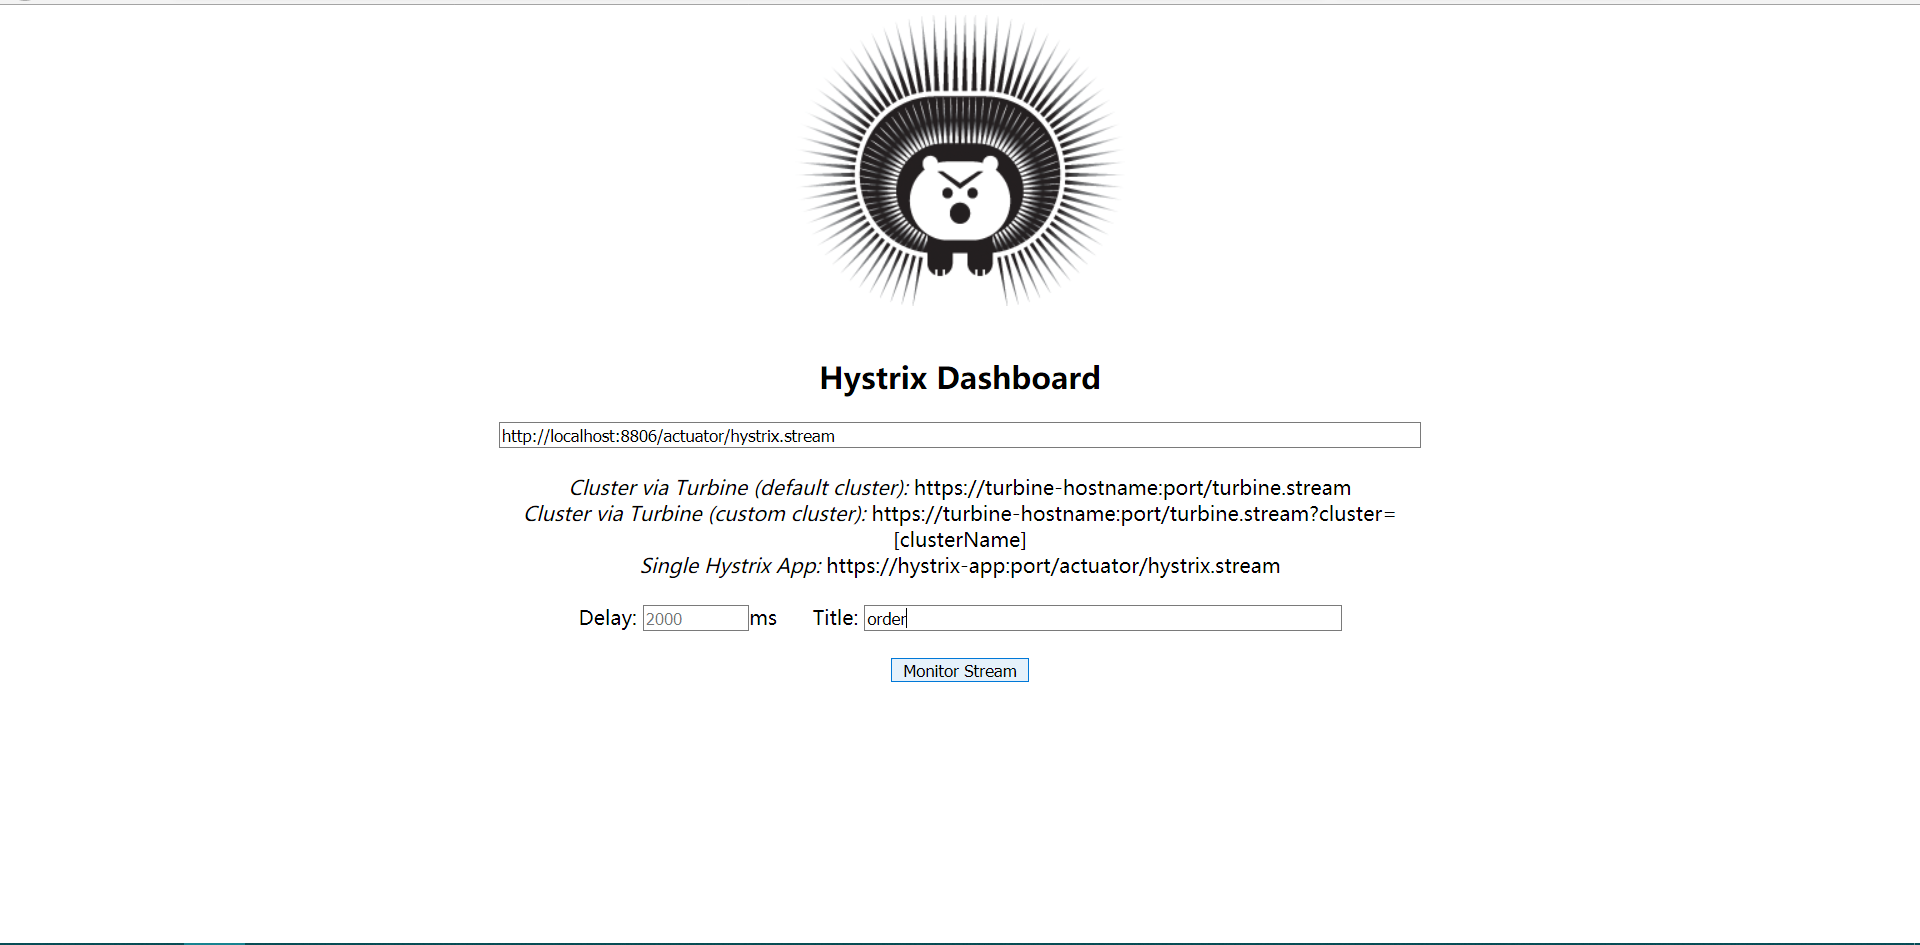
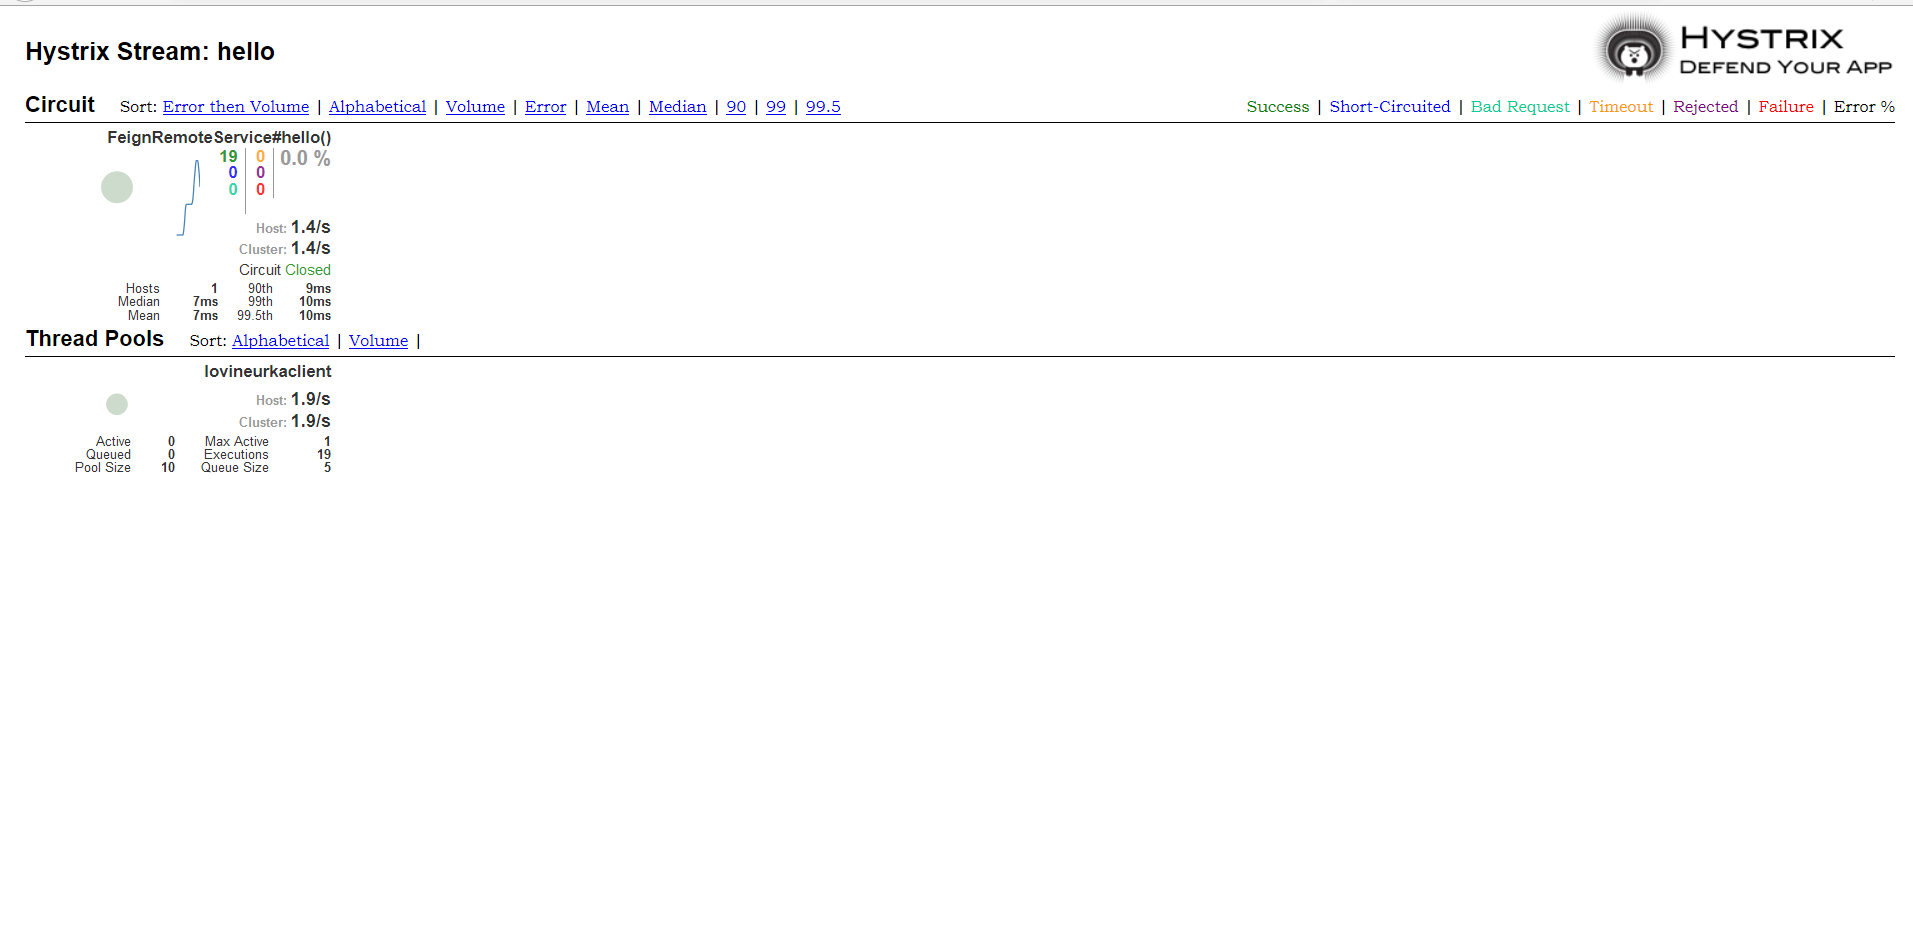
这样我们就完成了熔断器的监控,当然具体含义有待下一步深究。
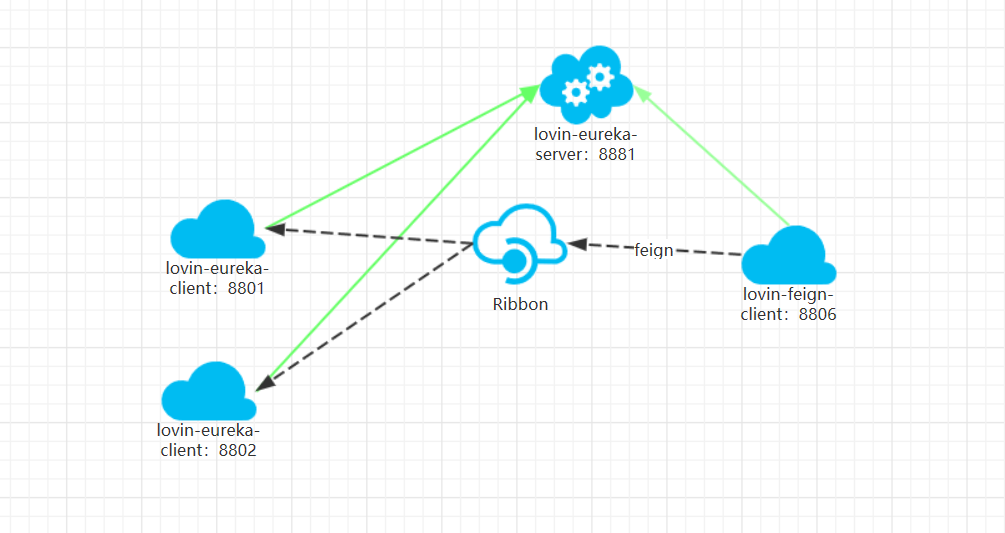
伍、网络架构
- 我们可以看到我们调用的服务不再是像再上一篇文章中的直接访问对应的服务,而是通过feign的Ribbon的负载均衡的去调用的,而且这里说明一点,Ribbon的默认机制是轮询。
最新文章
- nodeJS(express4.x)+vue(vue-cli)构建前后端分离详细教程(带跨域)
- synergy 两台Windows电脑配置过程
- JSP内置对象---request对象(用户登录页面(返回值和数组:gerParameter,getParameterValues))
- Android 学习第15课,Android 开发的单元测试、及输出错误信息
- ReactJS学习笔记(三)
- 【Android】[转] Android Handler应设为static
- 【Java每日一题】20161201
- TCMalloc 安装和使用
- LNMP安装成功的界面
- 复制选中的listbox内容
- jQuery 工具类库集锦
- SQL Script 杂记
- 最常见的HTTP错误
- Cpp again
- NSDictionary 的内部实现
- drbd(二):配置和使用
- 实现CString的Format功能,支持跨平台
- LeetCode——翻转数字
- php项目中使用element.ui和vue
- mysql 开发进阶篇系列 48 物理备份与恢复(xtrabackup 的增量备份与恢复,以及备份总结)
热门文章
- 深入学习OpenCV检测及分割图像的目标区域
- Codeforces Round #486 (Div. 3) C "Equal Sums" (map+pair<>)
- Ubuntu 16.04 LTS设置屏幕分辨率并永久保存所设置的分辨率
- netty使用EmbeddedChannel对channel的出入站进行单元测试
- 完美解决windows10磁盘占用100%并出现卡顿、假死无反应
- [ PyQt入门教程 ] PyQt5基本控件使用:单选按钮、复选框、下拉框
- php 获取未来七天的日期和星期
- 后端基于方法的权限控制--Spirng-Security
- Scala函数式编程(三)
- Unity工程无代码化