rviz学习笔记(一)——Markers: Sending Basic Shapes (C++) 发送基础形状
2024-08-24 20:30:19
一、创建一个包——进行marker练习
1、创建ROS工作空间和包
mkdir -p ~/catkin_ws/src       #创建工作空间目录

#创建ROS数据包

catkin_create_pkg using_markers roscpp visualization_msgs

#打开包根目录,进行编译

cd ~/catkin_ws

catkin_make
2、编写cpp文件,向rviz发送数据
vim ~/catkin_ws/src/using_marker/src/using_markers.cpp
贴入代码,代码中已经附加相关注释
#include <ros/ros.h>

#include <visualization_msgs/Marker.h>           //可视化

int main( int argc, char** argv )

{

  //初始化ROS,幷且创建一个ROS::Publisher 在话题visualization_marker上面

  ros::init(argc, argv, "basic_shapes");

  ros::NodeHandle n;

  ros::Rate r();

  ros::Publisher marker_pub = n.advertise<visualization_msgs::Marker>("visualization_marker", );

  // Set our initial shape type to be a cube

  // 初始化形状为立方体

  uint32_t shape = visualization_msgs::Marker::CUBE;

  while (ros::ok())

  {

    //实例化一个Marker

    visualization_msgs::Marker marker;

    // Set the frame ID and timestamp.  See the TF tutorials for information on these.

    // 设置frame ID 和 时间戳

    marker.header.frame_id = "/my_frame";

    marker.header.stamp = ros::Time::now();

    // Set the namespace and id for this marker.  This serves to create a unique ID

    // Any marker sent with the same namespace and id will overwrite the old one

    // 为这个marker设置一个独一无二的ID,一个marker接收到相同ns和id就会用新的信息代替旧的

    marker.ns = "basic_shapes";

    marker.id = ;

    // Set the marker type.  Initially this is CUBE, and cycles between that and SPHERE, ARROW, and CYLINDER

    // 设置marker类型,初始化是立方体。将进行循环

    marker.type = shape;

    // Set the marker action.  Options are ADD, DELETE, and new in ROS Indigo: 3 (DELETEALL)

    marker.action = visualization_msgs::Marker::ADD;

    // Set the pose of the marker.  This is a full 6DOF pose relative to the frame/time specified in the header

    // 设置marker的位置

    marker.pose.position.x = ;

    marker.pose.position.y = ;

    marker.pose.position.z = ;

    marker.pose.orientation.x = 0.0;

    marker.pose.orientation.y = 0.0;

    marker.pose.orientation.z = 0.0;

    marker.pose.orientation.w = 1.0;

    // Set the scale of the marker -- 1x1x1 here means 1m on a side

    // 设置marker的大小

    marker.scale.x = 1.0;

    marker.scale.y = 1.0;

    marker.scale.z = 1.0;

    // Set the color -- be sure to set alpha to something non-zero!

    // 设置marker的颜色

    marker.color.r = 0.0f;

    marker.color.g = 1.0f;

    marker.color.b = 0.0f;

    marker.color.a = 1.0;

    //取消自动删除

    marker.lifetime = ros::Duration();

    // Publish the marker

    // 必须有订阅者才会发布消息

    while (marker_pub.getNumSubscribers() < )

    {

      if (!ros::ok())

      {

        return ;

      }

      ROS_WARN_ONCE("Please create a subscriber to the marker");

      sleep();

    }

    marker_pub.publish(marker);

    // Cycle between different shapes

    // 连续改变形状

    switch (shape)

    {

    case visualization_msgs::Marker::CUBE:

      shape = visualization_msgs::Marker::SPHERE;

      break;

    case visualization_msgs::Marker::SPHERE:

      shape = visualization_msgs::Marker::ARROW;

      break;

    case visualization_msgs::Marker::ARROW:

      shape = visualization_msgs::Marker::CYLINDER;

      break;

    case visualization_msgs::Marker::CYLINDER:

      shape = visualization_msgs::Marker::CUBE;

      break;

    }

    r.sleep();

  }

}
在CMakeList.txt文件中加入
add_executable(basic_shapes src/basic_shapes.cpp)

target_link_libraries(basic_shapes ${catkin_LIBRARIES})
3、进行rviz设置
(1)打开roscore
(2)运行编写的发布器
rosrun using_marker basic_shapes
(3)重置rviz,运行rviz
rosmake rviz

rosrun rviz rviz
(4)在rviz中进行设置
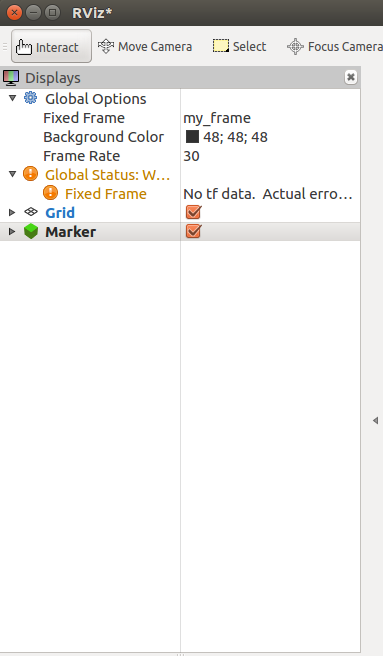
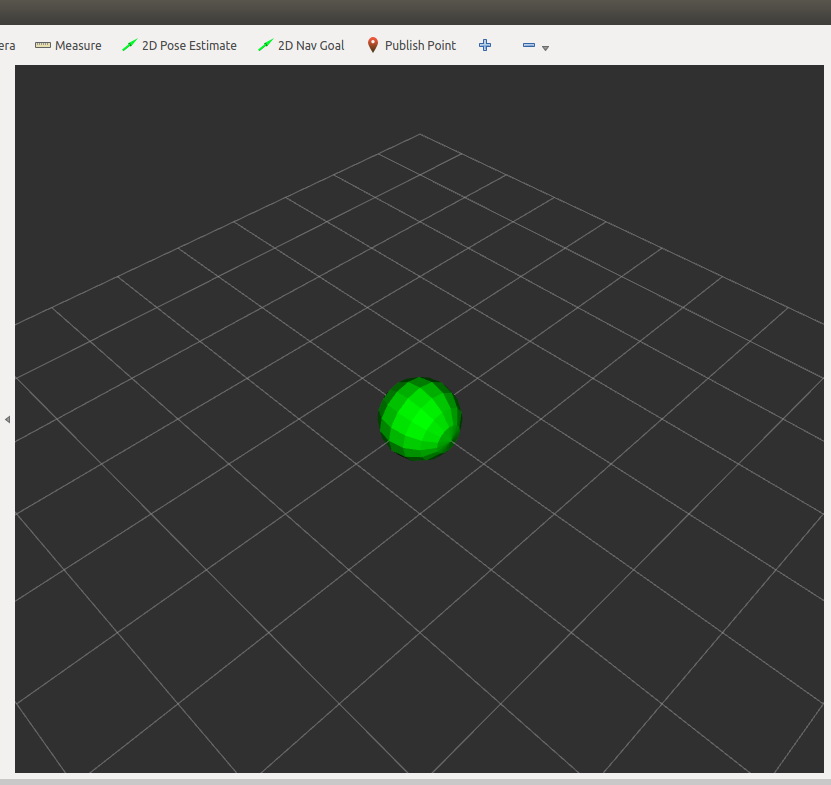
4、rviz最终效果显示:4个图形进行连续的变换
一、创建一个包——进行marker练习
1、创建ROS工作空间和包
mkdir -p ~/catkin_ws/src       #创建工作空间目录

#创建ROS数据包

catkin_create_pkg using_markers roscpp visualization_msgs

#打开包根目录,进行编译

cd ~/catkin_ws

catkin_make
2、编写cpp文件,向rviz发送数据
vim ~/catkin_ws/src/using_marker/src/using_markers.cpp
贴入代码,代码中已经附加相关注释
#include <ros/ros.h>

#include <visualization_msgs/Marker.h>           //可视化

int main( int argc, char** argv )

{

  //初始化ROS,幷且创建一个ROS::Publisher 在话题visualization_marker上面

  ros::init(argc, argv, "basic_shapes");

  ros::NodeHandle n;

  ros::Rate r(1);

  ros::Publisher marker_pub = n.advertise<visualization_msgs::Marker>("visualization_marker", 1);

  // Set our initial shape type to be a cube

  // 初始化形状为立方体

  uint32_t shape = visualization_msgs::Marker::CUBE;

  while (ros::ok())

  {

    //实例化一个Marker

    visualization_msgs::Marker marker;

    // Set the frame ID and timestamp.  See the TF tutorials for information on these.

    // 设置frame ID 和 时间戳

    marker.header.frame_id = "/my_frame";

    marker.header.stamp = ros::Time::now();

    // Set the namespace and id for this marker.  This serves to create a unique ID

    // Any marker sent with the same namespace and id will overwrite the old one

    // 为这个marker设置一个独一无二的ID,一个marker接收到相同ns和id就会用新的信息代替旧的

    marker.ns = "basic_shapes";

    marker.id = 0;

    // Set the marker type.  Initially this is CUBE, and cycles between that and SPHERE, ARROW, and CYLINDER

    // 设置marker类型,初始化是立方体。将进行循环

    marker.type = shape;

    // Set the marker action.  Options are ADD, DELETE, and new in ROS Indigo: 3 (DELETEALL)

    marker.action = visualization_msgs::Marker::ADD;

    // Set the pose of the marker.  This is a full 6DOF pose relative to the frame/time specified in the header

    // 设置marker的位置

    marker.pose.position.x = 0;

    marker.pose.position.y = 0;

    marker.pose.position.z = 0;

    marker.pose.orientation.x = 0.0;

    marker.pose.orientation.y = 0.0;

    marker.pose.orientation.z = 0.0;

    marker.pose.orientation.w = 1.0;

    // Set the scale of the marker -- 1x1x1 here means 1m on a side

    // 设置marker的大小

    marker.scale.x = 1.0;

    marker.scale.y = 1.0;

    marker.scale.z = 1.0;

    // Set the color -- be sure to set alpha to something non-zero!

    // 设置marker的颜色

    marker.color.r = 0.0f;

    marker.color.g = 1.0f;

    marker.color.b = 0.0f;

    marker.color.a = 1.0;

    //取消自动删除

    marker.lifetime = ros::Duration();

    // Publish the marker

    // 必须有订阅者才会发布消息

    while (marker_pub.getNumSubscribers() < 1)

    {

      if (!ros::ok())

      {

        return 0;

      }

      ROS_WARN_ONCE("Please create a subscriber to the marker");

      sleep(1);

    }

    marker_pub.publish(marker);

    // Cycle between different shapes

    // 连续改变形状

    switch (shape)

    {

    case visualization_msgs::Marker::CUBE:

      shape = visualization_msgs::Marker::SPHERE;

      break;

    case visualization_msgs::Marker::SPHERE:

      shape = visualization_msgs::Marker::ARROW;

      break;

    case visualization_msgs::Marker::ARROW:

      shape = visualization_msgs::Marker::CYLINDER;

      break;

    case visualization_msgs::Marker::CYLINDER:

      shape = visualization_msgs::Marker::CUBE;

      break;

    }

    r.sleep();

  }

}
在CMakeList.txt文件中加入
add_executable(basic_shapes src/basic_shapes.cpp)

target_link_libraries(basic_shapes ${catkin_LIBRARIES})
3、进行rviz设置
(1)打开roscore
(2)运行编写的发布器
rosrun using_marker basic_shapes
(3)重置rviz,运行rviz
rosmake rviz

rosrun rviz rviz
(4)在rviz中进行设置
4、rviz最终效果显示:4个图形进行连续的变换
最新文章
- mysql:ibdata1和mysql-bin log管理
- POST 500 Internal Server Error
- vue-cli创建项目
- 在Azure上搭建Orchard CRM入口网站
- liunx下tomcat启动 Cannot find ./catalina.sh
- ASP.NET Core学习零散记录
- webSphere提示SSL证书过期,解决方法
- 【BZOJ】【1115】【POI2009】石子游戏KAM
- Seay工具分享
- WordPress wp-admin/includes/post.php脚本安全漏洞
- Unity User Group 北京站:《Unity5.6新功能介绍以及HoloLens开发》
- asp.net core参数保护之自定义要保护的参数类型
- 微信x5内核很鸡贼啊
- 【BZOJ2823】[AHOI2012]信号塔(最小圆覆盖)
- mongodb异常恢复
- 锚接口(上)——hashchange api 和 $.uriAnchor
- H3C常用命令详解
- Chrome 66 禁止声音自动播放
- Origin绘制双Y轴图的方法
- 函数后面有个 const