Angular SPA基于Ocelot API网关与IdentityServer4的身份认证与授权(二)
上文已经介绍了Identity Service的实现过程。今天我们继续,实现一个简单的Weather API和一个基于Ocelot的API网关。
回顾
Weather API
Weather API实现非常简单,直接用Visual Studio 2019 Community Edition自带的ASP.NET Core Web Application模板创建就行了,我们的目的不是为了实现Weather API的业务,我们只需要有一个能让IdentityServer4进行保护的API就行,以便能够完成我们的各种实验。
在原有的(也就是Identity Service所在的)解决方案中,新建一个ASP.NET Core Web Application,应用程序模板选择API,并禁用HTTPS和Docker支持,因为目前不需要,也不要启用任何Authentication机制,因为这部分功能会由Ocelot配合IdentityServer4实现。在完成创建之后,我们的Weather API就做好了。
现在,设置启动端口为5000,启动项目,然后通过curl测试API是否工作正常:
curl http://localhost:5000/weatherforecast | json_pp && echo
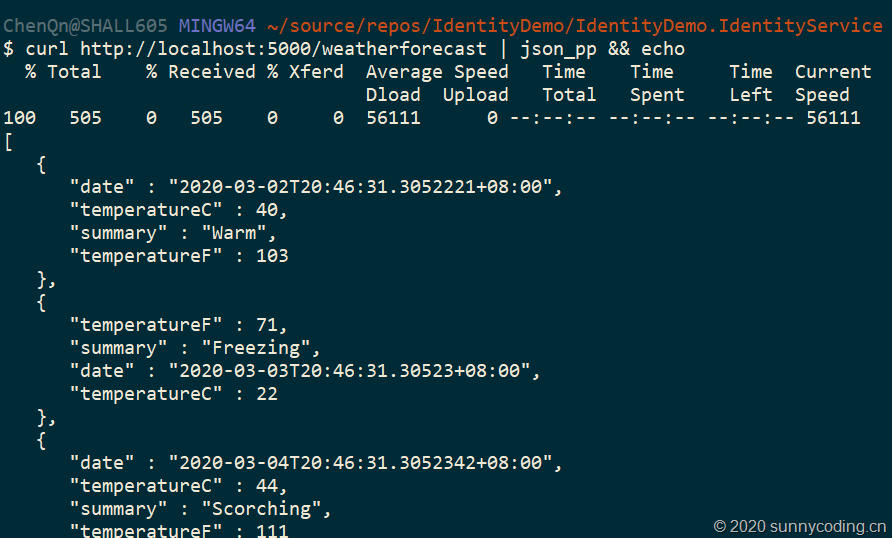
OK,Weather API就成功完成了。
Ocelot API网关
现在我们来创建Ocelot API网关,首先做到能够通过这个网关来访问Weather API,然后再加入认证机制,使得Ocelot API网关能够基于IdentityServer4完成认证。其实这部分实操我已经在《ASP.NET Core中Ocelot的使用:API网关的应用》和《使用Ocelot、IdentityServer4、Spring Cloud Eureka搭建微服务网关:Step by Step(二)》这些文章中介绍过了。为了保证描述的完整性,我还是把这部分工作重新做一次。
搭建网关
新建一个ASP.NET Core Web Application应用程序,模板选择Empty,去掉HTTPS支持。在项目创建后,向项目添加ocelot.config.json文件,内容如下:
{

  "ReRoutes": [

    {

      "DownstreamPathTemplate": "/weatherforecast",

      "DownstreamScheme": "http",

      "DownstreamHostAndPorts": [

        {

          "Host": "localhost",

          "Port": 5000

        }

      ],

      "UpstreamPathTemplate": "/api/weather",

      "UpstreamHttpMethod": [ "Get" ]

    }

  ]

}
然后,向项目添加Ocelot的NuGet包,修改Program.cs文件,将ocelot.config.json文件添加到应用程序配置系统中:
public static IHostBuilder CreateHostBuilder(string[] args) =>

    Host.CreateDefaultBuilder(args)

        .ConfigureWebHostDefaults(webBuilder =>

        {

            webBuilder.UseStartup<Startup>();

        })

        .ConfigureAppConfiguration(configBuilder =>

        {

            configBuilder.AddJsonFile("ocelot.configuration.json");

        });
并且修改Startup.cs文件,加入Ocelot的服务注册以及Middleware:
public void ConfigureServices(IServiceCollection services)

{

    services.AddOcelot();

}

public void Configure(IApplicationBuilder app, IWebHostEnvironment env)

{

    if (env.IsDevelopment())

    {

        app.UseDeveloperExceptionPage();

    }

    app.UseRouting();

    app.UseOcelot();

    app.UseEndpoints(endpoints =>

    {

        endpoints.MapGet("/", async context =>

        {

            await context.Response.WriteAsync("Hello World!");

        });

    });

}
让API网关侦听9000端口,同时启动Weather API和API网关两个项目,于是我们可以直接通过API网关来访问Weather API:
curl http://localhost:9000/api/weather | json_pp && echo
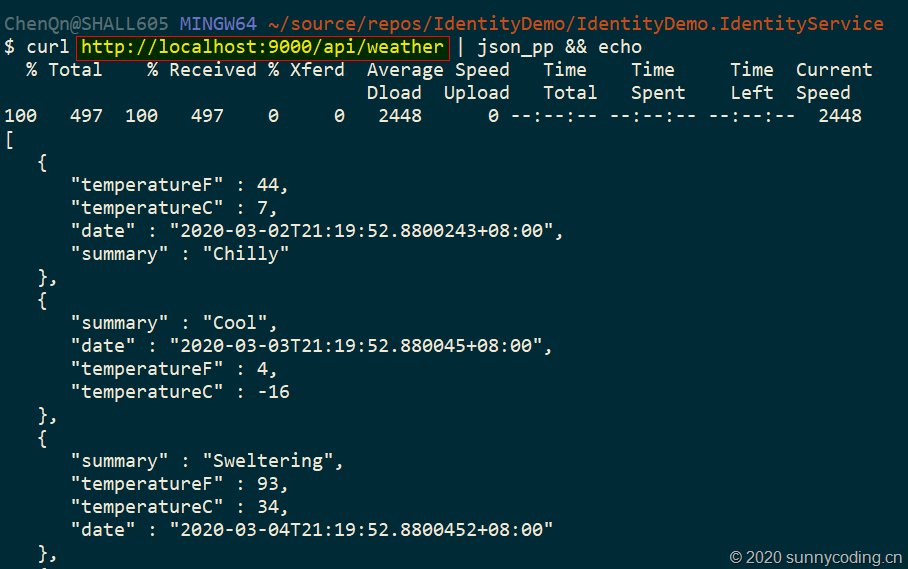
可以看到,我们已经可以直接通过API网关的地址来访问其下游服务了。
在网关上实现身份认证
接下来的这一步,我们会结合前一篇文章中介绍的Identity Service,在API网关上实现身份认证。在Ocelot API网关项目上,添加IdentityServer4.AccessTokenValidation NuGet包的引用,然后在Startup.cs的ConfigureServices中增加对IdentityServer4的认证支持:
public void ConfigureServices(IServiceCollection services)

{

    services.AddOcelot();

    services.AddAuthentication()

        .AddIdentityServerAuthentication("AuthKey", options =>

        {

            options.Authority = "http://localhost:7889";

            options.RequireHttpsMetadata = false;

        });

    services.AddCors(options => options.AddPolicy("AllowAll", p => p.AllowAnyOrigin()

       .AllowAnyMethod()

       .AllowAnyHeader()));

}
当然我们也添加了CORS的Policy,以便能够支持跨域访问,为之后的Angular SPA实现做准备。目前,无需对Configure方法做大的改动,只需要添加app.UseCors("AllowAll");这一调用,以允许跨域访问即可。然后,修改ocelot.config.json文件,在Weather API的ReRoute上增加AuthenticationOptions配置,用以启用基于IdentityServer4的身份认证:
{

  "ReRoutes": [

    {

      "DownstreamPathTemplate": "/weatherforecast",

      "DownstreamScheme": "http",

      "DownstreamHostAndPorts": [

        {

          "Host": "localhost",

          "Port": 5000

        }

      ],

      "UpstreamPathTemplate": "/api/weather",

      "UpstreamHttpMethod": [ "Get" ],

      "AuthenticationOptions": {

        "AuthenticationProviderKey": "AuthKey",

        "AllowedScopes": []

      }

    }

  ]

}
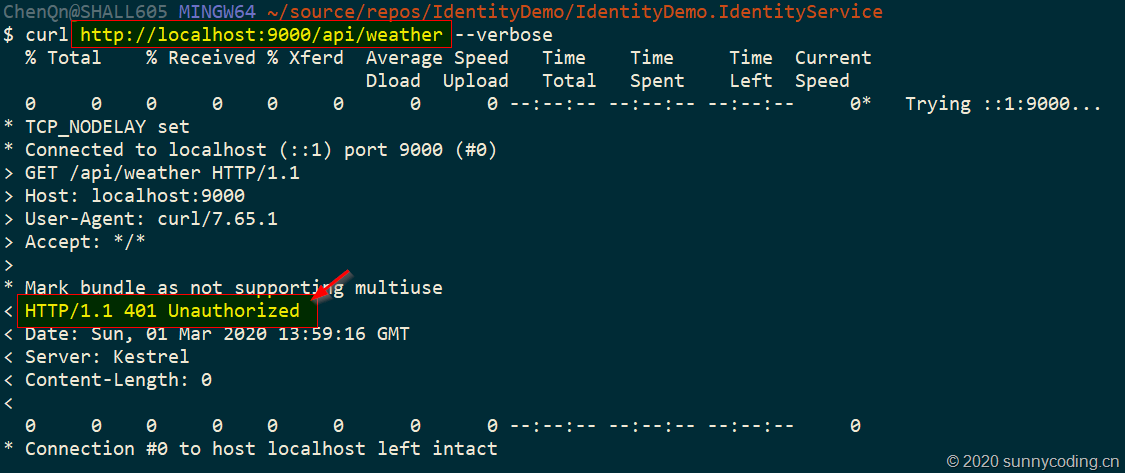
现在,同时启动Identity Service、Weather API和Ocelot网关三个项目,然后再用curl调用上面相同的地址,可以发现,服务端已经返回了401,告诉我们没有认证,无法发起API调用请求:
进一步测试
现在,让我们写一个Console App作为客户端,进行进一步测试。新建一个.NET Core Console App的项目,添加IdentityModel NuGet包,Main方法实现如下:
static async Task Main(string[] args)

{

    using var client = new HttpClient();

    var discoResponse = await client.GetDiscoveryDocumentAsync("https://localhost:7890");

    if (discoResponse.IsError)

    {

        Console.WriteLine(discoResponse.Error);

        return;

    }

    var tokenResponse = await client.RequestPasswordTokenAsync(new PasswordTokenRequest

    {

        Address = discoResponse.TokenEndpoint,

        ClientId = "webapi",

        Scope = "api.weather.full_access",

        ClientSecret = "mysecret",

        UserName = "daxnet",

        Password = "P@ssw0rd123"

    });

    if (tokenResponse.IsError)

    {

        Console.WriteLine(tokenResponse.Error);

        return;

    }

    Console.WriteLine(tokenResponse.Json);

    client.SetBearerToken(tokenResponse.AccessToken);

    var response = await client.GetAsync("http://localhost:9000/api/weather");

    Console.WriteLine(response.IsSuccessStatusCode ?

        $"{response.StatusCode} {await response.Content.ReadAsStringAsync()}" :

        response.StatusCode.ToString());

}
仍然同时启动Identity Service、Weather API和Ocelot网关三个项目,然后调试这个Console App,可以看到,API调用成功:

Console App也返回了正确的结果:
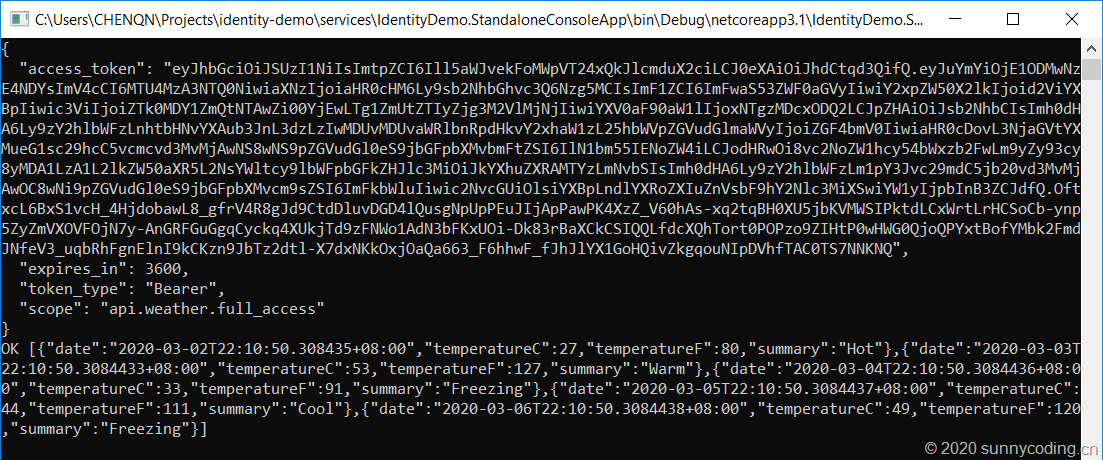
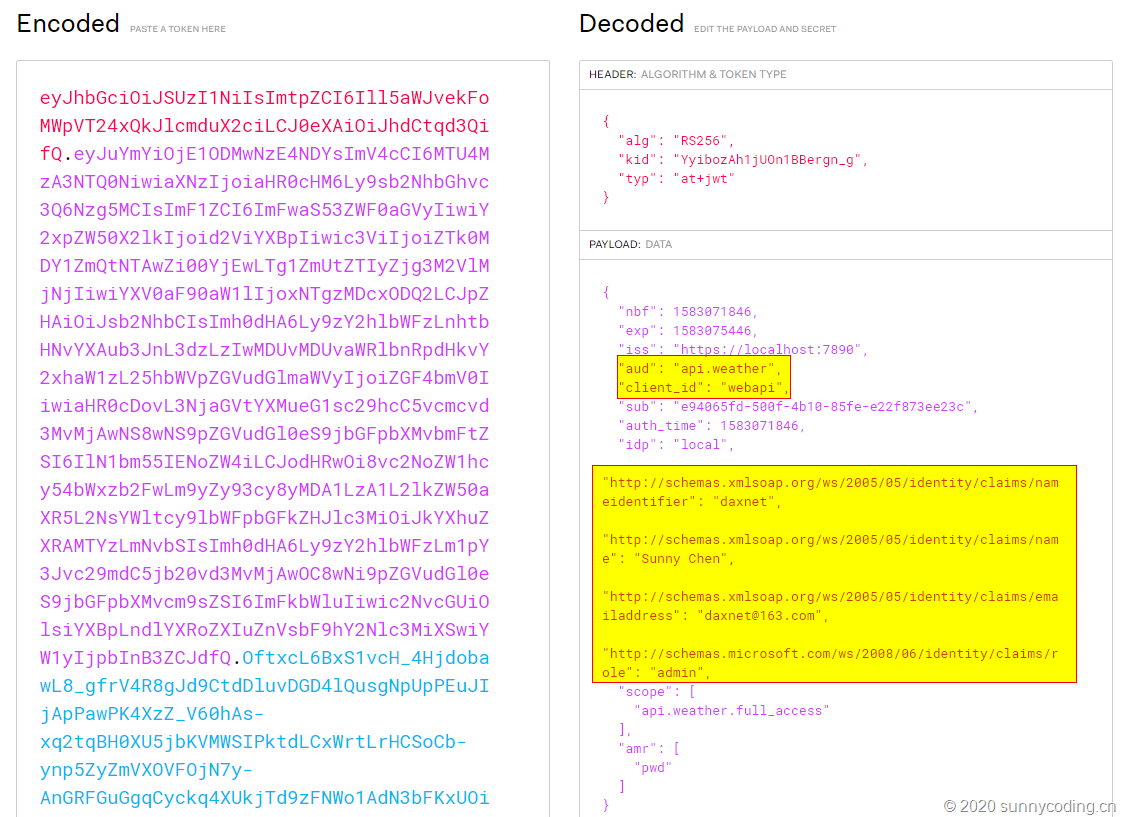
然后,将上面的access_token复制下来,打开https://jwt.io,粘贴到Encoded文本框,在Decoded文本框中可以看到,Identity相关的信息,包括我们在ApiResource上设定的Claims都被包含在了Access Token上:
小结
本文实现了一个实验性质的Weather API,然后搭建了一个Ocelot API网关,并在网关上结合Identity Service完成了身份认证机制,最后通过一个Console App,了解了一下Access Token。下文开始,我会介绍如何在Angular SPA中做身份认证。
源代码
访问以下Github地址以获取源代码:
https://github.com/daxnet/identity-demo
最新文章
- Python购物车程序
- vc下的静态链接库与动态链接库(一)
- Gym - 101102C
- cssReset - css初始化
- thinkphp框架中处理标签中条件输出
- Spring 框架整理
- QT5-控件-QTimeEdit和QTime
- MySQL5.1升级5.6后,执行grant出错:ERROR 2013 (HY000): Lost connection to MySQL server during query【转载】
- ArrayList中对象 排序
- linux系统连接的概念及删除原理
- MongoDB 安装与配置
- 【Teradata】磁盘碎片整理(ferret工具)
- GreenDao设置数据版本
- line number is important in Exceptions.
- CSS字体超出两行省略
- 快速了解Python的定制类
- Git下基本命令操作
- Linux pip安装使用详解
- C++结构变量数据对齐问题
- performSelector 多个参数
热门文章
- POJ1651:Multiplication Puzzle(区间dp)
- (附音视频、PPT地址)《打开Python这扇窗》分享总结
- Vs Code在Vue项目中v-for指令提示错误的解决办法
- JavaScript 后台获取数据 - HTTP203 Advent(中文字幕)
- WeChatSampleBuilder V2.0 使用教程(网页版+桌面版)
- winform练习-通过遍历Control容器中的对象统一委托事件-楼盘选择器
- 码云git本地仓库链接远程仓库
- CF思维联系– Codeforces-988C Equal Sums (哈希)
- bzoj4318 OSU!和bzoj 3450 Tyvj1952 Easy
- 一文带你学会java的jvm精华知识点