[前端] VUE基础 (9) (element-ui、axios、Vuex)
一、element-ui的使用
官方网页:https://element.eleme.cn/#/zh-CN
1.安装element-ui
(venv) D:\pycharm_workspace\vue_learn\leeoo>cnpm i element-ui -S

√ Installed  packages

√ Linked  latest versions

√ Run  scripts

√ All packages installed ( packages installed from npm registry, used 3s(network 3s), speed .46kB/s, json (.15kB), tarball 0B)
2.导入element-ui
在main.js中导入element-ui的js和css:
import Vue from 'vue'

import App from './App'

import router from './router'

// 引入element-ui的js

import ElementUI from 'element-ui'

// 引入element-ui的全局css

import 'element-ui/lib/theme-chalk/index.css'

// 使用ElementUI插件(很重要)

Vue.use(ElementUI)

Vue.config.productionTip = false

/* eslint-disable no-new */

new Vue({

  el: '#app',

  router,

  components: { App },

  template: '<App/>'

})
3.调整全局样式(习惯)
习惯用法:这是一个习惯用法,去除body的8px的margin,修改a标签和ul的样式。
在static目录下创建global目录,然后在其中创建index.css作为全局样式:
/* /static/global/index.css */

* {

  margin:;

  padding:;

}

a {

  text-decoration: none;

}

ul {

  list-style: none;

}
然后在main.js全局导入:
import '../static/global/index.css'
4.使用element-ui的组件
element-ui的组件使用很简单,找到一个我们想要使用的组件,例如环形进度条:
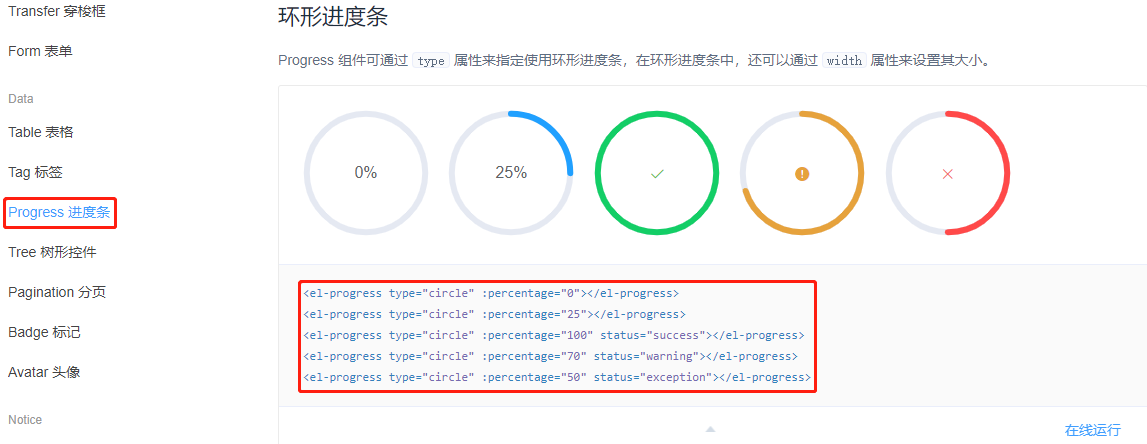
我们将代码直接拷贝到我们自己的组件中,例如Home组件:
<template>

  <div class="home">

    <el-progress type="circle" :percentage="0"></el-progress>

    <el-progress type="circle" :percentage="25"></el-progress>

    <el-progress type="circle" :percentage="100" status="success"></el-progress>

    <el-progress type="circle" :percentage="70" status="warning"></el-progress>

    <el-progress type="circle" :percentage="50" status="exception"></el-progress>

  </div>

</template>

<script>

  export default {

    name: "Home"

  }

</script>

<style scoped>

  .home {

    width: 1000px;

    height: 400px;

    margin: 0 auto;

    text-align: center;

  }

</style>
页面效果:

其他组件的使用方法也是一样的。使用组件时一定要注意看组件的属性和方法,对数据的操作等。
二、axios
类似于jQuery的Ajax操作
axios官方:http://www.axios-js.com/
参考:https://www.kancloud.cn/yunye/axios/234845
1.安装axios
(venv) D:\pycharm_workspace\vue_learn\leeoo>cnpm i axios -S

√ Installed  packages

√ Linked  latest versions

√ Run  scripts

√ All packages installed ( packages installed from npm registry, used 902ms(network 901ms), speed .68kB/s, json (.62kB), tarball .44kB)
2.导入axios
import Axios from 'axios'

// 将其挂载到Vue的原型上,这样所有的组件都可以使用axios

// Vue.prototype.$axios = Axios

// 一般命名为$https

Vue.prototype.$https = Axios
将axios挂载到Vue原型的$https变量下(Vue.prototype.$https),方便所有组件使用。在组件中使用this.$http调用axios。
注意:axios不是使用Vue.use来使用的,因为axios不是基于Vue的http库,而是独立的基于ES6的http库。所以只需要import后就可以使用了。
3.在组件中使用axios(get请求数据)
methods: {

  getCategoryList() {

    this.$https.get('https://www.luffycity.com/api/v1/course_sub/category/list/?belong=1')

      .then((res) => {

        console.log(res);

        var data = res.data;

        if (data.error_no === 0) {

          this.categoryList = data.data;

        }

        // 将 "全部" 加入categoryList列表

        let obj = {

          id: 0,

          name: '全部',

          belong: 1,

          category: 0

        }

        this.categoryList.unshift(obj);

      }).catch((err) => {

      // 处理错误

      console.log('获取数据失败', err)

    })

  },

  getAllCourseList() {

    this.$https.get('https://www.luffycity.com/api/v1/free/category/')

      .then((res) => {

        console.log(res);

        var data = res.data;

        if (data.error_no === 0) {

          console.log(res);

          this.courseList = data.data;

          this.showCourseList = data.data;

        }

      }).catch((err) => {

      console.log('获取课程全部列表失败', err);

    })

  }

},

created() {

  this.getCategoryList();

  this.getAllCourseList();

}
我们在created函数中调用getCategoryList和getAllCourseList函数,这两个函数都是从后台API接口获取数据列表。而且都是使用的get请求。
4.设置全局axios baseurl
在3.中我们可以看到,两个函数请求API数据的url前面部分是一样的。我们可以通过设置axios的全局baseurl来设置这部分数据。
在main.js中设置全局属性:
// main.js

import Axios from 'axios'

Axios.defaults.baseURL = 'https://www.luffycity.com/api/v1/';

Vue.prototype.$https = Axios
设置以后,我们再在组件中使用url获取数据的时候:
this.$https.get('course_sub/category/list/?belong=1')
直接使用baseURL之后的部分即可。
5.拦截器
参考官方文档:https://www.kancloud.cn/yunye/axios/234845
1)请求拦截器
如果我们在使用axios发送ajax请求之前,需要在请求头中添加token等认证信息的话,需要使用请求拦截器。
请求拦截器:就是运行在发送请求或接受响应后的一些钩子函数。
import VueCookies from 'vue-cookies'

import Axios from 'axios'

Axios.interceptors.request.use(function (config) {

  // 在发送请求之前做些事情

  if (VueCookies.isKey('access_token')) {

    Axios.defaults.headers.common['Authorization'] = VueCookies.get('access_token');

  }

  return config;

}, function (error) {

  // 请求错误的时候做些事情

  return Promise.reject(error);

});
2)响应拦截器
// 添加响应拦截器

Axios.interceptors.response.use(function (response) {

  // 对响应数据做点什么

  return response;

}, function (error) {

  // 对响应错误做点什么

  return Promise.reject(error);

});
三、Vuex
Vuex适用于中小型项目,可以方便的进行数据分发和传递,类似一个公共仓库。
官方文档:https://vuex.vuejs.org/zh/
Vuex架构图:
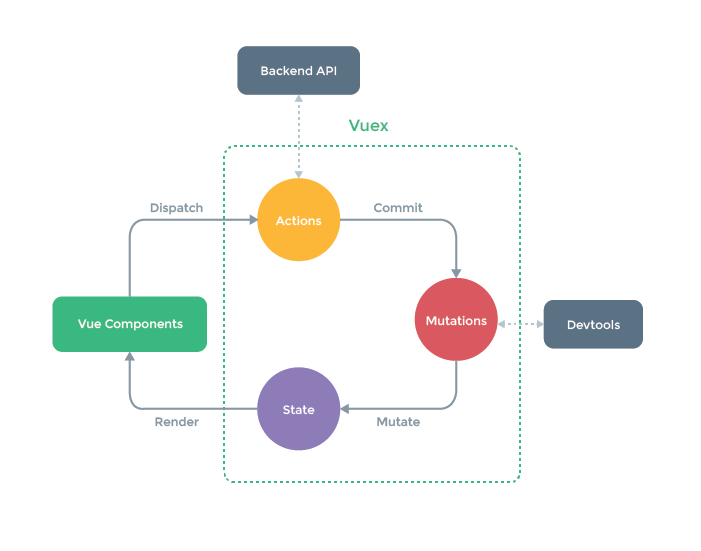
工作流程:
1)vue组件获取State中的数据,并渲染到页面
2)vue组件使用dispatch调用actions中的方法
3)actions中方法调用后端API获取数据(异步)
4)actions中方法获取到数据后,使用commit调用mutations中的方法
5)mutations中方法修改state中的数据
1.安装Vuex
cnpm i vuex -S
2.导入Vuex
在main.js导入:
import Vue from 'vue'

import App from './App'

import router from './router'

import Vuex from 'vuex'

Vue.use(Vuex)

Vue.config.productionTip = false

const store = new Vuex.Store({

  state: {

    num: 0

  },

  mutations: {},

  actions: {}

})

/* eslint-disable no-new */

new Vue({

  el: '#app',

  router,

  store,

  components: { App },

  template: '<App/>'

})
记得将store挂载到Vue对象中。
3.获取state中的变量值
vuex中的state用于存放数据。
我们可以在任何Vue对象的子组件中获取其中的值。
// Home.vue

<template>

  <div>

    My num : {{myNum}}

  </div>

</template>

<script>

  export default {

    name: "Home",

    computed:{

      myNum(){

        return this.$store.state.num;

      }

    }

  }

</script>
使用computed属性,来获取$store.state中num的值。并渲染到页面上。
我们可以同时在多个组件中通过这种方式获取num的值,做到仓库里的数据可以随意分发。
建议:如果一份数据只有一个组件会使用,则没必要放到仓库中去。
4.使用mutations修改仓库中的数据(同步)
我们在某个组件中如果想要修改仓库中的数据,不能直接对$store.state.num进行修改。
在vuex中修改仓库数据只能通过commit mutation来进行修改。
1)在mutations中定义修改函数
const store = new Vuex.Store({

  state: {

    num: 0

  },

  mutations: {

    setNum(state,val){

      state.num = val;

    }

  },

  actions: {}

})
在mutations中定义一个setNum函数,用于修改state中的num的值。这个函数供组件使用commit调用。
注意setNum的第一个参数是默认参数,指的就是state对象,第二个参数val是组件调用时传的值。
2)在组件中使用commit调用setNum
<template>

  <div>

    My num : {{myNum}}

    <br>

    <button @click="changeNum">修改仓库中的num</button>

  </div>

</template>

<script>

  export default {

    name: "Home",

    computed:{

      myNum(){

        return this.$store.state.num;

      }

    },

    methods:{

      changeNum(){

        this.$store.commit('setNum',10);

      }

    }

  }

</script>
我们点击"修改仓库中num"按钮,触发changeNum事件函数,然后在其中使用this.$store.commit('setNum',10)调用mutations中的setNum函数,并传递参数。
实现效果:当我们点击按钮时,页面上显示的数字也会变化为新值10。

5.使用actions+mutations修改数据(异步)
如果我们直接在组件中使用this.$store.commit()调用mutations中的方法修改数据。这种方式只支持同步修改。而如果其中存在异步操作(例如ajax获取数据),则会出错(页面的值被修改了,但是state中的值实际没有修改)。
mutations不支持异步操作,但是actions中支持异步操作,所以我们将异步操作在actions中执行,然后由actions中的函数来调用mutations中的方法。流程区别如下:
组件直接使用mutations中方法(同步)的流程:

组件 ----> commit ----> setNum

组件使用actions+mutations(异步)的流程:

组件 ----> dispatch ---->setNumAction ---->commit ----> setNum
1)实现actions中的方法
const store = new Vuex.Store({

  state: {

    num: 0

  },

  mutations: {

    // 只做最后的修改操作(同步操作)

    setNum(state,val){

      state.num = val;

    }

  },

  actions: {

    // 可以支持异步操作,例如ajax,然后将获取的数据调用setNum修改

    setNumAction(context,val){

      // 在这里使用异步操作

      // Send Ajax request to get data from server.

      context.commit('setNum',val)

    }

  }

})
2)组件中使用dispatch调用setNumAction
<template>

  <div>

    My num : {{myNum}}

    <br>

    <button @click="changeNum">修改仓库中的num</button>

  </div>

</template>

<script>

  export default {

    name: "Home",

    computed:{

      myNum(){

        return this.$store.state.num;

      }

    },

    methods:{

      changeNum(){

        this.$store.dispatch('setNumAction',10);

      }

    }

  }

</script>
四、vue-cookies
1.安装、导入vue-cookies
使用npm或cnpm安装vue-cookies:
cnpm i vue-cookies -S
在main.js中导入vue-cookies:
import VueCookies from 'vue-cookies'

Vue.use(VueCookies)
2.使用vue-cookies
vue-cookies的使用可以参考:https://www.npmjs.com/package/vue-cookies
总体来说,vue-cookie和在django中操作cookie很类似。
1)全局配置
// API

$cookies.config(expireTimes[,path[, domain[, secure]]])  // default: expireTimes = 1d, path = '/', domain = '', secure = ''

// eg.

// 30天过期

Vue.$cookies.config('30d')

// 7天过期,https才生效

Vue.$cookies.config('7d','','',true)

// 2019-3-13过期

this.$cookies.config(new Date(2019,03,13).toUTCString())
2)设置cookie
// API

$cookies.set(keyName, value[, expireTimes[, path[, domain[, secure]]]])   //return this

// eg.

// 支持json数据类型

var user = { id:1, name:'Journal',session:'25j_7Sl6xDq2Kc3ym0fmrSSk2xV2XkUkX' };

this.$cookies.set('user',user);

// 支持链式set,即每次set返回的是this.$cookies本身

this.$cookies.set("user_session","25j_7Sl6xDq2Kc3ym0fmrSSk2xV2XkUkX")

// 数字+d,d不区分大小写,表示一天
.set("user_session","25j_7Sl6xDq2Kc3ym0fmrSSk2xV2XkUkX","1d")

.set("user_session","25j_7Sl6xDq2Kc3ym0fmrSSk2xV2XkUkX","1D")

// 秒为单位

.set("user_session","25j_7Sl6xDq2Kc3ym0fmrSSk2xV2XkUkX",60 * 60 * 24)

// 输入一个Date对象

.set("user_session","25j_7Sl6xDq2Kc3ym0fmrSSk2xV2XkUkX", new Date(2017, 03, 12))

// 输入一个字符串日期

.set("user_session","25j_7Sl6xDq2Kc3ym0fmrSSk2xV2XkUkX", "Sat, 13 Mar 2017 12:25:57 GMT")

// 结束cookie,使用0,或者"0"

this.$cookies.set("default_unit_second","input_value",0);
3)其他操作
// 检查一个cookie键是否存在

this.$cookies.isKey("token")

// 获取一个cookie的值(通过key)

this.$cookies.get("token");

// 删除一个cookie

this.$cookies.remove("token");

// 获取所有cookie的键

this.$cookies.keys().join("\n");

// 删除所有的cookie

this.$cookies.keys().forEach(cookie => this.$cookies.remove(cookie))
≧◔◡◔≦
最新文章
- python安装、模块安装
- Node.js执行存储过程
- ApplePay扩大全球发卡行合作,“苹果税”撑不住了?
- 通过例子学python(1)
- G - Shuffle'm Up
- grails通过findBy或findBy查找的结果集进行排序
- HDU 2955(01背包问题)
- Gartner公布了集成系统的魔力象限 - Nutanix的关键技术是什么?
- Temporary Post Used For Theme Detection (19f70e1d-5d8d-4c19-aef1-5b5a71ae0c47 - 3bfe001a-32de-4114-a6b4-4005b770f6d7)
- 一步一步学习SignalR进行实时通信_3_通过CORS解决跨域
- JAVA card 应用开发(三) 把APPLET(CAP文件)装载到卡片
- IntelliJ IDEA Groovy(转)
- LINUX读写文件区别
- PMM Client 安装异常报错
- Create a toolwindow for the VBA editor with .NET(C#).
- 积木式编程——自制app点灯
- 蓝牙协议分析(6)_BLE地址类型
- php5.6-lumen与php5.6-phalcon性能对比
- ffmpeg 下载安装和简单应用
- vuex this.$store.state.属性和mapState的属性中的一点点区别