nginx的优化和防盗链
2024-09-12 08:16:04
nginx的优化和防盗链
目录
一、nginx的优化
1. 隐藏版本号
(1)隐藏版本号的原因
为了安全,如果暴露版本信息,黑客可以通过版本信息,得知该版本存在的漏洞,进而对服务器进行攻击。隐藏版本信息可以避免黑客有的放矢的搞破坏。
(2)查看版本号的方法
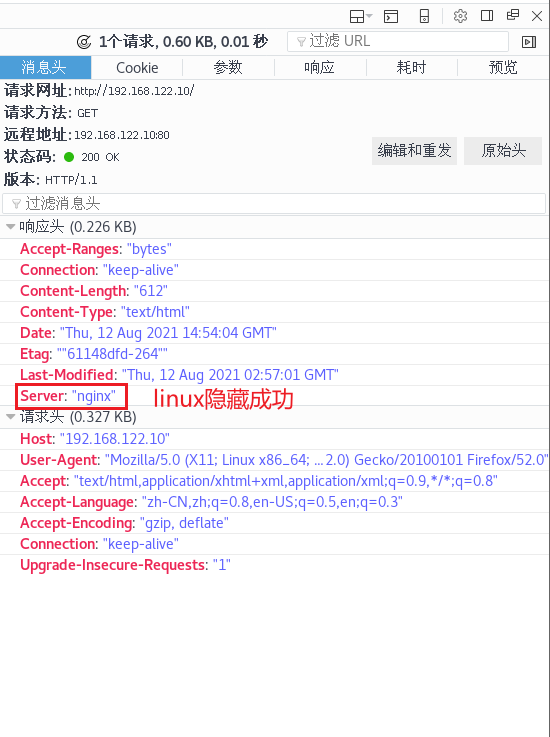
方法一:命令“nginx -v”(仅限web服务器)
[root@localhost ~]# nginx -v

nginx version: nginx/1.12.0
方法二:命令“crul -I”
[root@localhost ~]# curl -I 192.168.122.10
HTTP/1.1 200 OK
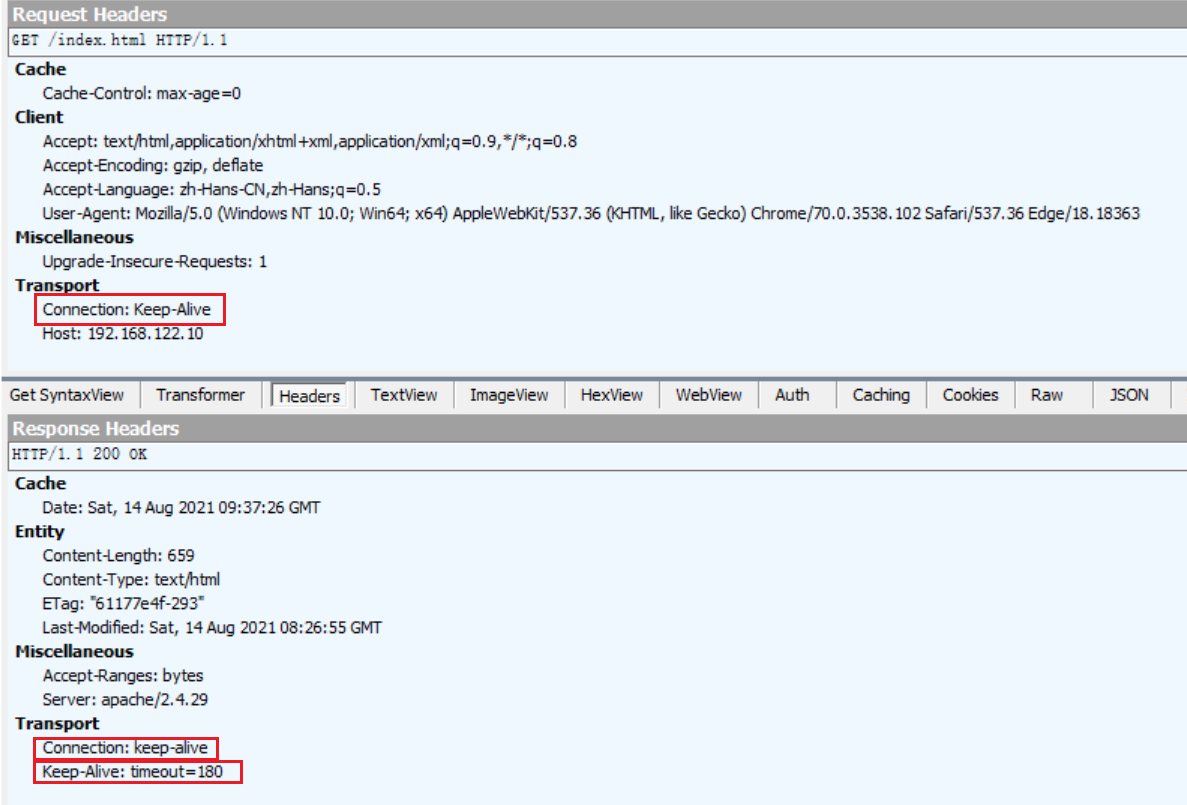
Server: nginx/1.12.0 #当前nginx版本为1.12
Date: Thu, 12 Aug 2021 13:55:40 GMT
Content-Type: text/html
Content-Length: 612
Last-Modified: Thu, 12 Aug 2021 02:57:01 GMT
Connection: keep-alive
ETag: "61148dfd-264"
Accept-Ranges: bytes
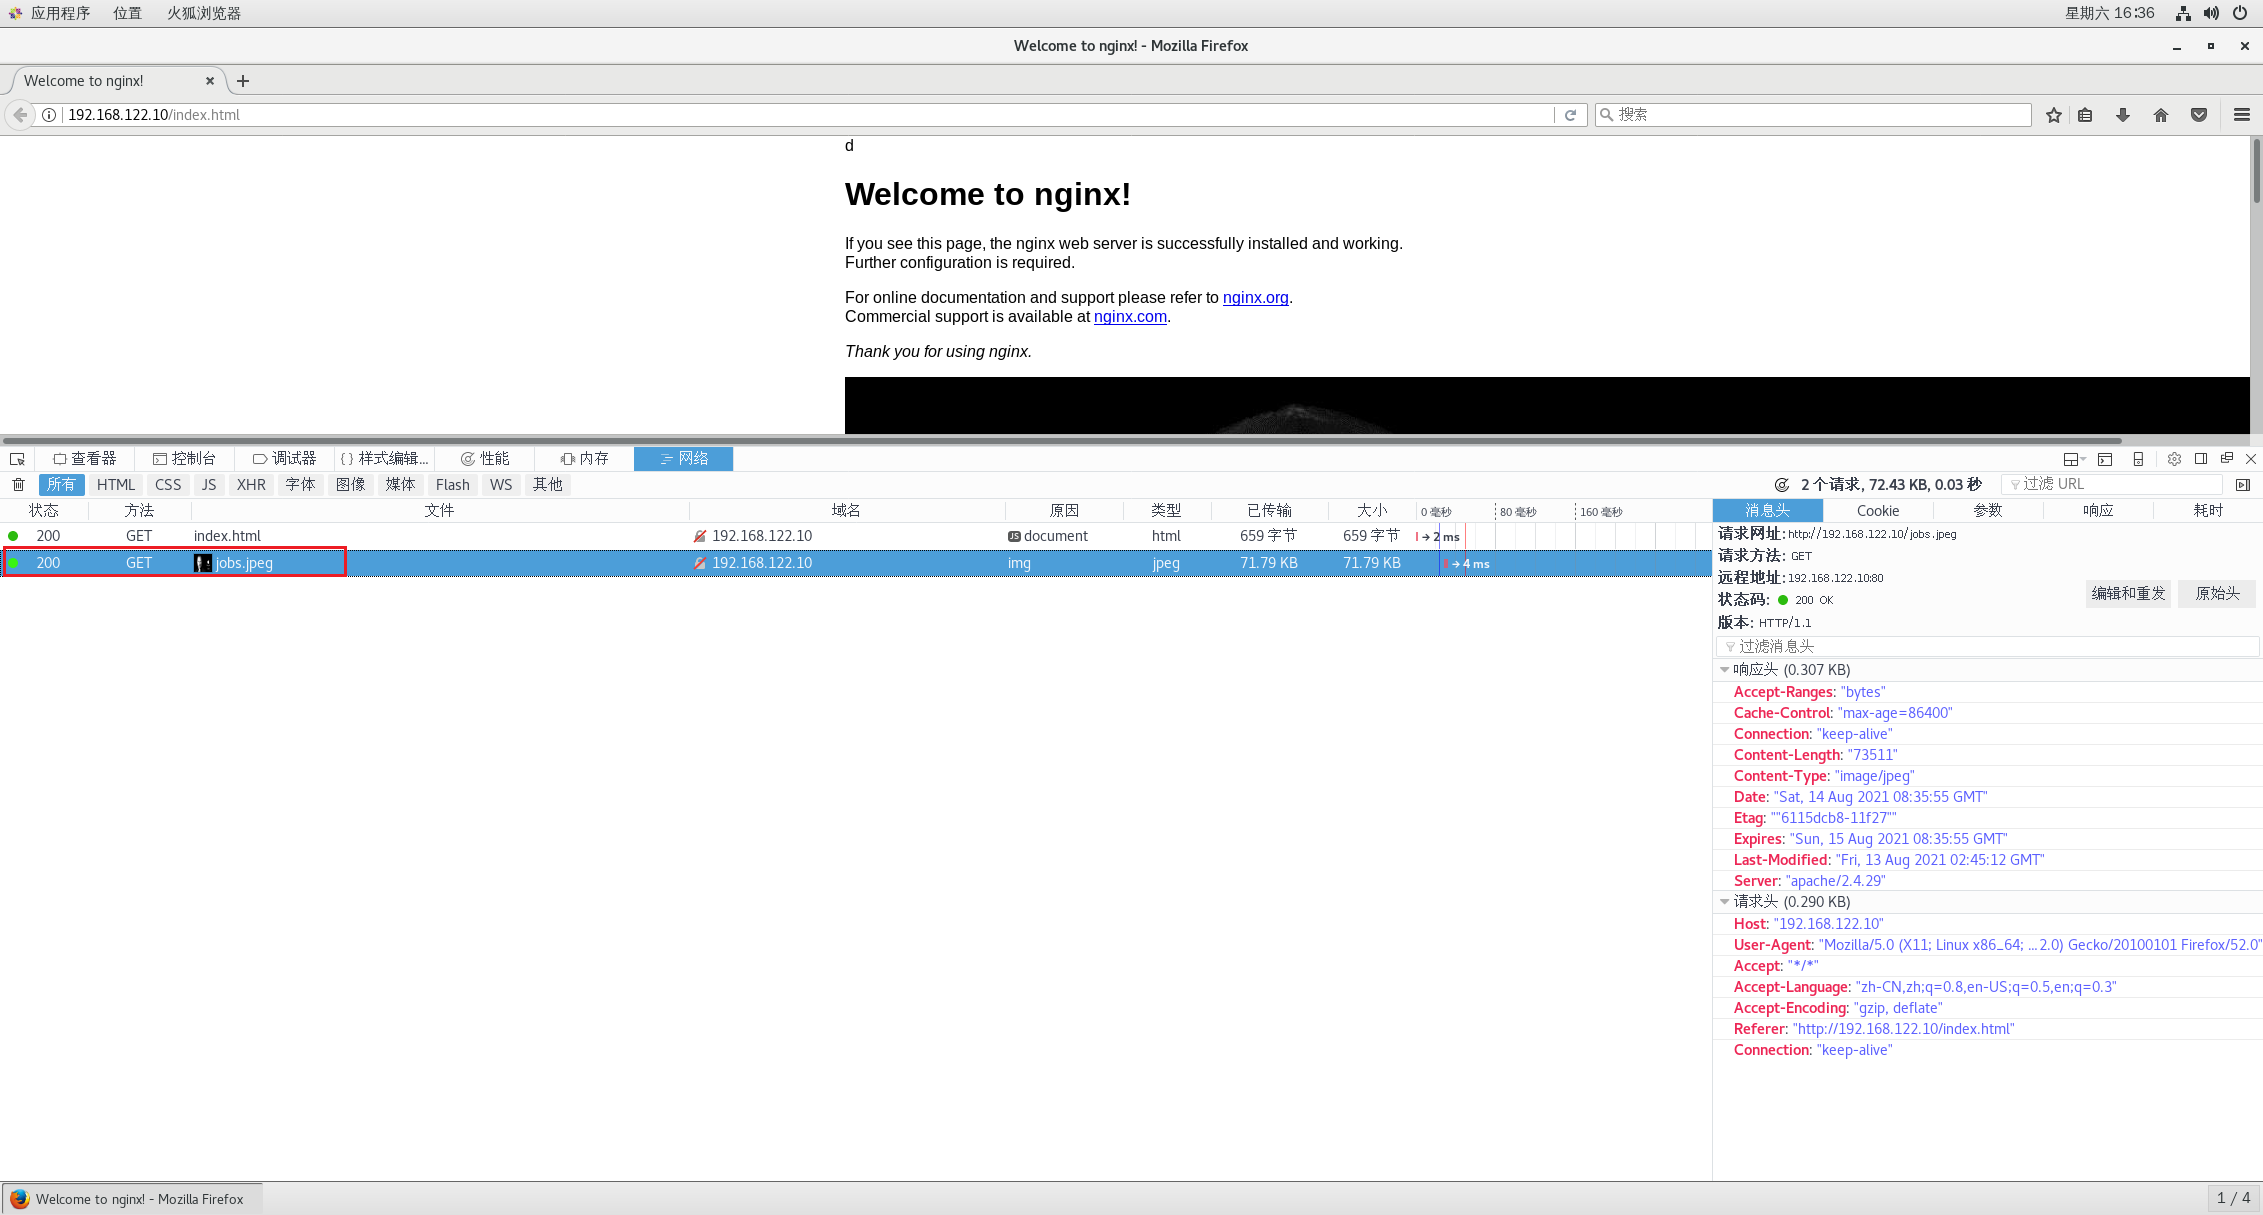
方法三:linux火狐浏览器查看
- 打开火狐浏览器
- 右击网页显示区,选择“查看元素”
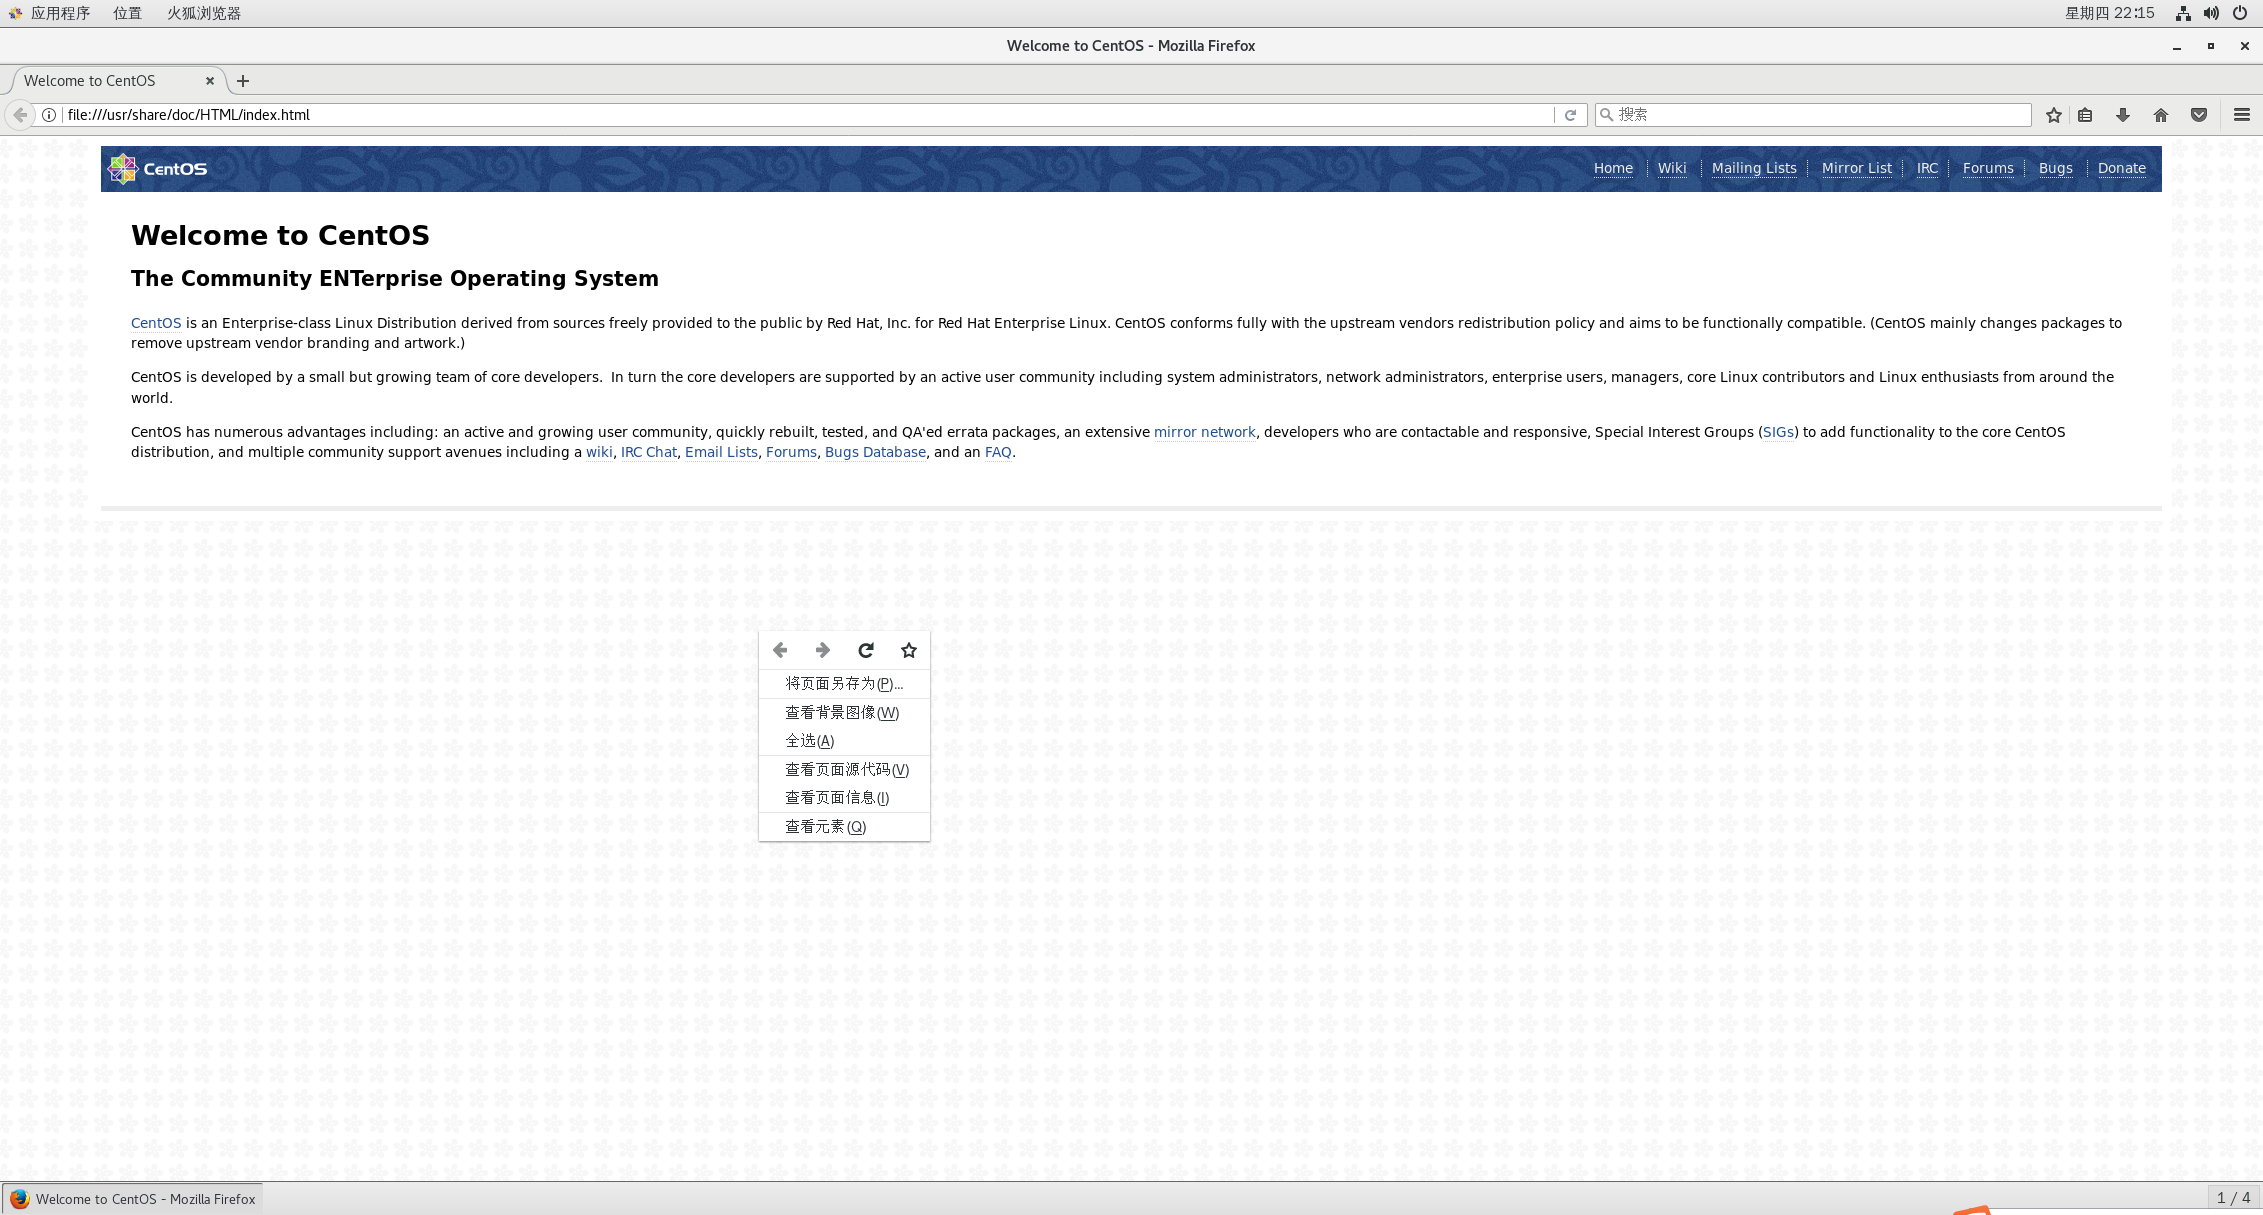
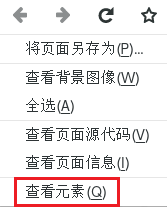
- 选择“网络",点击本次连接

- 输入网页地址
- 查看消息头

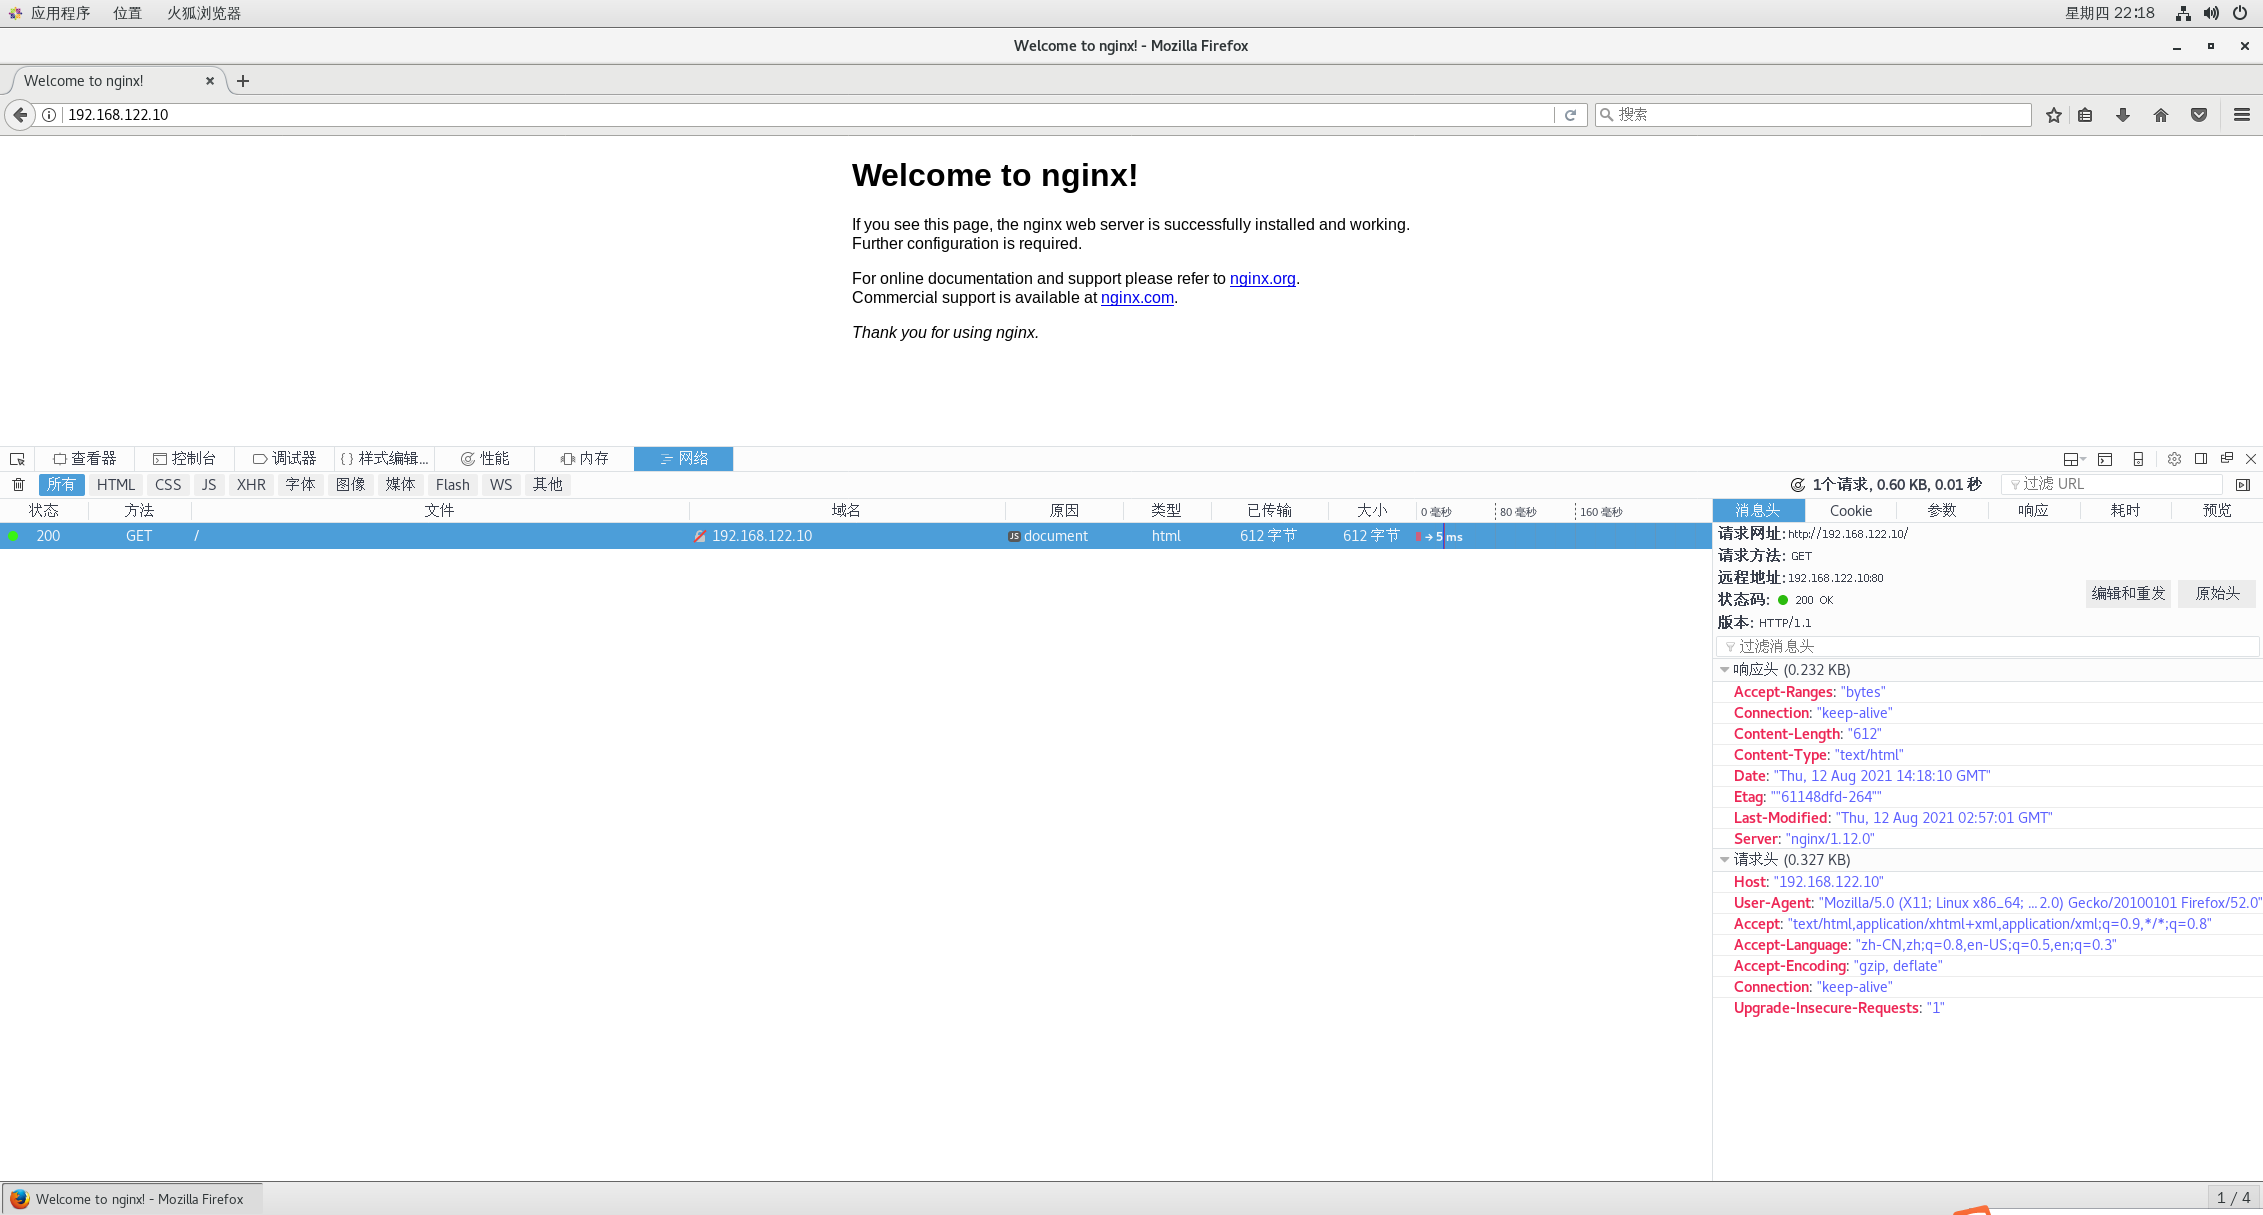
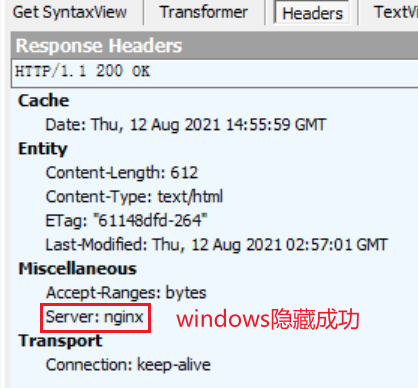
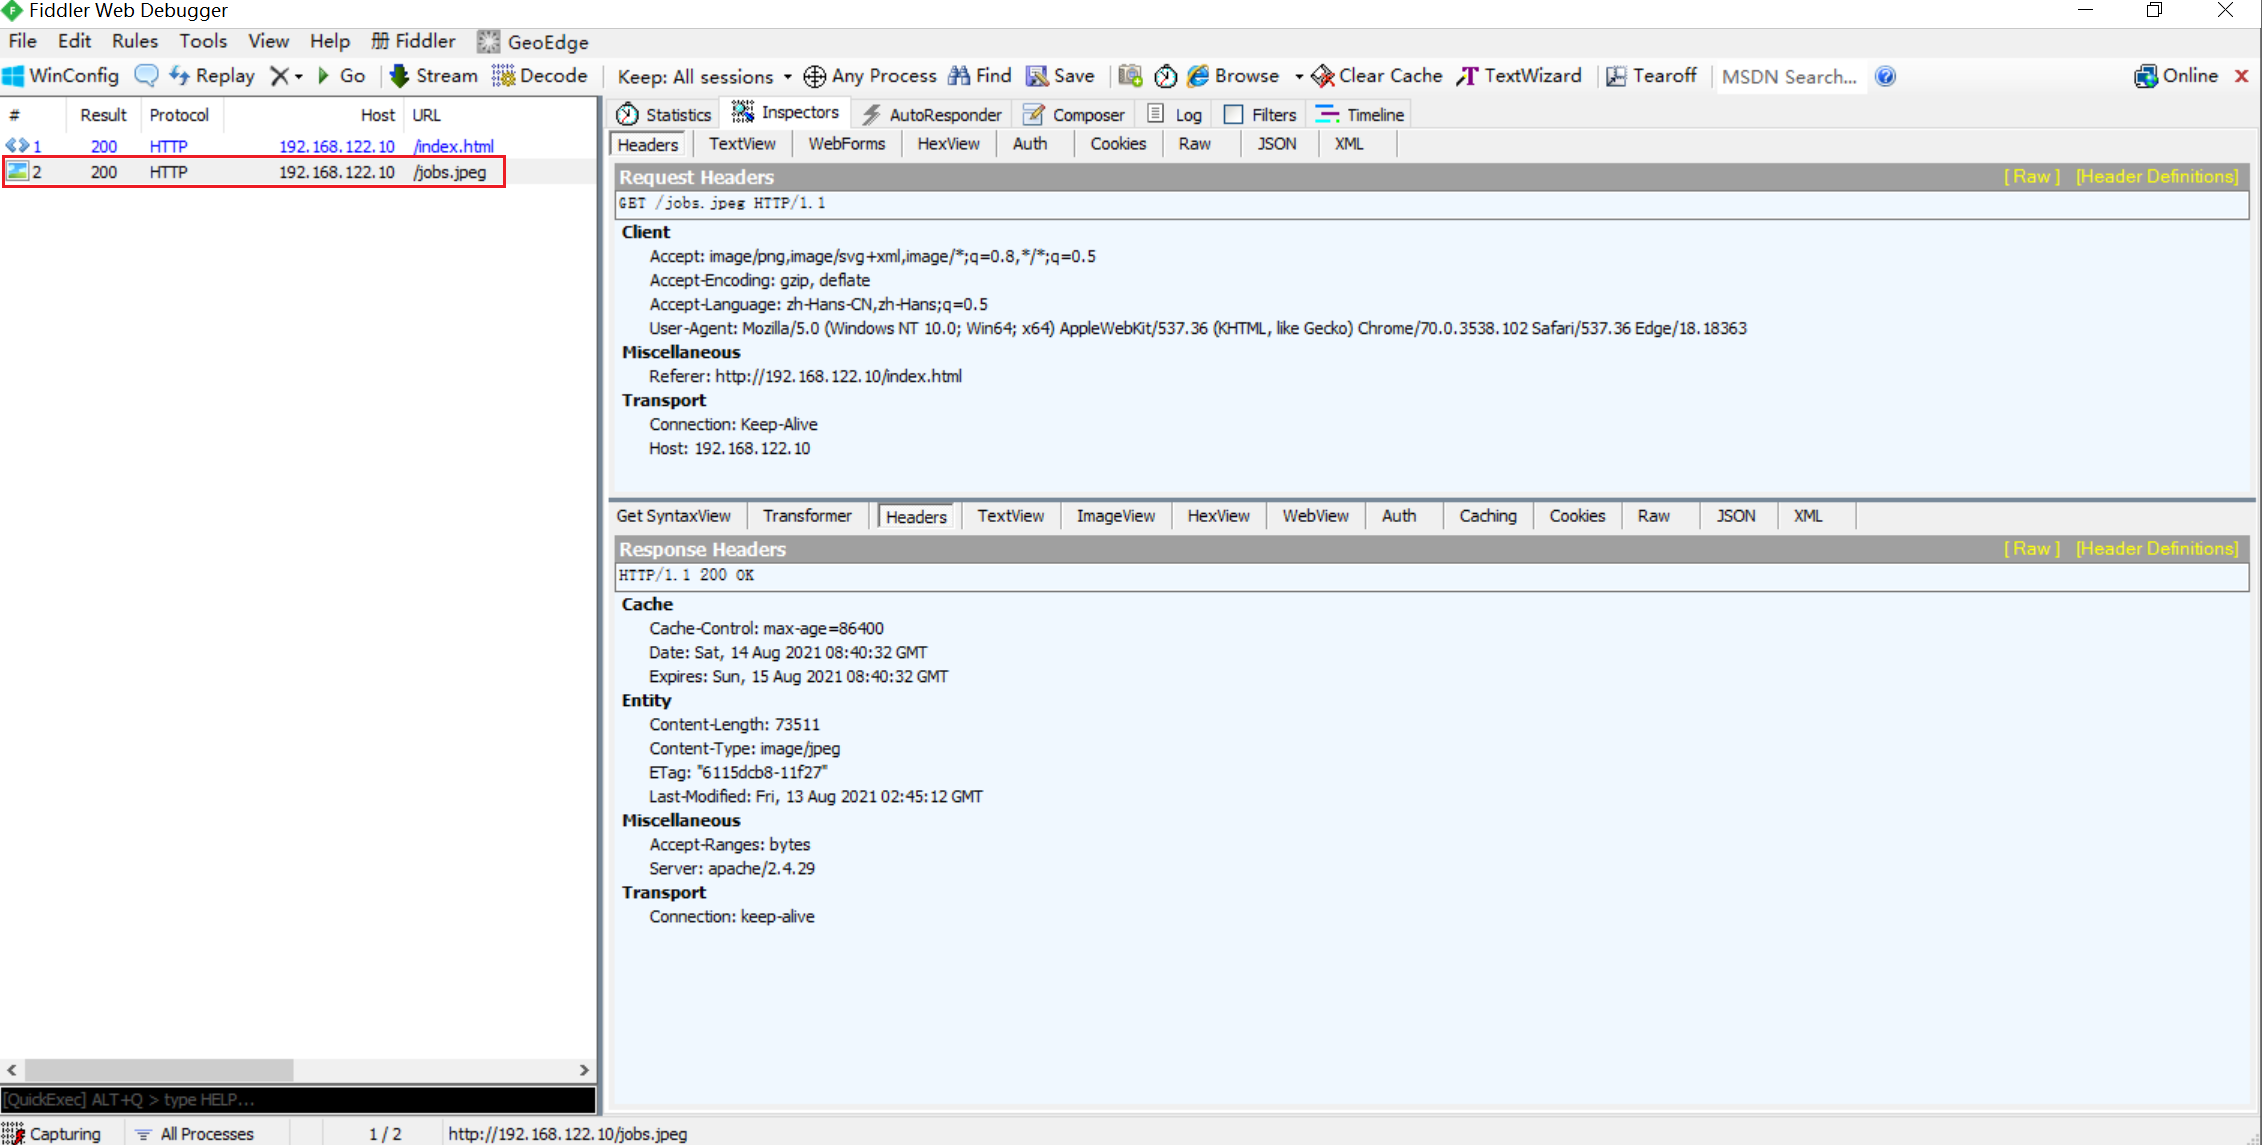
方法四:windows通过fiddler软件查看
- 打开fiddlder
- 打开浏览器,输入网页地址
- fiddler中点击Inspectors,选择Headers
(3)隐藏方法一:修改配置文件
[root@localhost ~]# vim /usr/local/nginx/conf/nginx.conf

http {

......

    server_tokens off;    #添加此行内容,关闭版本号的显示

......

[root@localhost ~]# systemctl restart nginx
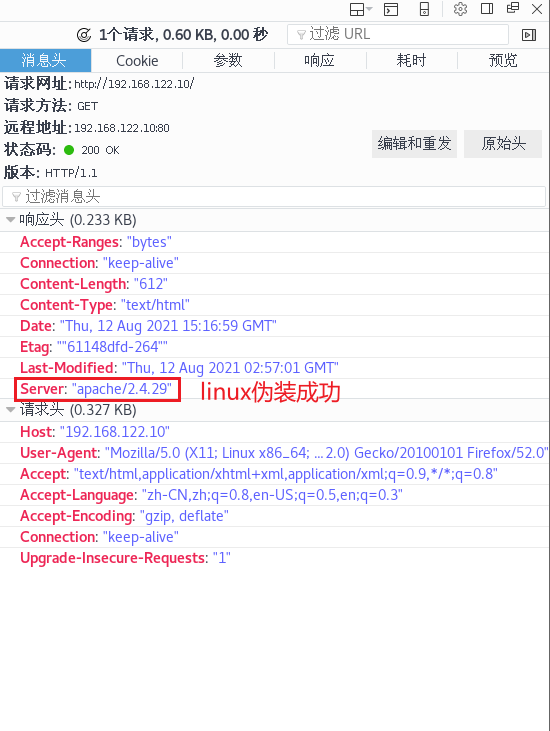
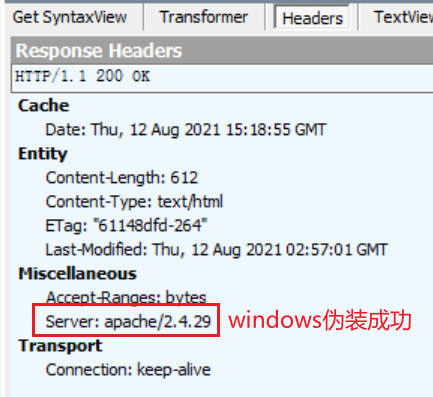
(4)隐藏方法二:修改源码文件,重新编译
[root@localhost ~]# vim /usr/local/nginx/conf/nginx.conf

http {

......

    #server_tokens off;    #注释此行内容,开启版本号的显示

......

[root@localhost ~]# vim /opt/nginx-1.12.0/src/core/nginx.h

#define NGINX_VERSION      "2.4.29"

##修改版本号,可伪装成其他服务器版本(例如apache、iis等)

#define NGINX_VER          "apache/" NGINX_VERSION

##修改服务器类型,可伪装成其他服务器版本(例如apache、iis等)

[root@localhost ~]# cd /opt/nginx-1.12.0/

[root@localhost nginx-1.12.0]# ./configure \

> --prefix=/usr/local/nginx \

> --user=nginx \

> --group=nginx \

> --with-http_stub_status_module

[root@localhost nginx-1.12.0]# make -j 2 && make install

[root@localhost nginx-1.12.0]# systemctl restart nginx
2. 修改用户与组
[root@localhost nginx-1.12.0]# vim /usr/local/nginx/conf/nginx.conf

user  nginx nginx;         #第二行,取消注释,修改用户为nginx,组为nginx

[root@localhost nginx-1.12.0]# systemctl restart nginx

[root@localhost nginx-1.12.0]# ps aux | grep nginx

#主进程由root创建,子进程由nginx创建

root      42095  0.0  0.0  20500   628 ?        Ss   23:29   0:00 nginx: master process /usr/local/nginx/sbin/nginx

nginx     42096  0.0  0.0  22948  1404 ?        S    23:29   0:00 nginx: worker process

root      42103  0.0  0.0 112676   976 pts/0    R+   23:29   0:00 grep --color=auto nginx
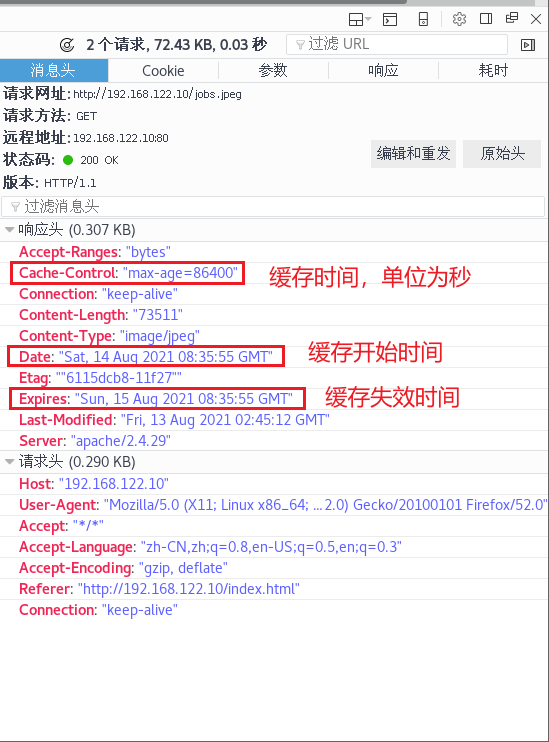
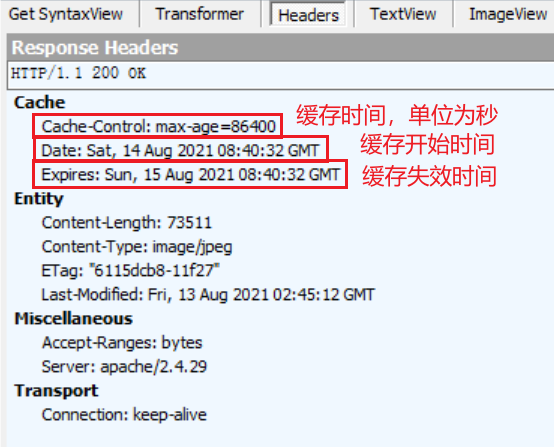
3. 缓存时间
当nginx将网页数据返回给客户端后,可设置缓存的时间,以方便在日后进行相同内容的请求时直接返回,避免重复请求,加快了访问速度。一般针对静态网页进行设置,对动态网页不设置缓存时间。
[root@localhost nginx-1.12.0]# vim /usr/local/nginx/conf/nginx.conf

......

    server {

    ......

        location ~ \.(gif|jpg|jpeg|png|bmp|ico)$ {   #新建location,以图片作为缓存对象

            root   html;

            expires 1d;                              #指定缓存时间为1天

        }

    ......

    }

......

[root@localhost nginx-1.12.0]# systemctl restart nginx
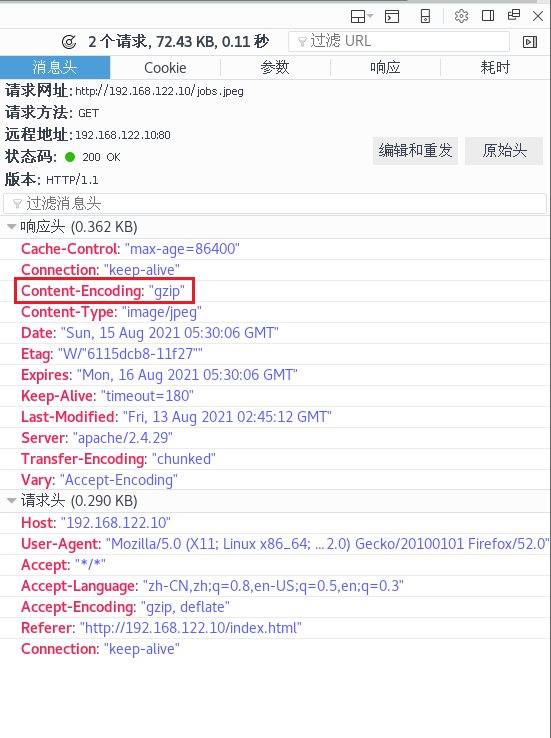
在网页中加入图片后测试
[root@localhost html]# vim /usr/local/nginx/html/index.html

#加入图片

</h1>

<img src="jobs.jpeg"/>

</body></html>
4. 日志切割
- 编写脚本
[root@localhost html]# vim /opt/log_cut.sh

#!/bin/bash

#Filename:log_cut.sh

lastday=$(date -d "-1 day" +%Y%m%d)

#显示前一天的时间

logs_path=/var/log/nginx

pid_path=/usr/local/nginx/logs/nginx.pid

[ -d $logs_path ] || mkdir -p $logs_path

#创建日志文件目录

mv /usr/local/nginx/logs/access.log $logs_path/test.com_access.log-$lastday

mv /usr/local/nginx/logs/error.log $logs_path/test.com_error.log-$lastday

#移动并重命名日志文件

kill -USR1 $(cat $pid_path)

#重建新日志文件

find $logs_path -mtime +30 -exec rm -rf {} \;

#删除30天之前的日志文件
- 脚本执行测试
[root@localhost html]# chmod +x /opt/log_cut.sh

[root@localhost html]# cd /opt

[root@localhost opt]# ./log_cut.sh

[root@localhost opt]# cd /var/log/nginx

[root@localhost nginx]# ls

test.com_access.log-20210813  test.com_error.log-20210813
- 加入计划任务
[root@localhost nginx]# crontab -e

0 1 * * * /opt/log_cut.sh

crontab: installing new crontab

[root@localhost nginx]# crontab -l

0 1 * * * /opt/log_cut.sh
- 补充-ctime/atime/mtime
在linux操作系统中,每个文件都有很多的时间参数,其中有三个比较常用,分别是ctime、atime、mtime。
| 时间参数 | 说明 |
|---|---|
| ctime | 当修改文件的权限或者属性的时候,就会更新这个时间,ctime并不是create time,更像是change time,只有当更新文件的属性或者权限的时候才会更新这个时间,但是更改内容的话不会更新这个时间 |
| atime | 当使用这个而文件的时候就会更新这个时间 |
| mtime | 当修改文件的内容数据的时候,就会更新这个时间,而更改权限或者属性,mtime不会改变,这就是和ctime的区别 |
5. 连接超时
HTTP有一个KeepAlive模式,它告诉web服务器在处理完一个请求后保持这个TCP链接的打开状态。若接收到来自同一客户端的其他请求,服务端会利用这个未被关闭的连接,而不需要再建立一个连接。
KeepAlive在一段时间内保持打开状态,它们会在这段时间内占用资源,占用过多就会影响性能。
[root@localhost nginx]# vim /usr/local/nginx/conf/nginx.conf

http {

......

    keepalive_timeout  65 180;

    client_header_timeout 80;

    client_body_timeout 80;

......

}

[root@localhost nginx]# systemctl restart nginx

| 设定参数 | 说明 |
|---|---|
| keepalive_timeout | 指定KeepAlive的超时时间(timeout)。指定每个TCP连接最多可以保持多长时间,服务器将会在这个时间后关闭连接。Nginx的默认值是65秒,有些浏览器最多只保持60秒,所以可以设定为60秒。若将它设置为0,就禁止了keepalive连接。 第二个参数(可选的)指定了在响应头Keep-Alive:timeout=time中的time值。这个头能够让一些浏览器主动关闭连接,这样服务器就不必去关闭连接了。没有这个参数,Ngnix不会发送Keep-Alive响应头 |
| clinet_header_timeout | 客户端向服务端发送一个完整的request header,Nginx返回HTTP 408(Request Time Out) |
| client_body_timeout | 指定客户端与服务端建立连接后发送request body的超时时间。如果客户端在指定时间内没有发送任何内容,Nginx返回HTTP 408(Request Time Out) |
6. 更改进程数
在高并发场景,需要启动更多的Nginx进程以保证快速响应,以处理用户的请求,避免造成阻塞。
[root@localhost nginx]# nproc --all

#显示所有CPU数目

2

[root@localhost nginx]# nproc

#显示当前进程可用的CPU数目

2

[root@localhost nginx]# ps aux | grep nginx

#查看nginx主进程中包含几个子进程

root       3383  0.0  0.0  20500   640 ?        Ss   17:34   0:00 nginx: master process /usr/local/nginx/sbin/nginx

nginx      3384  0.0  0.0  22948  1656 ?        S    17:34   0:00 nginx: worker process

root       3742  0.0  0.0 112676   980 pts/0    R+   18:09   0:00 grep --color=auto nginx

[root@localhost nginx]# vim /usr/local/nginx/conf/nginx.conf

worker_processes  2;

#修改为核数相同或者2倍

worker_cpu_affinity 01 10;

设置每个进程由不同cpu处理,进程数配为4时设置为0001 0010 0100 1000

#worker_rlimit_nofile 65535;

events {

    worker_connections  4096;

#单个工作进程可以允许同时建立外部连接的数量

}

[root@localhost nginx]# ulimit -a

core file size          (blocks, -c) 0

data seg size           (kbytes, -d) unlimited

scheduling priority             (-e) 0

file size               (blocks, -f) unlimited

pending signals                 (-i) 7822

max locked memory       (kbytes, -l) 64

max memory size         (kbytes, -m) unlimited

open files                      (-n) 1024

#

pipe size            (512 bytes, -p) 8

POSIX message queues     (bytes, -q) 819200

real-time priority              (-r) 0

stack size              (kbytes, -s) 8192

cpu time               (seconds, -t) unlimited

max user processes              (-u) 7822

virtual memory          (kbytes, -v) unlimited

file locks                      (-x) unlimited

[root@localhost nginx]# ulimit -n 65535

[root@localhost nginx]# ulimit -a

core file size          (blocks, -c) 0

data seg size           (kbytes, -d) unlimited

scheduling priority             (-e) 0

file size               (blocks, -f) unlimited

pending signals                 (-i) 7822

max locked memory       (kbytes, -l) 64

max memory size         (kbytes, -m) unlimited

open files                      (-n) 65535

pipe size            (512 bytes, -p) 8

POSIX message queues     (bytes, -q) 819200

real-time priority              (-r) 0

stack size              (kbytes, -s) 8192

cpu time               (seconds, -t) unlimited

max user processes              (-u) 7822

virtual memory          (kbytes, -v) unlimited

file locks                      (-x) unlimited

[root@localhost nginx]# systemctl restart nginx
- connections不是随便设置的,而是与两个指标有重要关联,一是内存,二是操作系统级别的“进程最大可打开文件数”。
- 内存:每个连接数分别对应一个read_event、一个write_event事件,一个连接数大概占用232字节,2个事件总占用96字节,那么一个连接总共占用328字节,通过数学公式可以算出100000个连接数大概会占用 31M = 100000 * 328 / 1024 / 1024,当然这只是nginx启动时,connections连接数所占用的nginx。
- 进程最大可打开文件数:进程最大可打开文件数受限于操作系统,可通过 ulimit -n 命令查询,以前是1024,现在是65535,
nginx提供了worker_rlimit_nofile指令,这是除了ulimit的一种设置可用的描述符的方式。 该指令与使用ulimit对用户的设置是同样的效果。此指令的值将覆盖ulimit的值,如:worker_rlimit_nofile 65535,相当于ulimit -n 65535。
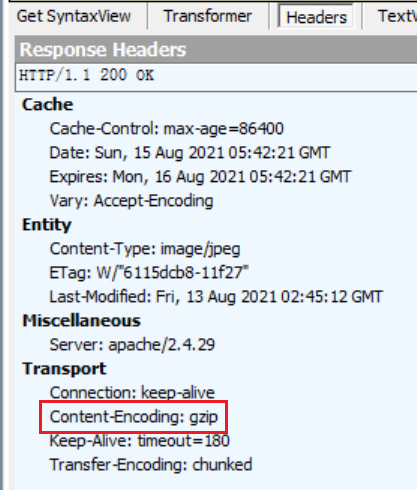
7. 配置网页压缩
Nginx的ngx_http_gzip_module压缩模块提供对文件内容压缩的功能。允许Nginx服务器将输出内容在发送客户端之前进行压缩,以节约网站带宽,提升用户的访问体验,默认已经安装,可在配置文件中加入相应的压缩功能参数对压缩性能进行优化。
[root@localhost nginx]# vim /usr/local/nginx/conf/nginx.conf

......

    gzip  on;

    #取消注释,开启gzip压缩功能

    gzip_min_length 1k;

    #最小压缩文件大小

    gzip_buffers 4 64k;

    #压缩缓冲区,大小为4个64k缓冲区

    gzip_http_version 1.1;

    #压缩版本(默认为1.1,前端如果是squid2.5需使用1.0)

    gzip_comp_level 6;

    #压缩比率

    gzip_vary on;

    #支持前端缓存服务器存储压缩页面

    gzip_types text/plain text/javascript application/x-javascript text/css text/xml application/xml application/xml+rss image/jpg image/jpeg image/png image/gif application/x-httpd-php application/javascript application/json;

    #压缩类型,表示哪些网页文档启用压缩功能

......

[root@localhost nginx]# nginx -t

nginx: the configuration file /usr/local/nginx/conf/nginx.conf syntax is ok

nginx: configuration file /usr/local/nginx/conf/nginx.conf test is successful

[root@localhost nginx]# systemctl restart nginx
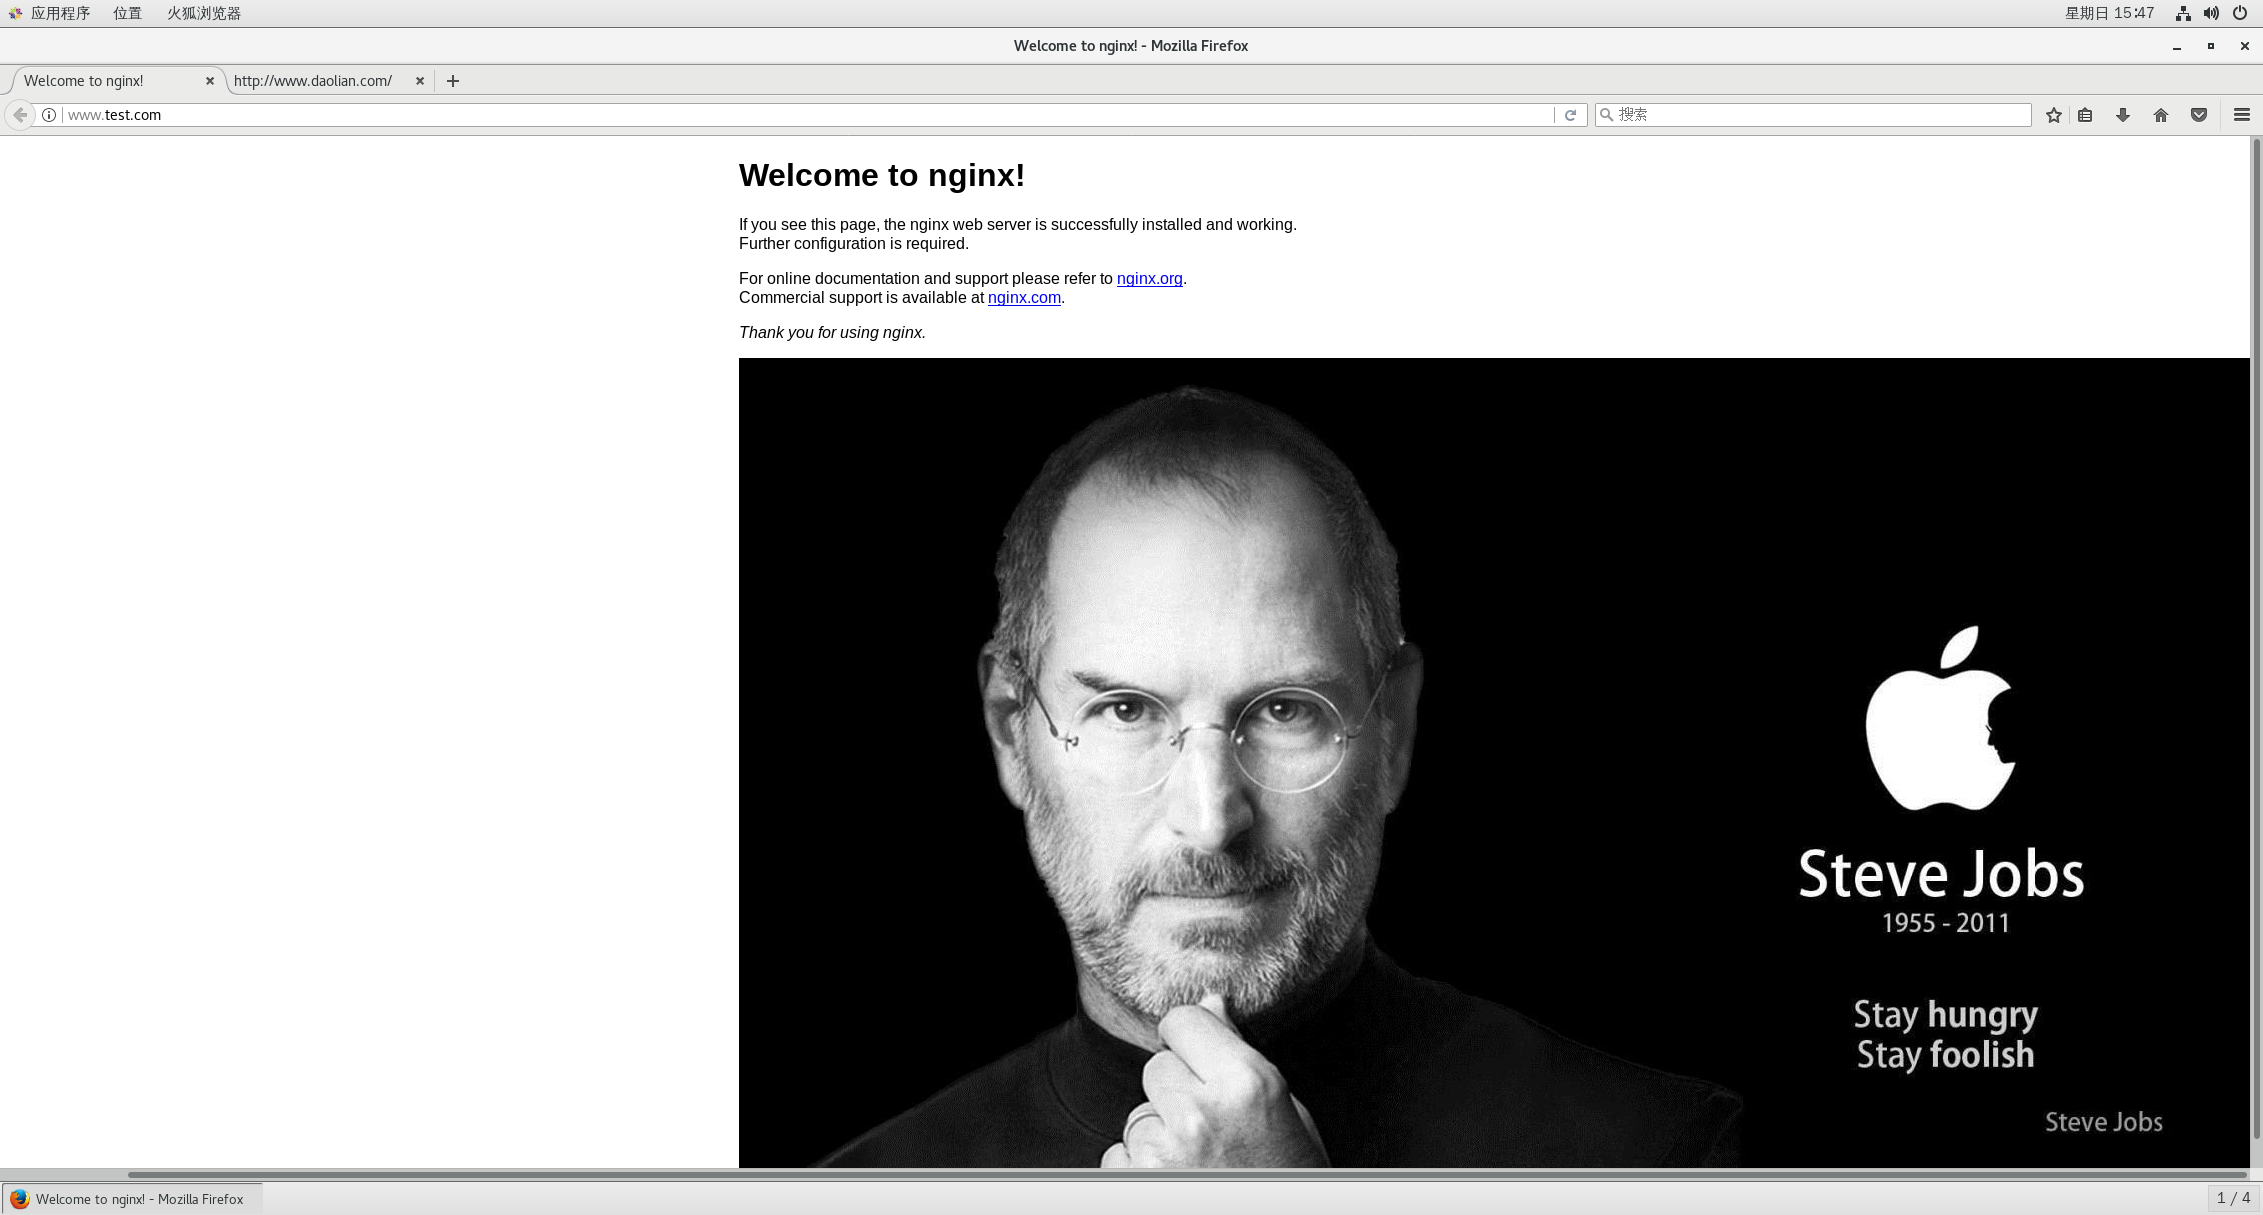
二、防盗链
- 配置基于域名的虚拟web服务器并配置防盗链
[root@localhost html]# vim /usr/local/nginx/conf/nginx.conf

http {

......

    server {

    ......

        location ~* \.(jpeg|gif|jpg|swf)$ {

#匹配不区分大小写,以.jpeg/.gif/.jpg/.swf结尾的文件

            valid_referers none blocked *.test.com test.com;

#设置信任的网站,可以正常使用以上文件

#none为允许没有http_refer的请求访问资源(根据referer的定义,它的作用是指示一个请求是从哪里链接过来的,如果直接在浏览器的地址栏中输入一个资源的URL地址,那么这种请求是不会包含referer字段的,例如http://www.test.com/jobs.jpeg)

#我们使用http://www,test.com访问显示的图片,可以理解成http://www.test.com/jobs.jpeg这个请求是从http://www.test.com这个链接过来的

#blocked允许不是http://开头的,不带协议的请求访问资源

#*.test.com只允许来自指定域名的请求访问资源,如http://www.test.com

            if ( $invalid_referer ) {

                rewrite ^/ http://www.test.com/error.png;

                #return 403;

#如果链接的来源域名不再valid_referers所列出的列表中,$invalid_referer为ture,则执行后面的操作,即执行后面的操作,即进行重写或返回403页面

            }

        }

    ......

    }

    server {

#配置盗链服务器

        listen       80;

        server_name  www.daolian.com;

        charset utf-8;

        access_log  logs/abc.access.log;

        location / {

            root   /var/www/html;

            index  index.html index.htm;

        }

    }

}

[root@localhost html]# nginx -t

nginx: the configuration file /usr/local/nginx/conf/nginx.conf syntax is ok

nginx: configuration file /usr/local/nginx/conf/nginx.conf test is successful

[root@localhost html]# systemctl restart nginx

[root@localhost html]# echo "192.168.122.10 www.test.com www.daolian.com" >> /etc/hosts
- 配置盗链网页
[root@localhost html]# mkdir -p /var/www/html
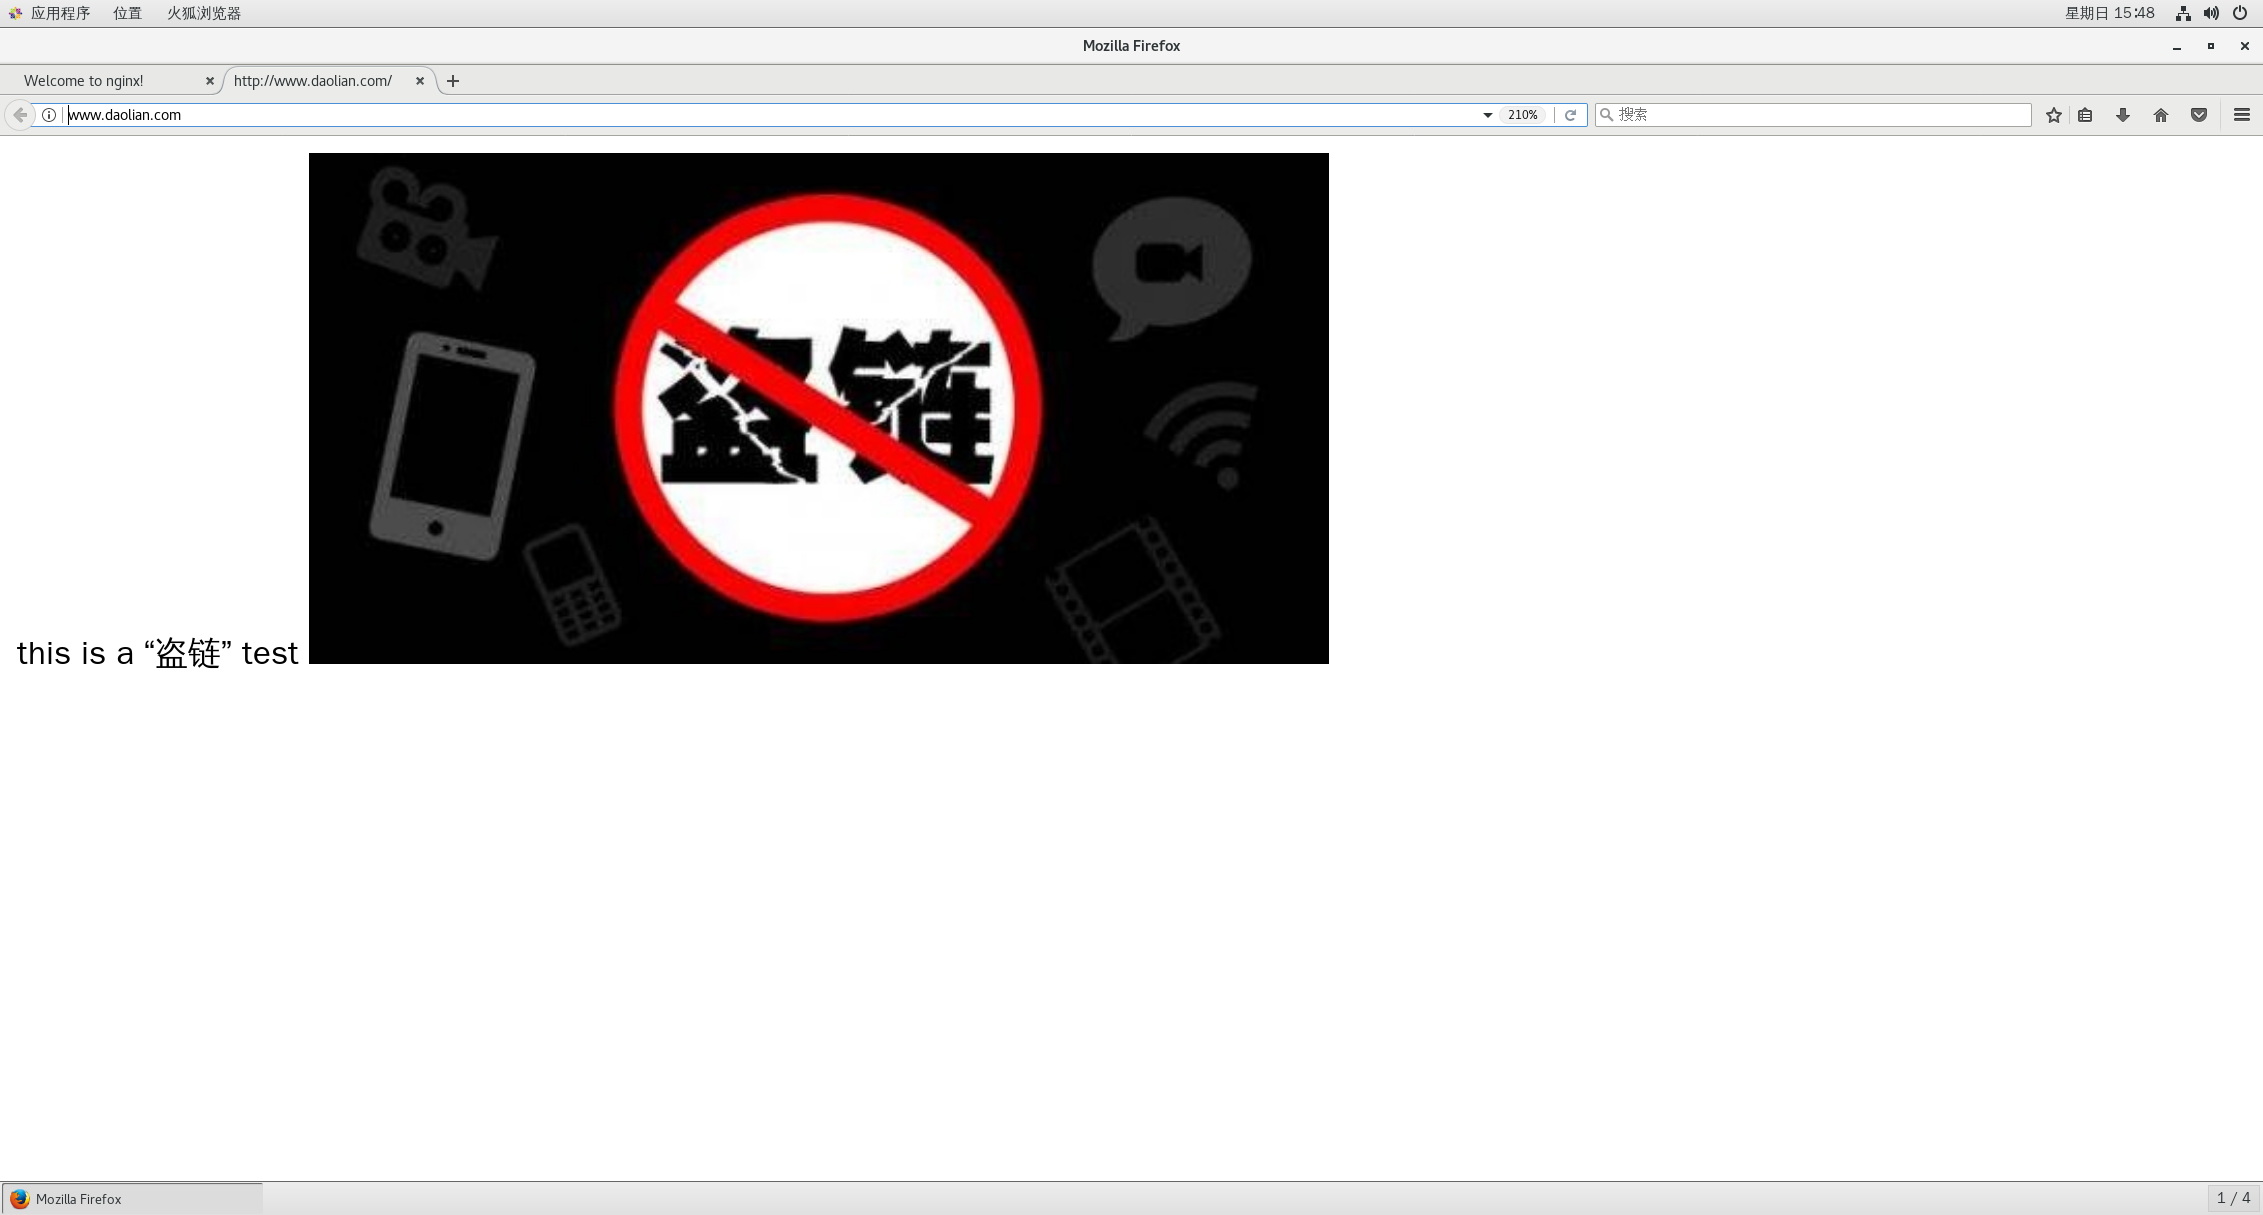
[root@localhost html]# vim /var/www/html/index.html
this is a “盗链” test
</h1>
<img src="http://www.test.com/jobs.jpeg"/>
</body>
</html>
- 防盗测试


最新文章
- 搭建fedora开发环境 common lisp, c++, go
- Silverlight 限制 规则输入(正整数或小数)的另一种“技巧”写法
- Oracle中用一条Sql实现任意的行转列拼接 多行拼接
- SWPFILE实现(增加swap空间)
- ntfs安全权限和共享权限的区别
- Jedis 操作
- UVA 1600 Patrol Robot(机器人穿越障碍最短路线BFS)
- iOS中AutoLayer自动布局流程及相关方法【转】
- jQuery Easy UI Resizable(调整大小)组件
- 【一天一道LeetCode】#13. Roman to Integer
- ERROR: The Python ssl extension was not compiled. Missing the OpenSSL lib?
- SQL对某个字段进行排名
- 数据结构(java版)学习笔记(一)——线性表
- 访问内网(https,udp)
- Java实验6
- Spring技术内幕总结 - IoC容器的实现
- 教你摆脱低级程序猿 项目中cocopads的安装使用
- [label][JavaScript]闭包阅读笔记
- 移动端touch滑屏事件
- ubuntu16.04 安装composer和 laravel