基于PHP构建OAuth 2.0 服务端 认证平台
OAuth2.0 认证服务
安装
你可以在github上下载OAuth Server PHP,也可以用下列命令下载,不过内容都是一样的
mkdir my-oauth2-walkthrough

cd my-oauth2-walkthrough

git clone https://github.com/bshaffer/oauth2-server-php.git -b master
下载后放在根目录,因为这只是个测试!
在这之后配置数据库
Database: `oauth2db`
 --

 -- Database: `oauth2db`

 --

 -- --------------------------------------------------------

 --

 -- 表的结构 `oauth_access_tokens`

 --

 CREATE TABLE IF NOT EXISTS `oauth_access_tokens` (

   `access_token` varchar(40) NOT NULL,

   `client_id` varchar(80) NOT NULL,

   `user_id` varchar(255) DEFAULT NULL,

   `expires` timestamp NOT NULL DEFAULT CURRENT_TIMESTAMP ON UPDATE CURRENT_TIMESTAMP,

   `scope` varchar(2000) DEFAULT NULL

 ) ENGINE=InnoDB DEFAULT CHARSET=utf8;

 -- --------------------------------------------------------

 --

 -- 表的结构 `oauth_authorization_codes`

 --

 CREATE TABLE IF NOT EXISTS `oauth_authorization_codes` (

   `authorization_code` varchar(40) NOT NULL,

   `client_id` varchar(80) NOT NULL,

   `user_id` varchar(255) DEFAULT NULL,

   `redirect_uri` varchar(2000) DEFAULT NULL,

   `expires` timestamp NOT NULL DEFAULT CURRENT_TIMESTAMP ON UPDATE CURRENT_TIMESTAMP,

   `scope` varchar(2000) DEFAULT NULL

 ) ENGINE=InnoDB DEFAULT CHARSET=utf8;

 -- --------------------------------------------------------

 --

 -- 表的结构 `oauth_clients`

 --

 CREATE TABLE IF NOT EXISTS `oauth_clients` (

   `client_id` varchar(80) NOT NULL,

   `client_secret` varchar(80) NOT NULL,

   `redirect_uri` varchar(2000) NOT NULL,

   `grant_types` varchar(80) DEFAULT NULL,

   `scope` varchar(100) DEFAULT NULL,

   `user_id` varchar(80) DEFAULT NULL

 ) ENGINE=InnoDB DEFAULT CHARSET=utf8;

 --

 -- 转存表中的数据 `oauth_clients`

 --

 INSERT INTO `oauth_clients` (`client_id`, `client_secret`, `redirect_uri`, `grant_types`, `scope`, `user_id`) VALUES

 ('testclient', 'testpass', 'https://user.endv.cn/', 'authorization_code', '', '');

 -- --------------------------------------------------------

 --

 -- 表的结构 `oauth_jwt`

 --

 CREATE TABLE IF NOT EXISTS `oauth_jwt` (

   `client_id` varchar(80) NOT NULL,

   `subject` varchar(80) DEFAULT NULL,

   `public_key` varchar(2000) DEFAULT NULL

 ) ENGINE=InnoDB DEFAULT CHARSET=utf8;

 -- --------------------------------------------------------

 --

 -- 表的结构 `oauth_refresh_tokens`

 --

 CREATE TABLE IF NOT EXISTS `oauth_refresh_tokens` (

   `refresh_token` varchar(40) NOT NULL,

   `client_id` varchar(80) NOT NULL,

   `user_id` varchar(255) DEFAULT NULL,

   `expires` timestamp NOT NULL DEFAULT CURRENT_TIMESTAMP ON UPDATE CURRENT_TIMESTAMP,

   `scope` varchar(2000) DEFAULT NULL

 ) ENGINE=InnoDB DEFAULT CHARSET=utf8;

 -- --------------------------------------------------------

 --

 -- 表的结构 `oauth_scopes`

 --

 CREATE TABLE IF NOT EXISTS `oauth_scopes` (

   `scope` text,

   `is_default` tinyint(1) DEFAULT NULL

 ) ENGINE=InnoDB DEFAULT CHARSET=utf8;

 -- --------------------------------------------------------

 --

 -- 表的结构 `oauth_users`

 --

 CREATE TABLE IF NOT EXISTS `oauth_users` (

   `username` varchar(255) NOT NULL,

   `password` varchar(2000) DEFAULT NULL,

   `first_name` varchar(255) DEFAULT NULL,

   `last_name` varchar(255) DEFAULT NULL

 ) ENGINE=InnoDB DEFAULT CHARSET=utf8;
我们来建立一个server.php文件来配置server,这个文件可以被所有的终端来调用。
 <?php

   /** 配置 */

 $dsn= 'mysql:dbname=test;host=localhost';

 $username = 'test';

 $password = 'test';

 // 错误报告(这毕竟是一个演示!)

 ini_set('display_errors',1);error_reporting(E_ALL);

 // 自动加载

 require_once('oauth2-server-php/src/OAuth2/Autoloader.php');

 OAuth2\Autoloader::register();

 $storage = new OAuth2\Storage\Pdo(array('dsn' => $dsn, 'username' => $username, 'password' => $password));

 // 通过存储对象或对象数组存储的oauth2服务器类

 $server = new OAuth2\Server($storage);

 // 授权码 有效期只有30秒

 $server->addGrantType(new OAuth2\GrantType\AuthorizationCode($storage));

 // 客户端证书

 $server->addGrantType(new OAuth2\GrantType\ClientCredentials($storage));

 // 用户凭据

 $server->addGrantType(new OAuth2\GrantType\UserCredentials($storage));

 // 刷新令牌  启用这个会报错,原因未知

 // $server->addGrantType(new OAuth2\GrantType\RefreshToken($refreshStorage))
记得配置数据库的用户名和密码 test
Token控制器
下面,我们将建立一个Token控制器,这个控制器URI将会返回OAuth2的Token给客户端
<?php

 // include our OAuth2 Server object

require_once __DIR__.'/server.php';

$server->handleTokenRequest(OAuth2\Request::createFromGlobals())->send();
测试Token控制器
需要先创建一条记录,来注册一个新的应用 (上面脚本中已插入,需要先删除!)
INSERT INTO `oauth_clients` (`client_id`, `client_secret`, `redirect_uri`, `grant_types`, `scope`, `user_id`) VALUES

('testclient', 'testpass', 'https://user.endv.cn/', 'authorization_code', '', '');
然后用命令行调用
curl -u testclient:testpass https://user.endv.cn/token.php --data "grant_type=authorization_code&code=f8ef50221f7817f3e01d2d6c31a33f3c40db76a5"
这里的URL只是示例,实地操作要确定能找到这个token.php
如果运行正常,则显示
{"access_token":"84c66d296308aad20aa5e065743d2fe30426b046","expires_in":3600,"token_type":"Bearer","scope":null,"refresh_token":"d49cd4d7d875065888fc457c7c714cab9fcf9d69"}
资源控制器的建立和测试
你创建了Token,你需要在API中测试它:
resource.php
<?php

 //资源控制器的建立和测试

require_once __DIR__.'/server.php';

if (!$server->verifyResourceRequest(OAuth2\Request::createFromGlobals())) {

    $server->getResponse()->send();

    die;

}

$token = $server->getAccessTokenData(OAuth2\Request::createFromGlobals());

echo "User ID associated with this token is {$token['user_id']}";

echo json_encode(array('success' => true, 'message' => '您访问了我的API!'));
然后运行下面的命令,记得将YOUR_TOKEN替换成刚才得到的token,还有确保URL的正确
curl https://user.endv.cn/resource.php --data 'access_token=YOUR_TOKEN'
如果没出问题,则会得到下面的结果
{"success":true,"message":"You accessed my APIs!"}
认证控制器的创建和测试
验证控制器是OAuth2的杀手锏,它允许你的平台帮助用户验证第三方应用
它不像第一个例子中直接返回一个Access Token,这里稍微复杂一点:
然后在浏览器中打开这个URL
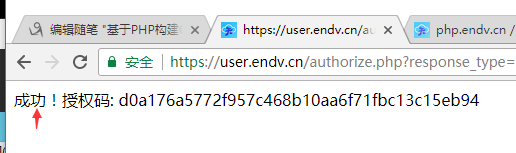
https://user.endv.cn/authorize.php?response_type=code&client_id=testclient&state=xyz
你将会看到一个表单,当你选择yes的时候会弹出你所获得的Authorization Code
现在你可以用这个Authorization Code来刚才建立的token.php获得TOKEN,命令如下
curl -u testclient:testpass https://user.endv.cn/token.php -d 'grant_type=authorization_code&code=YOUR_CODE'
就像刚才一样,你获得了一个TOKEN
{"access_token":"6f05ad622a3d32a5a81aee5d73a5826adb8cbf63","expires_in":3600,"token_type":"bearer","scope":null}
请在30秒内完成这个操作,因为Authorization Code的有效期只有30秒
用Access Token联系本地用户
当你认证了一个用户并且分派了一个Token之后,你可能想知道彼时到底是哪个用户使用了这个Token
你可以使用handleAuthorizeRequest的可选参数user_id来完成,修改你的authorize.php文件
$userid = 1234; // A value on your server that identifies the user

$server->handleAuthorizeRequest($request, $response, $is_authorized, $userid)
这样一来,用户ID就伴随Token一起存进数据库了
当Token被客户端使用的时候,你就知道是哪个用户了,修改 resource.php 来完成任务
测试:点我测试

测试到此结束,后续客户端的建立。
最新文章
- Atitit  循环(loop), 递归(recursion), 遍历(traversal), 迭代(iterate).
- leetcode 402. Remove K Digits
- maven - pom.xml 聚合(父)工程 基本内容演示
- 【性能诊断】六、并发场景的性能分析(windbg案例,大量的内部异常造成CPU飙升)
- Hadoop安装(Ubuntu Kylin 14.04)
- CreateEvent的用法
- BZOJ3258: 秘密任务
- 类库探源——System.Environment
- English Vocabulary
- mysql建库
- Xshell5一打开就提示要使用该程序,请更新至最新版本
- 【VMware vSphere】VMware vSphere简单了解
- 2.1 mac下多版本jdk的安装和管理
- DevOps - CI - 持续集成(Continuous Integration)
- PyMongo 常见问题
- JDK中ConcurrentHashMap效率测试
- Windows环境下Qwt安装和使用
- Binary Tree ZigZag Level Order Traversal leetcode java
- C#.NET常见问题(FAQ)-命名空间namespace如何理解
- 【深入理解javascript】王福朋,厉害了word哥