springboot与swagger2的集成
2024-10-19 10:28:37
springboot与swagger2的集成
1、出现的背景
随着互联网技术的发展,现在的网站架构基本都由原来的后端渲染变成了:前端渲染、先后端分离的形态,而前端和后端的唯一联系,变成了API接口;
API文档变成了前后端开发人员联系的纽带,变得越来越重要。包括app开发人员和后端直接的交流都是基于api文档。
手写接口文档
手写Api文档的几个痛点:
- 文档需要更新的时候,需要再次发送一份给前端,也就是文档更新交流不及时。
- 接口返回结果不明确
- 不能直接在线测试接口,通常需要使用工具,比如postman
- 接口文档太多,不好管理
- swagger就是一款让你更好的书写API文档的框架。
2、什么是swagger2
编写和维护接口文档是每个程序员的职责,根据Swagger2可以快速帮助我们编写最新的API接口文档,再也不用担心开会前仍忙于整理各种资料了,间接提升了团队开发的沟通效率。
3、swagger2常用注解:
swagger通过注解表明该接口会生成文档,包括接口名、请求方法、参数、返回信息的等等。

    @Api:修饰整个类,描述Controller的作用

    @ApiOperation:描述一个类的一个方法,或者说一个接口

    @ApiParam:单个参数描述

    @ApiModel:用对象来接收参数

    @ApiProperty:用对象接收参数时,描述对象的一个字段

    @ApiResponse:HTTP响应其中1个描述

    @ApiResponses:HTTP响应整体描述

    @ApiIgnore:使用该注解忽略这个API

    @ApiError :发生错误返回的信息

    @ApiImplicitParam:一个请求参数

    @ApiImplicitParams:多个请求参数
@Api:用在请求的类上,表示对类的说明

    tags="说明该类的作用,可以在UI界面上看到的注解"

    value="该参数没什么意义,在UI界面上也看到,所以不需要配置"

@ApiOperation:用在请求的方法上,说明方法的用途、作用

    value="说明方法的用途、作用"

    notes="方法的备注说明"

@ApiImplicitParams:用在请求的方法上,表示一组参数说明

    @ApiImplicitParam:用在@ApiImplicitParams注解中,指定一个请求参数的各个方面

        name:参数名

        value:参数的汉字说明、解释

        required:参数是否必须传

        paramType:参数放在哪个地方

            · header --> 请求参数的获取:@RequestHeader

            · query --> 请求参数的获取:@RequestParam

            · path(用于restful接口)--> 请求参数的获取:@PathVariable

            · body(不常用)

            · form(不常用)

        dataType:参数类型,默认String,其它值dataType="Integer"

        defaultValue:参数的默认值

@ApiResponses:用在请求的方法上,表示一组响应

    @ApiResponse:用在@ApiResponses中,一般用于表达一个错误的响应信息

        code:数字,例如400

        message:信息,例如"请求参数没填好"

        response:抛出异常的类

@ApiModel:用于响应类上,表示一个返回响应数据的信息

            (这种一般用在post创建的时候,使用@RequestBody这样的场景,

            请求参数无法使用@ApiImplicitParam注解进行描述的时候)

    @ApiModelProperty:用在属性上,描述响应类的属性
4、SpringBoot 集成 Swagger2
1)、第一步:导入pom
<!-- Swagger -->

<dependency>

    <groupId>io.springfox</groupId>

    <artifactId>springfox-swagger-ui</artifactId>

    <version>2.8.</version>

</dependency>

<dependency>

    <groupId>io.springfox</groupId>

    <artifactId>springfox-swagger2</artifactId>

    <version>2.8.</version>

</dependency>

<!-- END Swagger -->
2)、编写SwaggerConfig.java配置类
import org.springframework.context.annotation.Bean;

import org.springframework.context.annotation.Configuration;

import springfox.documentation.builders.ApiInfoBuilder;

import springfox.documentation.builders.PathSelectors;

import springfox.documentation.builders.RequestHandlerSelectors;

import springfox.documentation.service.ApiInfo;

import springfox.documentation.spi.DocumentationType;

import springfox.documentation.spring.web.plugins.Docket;

import springfox.documentation.swagger2.annotations.EnableSwagger2;

@Configuration

@EnableSwagger2

public class SwaggerConfig {

    @Bean

    public Docket createRestApi() {

        return new Docket(DocumentationType.SWAGGER_2)

            .apiInfo(apiInfo())

            .select()

            .apis(RequestHandlerSelectors.basePackage("hello"))

            .paths(PathSelectors.any())

            .build();

    }

    private ApiInfo apiInfo() {

        return new ApiInfoBuilder()
        //页面标题

            .title("Spring Boot中使用Swagger2构建RESTful APIs")
        //描述

            .description("欢迎来到java思维导图社区学习")

            .termsOfServiceUrl("http://www.java-mindmap.com/")
        //版本号

            .version("1.0")

            .build();

    }

}
3)、编写测试的controller
package com.springboot.example.Controller;

import com.springboot.example.Service.StudentService;

import com.springboot.example.entity.Student;

import io.swagger.annotations.Api;

import io.swagger.annotations.ApiImplicitParam;

import io.swagger.annotations.ApiOperation;

import org.slf4j.Logger;

import org.slf4j.LoggerFactory;

import org.springframework.beans.factory.annotation.Autowired;

import org.springframework.web.bind.annotation.PathVariable;

import org.springframework.web.bind.annotation.RequestMapping;

import org.springframework.web.bind.annotation.RequestMethod;

import org.springframework.web.bind.annotation.RestController;

/**

 * Created by Administrator on 2017/9/13.

 */

@RestController

@RequestMapping("api")

@Api("swaggerDemoController相关的api")

public class SwaggerDemoController {

    @Autowired

    private StudentService studentService;

    private static final Logger logger= LoggerFactory.getLogger(SwaggerDemoController.class);

    @ApiOperation(value = "根据id查询学生信息", notes = "查询数据库中某个的学生信息")

    @ApiImplicitParam(name = "id", value = "学生ID", paramType = "path", required = true, dataType = "Integer")

    @RequestMapping(value = "/{id}", method = RequestMethod.GET)

    public Student getStudent(@PathVariable int id) {

        logger.info("开始查询某个学生信息");

        return studentService.selectStudentById(id);

    }

}
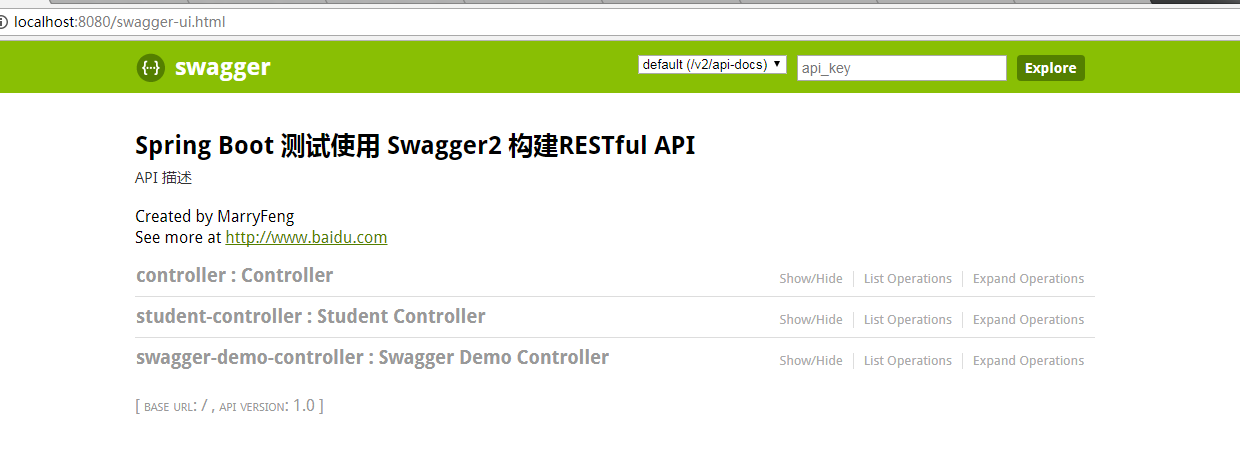
4)、启动项目 访问
访问路径:http://localhost:8080/swagger-ui.html
5)、查看页面的效果

至此 SpringBoot 集成 Swagger2 完成!!!!!!
最新文章
- 更改默认alert框体
- HighChart报表之饼图
- c3p0数据库连接池
- 成为嵌入式程序员应知道的0x10个基本问题
- jQuery 的 json 格式的处理问题
- Linux下安装MySQL步骤
- 网络编程API-上 (基本API)
- 读书笔记:深入理解java虚拟机(一)虚拟机的运行时的数据区域
- amoeba实现读写分离
- 本地node启动服务步骤
- 实现Servlet容器一
- 2014年蓝桥杯省赛A组c++第1题(暴力求解)
- javascript-词法分析解析
- 如何利用Reveal神器查看各大APP UI搭建层级
- GitHub 二次验证收不到短信咋办?
- java判断包含contains方法的使用
- ruby的循环控制命令loop等
- Daily Scrum 11.14
- NumPy 新知
- mysql 命令行导数据库