How to Set Up an Rsync Daemon on Your Linux Server
Introduction
This tutorial will take you through setting up an rsync daemon on your Linux server. You might want an rsync daemon if you have files that you want available so anyone (or just yourself) can download existing files or upload new files. This guide will review both running rsync as its own daemon and running it via xinetd.
Prerequisites
– A Linux server with rsync installed – if you do not have a server already, why not spin up a robust and reliable Cloud Server in under 30 seconds.
– (Optional) Xinetd installed.
– Appropriate permissions to read and/or write on the rsync daemon (this tutorial will show commands run as the root user).
Setting up an Rsync Daemon
First, using your preferred text editor, you’ll need to create the configuration file /etc/rsyncd.conf, if you do not have one already. Below is an example of our basic configuration parameters and explanations of each one.
pid file = /var/run/rsyncd.pid

lock file = /var/run/rsync.lock

log file = /var/log/rsync.log

port = 12000

[files]

path = /home/public_rsync

comment = RSYNC FILES

read only = true

timeout = 300
pid file: The process id file the daemon uses.
lock file: The daemon lock file.
log file: The location of the log file.
port: If you do not want the rsync daemon to run on its default port (873) then you may specify a new port here. Make sure this port is open in your firewall. Rsync uses the TCP protocol for its transfers.
[files]: This is the module name. The name used here is what you’ll be putting in the rsync pull command as the first part of the source (/files/../..). You can name it what you’d like and can have as many as you’d like.
path: The file path for files associated with this module.
comment: Descriptive comment for this module.
read only: This tells the daemon the directory for this module is read-only. You cannot upload to it. For upload only, use upload only = true.
timeout: Time, in seconds, the rsync daemon will wait before terminating a dead conenction.
This is just a basic configuration. For a more detailed list of options, see the manual page.
Running Rsync as a Daemon
Now with this basic configuration we can start the daemon by itself by running the below:
rsync --daemon
You can verify the daemon is running with:
ps x | grep rsync
If you have anything weird in the output, such as a statement stating unconfined, you may have SELinux blocking the daemon. You will need to work to add rsync to be accepted by SELinux in order for you to run the daemon.
.
Now that the rsync daemon is running, it’s ready to accept connections. If you are unsure how to do connect from an rsync client, review our guide on connecting with rsync.
To stop the daemon you can run a kill command.
kill `cat /var/run/rsyncd.pid`
.
Running Rsync Via Xinetd
If you are already using xinetd to manage services, you can add rsync daemon control as well. While xinetd provides greater central control over running processes, note that it doesn’t necessarily mean greater security.
First, edit the xinet.d file for rsync, if it already exists (if not, you can create it and use the example configuration below). Change the disabled line to no. You will also want to add the port line with either the default (873) or your custom port.
Note: If you are using a custom port, you will also need to edit the rsync port in the service file (
/etc/services) to your custom port.
.
Using your preferred text editor, create or edit /etc/xinetd.d/rsync as below:
# default: off

# description: The rsync server is a good addition to an ftp server, as it \

# allows crc checksumming etc.

service rsync

{

disable = no

flags = IPv6

socket_type = stream

port = 12000

wait = no

user = root

server = /usr/bin/rsync

server_args = --daemon

log_on_failure += USERID

}
Now you just need to restart xinetd, and the rsync daemon should run.
/etc/init.d/xinetd restart
.
Testing the Rysnc Directories
To test your connection to the rsync daemon and find which paths are available to you, simply connect from your client to the rsync host using the following method. This method runs only part of a pull command but will reveal paths for you.
rsync -rdt rsync://IPADDR:RsyncPort/

Find file path
This command will show which directories are open to you. If you do not know the file name you can repeat the process (adding onto the file path) until you find the intended file(s).
rsync -rdt rsync://IPADDR:RsyncPort/DirectoryName

More file paths discovered
And once you find the file, you can complete the command and pull it in.
rsync -rdt rsync://IPADDR:RsyncPort/DirectoryName/File /DestinationDirectory/

Full path found
Adding Usernames and Passwords to the Rsync Daemon
You can make your rsync daemon more secure by adding a username and password requirement in its configuration file. Open /etc/rsyncd.conf with your preferred text editor, and enter these parameters under the module.
[files]

path = /home/public_rsync

comment = RSYNC FILES

read only = true

timeout = 300

auth users = rsync1,rsync2

secrets file = /etc/rsyncd.secrets
auth users: List of users, seperated by commas. They do not necessarily need to exist on the system, but they do need to exist in the secrets file.
secrets file: File path to your secrets file that contains the list of usernames and passwords.
Then, again using your preferred text editor, open or create your /etc/rsyncd.secrets file. Use the following format username:password.
rsync1:9$AZv2%5D29S740k

rsync2:Xyb#vbfUQR0og0$6

rsync3:VU&A1We5DEa8M6^8
Once you have saved this file, secure it so only the root user can read or edit it.
chmod 600 /etc/rsyncd.secrets
Note that we added an rsync3 user which we did not specify in the auth users parameter in /etc/rsyncd.conf. You’ll see why below.
Now, when connecting to this rsync daemon, you’ll need to be sure to use the appropriate username.

Valid rsync user
If you try to connect with a user not permitted in the auth users, you will get the below error.
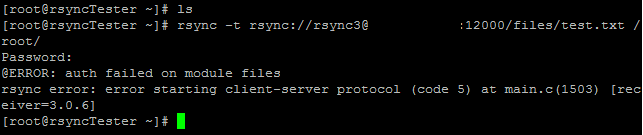
Invalid rsync user
Just remember that authorized users must appear in both the /etc/rsyncd.conf and the /etc/rsyncd.secrets files.
.
And that’s it for the basics of an rsync daemon. You should now be able to create a basic rsync daemon and have directories specified for uploading, downloading, or both! Please check back here for more updates, and to consider a market-leading cloud server from Atlantic.Net.
最新文章
- TEXTAREA自适应文字行数的多少
- linux-----------linux查看并发数
- discuzX3后台管理插件开发示例一 用户表查询
- Traffic Lights
- [MAC] Mac下的SVN命令行
- PHP 使用 GET 传递数组变量
- 在ASP.NET中实现OAuth2.0(二)之打造自己的API安全策略
- javascript笔记——jqGrid再次封装
- SQL SERVER排序函数
- linux 启动 oracle数据库
- Programming C#.Classes and Objects.成员方法
- Swift - 多线程实现方式(3) - Grand Central Dispatch(GCD)
- 使用caffe训练mnist数据集 - caffe教程实战(一)
- Android ClassLoader详解
- java http缓存
- Cocos2d-x 实战
- Excel导出采用mvc的ExcelResult继承遇到的问题
- servlet之ServletRequest与ServletResponse (三)
- ajax 提交字符串到后台 反序列化
- 把MP3保存到数据库中